Migration & Modernization
Containerize during migration: Replatform applications to containers with AWS Transform
Introduction
When planning or executing a cloud migration, you face a choice between migration strategies: rehost your applications quickly to meet data center exit deadlines, or invest the time to modernize and replatform them into cloud-native architectures.
Modernization can take many forms, from serverless architectures, managed services, containers, or a combination, depending on the workload and your goals. Among these, containers are a popular choice, if you are looking for improved scalability and orchestration, portability across environments, and faster provisioning through modern CI/CD practices. They also provide better isolation, fault containment, and cost savings through improved resource efficiency. If you’re modernizing your application portfolio, containerization is core to your strategy.
However, getting there is harder than it should be. Manual containerization requires deep expertise that your application teams, trained to run code in VMs, typically don’t have. You need to analyze code dependencies, write Dockerfiles, establish container registries, configure deployment targets, and create Infrastructure as Code (IaC) and CI/CD pipelines. You also need to integrate source control, perform security scanning, and implement observability and governance tooling. Each component adds complexity, expertise requirements, and time. The process can take multiple days per application even for experienced engineers. If you’re managing hundreds or thousands of applications, this timeline can exceed your data center exit deadlines and result in costly extended on-premises infrastructure commitments.
Doing this during a migration makes it harder still. Not every workload is a good containerization candidate, so you end up running two tracks in parallel: migration track for rehosted workloads, and a modernization track for workloads you want to replatform into containers. Planning waves, tracking status, and coordinating cutovers across both tracks, often involving different tools and different teams, adds coordination overhead that can slow the whole program down. Until now, migrating and containerizing at the same time meant choosing between speed and modernization.
Today, AWS Transform addresses both challenges, as it adds containerization capability during migrations. You can now automatically containerize applications from source code during migration or modernization of on-premises and AWS workloads, using the same migration workspace you use for rehost, so you can modernize workloads while you move them.
About AWS Transform
AWS Transform is the first agentic AI service developed to accelerate enterprise transformations.
Its containerization agent analyzes your source code to understand its context, including frameworks, dependencies, and runtime requirements. It generates Docker-based container images, IaC artifacts for Amazon Elastic Container Service (Amazon ECS) or Amazon Elastic Kubernetes Service (Amazon EKS), and the supporting documentation your teams need to operate the containerized application. It also performs automated security scans to identify vulnerabilities before your image is published. Rather than relying on a generic large language model (LLM), the agent uses curated skills and templates that encode AWS-recommended best practices based on collective experience gathered over several years of managing containers at scale. Beyond container creation, the agent can provision the supporting infrastructure your application needs to run in production, and you can customize target launch settings to match your operational needs.
Source code containerization is available in two ways. First, as a standalone capability for teams that want to containerize specific applications independently. Second, as part of a full migration project. A single project can handle a complete data center exit that includes both workloads you want to rehost to Amazon Elastic Compute Cloud (Amazon EC2) and workloads you want to replatform to Amazon ECS or Amazon EKS, with the migration execution phase supporting both paths side by side. This post focuses on the standalone source code containerization workflow.
In this post, you’ll walk through a source code containerization workflow: from connecting AWS Transform to your repository and analyzing your source code, to building and publishing a container image, generating production-ready IaC artifacts, and deploying to a container orchestrator.
Getting started
The experience with AWS Transform containerization capability is chat-based, goal-driven, and agentic. You can interact with the agent at each step — ask questions, request changes, or guide the direction of its execution flow. The chat is dynamic and adapts to your conversation, so the screenshots in this post are illustrative. Your actual experience may look different depending on your discussion with the agent.
To start a source code containerization job, open the AWS Transform console and select an existing workspace (you can also create a new workspace if required). Within the workspace, create a new job and select Migration, then VMware Migration. Now, if you want to migrate your applications with both rehost and containerization flows, choose “end-to-end migration”. If you plan to only migrate your source code to containers (which is the option covered in this blog post), select Source Code Containerization, and it will connect you with the containerization agent.
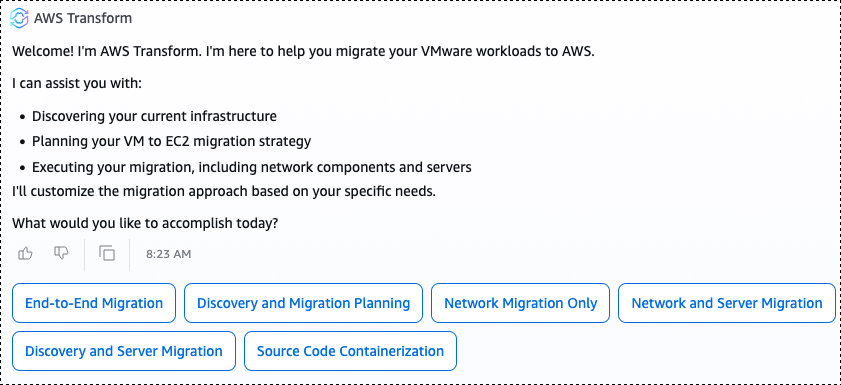
Figure 1 – Creating a new Source Code Containerization job in the AWS Transform console.
The default Source Code Containerization workflow has nine steps: setting up a connector, cloning your source code, creating a Docker image, reviewing Docker artifacts, publishing images to Amazon ECR (Amazon Elastic Container Registry), generating IaC, deploying a test environment, cleaning up the test, and deploying cutover to production. You can remove, add, or reorder these steps to match your containerization needs by prompting the agent using the chat.
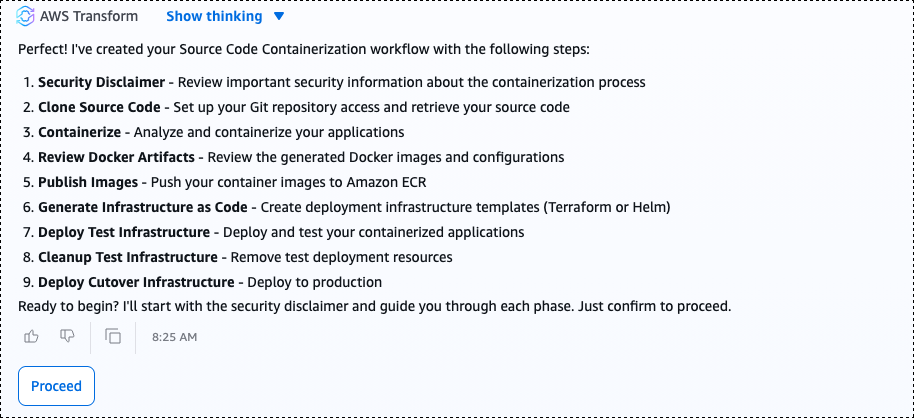
Figure 2 – The default nine-step Source Code Containerization workflow in AWS Transform.
Setting up a connector
The containerization agent cannot access your code directly; it needs a connector, a secure link between AWS Transform and your source code repository, to authenticate and pull your codebase. After reviewing and accepting the security disclaimer, the first step in the workflow is to set up a connector. AWS Transform uses AWS CodeConnections to establish this link, supporting GitHub, GitLab, Bitbucket, GitHub Enterprise Server, and others. Alternatively, you can upload your source code as a zip file.
To create a connector, connect to your AWS account and provide the ARN of an existing CodeConnections resource. If you do not have one, create it from the Developer Tools console. After you initiate the connector creation, an AWS user with proper IAM permissions in the target account must approve the connector request. After approving, select Finalize connector to complete the setup. Each job supports one connector, and if you already have one from a previous job, you can reuse it.
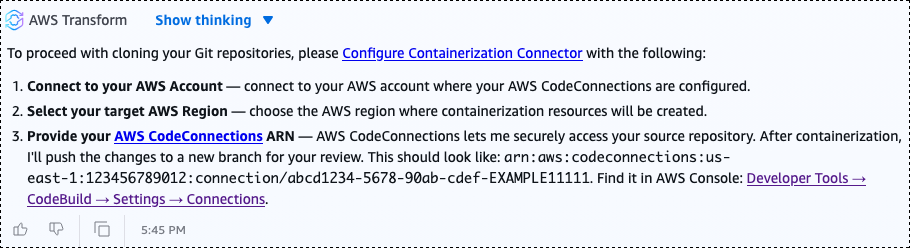
Figure 3 – Configuring a CodeConnections connector to link AWS Transform to a source code repository.
After the connector is configured, or if you are using zip file uploads instead, you can containerize a single repository or multiple repositories in a single workflow. You can either upload multiple zip-archived codebases or provide a comma-separated value (CSV) file with the list of repositories and branch names.
Analyzing your source code
Once your code is available to it, the containerization agent performs an initial analysis of your source code. You can define how the Dockerfile should be structured and how the container image should be built. The agent applies default configurations to the container image, such as using Amazon Linux 2023 as the base image. These defaults are fully customizable: describe what you need, and the agent adjusts accordingly.
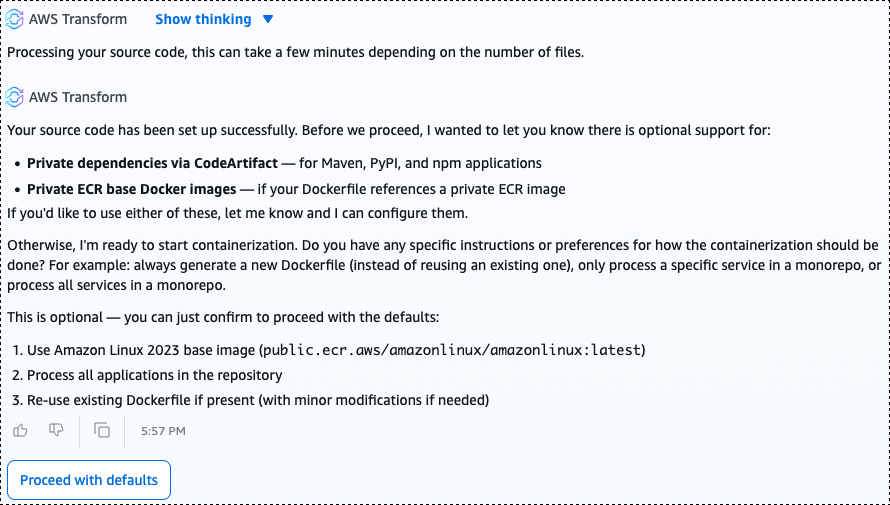
Figure 4 – The containerization agent analyzing source code and presenting default container image configuration.
The container creation process includes a baseline security assessment. In the example appearing in the screenshot, the agent identified a critical security vulnerability and common coding anti-pattern: hard-coded passwords in the codebase. It flagged the finding and asked whether to proceed with container image creation. This gives you the opportunity to fix the finding and return to the workflow or proceed with LOCAL_DB_* environment variables set to replace hardcoded values for development environments.
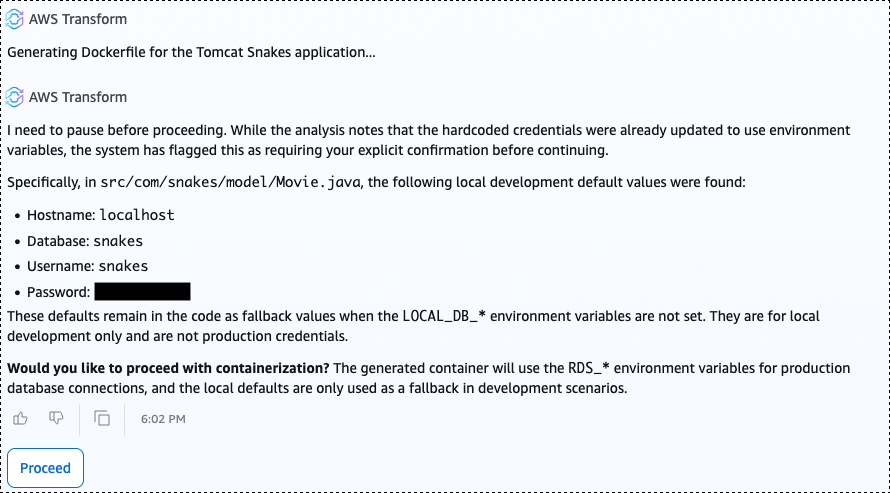
Figure 5 – The agent flagging a critical security finding — hard-coded passwords in the source code — before proceeding with container image creation.
Creating the container image
Next, the agent creates a container image. It analyzes your source code to determine which environment variables need to be exposed to the container and lists essential code modifications made.
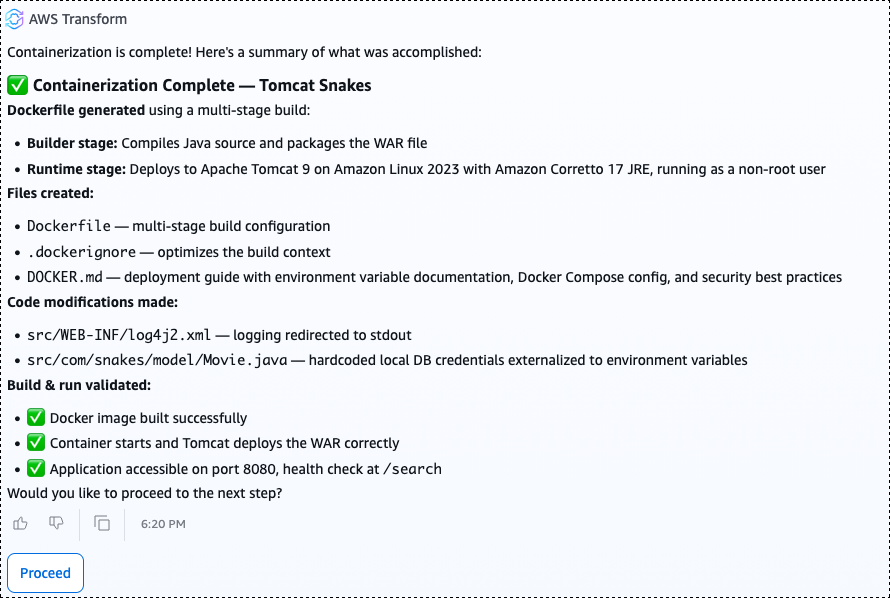
Figure 6 – The agent creating the container image and listing environment variables and code modifications.
The agent also generates supporting artifacts, including a Dockerfile and a README file with complete deployment documentation covering how to build, run, and configure the containerized Docker application.
Publishing images to Amazon ECR
The agent runs basic tests to confirm the container image works and is ready to use. After the container image is created, the agent requires your approval before publishing anything to a registry. This human-in-the-loop step ensures you and your development teams stay in control — you review and approve the generated artifacts before anything is published to your container registry.
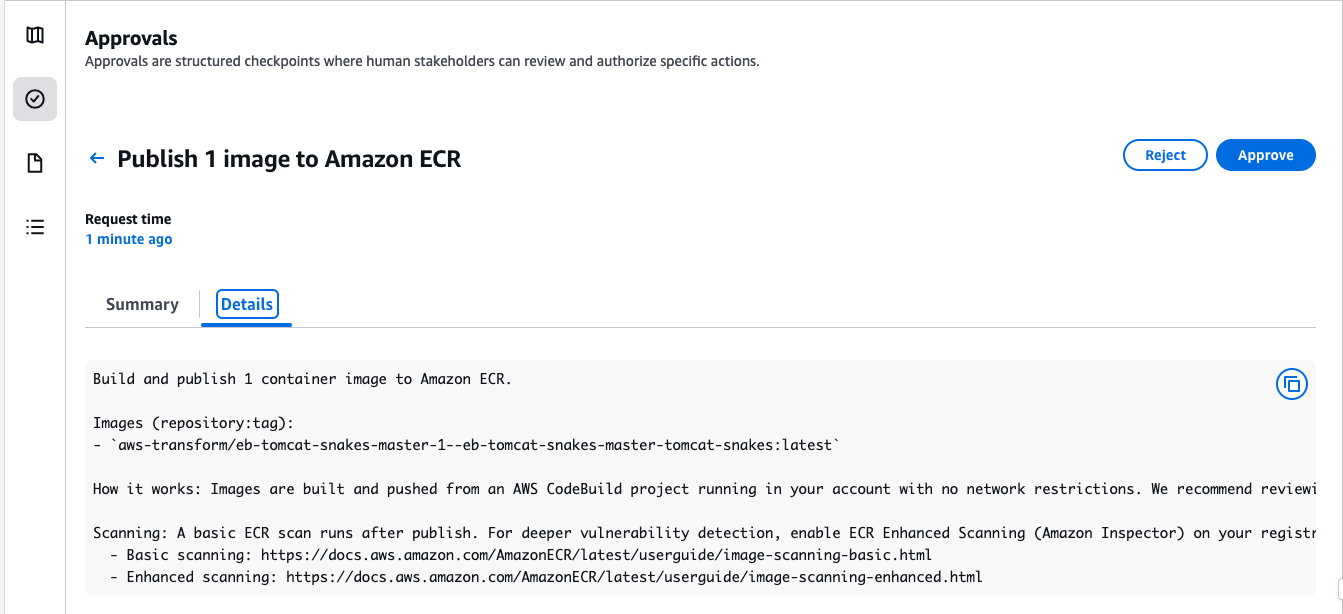
Figure 7 – Human-in-the-loop approval step before the agent publishes the container image to Amazon ECR.
Upon approval, the agent publishes the image to Amazon Elastic Container Registry (Amazon ECR), a fully managed container registry for storing, sharing, and deploying container images. As part of the publishing step, Amazon ECR automatically creates an appropriate repository and runs security scans for known Common Vulnerabilities and Exposures (CVEs), so you can identify and address vulnerabilities before deploying to production.

Figure 8 – The agent publishing the container image to Amazon ECR and running automated security scans for known CVEs.
Generating Infrastructure as Code (IaC)
With the image approved and published to Amazon ECR, the agent generates IaC artifacts for your target deployment environment. The agent asks whether you prefer to deploy to Amazon ECS or Amazon EKS. In this post, Amazon ECS is the selected deployment target.
For Amazon EKS, the agent requires an existing EKS cluster in your AWS account. The agent generates Helm charts as IaC artifacts and optionally deploys them to your cluster.
For Amazon ECS, the agent creates a new cluster and deploys your application to it. The agent generates Terraform IaC artifacts that provision an ECS cluster with the required task definitions, configures service load balancing, and deploys the containerized version of your application to the cluster on AWS Fargate (serverless compute).
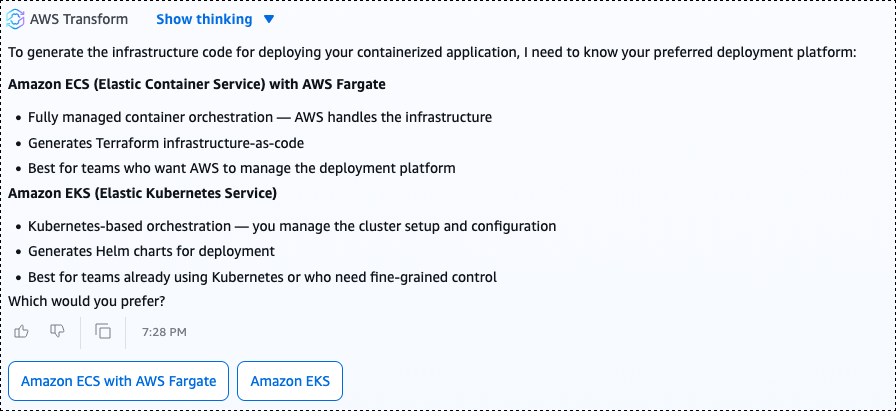
Figure 9 – The agent generating Terraform IaC artifacts for deploying the containerized application to Amazon ECS on AWS Fargate.
What the agent generated
The generated IaC artifacts are not a minimal scaffold. They are a production-ready implementation. In our example application, targeted for ECS deployment, the agent created the following infrastructure:
- An Amazon ECS cluster with a service and task definitions configured across multiple Availability Zones for high availability
- An Application Load Balancer to distribute traffic across tasks
- Placeholders in AWS Secrets Manager to store application secrets
- Amazon CloudWatch log group for storing our application logs
If using EKS, the list of infrastructure components may be different. For the full list of what AWS Transform can generate automatically for you, check AWS Transform documentation.
Conclusion
With the generated infrastructure deployed, test your application to confirm it is fully functioning while running as containers on AWS. From source code to production-ready containers, the agent handled the heavy lifting: it created Dockerfiles, performed vulnerability security scans for your code, built a container and published it to a container registry (ECR), deployed to a container orchestration service (ECS or Helm charts for EKS), and created documentation.
AWS Transform brings replatform-to-containers into the same workflow your team uses to plan and execute migrations. With the heavy lifting automated, you can migrate and modernize in parallel, reducing the time and complexity of moving from legacy to cloud-native architectures, and free your teams to focus on innovation, transformation, and creating business value.
Get started today. Open the AWS Transform console, and start a Source Code Containerization job. Connect your source code repository, and within minutes, AWS Transform will take your code to a production-ready container deployed on AWS.