Microsoft Workloads on AWS
Fine-tune SQL Server to Aurora PostgreSQL conversions with AWS Transform and Kiro
Introduction
When customers modernize SQL Server databases with AWS Transform, most standard database objects convert automatically. A smaller set of complex objects needs human validation, and resolving them is often where modernization projects stall.
In this blog post, we show how to resolve the Microsoft SQL Server objects that AWS Transform flags for human review, such as stored procedures with proprietary Transact-SQL patterns. You fix them in your local integrated development environment (IDE) with Kiro and the AWS Transform Model Context Protocol (MCP) server, and then deploy the corrected schema to Amazon Aurora PostgreSQL-Compatible Edition (Aurora PostgreSQL).
This post builds on Modernize Microsoft SQL Server databases to Aurora PostgreSQL using AWS Transform, which walks through the full Offline Source workflow, from assessment to deployment.
Working in a local IDE can help you in two ways. First, you review the converted PostgreSQL code with full context. That context includes application and dependency code that you didn’t submit to AWS Transform, which can help you and your coding assistant make better-informed fixes. Second, you iterate locally while AWS Transform validates each round, which can help you reach a clean validation in fewer passes.
You can use the coding assistant that you prefer. Kiro uses the AWS Transform Kiro Power, and Claude Code, Codex, and Cursor use the AWS Transform agent plugin. Any MCP-compatible client can also connect through the AWS Transform MCP server. In this post, we use Kiro with the MCP server, and we wrote each step so that you can follow it manually, even if you haven’t used Kiro or MCP before.
Solution overview
After AWS Transform converts and validates your schema, it reports two kinds of results. Validation scores measure conversion completeness for each object group. AWS Transform also groups related issues that share a root cause into a single cluster and assigns each cluster a severity, as shown in Figure 1.
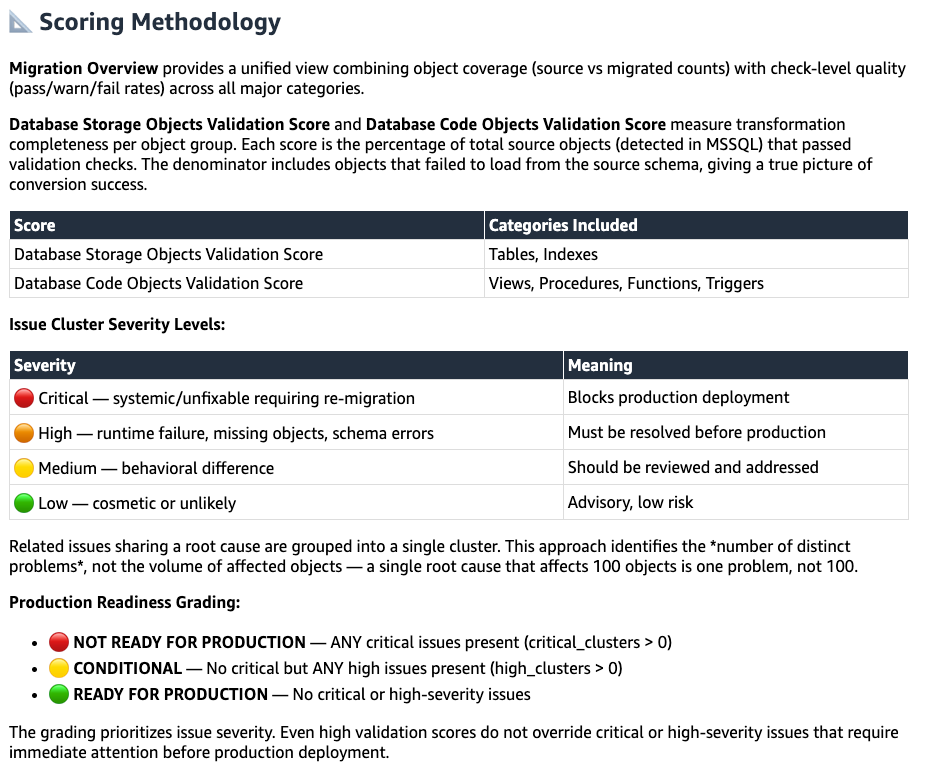
Figure 1: Scoring methodology
| Severity | Typical cause | Impact |
|---|---|---|
| Critical | Systemic or unfixable issue that requires re-migration | Blocks production deployment |
| High | Runtime failure, missing objects, or schema errors | Must be resolved before production |
| Medium | Behavioral difference | Should be reviewed and addressed |
| Low | Cosmetic or unlikely issue | Advisory, low risk |
AWS Transform then uses the cluster severities to grade the production readiness of the converted schema, as shown in the following table.
| Grade | Condition |
|---|---|
| Not Ready for Production | One or more critical clusters |
| Conditional | No critical clusters, and one or more high clusters |
| Ready for Production | No critical or high clusters |
Because the grade follows issue severity, a high validation score doesn’t override a critical or high issue. For Conditional and Not Ready for Production results, AWS Transform provides a Schema Conversion Report with specific next steps. You can address these objects in one of two ways:
- Web console: Review and fix conversion issues directly in the browser.
- Local IDE: Use a coding assistant, such as Kiro, with the AWS Transform MCP server to fetch the converted artifacts into your IDE and iterate there. This option requires a coding assistant on your workstation.
MCP is an open standard that connects AI assistants to external data sources, tools, and applications in a consistent way. Instead of building a custom integration for each tool, developers can use MCP so that any compatible AI assistant can read data and call functions. The AWS Transform MCP server runs on your workstation and exposes AWS Transform actions as tools that the Kiro agent can call. For example, the agent can fetch a converted artifact or upload an iterated one.
In this post, we follow the local IDE path. The IDE handoff is a built-in step of the AWS Transform workflow. AWS Transform carries the job context over and provides a ready-made prompt, so you don’t need to write new instructions. Kiro fetches the converted artifacts, along with that context, from your AWS Transform workspace, fixes the complex objects, and uploads the results. AWS Transform then revalidates the corrected schema and redeploys it to Aurora PostgreSQL. The following diagram shows how these pieces interact (Figure 2).
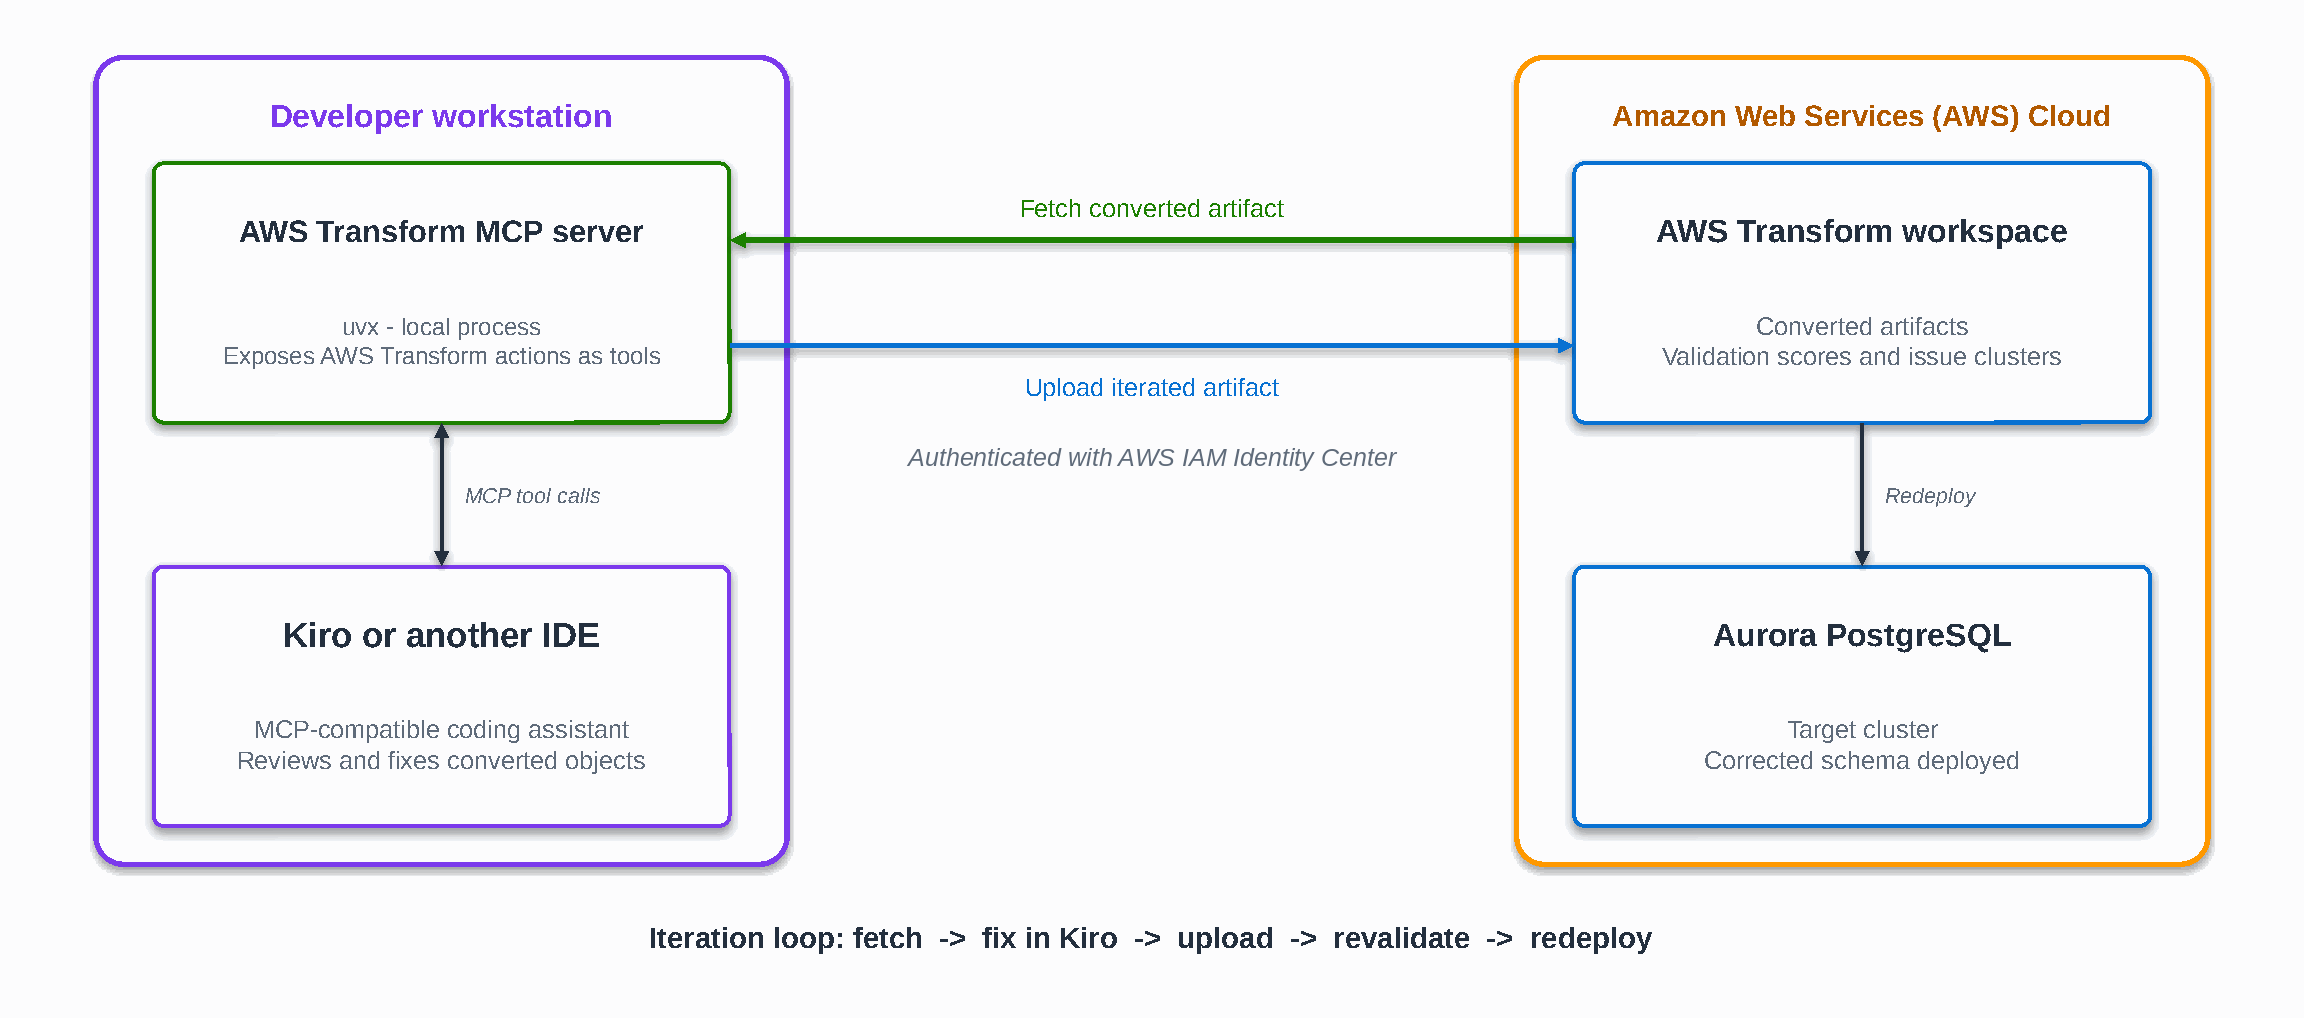
Figure 2: AWS Transform MCP server connecting Kiro to the AWS Transform workspace
The walkthrough has six steps:
- Install and configure the AWS Transform MCP server in Kiro.
- Get the IDE prompt from AWS Transform.
- Start the IDE session and sign in.
- Review the handoff summary and choose how to fix.
- Approve the fixes and upload for revalidation.
- Deploy the corrected schema to Aurora PostgreSQL.
Prerequisites
Before you begin, verify you have the following:
- An AWS Transform job for SQL Server modernization that has completed schema conversion, validation, and an initial schema deployment, with objects that still need fixes. These include objects in critical or high issue clusters and statements that failed to deploy. For the steps to create the job, refer to our earlier blog post.
- Kiro or another MCP-compatible IDE installed and signed in on your workstation. For steps, refer to the Kiro installation guide. You can sign in with an AWS Builder ID or another supported provider.
- Python 3.10 or later.
- uv, which provides the uvx command that runs the MCP server. Step 1 shows how to check for and install both tools.
- Outbound HTTPS (TCP port 443) access from your workstation to AWS Transform. The MCP server doesn’t open any inbound ports.
Walkthrough
In this walkthrough, we install the AWS Transform MCP server in Kiro, hand off our AWS Transform job from the console to Kiro, fix the complex objects, and redeploy the corrected schema. These steps are numbered for this post and don’t map to the step numbers in the overview post.
Step 1: Install and configure the AWS Transform MCP server
In this step, we check the tools that the MCP server needs and then add the server to Kiro. For all available settings, refer to the AWS Transform MCP server documentation.
- Open a terminal, and check your Python version:
python3 --version # macOS or Linuxpython --version # Windows
The output must show version 3.10 or later. If Python is missing or older, install it from python.org. - Check that uvx is available:
which uvx # macOS or Linuxwhere uvx # WindowsIf the command isn’t found, install uv, and then open a new terminal so that the command is on your path:curl -LsSf https://astral.sh/uv/install.sh | sh # macOS or Linuxpowershell -ExecutionPolicy ByPass -c "irm https://astral.sh/uv/install.ps1 | iex" # Windows - In Kiro, open the command palette (Cmd+Shift+P on macOS, or Ctrl+Shift+P on Windows and Linux), type and choose Kiro: Open user MCP config (JSON). This opens ~/.kiro/settings/mcp.json, which applies to all your Kiro workspaces (Figure 3). For more information, refer to MCP configuration in Kiro.
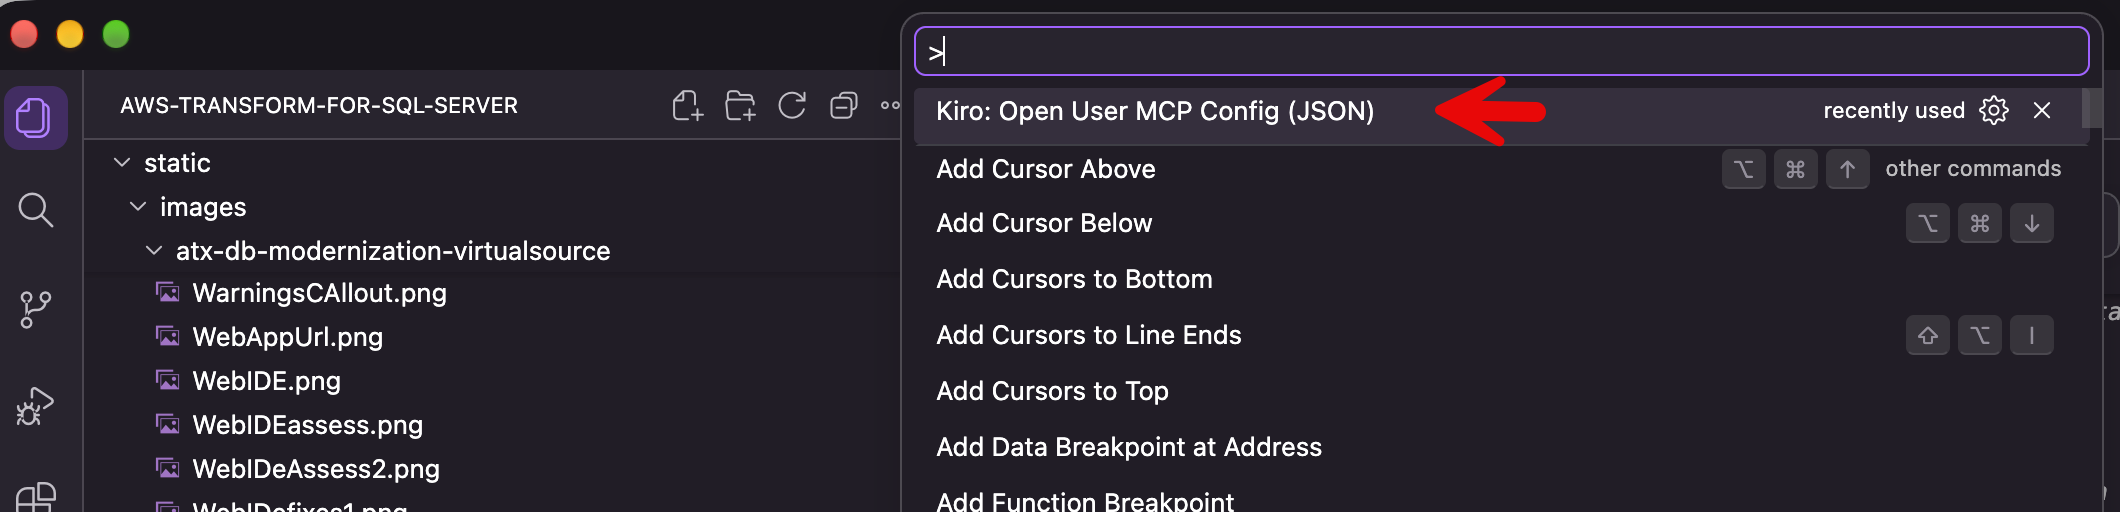
Figure 3: Opening the MCP config file
Note: On Windows, if the command palette doesn’t open the file, press Windows+R and enter %USERPROFILE%\.kiro\settings\mcp.json to open it directly.
- Add the AWS Transform MCP server under mcpServers. On macOS or Linux, use the following configuration:
{
  "mcpServers": {
    "awslabs.aws-transform-mcp-server": {
      "command": "uvx",
      "args": ["awslabs.aws-transform-mcp-server@latest"],
      "env": {
        "AWS_REGION": "us-east-1",
        "FASTMCP_LOG_LEVEL": "ERROR"
      }
    }
  }
}
On Windows, use the following configuration instead:
{
  "mcpServers": {
    "awslabs.aws-transform-mcp-server": {
      "command": "uvx",
      "args": [
        "--from",
        "awslabs.aws-transform-mcp-server@latest",
        "awslabs.aws-transform-mcp-server.exe"
      ],
      "env": {
        "AWS_REGION": "us-east-1",
        "FASTMCP_LOG_LEVEL": "ERROR"
      },
      "disabled": false
    }
  }
}
If the file already lists other servers, add this entry alongside them. Don’t replace existing entries.
Save the file. Kiro applies MCP configuration changes when you save and reconnects the servers. If the server doesn’t connect, quit Kiro completely, and then open it again.
In the Kiro panel, find MCP servers, and verify that awslabs.aws-transform-mcp-server shows Connected (Figure 4).
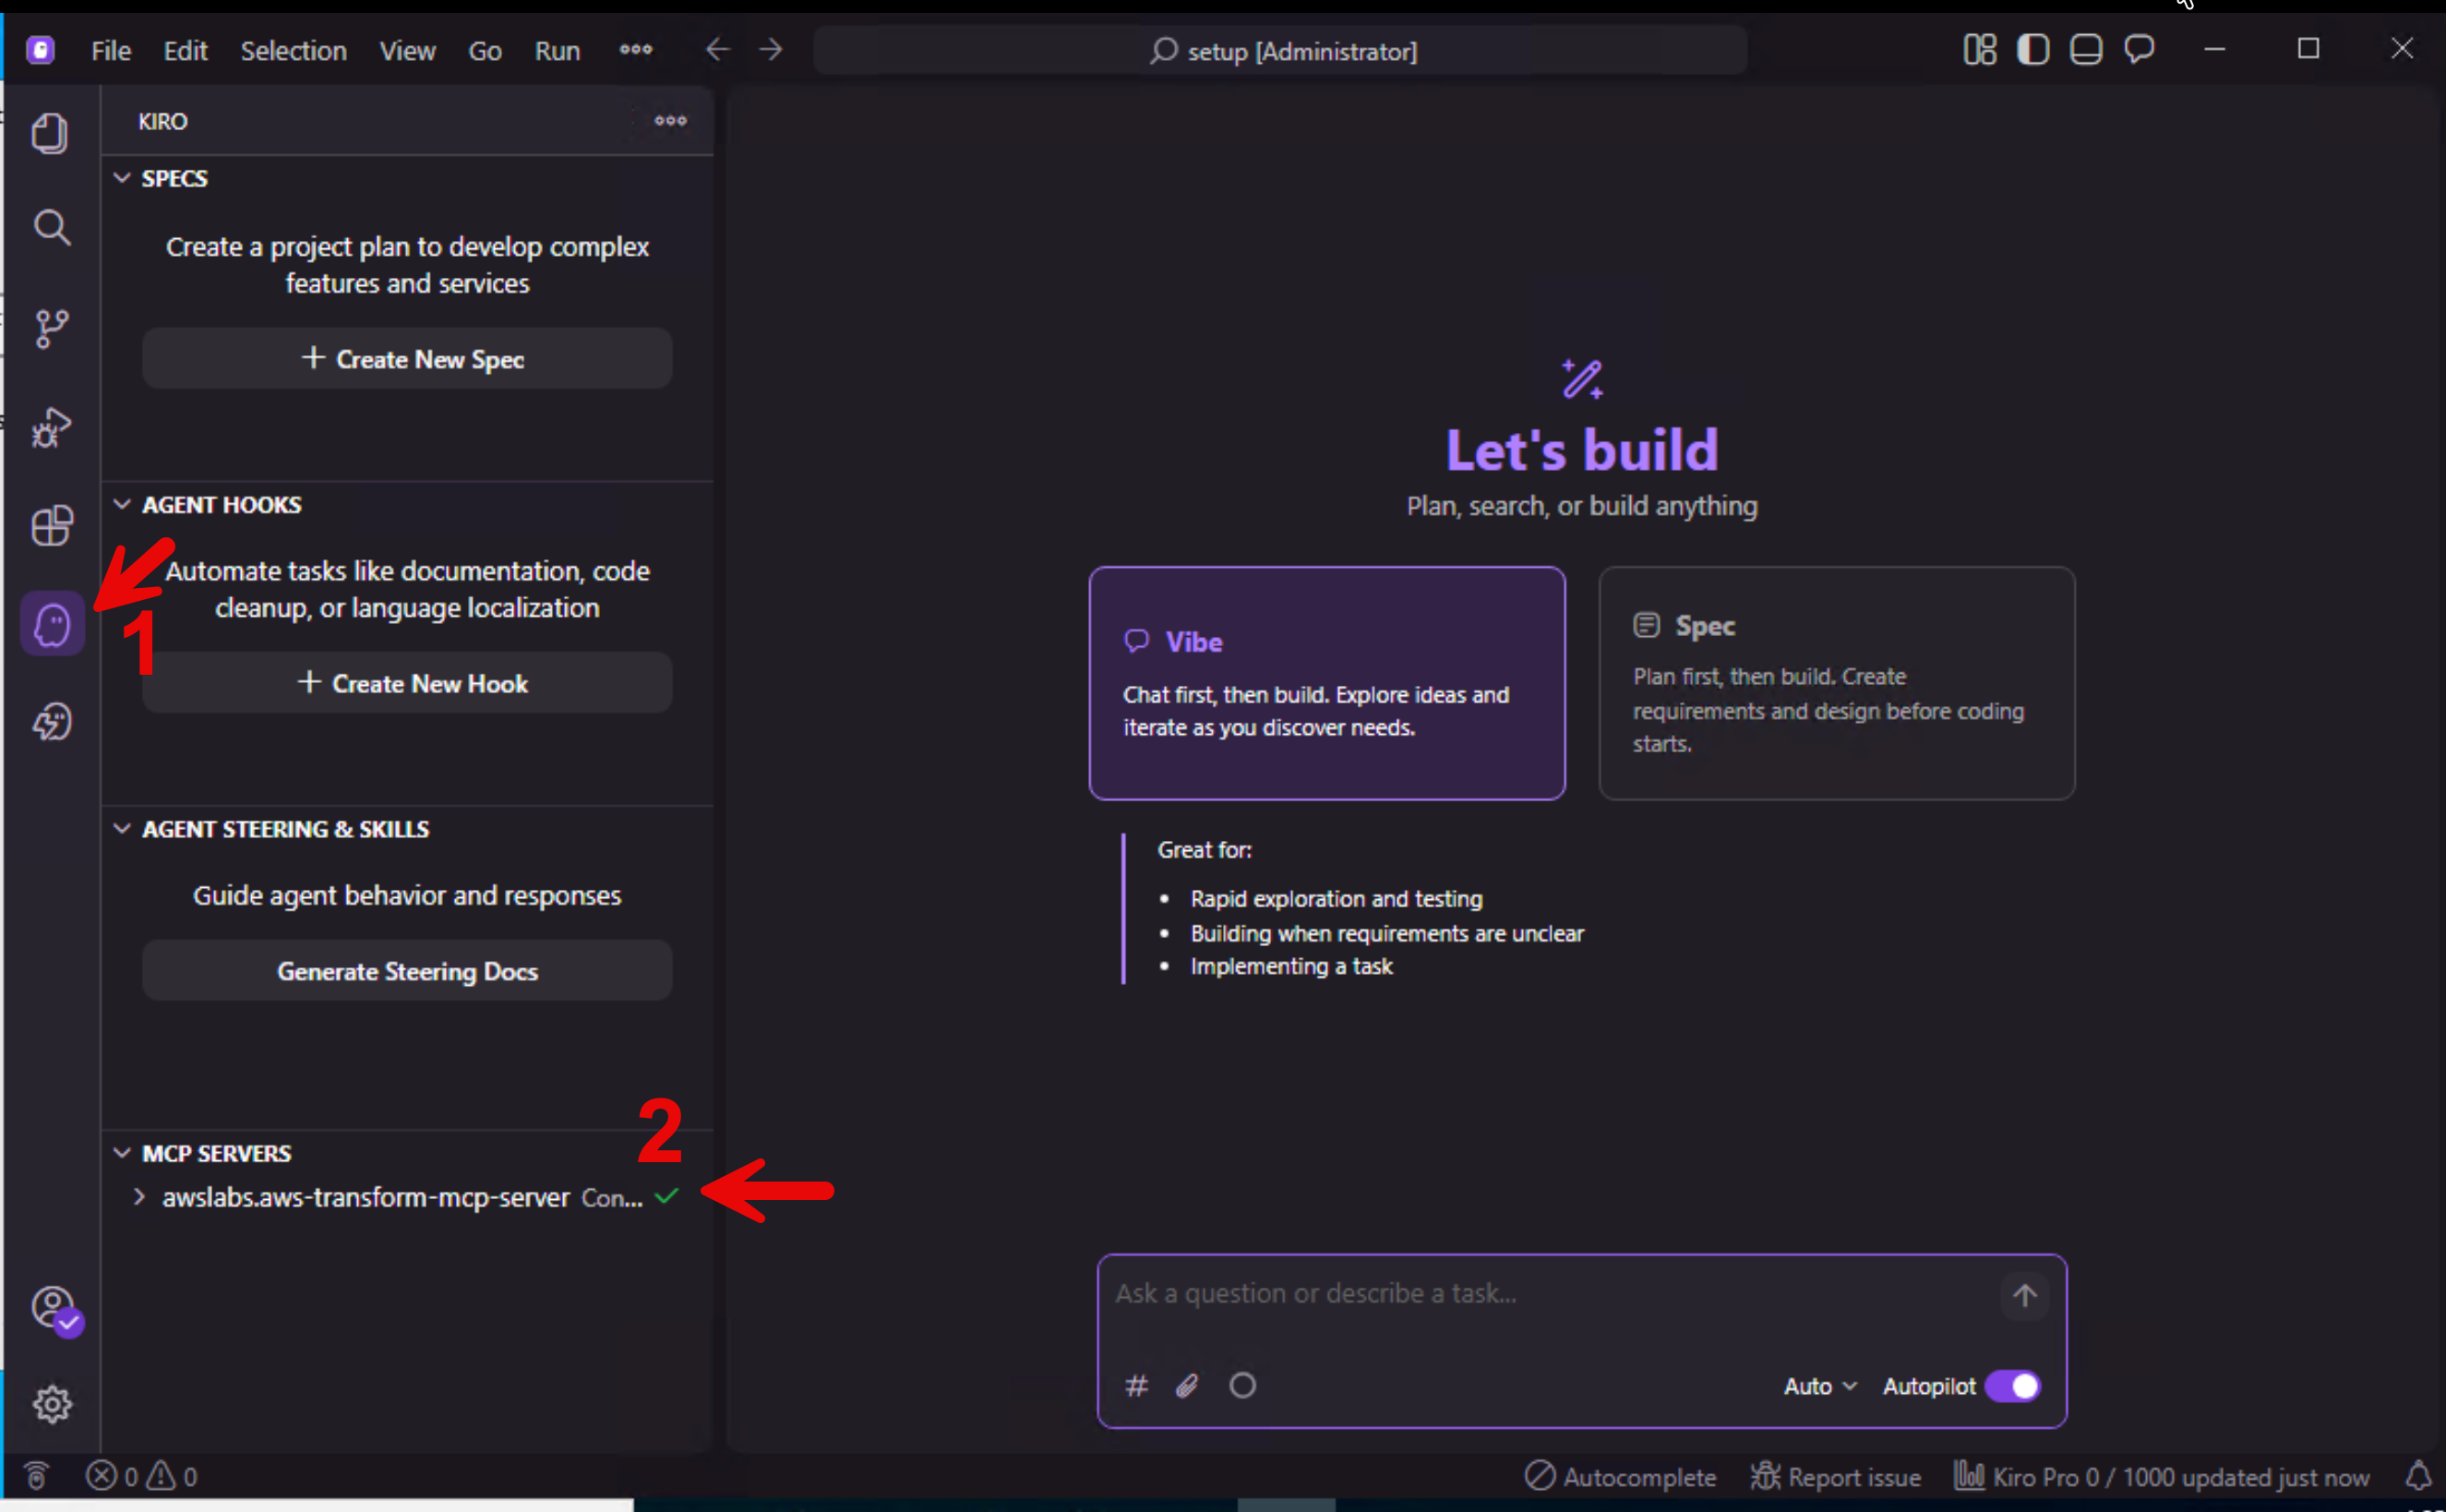
Figure 4: The AWS Transform MCP server connected in Kiro
Note: If Kiro starts the server with the filesystem root as its working directory, the server refuses to download artifacts. To fix this, add AWS_TRANSFORM_MCP_WRITE_DIR to the env block, and set it to the folder where you want downloads saved.
Step 2: Get the IDE prompt from AWS Transform
In this step, we hand off the job from the AWS Transform console to Kiro. AWS Transform generates the prompt that Kiro needs, so you don’t have to look up any IDs.
- In the AWS Transform console, open your SQL Server modernization job. After the first schema deployment, the job chat lists the next steps that you can take (Figure 5).
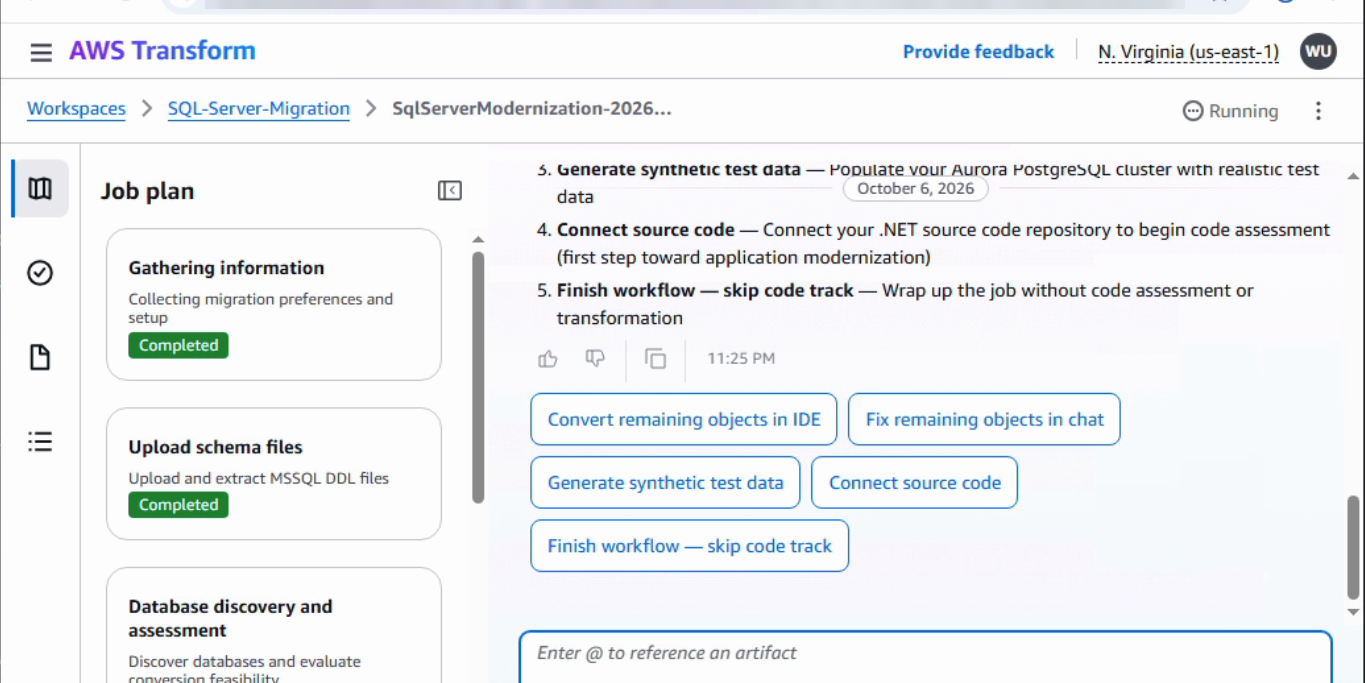
Figure 5: Next-step options in the AWS Transform job chat after schema deployment
- Choose Convert remaining objects in IDE. To fix the objects in the browser instead, choose Fix remaining objects in chat.
- AWS Transform confirms that the converted schema artifact is ready for IDE iteration and provides a prompt to continue in your IDE. The prompt already includes your database name, job ID, and workspace ID. Copy the prompt (Figure 6).
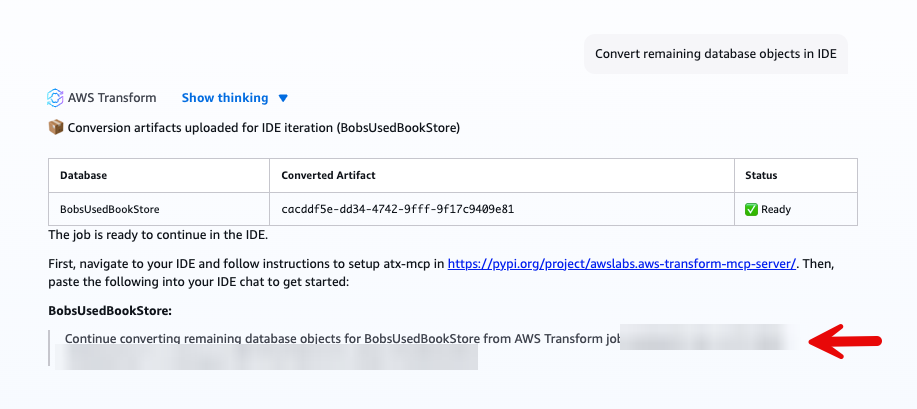
Figure 6: Prompt that AWS Transform provides to continue in your IDE
The prompt has the following form:
Continue converting remaining database objects for <database-name>
from AWS Transform job <job-ID>
in workspace <workspace-ID>.
Step 3: Start the IDE session and sign in
In this step, we paste the prompt into Kiro. If the MCP server isn’t signed in to AWS Transform yet, Kiro asks you to sign in first. From here, Kiro relays messages between you and the AWS Transform agent.
- In Kiro, choose File, and then choose Open Folder. Open or create a folder to use as the working directory for the conversion files.
- Start a new chat session, and paste the prompt from Step 2 (Figure 7).
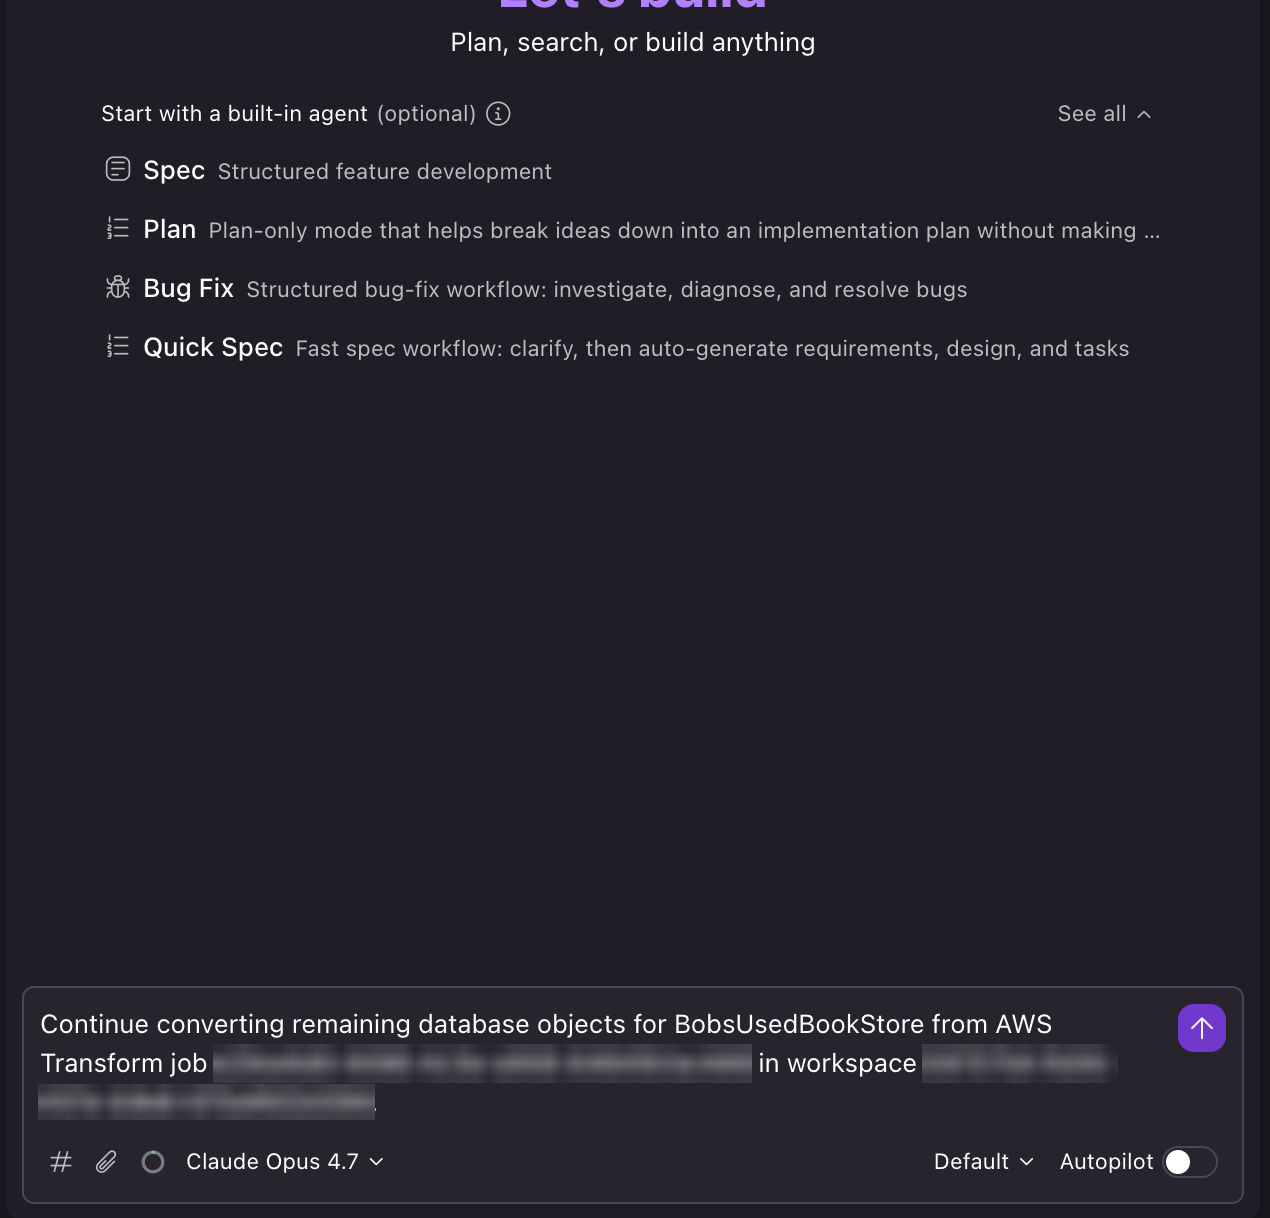
Figure 7: Prompt pasted into a new Kiro chat session
- When Kiro asks to run an MCP tool or a command, review the request. Choose Run to approve that call, or Trust to let Kiro run it in the future without asking. You can manage trusted commands in the Kiro Trusted Commands setting.
- If you aren’t signed in, Kiro offers two ways to authenticate: single sign-on through IAM Identity Center, or a session cookie from the AWS Transform web app. In this post, we use IAM Identity Center (Figure 8).
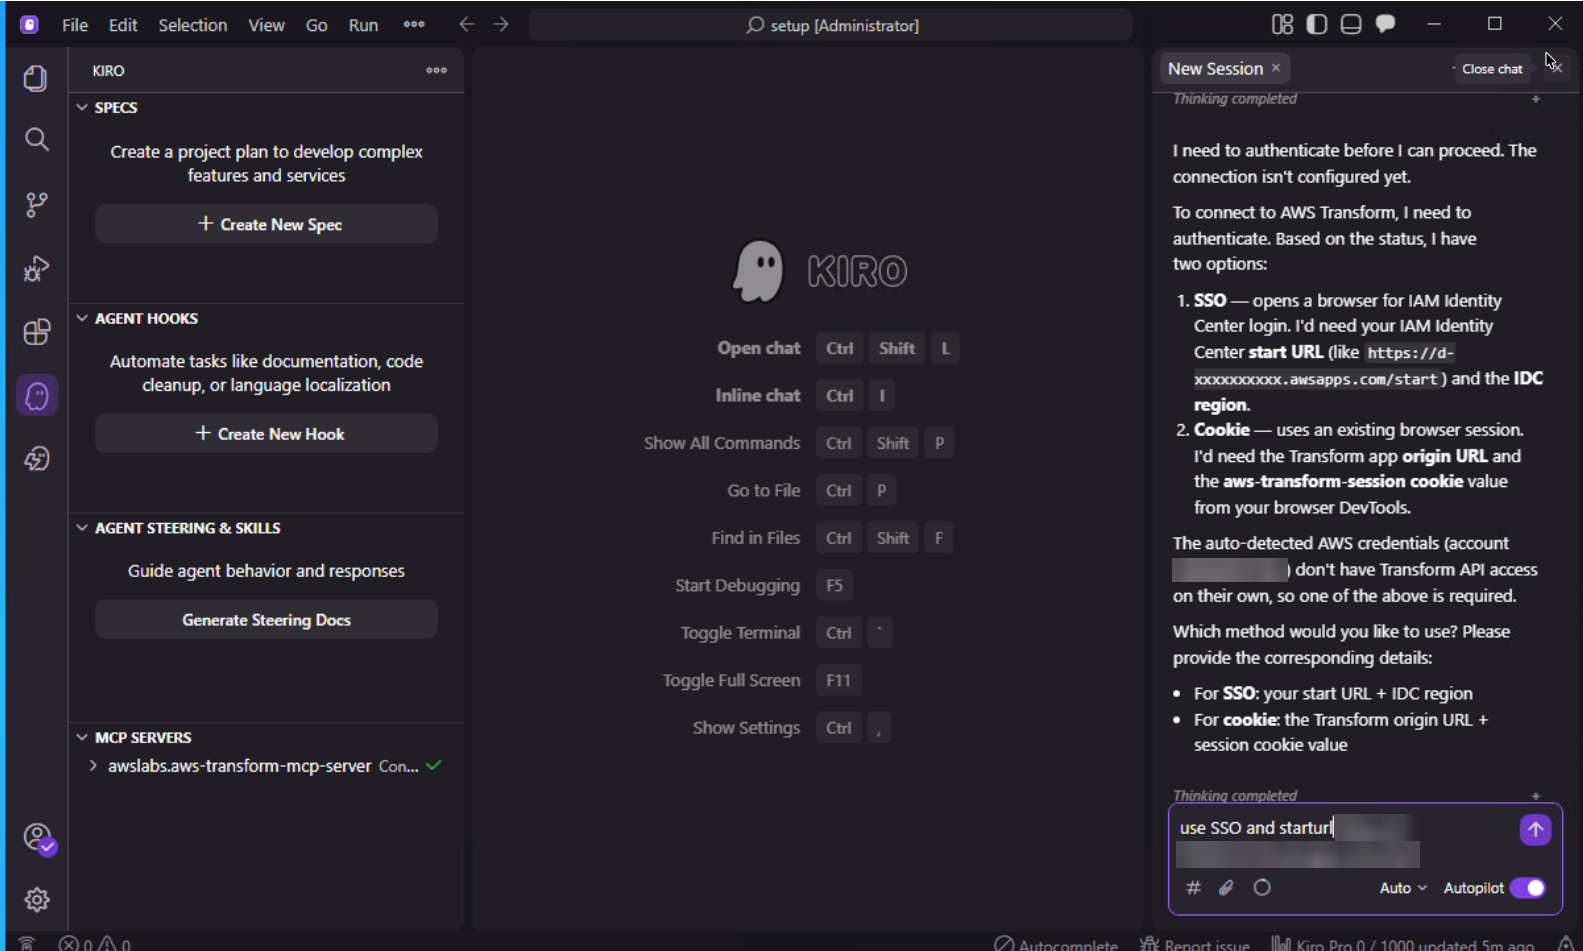
Figure 8: Kiro asking how to authenticate to AWS Transform
- Reply with your AWS access portal URL and Region:
Start URL: <your-AWS-access-portal-URL>
Region: us-east-1 - A browser window opens. Sign in with your IAM Identity Center user. When the page asks whether to allow aws-transform-mcp to access your data, choose Allow access (Figure 9).
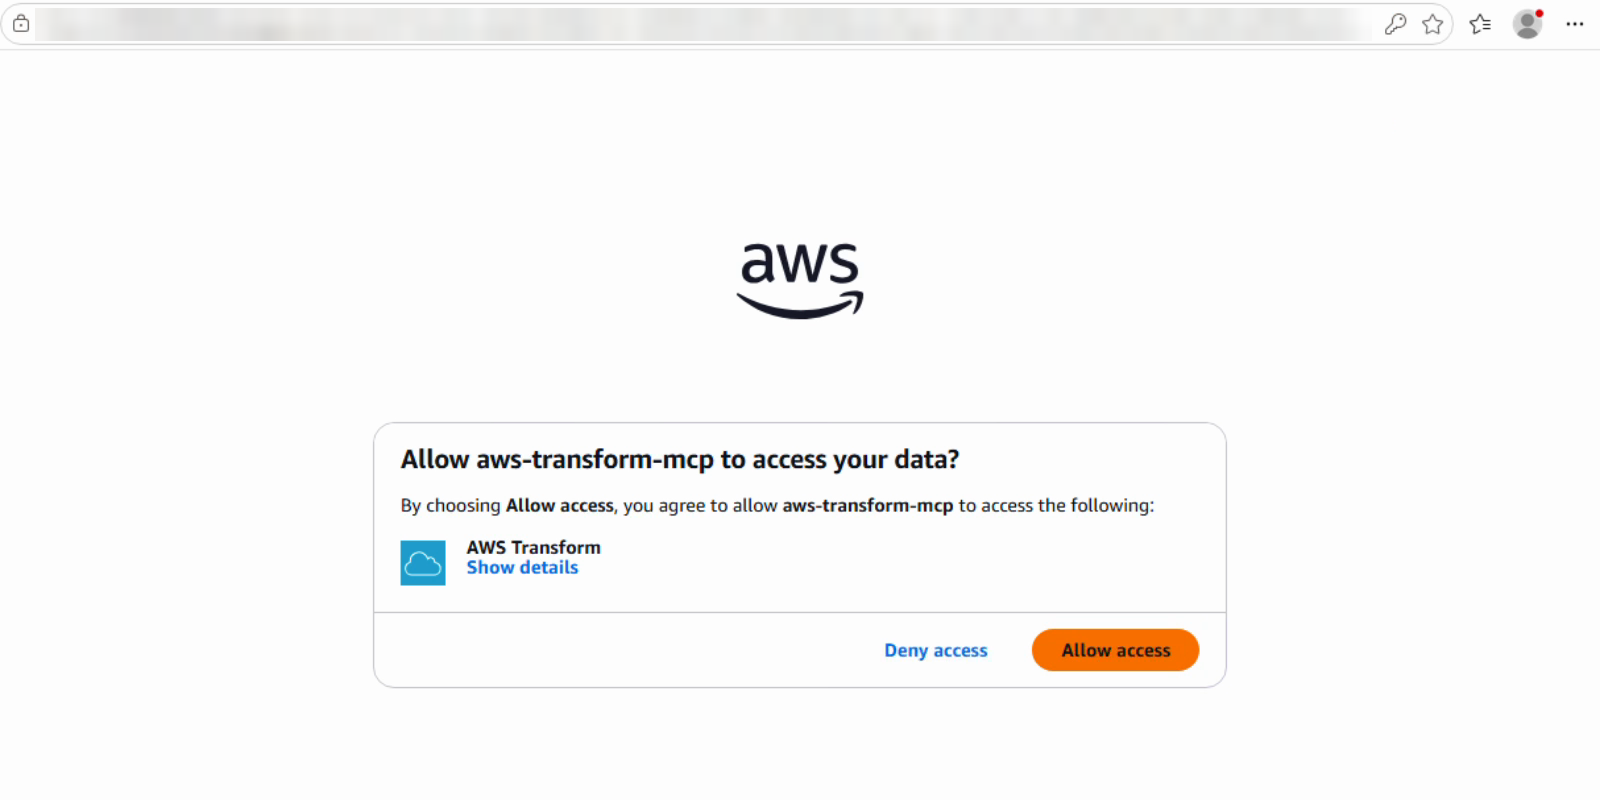
Figure 9: Allowing the AWS Transform MCP server to access AWS Transform
- Return to Kiro. Kiro confirms the connection and continues with the job. The server saves your sign-in to ~/.aws-transform-mcp/config.json and reloads it when Kiro restarts. When your sign-in expires, repeat this step.
Step 4: Review the handoff summary and choose how to fix
In this step, Kiro downloads the converted artifact, summarizes where the job stands, and asks how you want to approve fixes.
- Kiro connects to the job, downloads the converted schema artifact, and creates a working copy in your working directory. It then presents an IDE handoff summary with the validation report (Figure 10).
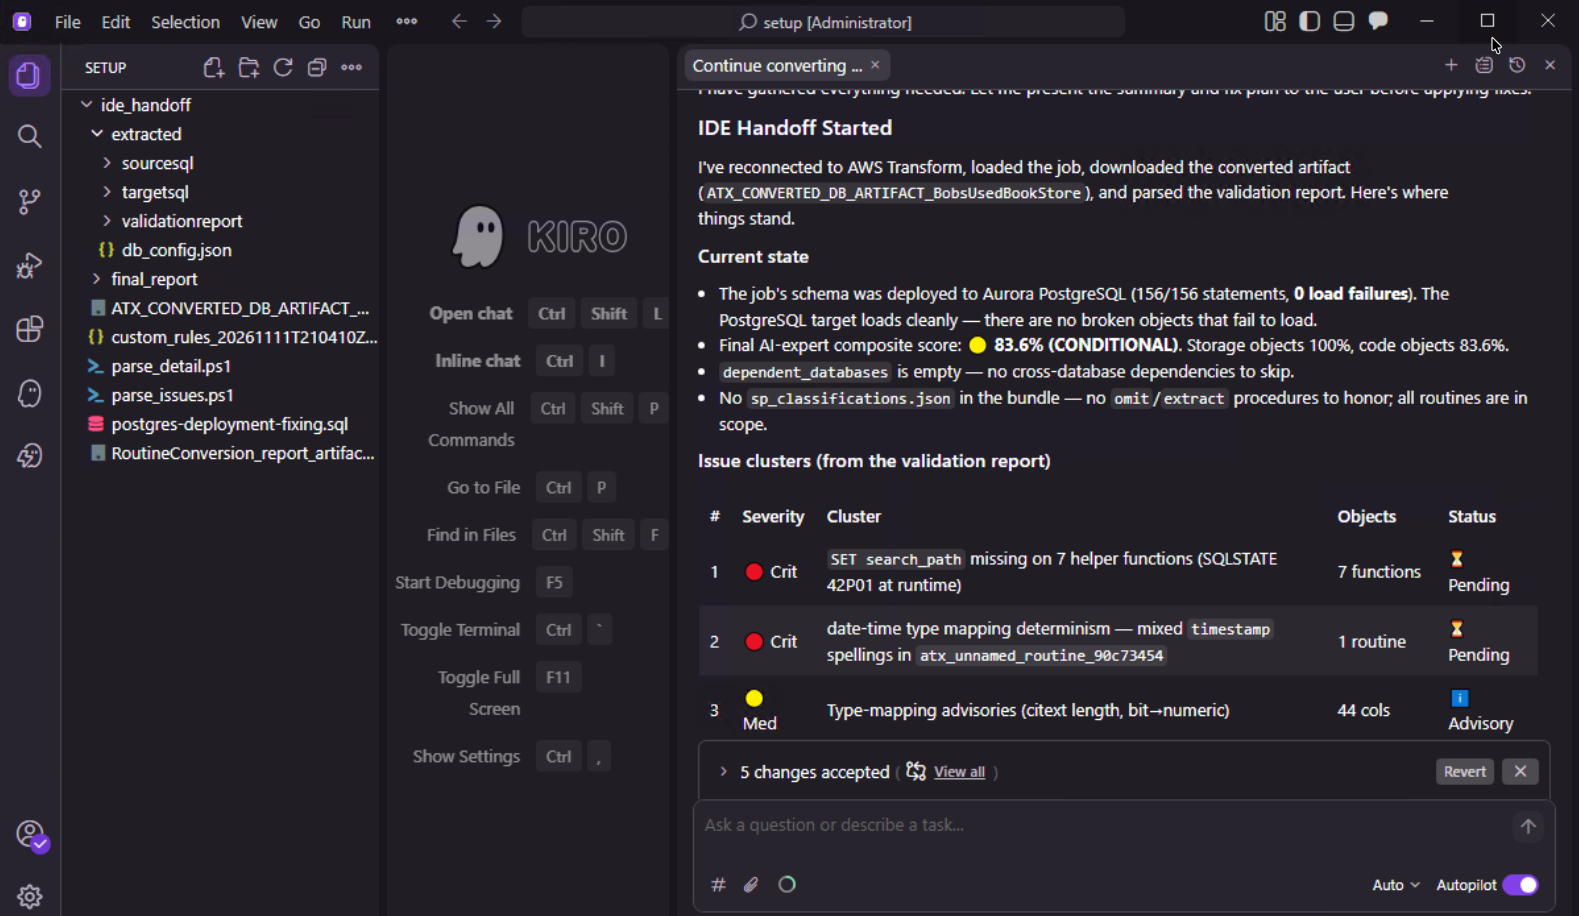
Figure 10: IDE handoff summary and validation report in Kiro
- Kiro groups the issues into clusters. Critical and high issues are in scope for fixes. Advisory items, such as type-mapping warnings, aren’t fixed unless you ask. Before it applies any fixes, Kiro asks how to approve them and which issues to fix (Figure 11).
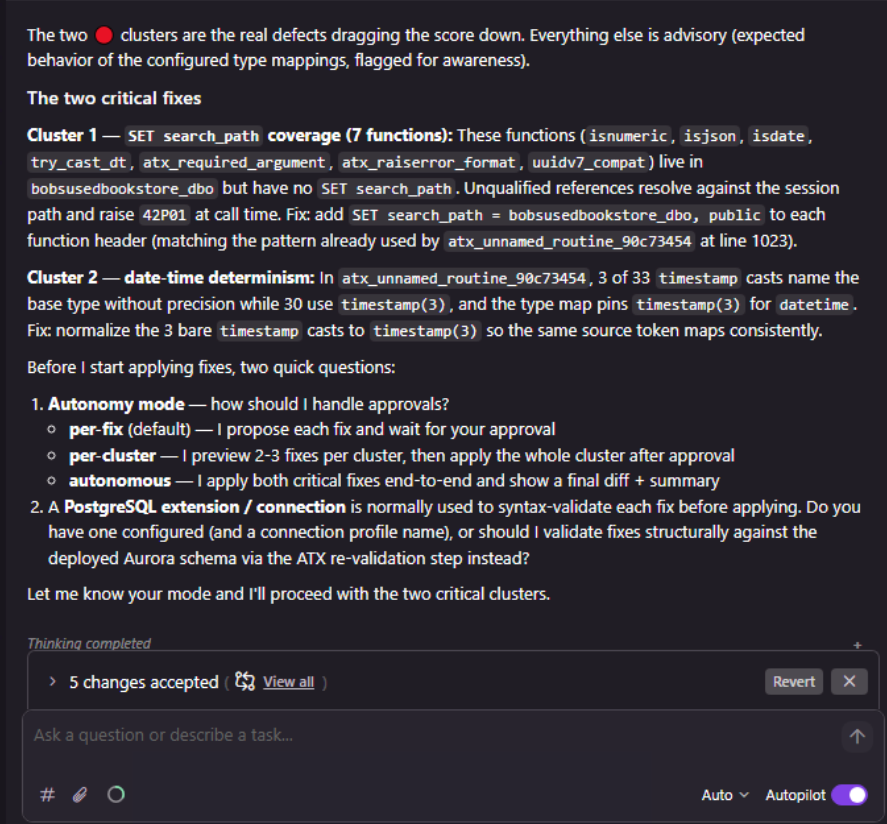
Figure 11: Issue clusters and approval questions in Kiro
- In this post, we chose autonomous mode (Figure 12). For production code, we recommend per-fix or per-cluster mode so that you review each change before Kiro applies it.
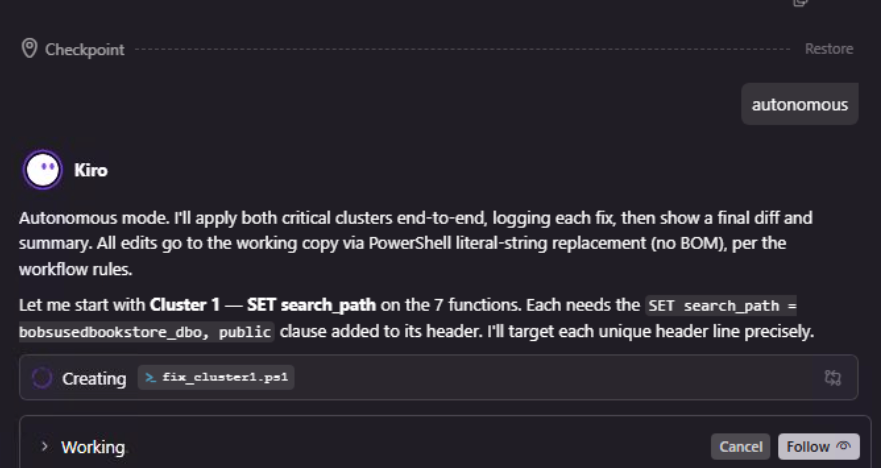
Figure 12: Choosing autonomous mode for fixes
Step 5: Approve the fixes and upload for revalidation
In this step, we review the proposed fixes and then send the corrected schema back to AWS Transform for validation.
Note: While Kiro works through the fixes, the chat might pause with Waiting on your input and show Reject, Trust, and Run for a command that Kiro wants to run. Choose Run to continue. This applies to every command and MCP tool call in this step and the remaining steps, so check the chat if progress seems to stop. To avoid repeated prompts for the same command, choose Trust.
- When all in-scope clusters are fixed, Kiro checks whether the custom rules need updates and removes non-ASCII characters that could corrupt the package. It then asks whether to upload the working copy for revalidation. Reply Yes.
- Kiro packages the corrected SQL, the custom rules, and a manifest into a ZIP file. It uploads the ZIP file and the source SQL to AWS Transform and asks the job to run validation again (Figure 13).
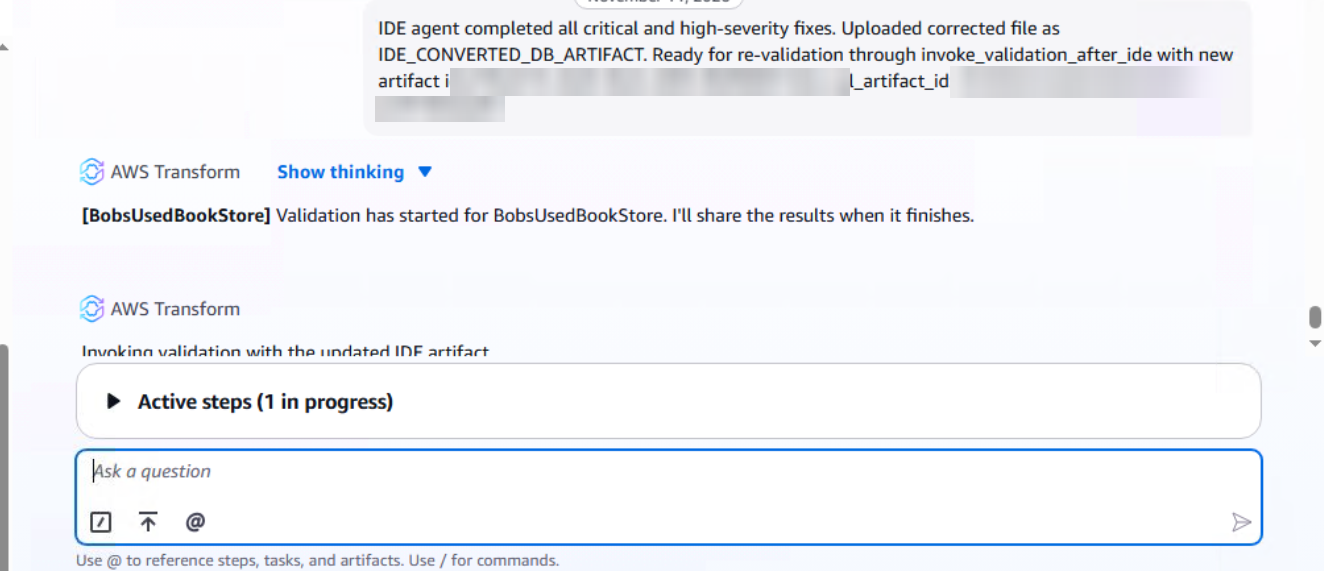
Figure 13: Validation started in AWS Transform after the upload
- Validation takes several minutes. Kiro polls the job and reports the results when validation finishes. In our example, overall compatibility increased from 97.9 percent to 100 percent (Figure 14).
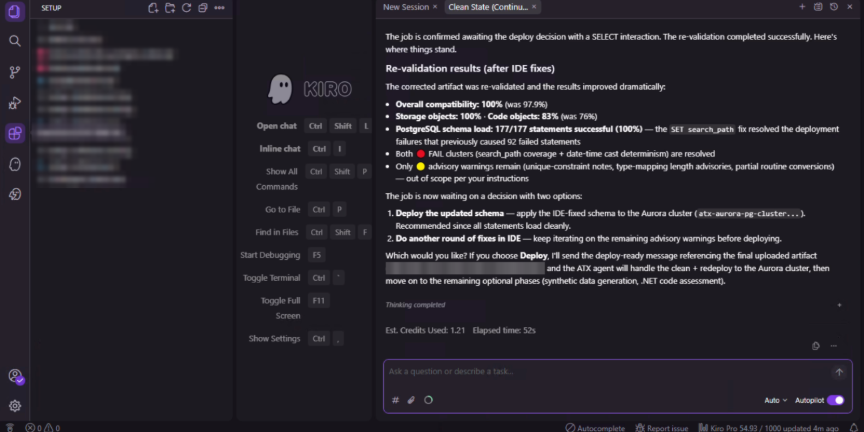
Figure 14: Revalidation results and next options in Kiro
Note: In a long session, Kiro might summarize the conversation and continue in a new chat tab. The job context carries over, so you can keep working in the new tab.
Step 6: Deploy the corrected schema to Aurora PostgreSQL
In this step, we apply the corrected schema to the target Aurora PostgreSQL cluster. You can complete this step from the Kiro chat.
- After revalidation, Kiro offers two options: Deploy the updated schema, or Do another round of fixes in IDE. To address advisory items before you deploy, choose another round. In our example, we replied Deploy.
- AWS Transform asks how to handle the objects that the earlier deployment created in the target, and Kiro relays the question (Figure 15).
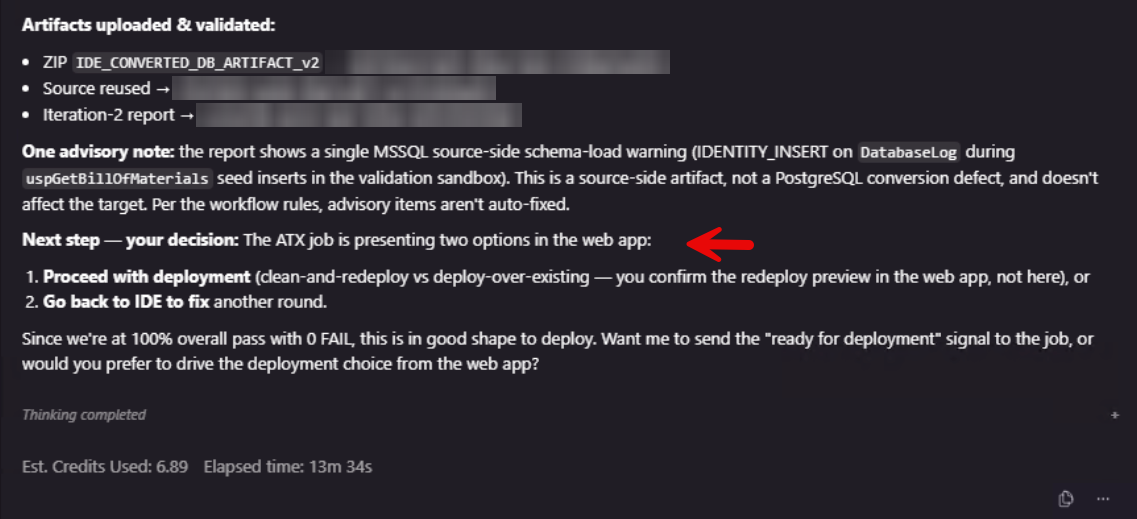
Figure 15: Choosing how to apply the corrected schema to the target
- Reply with one of the following options:
- Yes, clean and redeploy: Drops all existing objects in the target database and redeploys the schema from scratch.
- No, deploy over existing: Applies the updated schema on top of the existing objects. This keeps existing data but can produce errors for objects that already exist.
Warning: Yes, clean and redeploy permanently deletes all data in the target database, including any synthetic test data. Use it only on a new or empty target. If the target has data that you want to keep, take a backup first.
In our example, the target held only the partial schema from the first deployment, so we chose to clean and redeploy.
- Kiro reports the deployment result and the artifacts that AWS Transform produced, including the deployment report. If statements fail, ask Kiro for another round of fixes, or review the deployment report in the AWS Transform console. In our example as shown in Figure 16, schema deployed successfully to Aurora PostgreSQL cluster.
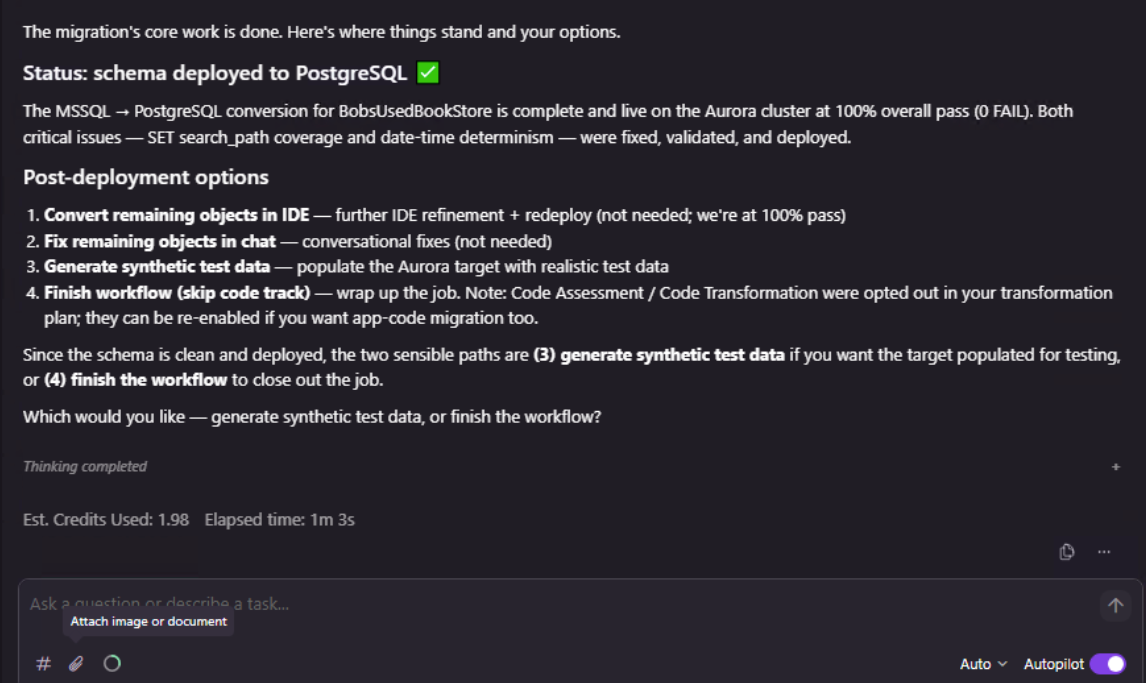
Figure 16: Deployment complete in Kiro, with the next steps
- Choose the next step. You can reply in Kiro or in the AWS Transform job chat:
- Generate synthetic test data: Populates the Aurora PostgreSQL cluster with test data for validation.
- Connect source code: Starts the .NET code assessment and transformation.
- Finish workflow – skip code track: Completes the job without code assessment or transformation.
- In our example, we chose Finish workflow – skip code track in the AWS Transform console, and the job status changed to Completed (Figure 17).
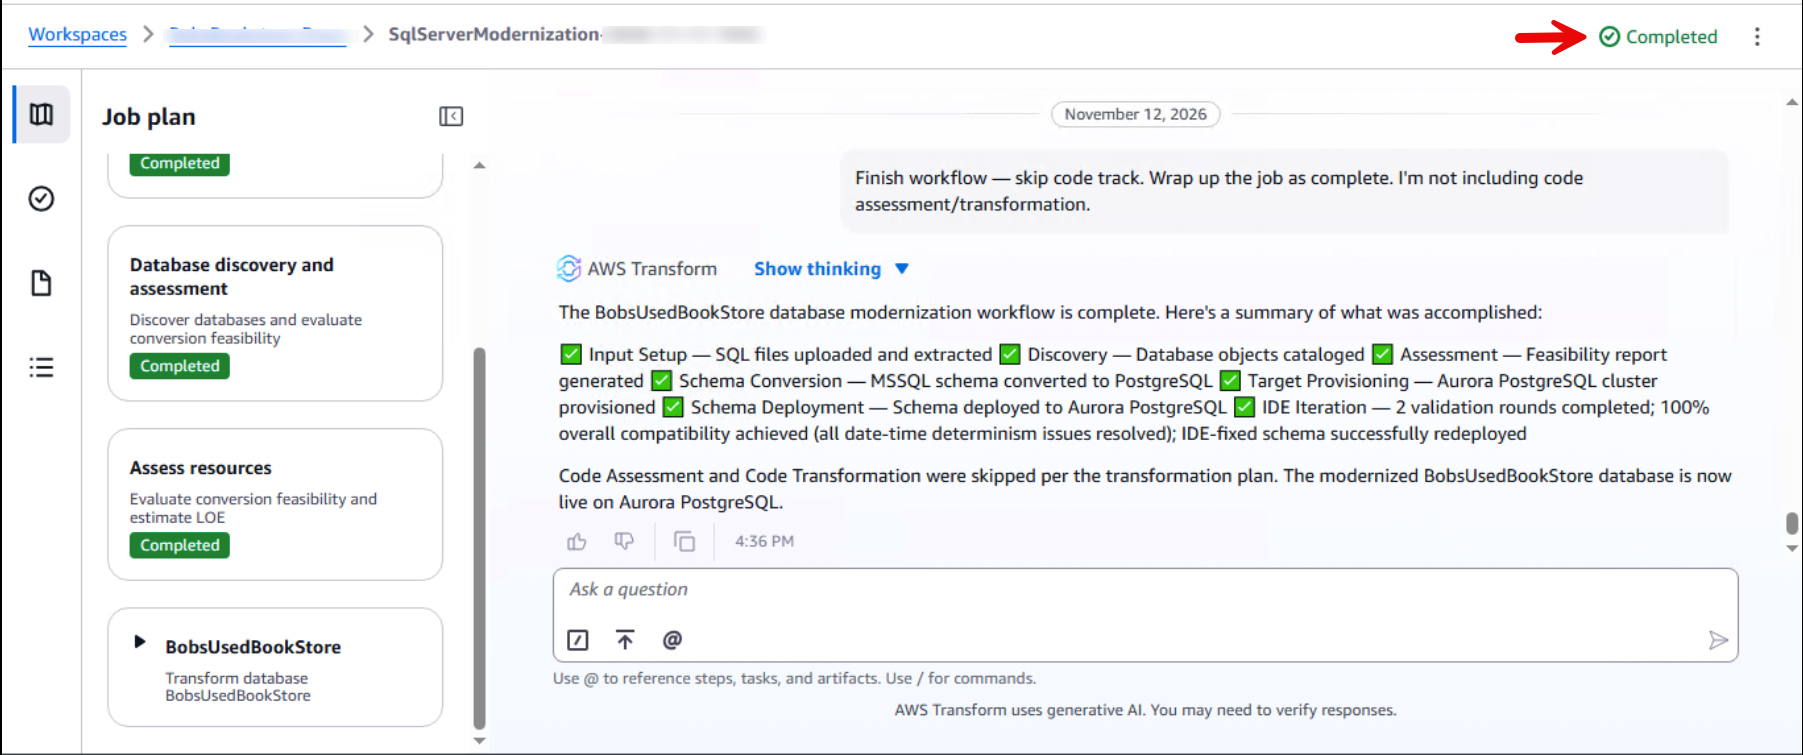
Figure 17: Completed job in the AWS Transform console
Cleaning up
To avoid ongoing charges and remove saved credentials from your workstation, clean up the following resources:
- If you created an Aurora PostgreSQL cluster for testing, delete it in the Amazon Relational Database Service (Amazon RDS) console. Select the cluster, choose Actions, choose Delete, and confirm. For details, refer to Deleting Aurora DB clusters and DB instances.
- To remove the MCP server from Kiro, delete the awslabs.aws-transform-mcp-server entry from ~/.kiro/settings/mcp.json, and save the file.
- To remove your saved sign-in, delete the ~/.aws-transform-mcp/config.json file.
You can keep your AWS Transform workspace for future reference.
Conclusion
In this blog post, we showed how to resolve the SQL Server objects that need human review in a SQL Server to Aurora PostgreSQL modernization from your IDE. With this approach, you can fix the objects that AWS Transform can’t convert automatically in your own IDE. AWS Transform revalidates each round against the same checks that it applies to automatically converted objects.
To get started, open the AWS Transform console, and start a SQL Server modernization job. For the steps, refer to SQL Server modernization in the AWS Transform User Guide. When the first schema deployment finishes, choose Convert remaining objects in IDE in the job chat, and follow the steps in this post.