AWS Cloud Operations Blog
Automate CI/CD troubleshooting with AWS DevOps Agent and GitHub
Introduction
Every development team knows the frustration: a GitHub Actions workflow fails, a notification fires, and an engineer begins the manual triage loop; read the logs, identify the root cause, write a fix, open a pull request, wait for review, merge, re-run the workflow, and hope it passes.
For organizations running dozens or hundreds of GitHub Actions workflows across multiple repositories, this manual triage compounds quickly. A single type error can block an entire release. A misconfigured deployment path can cascade across environments. The investigative work which includes correlating logs, reading code, understanding what changed consumes hours that could be spent on innovation.
AWS DevOps Agent fundamentally changes this equation. As an autonomous, always-on AI agent, it investigates CI/CD failures the moment they occur , correlating build logs, source code, deployment history, and infrastructure state to identify root causes and recommend specific mitigations. Rather than waiting for an engineer to manually sift through logs, the agent performs the same investigative reasoning an experienced SRE would, but in minutes instead of hours.
This post demonstrates how to integrate AWS DevOps Agent with GitHub for read access to repositories, workflow runs, and deployment events. It also covers integrating the GitHub MCP Server for push-based resolutions such as creating fix pull requests and updating files. Together, these integrations enable a fully autonomous, closed-loop CI/CD troubleshooting pipeline. When a workflow fails, the agent investigates. When it finds the root cause, it pushes the fix directly back into your repository as a pull request.
Solution overview
This solution integrates AWS DevOps Agent with GitHub to create an autonomous CI/CD troubleshooting system. The following architecture and event flow demonstrate how the components work together.
Architecture
The following diagram illustrates how AWS DevOps Agent integrates with GitHub to create an autonomous CI/CD troubleshooting system. The architecture has five main components that work together: a GitHub source repository and GitHub Actions pipelines emit workflow events; a webhook routes failure incidents to AWS DevOps Agent; an Agent Space hosts the agent’s capability providers, namely the GitHub App for read access and the GitHub MCP Server for write actions; and Amazon CloudWatch supplies application logs that the agent correlates during root-cause analysis.
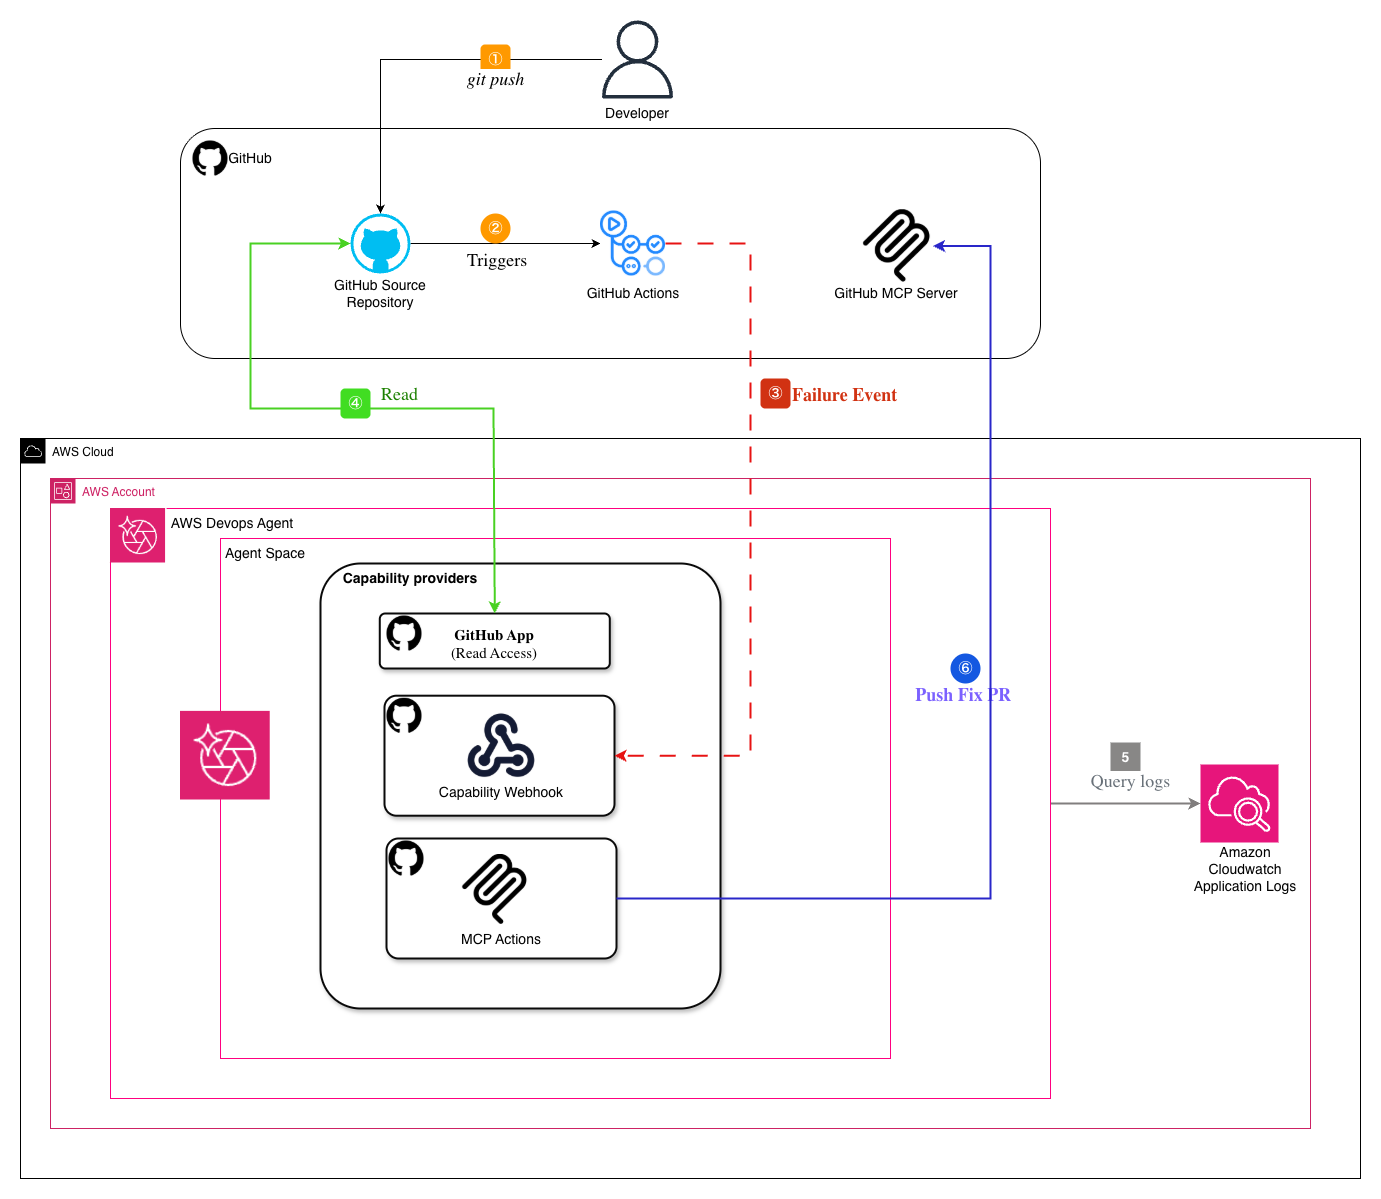
Figure 1 : Architecture diagram showing AWS DevOps Agent integration with GitHub
Event flow
- A developer pushes code → GitHub Actions pipeline runs.
- A pipeline stage fails such as build errors, test failures, or deployment crashes.
- A webhook notification fires the AWS DevOps Agent with incident details.
- The agent begins an autonomous investigation:
- Reads the workflow run logs via the GitHub App integration.
- Inspects source code, configurations, and recent commits.
- Correlates the failure with deployment history and infrastructure state.
- The agent also correlates the Amazon CloudWatch logs for detailed analysis.
- Using the GitHub MCP Server, the agent pushes a fix, typically as a pull request.
Why the MCP server is needed
The GitHub App integration provides read-only access. The agent can inspect repositories, read workflow logs, view commit history, and receive deployment events. This is sufficient for investigation and root cause analysis.
However, to push resolutions , the agent needs a write channel. The Model Context Protocol (MCP) server provides this capability, enabling AI agents to interact with external tools through a standardized interface. By registering the GitHub MCP Server with your Agent Space, you give the agent the ability to take corrective action, closing the loop from investigation to remediation.
Prerequisites
- AWS Account: With access to AWS DevOps Agent. For supported Regions, see Supported Regions for AWS DevOps Agent
- GitHub Repo: With existing GitHub Actions workflows.
- GitHub Personal Access Token: For instructions, see Managing your personal access tokens
Important: This solution creates billable AWS resources. Charges accrue until resources are deleted. See the Cleanup section to help remove all resources when no longer needed.
Follow these steps to set up the complete integration between AWS DevOps Agent and GitHub. Each step builds on the previous one to create a fully functional autonomous troubleshooting system.
Implementation steps
Step 1: Create an Agent Space
An Agent Space defines the scope of what AWS DevOps Agent can investigate. It contains your AWS account associations, tool integrations (GitHub, observability platforms), and access permissions. Each Agent Space operates as an isolated investigation context. There are two ways to create the Agent Space: via the AWS Console or using the AWS Cloud Development Kit (AWS CDK) .
Option A: Create via the AWS Console
- Log in to the AWS Management Console, navigate to AWS DevOps Agent.
- Choose Create Agent Space**.**
- Enter a descriptive name for the Agent Space , for example, my-app-cicd-agent.
- Select one of the supported Regions.
- Note that the console automatically creates the required AWS Identity and Access Management (IAM) roles (DevOpsAgentRole-AgentSpace and DevOpsAgentRole-WebappAdmin).
- Associate your AWS account with the Agent Space.
Option B: Create via AWS Cloud Development Kit (AWS CDK)
For infrastructure-as-code workflows using AWS CDK, clone the sample AWS DevOps Agent CDK project
Reference: Getting started with AWS DevOps Agent using AWS CDK
Step 2: Connect GitHub to the Agent Space
The GitHub integration enables AWS DevOps Agent to access code repositories and receive deployment events during investigations. This follows a two-step process: account-level registration of GitHub, then connecting specific repositories to your Agent Space.
Register GitHub (account-level, one-time)
- In the DevOps Agent console, navigate to the Capability Providers tab.
- In the Pipeline section, choose Register option in front of GitHub.
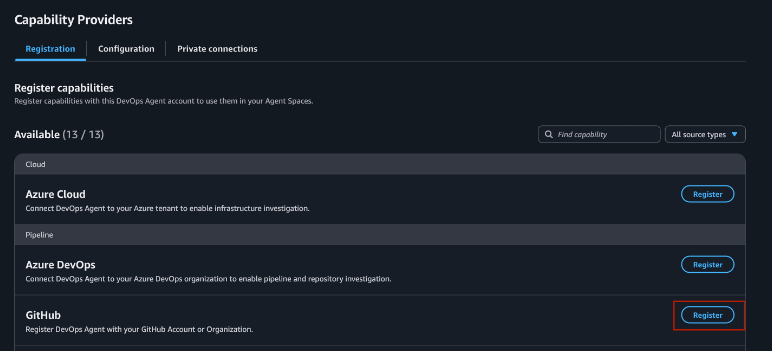
Figure 2 : AWS DevOps Agent Capability Providers page showing the Pipeline section with GitHub Register button highlighted
- Choose your connection type (User for your personal GitHub account or Organization for a shared GitHub organization account).
- User: your personal GitHub account with a username and password.
- Organization: a shared GitHub organization account.
- Choose Submit to initiate the OAuth flow.
- The system redirects you to GitHub to install the AWS DevOps Agent GitHub App.
- Select which repositories to grant access to (All repositories for current and future repos or Select repositories to choose specific ones).
- Choose Install to complete the installation. The system redirects you back to the AWS console.

Figure 3 : GitHub AWS DevOps Agent installation page showing repository access permissions
Connect repositories to the Agent Space
- In your Agent Space, navigate to Capabilities → Pipeline.
- Choose Add Source.
- In the dialog that appears, select your GitHub pipeline.
- Choose Add.
- Select the repositories relevant to this Agent Space.

Figure 4 : AWS DevOps Agent page showing GitHub repository selection to allow access
- Choose Save to complete the connection.
After connection, the agent can: –
- Read source code, configurations, and workflow definitions
- Access workflow run logs and build output
- View commit history and recent changes
- Receive deployment events for correlation with incidents
Reference: Connecting GitHub
Step 3: Register the GitHub MCP server
The GitHub App provides read-only access, sufficient for investigation. To enable the agent to push resolutions, you register the GitHub MCP Server as a custom tool.
Register the MCP (Model Context Protocol) Server
- In your Agent Space, navigate to Capability Providers.
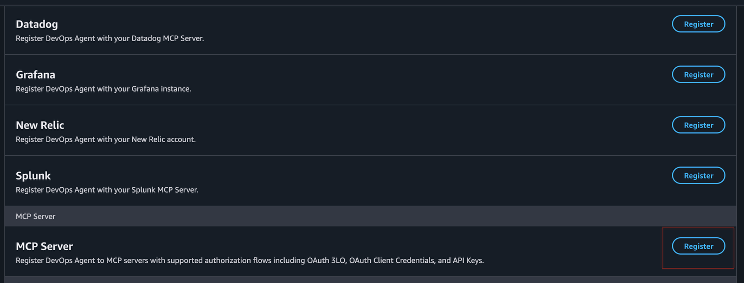
Figure 5 : Capability providers page showing MCP Server section with Register button
- In the Registration section, choose Register for MCP server.
- Configure the connection:
| Field | Value |
| Name | github-mcp |
| Endpoint | https://api.githubcopilot.com/mcp/ |
| Authentication | API Key |
| API Key Header | Authorization |
| API Key Value | Bearer <YOUR_GITHUB_PAT> |
- After the MCP Server is registered, navigate back to Agent Spaces.
- Navigate to the MCP Server section.
- Choose Add Source.
- A pop-up window will appear on your screen. From the options, choose the added GitHub MCP server.
- Once you choose Add, it will ask you to select the tools.
- Select the tools to enable (such as create_pull_request, create_branch, fork_repositories, search_code, search_pull_requests, search_repositories, update_pull_request, update_pull_request_branch, create_or_update_file, push_files, and create_issue).
- Choose Save. The system redirects you to the Webhook section.
- Record the Webhook URL and Webhook Secret in a secure location.
- This webhook will be listed in the Capability Webhooks section.
Step 4: Configure the webhook
To trigger investigations automatically when GitHub Actions workflows fail, you need a webhook that your CI/CD pipeline calls on failure.
When you register the GitHub MCP server in Step 3, a capability webhook is automatically created.
The webhook accepts incident payloads conforming to the standard AWS DevOps Agent schema:
{
   "eventType": "incident",
   "incidentId": "gha-<run_id>",
   "action": "created",
   "priority": "HIGH",
   "title": "CI/CD Pipeline Failed: <workflow_name>",
   "description": "Detailed description of the failure...",
   "timestamp": "2026-01-15T10:30:00Z",
   "service": "my-service",
   "data": {
     "repository": "org/repo-name",
     "run_id": "12345678",
     "run_url": "https://github.com/org/repo/actions/runs/12345678",
     "branch": "main",
     "commit_sha": "abc1234"
   }
 }
Add the notification job to your GitHub Actions workflow
Store the webhook URL and secret as GitHub repository secrets (DEVOPS_AGENT_WEBHOOK_URL and DEVOPS_AGENT_WEBHOOK_SECRET).
Add a failure notification job to the existing ci.yml file:
notify-devops-agent:
     name: Notify DevOps Agent
     runs-on: ubuntu-latest
     needs: [build, test, deploy]
     if: failure()
     steps:
       - name: Trigger Investigation
         env:
           WEBHOOK_URL: ${{ secrets.DEVOPS_AGENT_WEBHOOK_URL }}
           WEBHOOK_SECRET: ${{secrets.DEVOPS_AGENT_WEBHOOK_SECRET }}
         run: |
           TIMESTAMP=$(date -u +"%Y-%m-%dT%H:%M:%SZ")
           PAYLOAD="{\"eventType\":\"incident\",\"incidentId\":\"gha-${{ github.run_id }}\",\"action\":\"created\",\"priority\":\"HIGH\",\"title\":\"CI/CD Pipeline Failed: ${{ github.workflow }}\",\"description\":\"Workflow ${{ github.workflow }} failed on branch ${{ github.ref_name }} (run #${{ github.run_number }}). Commit: ${{ github.sha }}. See: ${{ github.server_url }}/${{ github.repository }}/actions/runs/${{ github.run_id }}\",\"timestamp\":\"${TIMESTAMP}\",\"service\":\"my-service\",\"data\":{\"repository\":\"${{ github.repository }}\",\"run_id\":\"${{ github.run_id }}\",\"run_url\":\"${{ github.server_url }}/${{ github.repository }}/actions/runs/${{ github.run_id }}\",\"branch\":\"${{ github.ref_name }}\",\"commit_sha\":\"${{ github.sha }}\"}}"

          SIGNATURE=$(echo -n "${TIMESTAMP}:${PAYLOAD}" | openssl dgst -sha256 -hmac "${WEBHOOK_SECRET}" -binary | base64)

          curl -sf -X POST "${WEBHOOK_URL}" \
             -H "Content-Type: application/json" \
             -H "x-amzn-event-timestamp: ${TIMESTAMP}" \
             -H "x-amzn-event-signature: ${SIGNATURE}" \
             -d "${PAYLOAD}"
The if: failure() condition ensures this job runs only when a preceding stage fails. The HMAC (Hash-Based Message Authentication Code) signature authenticates the request to the DevOps Agent webhook endpoint.
Step 5: Configure permissions (least privilege)
GitHub PAT Scopes
| Permission | Access Level | Why needed |
| Contents | Read and Write | Create branches, push file changes, read code |
| Pull request | Read and Write | Create and update PRs |
| Actions | Read | View workflow runs and logs |
| Workflows | Read and Write | If you need to modify workflow files via PR |
| Commit Statuses | Read | Check CI status on commits |
| Metadata | Read | Basic repo info (usually auto granted) |
Best practice: Use a fine-grained personal access token scoped to only the repositories the agent should remediate. This limits blast radius if the token is compromised.
Walkthrough: Automated troubleshooting in action
Scenario 1: Build failure
Situation: A developer adds a new property to an object literal, but the property doesn’t exist on the TypeScript interface. The npm run build step fails.
Error in the pipeline log:
src/services/items.service.ts(108,7): error TS2353: Object literal may only specify known properties, and 'trackingId' does not exist in type 'Item'.
What the DevOps Agent does:
- Receives the incident: the webhook payload arrives with the workflow run URL and failure details.
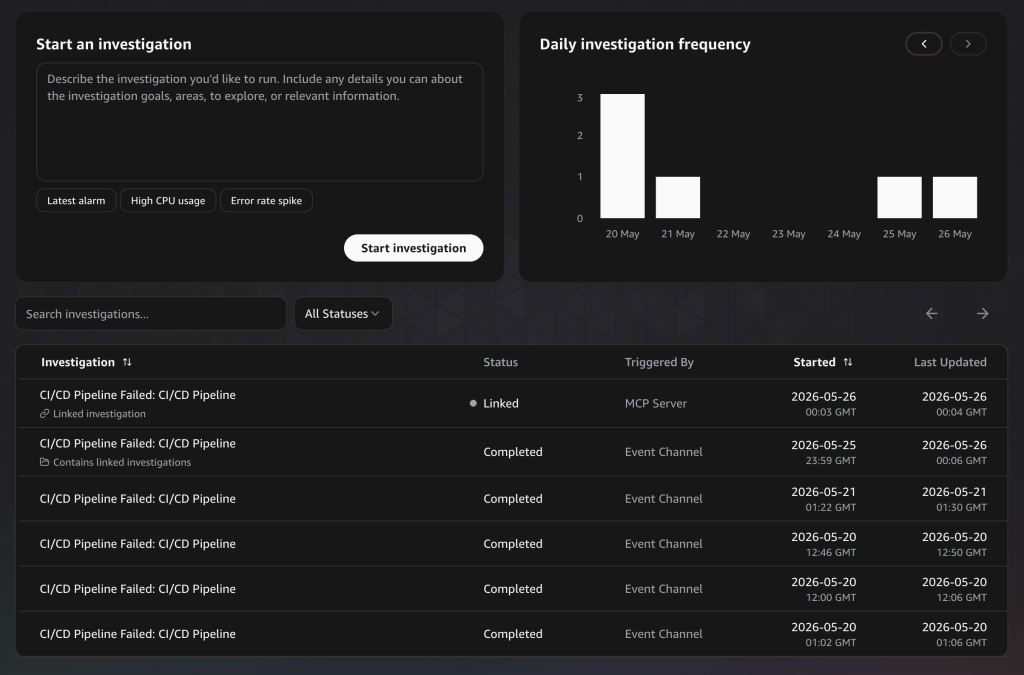
Figure 6 : AWS DevOps Agent WebApp showing Incidents page with list of triggered CI/CD Pipeline Failures.
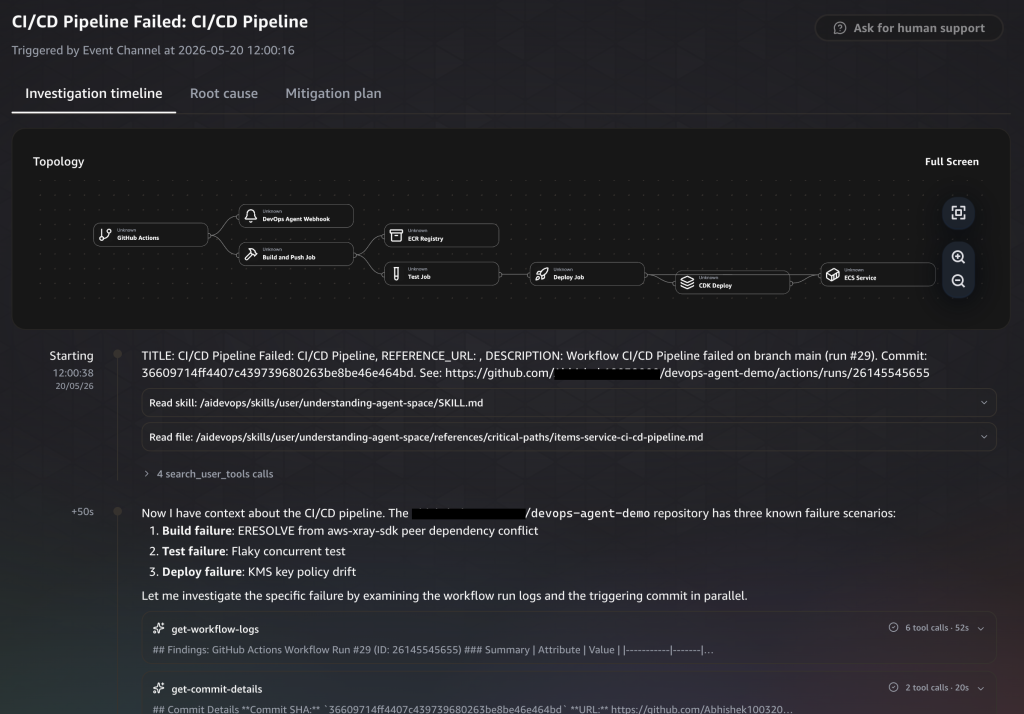
Figure 7 : Investigation timeline showing topology diagram with GitHub Actions
- Reads the build log: via the GitHub App, accesses the workflow run output and identifies the TypeScript compiler error (TS2353).
- Inspects the source file: reads src/services/items.service.ts to understand the code context around line 108.
- Reads the interface definition: locates the Item interface and confirms trackingId is not a valid property.
- Checks recent commits: identifies which commit introduced the change and who authored it.
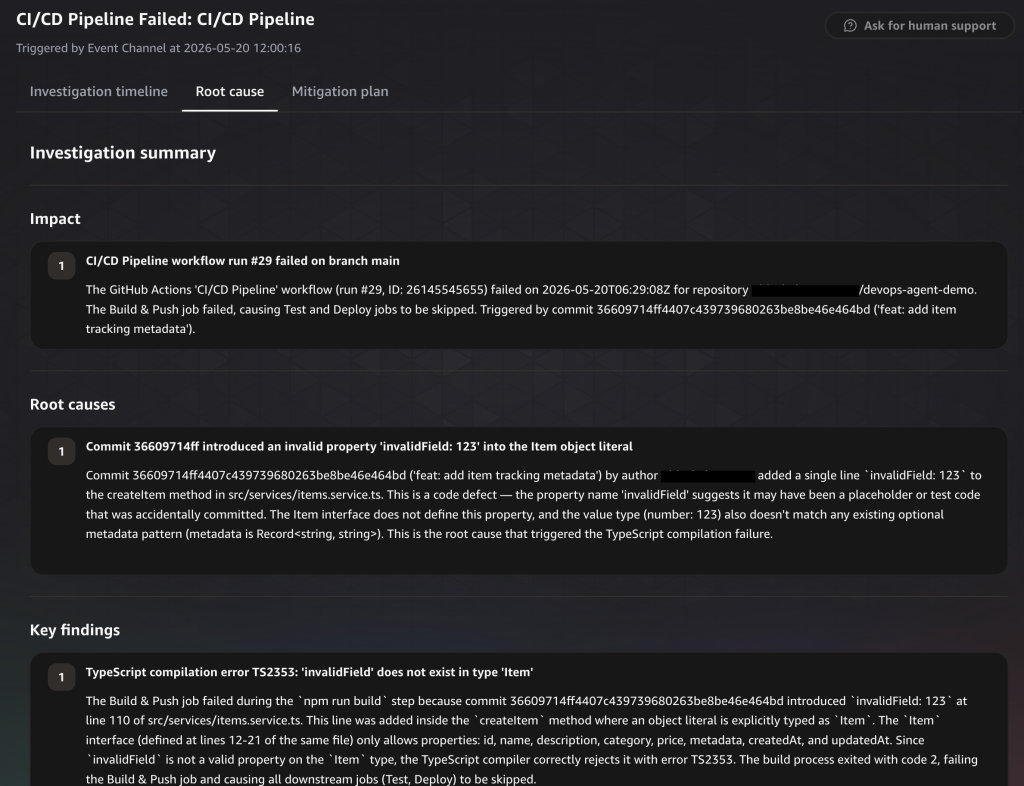
Figure 8 : Root cause tab showing investigation summary with impact statement and root cause analysis identifying TypeScript compilation error
- Determines the fix: removing the trackingId property from the object literal resolves the type error.
- Creates a mitigation plan from the root cause.
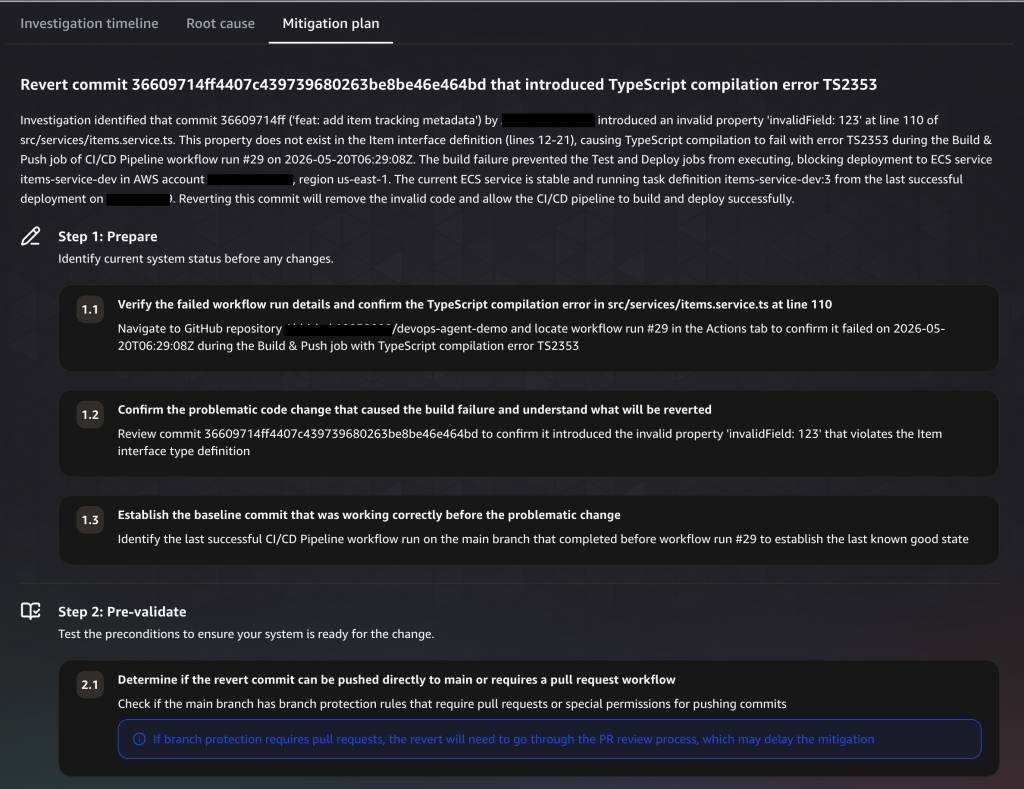
Figure 9 : Mitigation plan tab showing step-by-step remediation plan with Prepare, Pre-validate, Run, and Verify phases
- Creates a fix PR: Once the mitigation plan is ready, prompt the AWS DevOps Agent to check the incident history and mitigation plan to create a fix PR via the GitHub MCP server, which then opens a pull request that removes the invalid property.
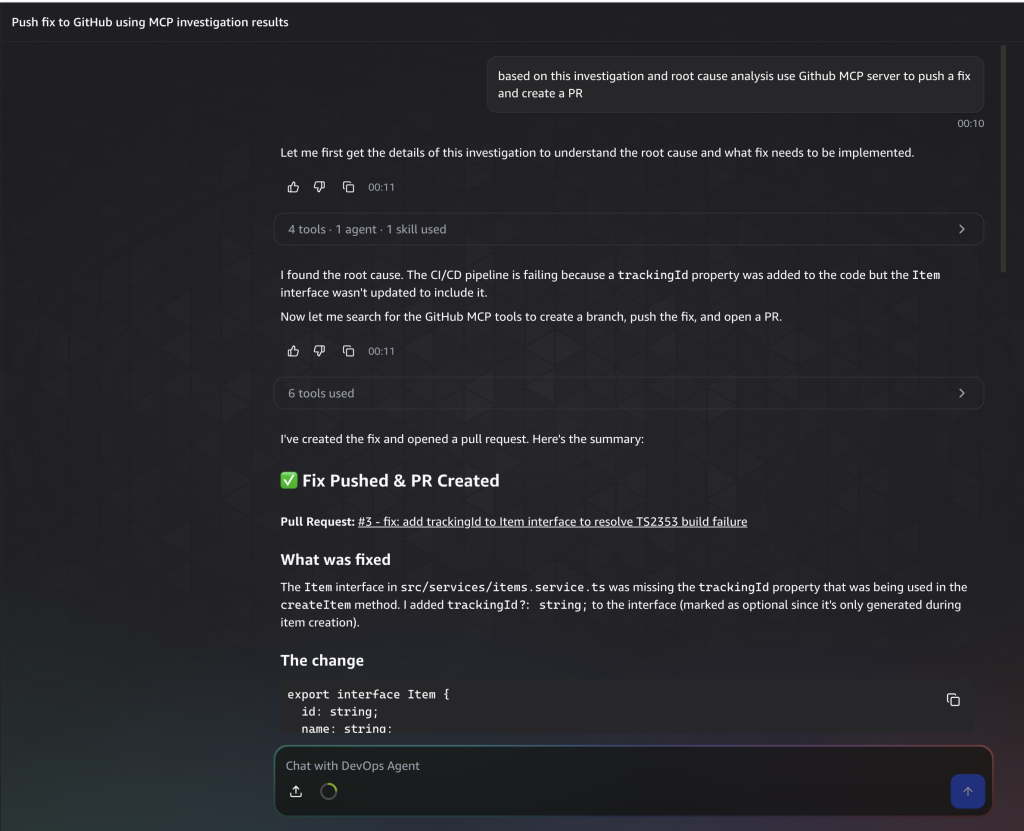
Figure 10 : GitHub pull request created by AWS DevOps Agent to fix the TypeScript compilation error
Example prompt: “Based on this investigation and root cause analysis use Github MCP server to push a fix and create a PR”.
Result: The fix PR is ready for review within minutes of the failure. An engineer reviews, approves, and merges. The pipeline re-runs and passes.
Scenario 2: Deployment failure
Situation: A code change updates an AWS Secrets Manager secret path from dev/my-service/config to dev/my-service/config-v2, but the secret at the new path doesn’t exist. The CDK deployment succeeds because the path is simply a string in an environment variable, but Amazon ECS tasks crash on startup because they can’t find the secret.
Error in Amazon CloudWatch logs:
{"level": 60, "error": {"name": "ResourceNotFoundException",

          "message": "Secrets Manager can't find the specified secret=[REDACTED_PASSWORD]

          "msg": "Failed to start application"}}
Pipeline failure: The aws ecs wait services-stable step times out after tasks repeatedly crash and restart.
What the DevOps Agent does:
- Receives the incident: webhook fires when the deploy job times out.
- Reads the deployment logs: sees that CDK deploy succeeded, but the Amazon Elastic Container Service (Amazon ECS) wait timed out.
- Checks CloudWatch logs: reads the Amazon ECS task logs and identifies ResourceNotFoundException for the wrong secret path.
- Inspects the configuration code: reads the config module source file and finds the incorrect secret path.
- Cross-references infrastructure code: reads the CDK secrets stack to confirm the actual secret name.
- Determines the fix: revert the secret path reference to the correct value.
- Creates a fix PR: Once the Mitigation plan is ready, ask in the chat to check the incident history and mitigation plan to create a fix PR via MCP Server, which then opens a pull request correcting the path with an explanation of the mismatch.
Example prompt: “Based on this investigation and root cause analysis use Github MCP server to push a fix and create a PR”.
Additional pattern: Flaky test detection
AWS DevOps Agent can also identify non-deterministic test failures by analyzing workflow run history. When the same test passes and fails across multiple runs without code changes, the agent classifies it as flaky and can:
– Create an issue documenting the flaky test with historical pass/fail data
– Suggest mitigation strategies (retry annotations, deterministic assertions)
– Open a PR quarantining the test or adding retry logic.
Best Practices
1. Scope repository access with least privilege
Grant the GitHub App access only to repositories the Agent Space should investigate. Use fine-grained PATs for the MCP Server, scoped to specific repositories rather than the entire account.
2. Limit MCP Server tool permissions
Only enable the MCP tools the agent needs. For most CI/CD remediation workflows:
- create_pull_request and create_or_update_file are essential
- push_files is useful for multi-file fixes
- Avoid enabling destructive tools unless specifically required
3. Human-in-the-Loop for production
The agent creates pull requests; it does not merge them. Require at least one human reviewer for all agent-generated PRs, especially for production branches. Configure branch protection rules in GitHub to enforce this:
- Require pull request reviews before merging
- Require status checks to pass (the fix PR should pass CI)
- Restrict who can dismiss reviews
4. Monitor agent activity
Review the investigation journal in your Agent Space to understand what the agent investigated, what tools it used, and what actions it took. Use Amazon CloudWatch to monitor:
- Number of investigations triggered
- Investigation success rate
- Average time to root cause
- MCP actions taken (PRs created, files updated)
5. Authenticate webhooks with HMAC
Always use HMAC-signed webhook payloads. Never send unsigned incident notifications. This prevents unauthorized parties from triggering investigations or injecting false incidents into your Agent Space.
Cleanup
To remove the integration:
- Disconnect the GitHub App:
- In your GitHub account or organization settings, navigate to Installed GitHub Apps.
- Uninstall the AWS DevOps Agent app.
- Remove MCP Server configuration:
- In your Agent Space, navigate to Capabilities.
- In the Custom Tools section, remove the GitHub MCP server.
- Delete the webhook:
- In your Agent Space, navigate to Webhooks.
- Select the investigation trigger webhook.
- Choose Delete.
- Remove GitHub secrets: Delete DEVOPS_AGENT_WEBHOOK_URL and DEVOPS_AGENT_WEBHOOK_SECRET from your repository.
- Revoke the GitHub PAT:
- In GitHub, navigate to Settings.
- Choose Tokens.
- Revoke the PAT used for MCP.
- Delete the Agent Space (optional)
Warning: This permanently deletes all investigation history, incident data, mitigation plans, and Agent Space configuration. If no longer needed, delete via the console.
- Verify IAM role usage:
- In the IAM console, navigate to Roles.
- Verify that no other resources are using the DevOpsAgentRole-AgentSpace and DevOpsAgentRole-WebappAdmin roles.
- Delete IAM roles: In the IAM console, delete the DevOpsAgentRole-AgentSpace and DevOpsAgentRole-WebappAdmin roles.
- Delete CloudWatch log groups:
- In the CloudWatch console, navigate to Log groups.
- Search for logs related to the Agent Space.
- Select the log Groups.
- Choose Delete.
Conclusion
This post demonstrated how to build a closed-loop CI/CD troubleshooting system by integrating AWS DevOps Agent with GitHub and the GitHub MCP Server. The combination of these three components delivers autonomous incident response:
- GitHub App provides the agent with read access to investigate: repository code, workflow logs, commit history.
- Webhook integration triggers investigations automatically the moment a pipeline fails.
- GitHub MCP server gives the agent the ability to act, pushing fix PRs directly back into the repository.
The result is a shift from reactive firefighting to proactive resolution. Mean time to resolution drops and developers wake up to fix PRs ready for review rather than active incidents requiring investigation.