AWS Cloud Operations Blog
Improve monitoring of AWS Systems Manager Agent
The ability to present a single pane of glass simplifies the process of tracking and controlling IT systems. Enterprises that run workloads on AWS use AWS Systems Manager because of its security, ease of management, and centralized reporting.
When an agent loses connection to the management platform, you can lose visibility into system behavior and the ability to secure and control your systems. When you add detective controls using AWS Config with Systems Manager, you can also add automation. This automation would increase your ability to meet compliance objectives, reduce mean remediation time, and achieve real-time visibility.
GE Appliances needed tools that would provide real-time visibility into the company’s hybrid IT infrastructure. They also looked to automate management tasks at scale, and detect security events before they became incidents. By using Systems Manager and other AWS Management Tools, they were able to:
- Increase visibility into cloud and on-premises environments to 100%.
- Eliminate many labor-intensive, manual IT-management tasks.
- Improve average security-event response times from more than a day to less than two hours.
- Tighten integration of development, business, and security teams.
Solution overview
In this post, I’ll show you how to detect that your AWS Systems Manager Agent (SSM Agent) has a healthy connection to Systems Manager. Systems Manager provides a managed rule to check whether Systems Manager manages the Amazon Elastic Compute Cloud (Amazon EC2) instances in your account. However, this does not allow you to ensure that your EC2 instance is managed by, and also has a healthy active connection to, Systems Manager. In this post, we’ll add the capability by providing insights into changes of the PingStatus of your instances.
In this post, you will:
- Create a custom AWS Config rule to monitor the reachability of your running EC2 instances from Systems Manager.
- Use a Systems Manager runbook to perform automation steps when your SSM Agent is unreachable.
- Use AWS CloudFormation to deploy the monitoring/alerting solution in a repeatable manner.
The high-level architecture you’ll create uses Systems Manager, AWS Config, Amazon EventBridge, Amazon Simple Notification Service (Amazon SNS), and AWS Lambda. To upload the sample code to AWS Lambda, you will use Amazon Simple Storage Service (Amazon S3).
The workflow of the architecture you’ll create is as follows:
- AWS Config runs a Lambda function every hour that checks running EC2 instances against the fleet of instances in Systems Manager. You can adjust the frequency of the AWS Config rule between 1 and 24 hours, which will also adjust frequency the Lambda function is invoked.
- If a running instance does not appear in Systems Manager or has a ping status other than online, the instance is reported as noncompliant to AWS Config.
- Any noncompliant instance triggers an event in EventBridge that invokes a Systems Manager runbook that sends an email notification. You’ll use EventBridge to format the email notification.
The Systems Manager runbook you’ll create is extensible. As you become more familiar, you can add further automation steps to remediate or test connectivity to your offline SSM Agent.
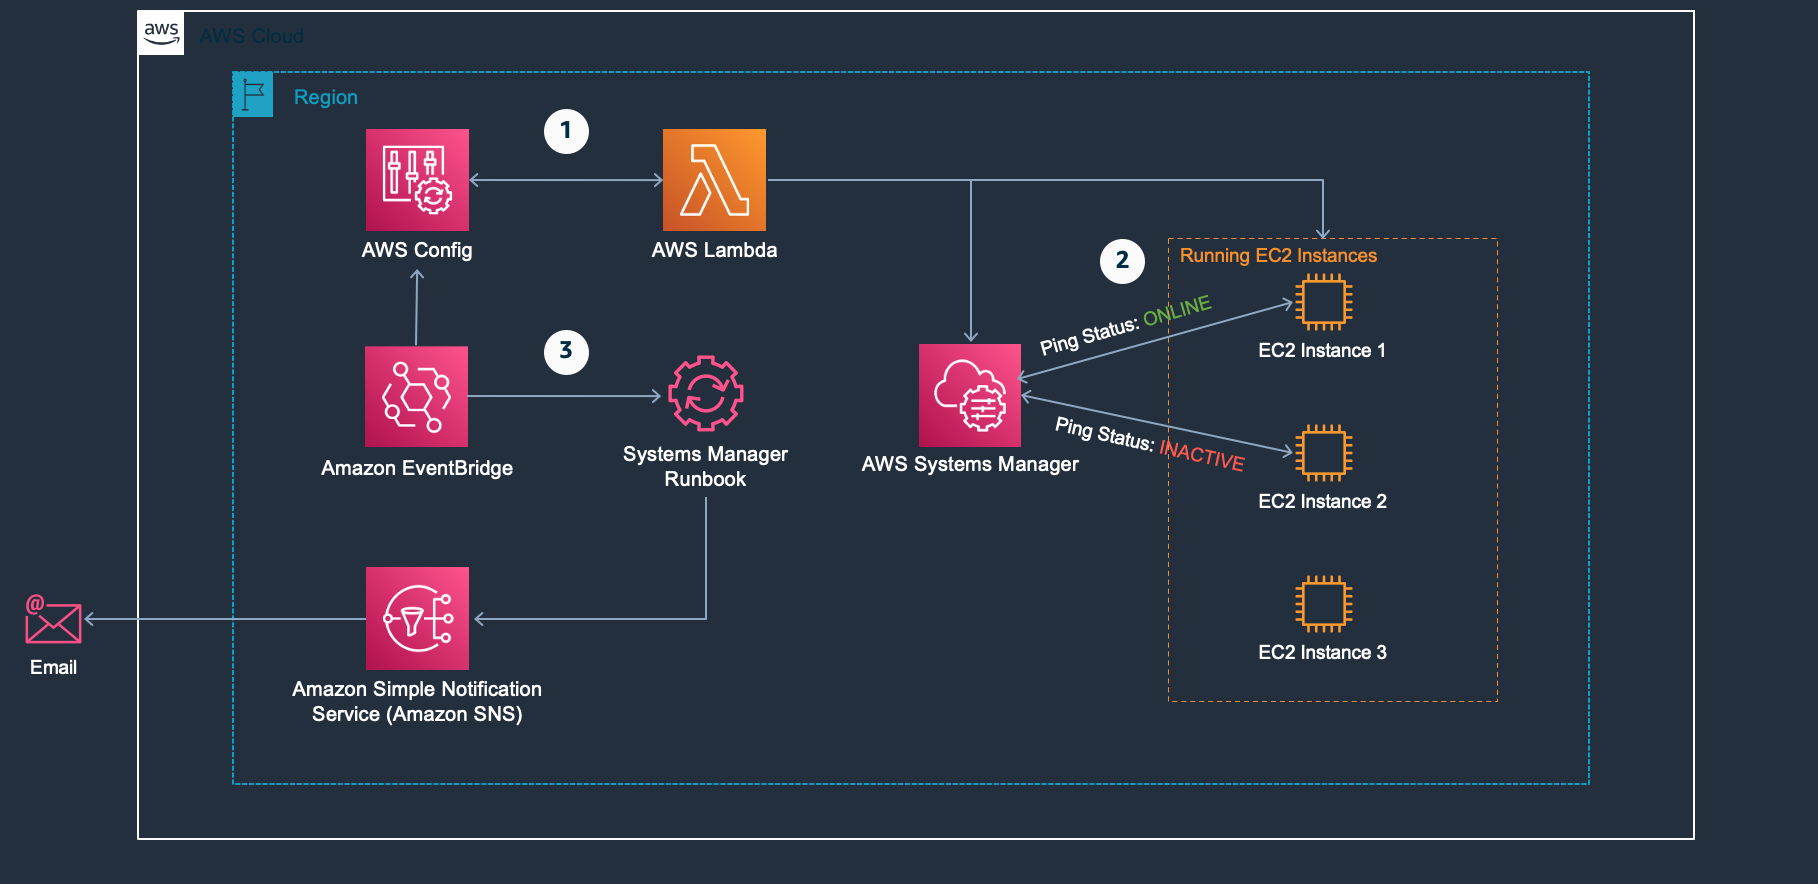
Figure 1: Solution architecture
Prerequisites
To complete the steps in this walkthrough, you’ll need the following:
IAM Setup
- An AWS account with permissions to edit AWS Config rules, Lambda functions, and other resources. For the minimum permissions required, see this example IAM policy on GitHub.
- Appropriate IAM permissions attached to the EC2 instances. I recommend that you attach the AmazonSSMManagedInstanceCore policy to a role attached to your EC2 instances. For more information, see the “Applying managed instance policy best practices” blog post.
Systems Manager
- Systems Manager enabled in your account. For instructions, see “Quick Setup for Systems Manager” in the Systems Manager user guide.
- SSM Agent installed on all EC2 instances. For instructions, see “Working with SSM Agent” in the Systems Manager user guide.
Note: On many AMIs, the SSM Agent is already installed.
AWS CLI and RDK
- The latest version of the AWS CLI installed. For instructions, see “Installing, updating, and uninstalling the AWS CLI” in the AWS CLI user guide.
- RDK installed. Follow the “Getting Started” instructions in the AWS Config RDK GitHub repository.
- The RDK uses the Boto3 libraries for API access. Make sure you configure your system to pass permissions to Boto3. For more information, see “Configuration” in the AWS SDK for Python (Boto3) documentation.
You can also pass your credentials as CLI parameters:
-
-profile-region-access-key-id-secret-access-key
Walkthrough
You’ll use the Rule Development Kit (RDK) to create a custom AWS Config rule. You will also edit the RDK template with custom logic to generate a CloudFormation template that will deploy the solution. RDK supports development in multiple languages. In this post, we’ll use Python.
Create your custom AWS Config rule
Follow these steps to create the custom AWS Config rule that will monitor SSM Agent connectivity using the RDK.
- In the CLI, navigate to a directory that you will use as your working directory. This directory will hold the rule definition and the template you will use to build your custom AWS Config rule.
- Use the following command to set up your account with the required development resources:
zsh output:
- Use the following command to copy the RDK rule files to your local machine. This command will create a directory that contains these files.
zsh output:
- In the newly created directory (in this example,
MonitorSSMAgents), you should findMonitorSSMAgents.py. This sample file was copied from an existing repository. It contains boilerplate code and helper functions that you can use as a starting template for your custom rule. - Open the
MonitorSSMAgents.pyfile and in theparameterssection, change the default resource type to the following:
DEFAULT_RESOURCE_TYPE = 'AWS::EC2::Instance'- In the same file, replace the existing
evaluate_compliance()function with the following, and then save the file.
Note: The code has dependencies on the code in MonitorSSMAgents.py, so do not modify the rest of the code in the MonitorSSMAgents.py file.
def evaluate_compliance(event, configuration_item, valid_rule_parameters):
    """Form the evaluation(s) to be return to Config Rules

    Return either:
    None -- when no result needs to be displayed
    a string -- either COMPLIANT, NON_COMPLIANT or NOT_APPLICABLE
    a dictionary -- the evaluation dictionary, usually built by build_evaluation_from_config_item()
    a list of dictionary -- a list of evaluation dictionary , usually built by build_evaluation()

    Keyword arguments:
    event -- the event variable given in the lambda handler
    configuration_item -- the configurationItem dictionary in the invokingEvent
    valid_rule_parameters -- the output of the evaluate_parameters() representing validated parameters of the Config Rule

    Advanced Notes:
    1 -- if a resource is deleted and generate a configuration change with ResourceDeleted status, the Boilerplate code will put a NOT_APPLICABLE on this resource automatically.
    2 -- if a None or a list of dictionary is returned, the old evaluation(s) which are not returned in the new evaluation list are returned as NOT_APPLICABLE by the Boilerplate code
    3 -- if None or an empty string, list or dict is returned, the Boilerplate code will put a "shadow" evaluation to feedback that the evaluation took place properly
    """

    ###############################
    # Add your custom logic here. #
    ###############################

    # get the ec2 resource and the ssm client
    ec2_resource = boto3.resource('ec2')
    ssm_client = get_client('ssm', event)

    # get the SSM agent ping status of all instances that are registered in Systems Manager
    ssm_instances = ssm_client.describe_instance_information()['InstanceInformationList']
    ssm_status_instances = {instance['InstanceId'] : instance['PingStatus'] for instance in ssm_instances}

    # get the list of currently running instances under the account
    ec2_instances = ec2_resource.instances.all()
    ec2_running_instances = [instance.id for instance in ec2_instances if instance.state['Name'] == 'running']

    # 1 -- if a running instance is found to have an SSM agent status other than 'Online', or the instance is not reporting
    # to Systems Manager (in which case we classify the agent_status as 'Missing'), the running instance is marked as
    # NON-COMPLIANT
    # 2 -- otherwise the running instance is reporting to Systems Manager and the agent is 'Online', and the instance is
    # marks as COMPLIANT
    # 3 -- if no instances are running we return None

    if ec2_running_instances:
        evaluations = []
        for inst in ec2_running_instances:
            agent_status = ssm_status_instances.get(inst, 'Missing')
            if agent_status != 'Online':
                evaluations.append(
                    build_evaluation(
                        inst,
                        'NON_COMPLIANT',
                        event,
                        annotation='SSM agent not installed or unreachable'.format(inst)
                    )
                )
            else:
                evaluations.append(
                    build_evaluation(
                        inst,
                        'COMPLIANT',
                        event
                    )
                )
        return evaluations

    return None
- Important: If you want to customize your CloudFormation template to set up Amazon SNS, EventBridge, and Systems Manager runbook resources, skip this step and go to step 1 in the next section.
To deploy the solution without automated notifications and a Systems Manager runbook, complete this step. Make sure you are one directory above the directory you created in step 3, and then run the following command:
zsh output:
This will zip your code, upload it to S3, and then deploy your custom AWS Config rule into your AWS account.
To view the CloudFormation template that is deployed by the rdk deploy command, see the RDK GitHub repository. Review your IAM policies, and follow the principle of least privilege when you provision new resources.
Create and modify your CloudFormation template
- Download the CloudFormation template by navigating to
https://raw.githubusercontent.com/awslabs/aws-config-rdk/master/rdk/template/configRule.jsonin a web browser or by running a command such as:
zsh output:
- Define an EventBridge rule by adding the following resources to your CloudFormation template:
- Under the
resourcessection, add the following to define the SNS topic and SNS topic policy:
- Under the
resourcessection, add the following to define the automation document for publishing Amazon SNS notifications. (You can customize this document to include moremainStepsfor testing and remediation.)
- Under the
resourcessection, add the following IAM role definitions. TheAutomationAssumeRolewill be used by Systems Manager to perform automation tasks. TheAmazonEventBridgeInvokeAutomationrole will be used by EventBridge to trigger automation and pass theAutomationAssumeRoleto Systems Manager.
- Under the
parameterssection, add the following to the CloudFormation template:
- To deploy the template, make sure that your source code folder is zipped and uploaded to S3. The bucket name and location are specified as a parameter in the CloudFormation template. If you have been using the naming conventions in this walkthrough, you can use the following zsh script.
Important: The script is written with the assumption you are one directory level above your AWS Config rule source code folder. It will zip your code, upload it to S3, and deploy a CloudFormation stack based on the template you customized. Make sure you change the EmailForNotifications parameter value to your desired email address. The bucket specified for the code upload was created in your account when you ran rdk init earlier in the walkthrough. If you prefer to use the CloudFormation console, you can zip your code and upload it to the S3 location. In this case, you do not need to specify all the parameters. Use the parameter values provided in the script and leave the other parameters blank.
zsh:
- After you deploy the CloudFormation stack, an email will be sent to the value you specified in the
EmailForNotifications. Be sure to confirm your subscription.
You should now have deployed the architecture described at the beginning of this blog post in your account. The Systems Manager runbook will trigger an email notification when a running EC2 instance cannot connect to Systems Manager, or does not have the SSM Agent installed. You can resolve the email notification by ensuring you:
- Have the appropriate permissions in your instance profile
- Verifying that the SSM Agent is installed
- Checking that your EC2 instance has a path to the public internet or an appropriate VPC endpoint
As you become familiar with this automation, I also encourage you to customize the runbook to perform other tasks.
You can use the script to deploy this solution across other accounts or AWS Regions. It is important to monitor your costs because you incur AWS Config charges per rule evaluation, per AWS Region. If you have a central compliance account, you can use the RDK advanced features to modify this solution for cross-account deployments.
Cleanup
To remove the resources from your account, open the CloudFormation console and delete the MonitorSSMAgent stack.
Conclusion
In this blog post, I showed you how to implement a solution for monitoring your running EC2 instances using the RDK. You customized the solution by modifying the CloudFormation stack produced by the RDK to set up automated email notifications.
Management of your systems is critical to operational excellence and security. I hope you continue to identify ways to automate your systems management and create your own custom AWS Config rules using the RDK.