AWS Cloud Operations Blog
Managing CloudWatch Synthetics canaries at scale
Amazon CloudWatch Synthetics offers an automated approach to monitoring the performance and availability of your application endpoints, REST APIs, and website content, allowing you to discover issues before your customers do. As your applications and suite of accompanying canaries grows over time, it becomes more challenging and time consuming to manage them at scale. This solution was designed to show how you can use a consistent and automated approach to maintaining your synthetic test coverage.
You can use CloudWatch Synthetics to create canaries, which are configurable scripts that provide programmatic access to a headless Google Chrome Browser through Puppeteer or Selenium Webdriver. You can create a canary using one of several available methods including canary blueprints and the Synthetics Recorder extension for Chrome. These approaches will allow you to get up and running with your first canary tests in just a few minutes.
As you set out to incorporate synthetic testing into your organization’s software development lifecycle, it’s important consider how this can be done consistently even with hundreds or thousands of different canaries spanning multiple environments and applications. By storing canary tests in a source code repository and automatically building and deploying them through CI/CD pipelines, teams can scale more efficiently.
Overview
In this post we explore a solution that provides a repeatable process for developing, deploying, and maintaining CloudWatch Synthetics canaries at scale. We share how it works and how it can be used as the foundation for your own set of canary tests. Using this solution will help you to:
- Minimize the time and effort required to write and maintain CloudWatch Synthetics canaries.
- Simplify infrastructure management by using AWS CloudFormation to model and setup AWS resources.
- Build with consistency and reduce script duplication by leveraging reusable canary test and alarm templates.
- Streamline mass updates of settings across all canaries, such as the runtime version and artifact retention periods.
- Automate canary deployments using a CI/CD pipeline.
- Deploy canaries to a secondary AWS Region to better identify and isolate regional performance issues.
Solution
The solution uses AWS CodePipeline to orchestrate the steps required to deploy canaries into an AWS account. CodePipeline is a fully managed continuous delivery service that is used to automate release pipelines. The pipeline ties together several other managed services to create a comprehensive delivery solution:
- AWS CodeCommit – Managed private Git repository.
- AWS CodeBuild – Managed continuous integration service.
- AWS CodeDeploy – Managed deployment service.
An AWS CloudFormation template is used to create our CI/CD pipeline including the aforementioned services, along with other supporting resources like Amazon S3 Buckets, AWS Systems Manager Parameters, Amazon EventBridge Rules, and AWS Identity and Access Management (IAM) Roles. CloudFormation is also used to add, update, and delete canaries from our library of tests. When changes to CloudFormation templates or the underlying canary test code are checked in to the CodeCommit repository, the CodePipeline automated release process will be initiated to build and deploy changes. Canaries can optionally be deployed to a secondary AWS Region so that test scripts are run from multiple geographic locations.
In our walkthrough, AWS Cloud9 is used to edit CloudFormation templates and canary script code. It also provides us with direct terminal access to AWS which is used to interact with our CodeCommit repository.
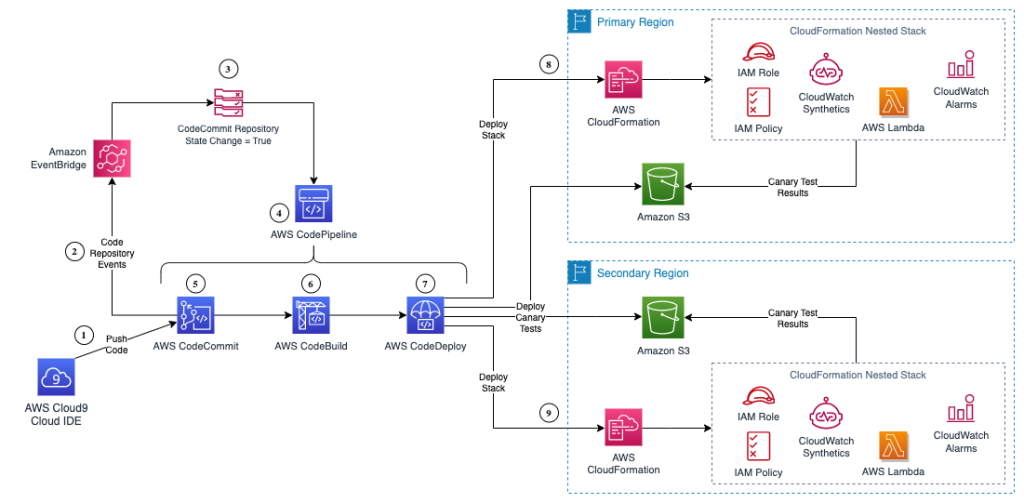
Figure 1: Architecture for automated canary deployment using AWS CodePipeline and AWS CloudFormation.
To implement this solution, we will:
- Setup the continuous delivery pipeline.
- Clone and explore the canary tests repository.
- Define the new canary test.
- Explore canary templates.
- Write the canary test script.
- Add the canary to a group.
- Build and deploy changes.
Prerequisites
- An AWS account with a default VPC
Walkthrough
To get started, log in to your AWS account. These resources will be automatically created using CloudFormation templates:
- S3 Buckets to store build artifacts, build results and canary test artifacts.
- CodeCommit repository including a default canary test code base.
- CodeBuild project with associated IAM Role.
- CodePipeline automated release process with associated IAM Role.
- EventBridge Rule with associated IAM Role used to initiate builds.
- CloudFormation Deployment Role.
- Systems Manager (SSM) Parameter Store entries.
- CloudWatch Synthetics IAM Role used to run canaries.
- Lambda function with associated IAM role used to create resources (S3 buckets and SSM Parameters) in the secondary AWS Region set in the stack parameters.
- AWS Cloud9 cloud-based integrated development environment (IDE) instance.
Download and save the following files locally that we’ll use in our next step.
- cfn-pipeline-stack-v2.yaml – CloudFormation templates that creates aforementioned AWS resources
- synth-at-scale-repo-v2.zip – default canary test project
Step 1: Setup the continuous delivery pipeline
Once logged in to the AWS Console, navigate to the S3 service. From the Buckets list, select Create Bucket to create a new S3 bucket with a unique name. Rename the synth-at-scale-repo-v2.zip file that you downloaded to synth-at-scale-repo.zip and upload it to the new S3 bucket. Remember the name of the bucket you create as we’ll refer back to it in our next step.
Next, navigate to the CloudFormation service in the AWS Console. From the Stacks list, select Create Stack > With new resources (standard) to begin the deployment wizard.
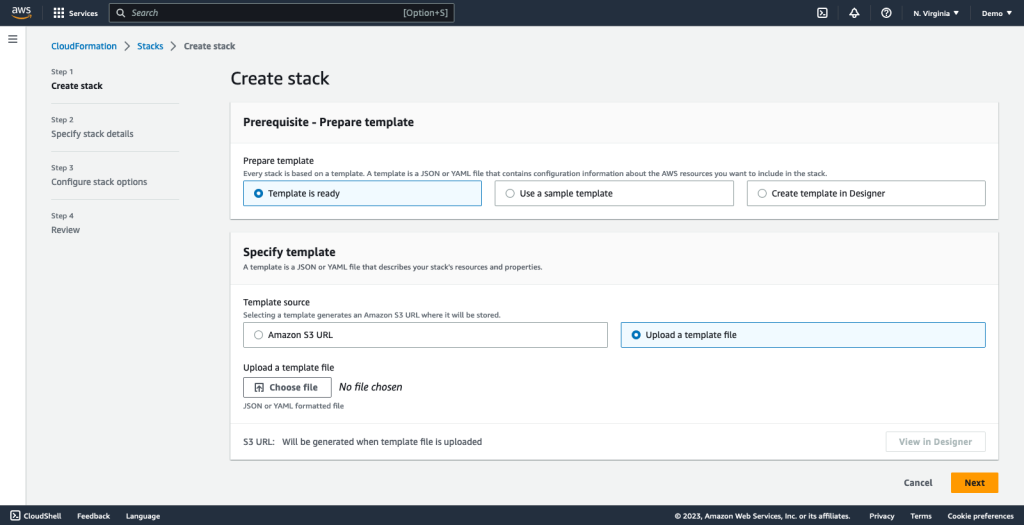
Figure 2: Create a new CloudFormation stack
To specify the CloudFormation template, select Upload a template file and then Choose file. Choose the cfn-pipeline-stack.yaml file that you previously downloaded and select Next.
In the second step of the stack deployment process, we’ll specify our stack details starting with a name. We’ve set our Stack Name to canary-pipeline, but you can change that as needed. There are five parameters in this CloudFormation template.
In the S3 Bucket Name field, enter the name of the S3 bucket you just created that contains the synth-at-scale-repo.zip. Default values for the CodeCommit Repository Name [canary-tests] and Branch Name [main] are provided as part of the CloudFormation template. Those values can be changed as needed. This CloudFormation template cannot be deployed to the same AWS Region multiple times, but it can be deployed in different AWS Regions by using a unique Stack Name and Repository Name.
The URL will be the application or endpoint that you want your canaries to test. This should be a URL that you own since we’ll be generating traffic on the site. We also set the Secondary Region [us-east-2] to install our canaries in, which must be different than the AWS Region we’re currently creating our stack in. Deploying canaries across multiple geographic regions will help us identify regional performance anomalies. Leave the parameter blank to run canaries only in the current AWS Region.

Figure 3: Set CloudFormation stack parameters
Once you’ve set the stack parameters, select Next to move to the next step.
In the third step we will leave all default stack options in place and select Next again.
Finally, review values for the parameters you’ve set and scroll to the bottom of the page. Check the box to acknowledge the creation of IAM resources and select Submit to begin creating the stack.
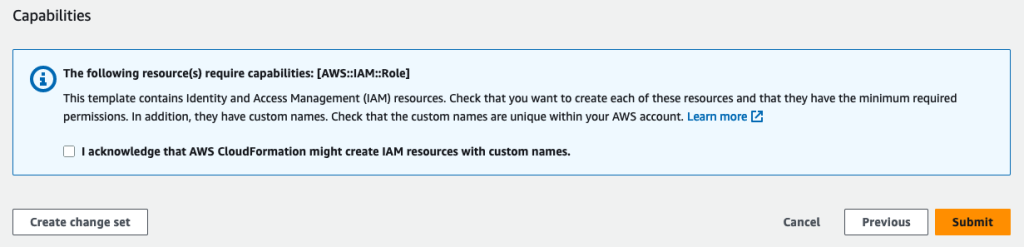
Figure 4: Final confirmation before creating CloudFormation stack
Check the status of your deployment on the CloudFormation console. Switch to the Events tab to track progress. Review the Resources tab to see the resources that have been created.
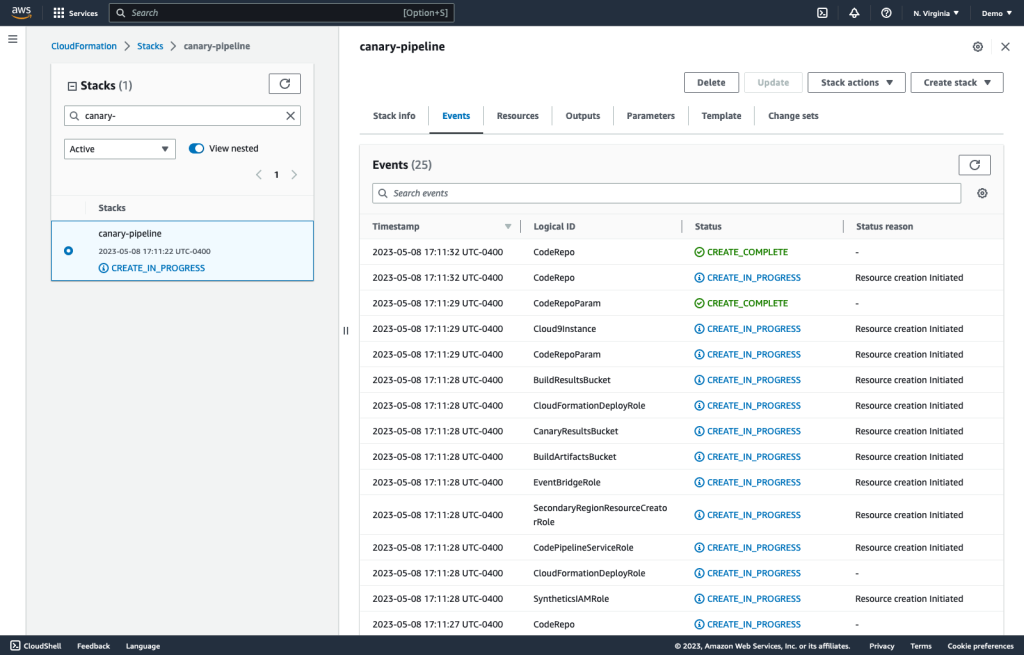
Figure 5: List of CloudFormation stack creation events
Once the AWS CodePipeline setup is completed, the pipeline will be started for an initial run. Completion of the build process will initiate the deployment of a second CloudFormation template, which serves as the root template for our library of canary scripts. Each canary script will be deployed as its own nested stack under the root template. The name of the root stack will match the name of your CodeCommit Repository.
After the initial CodePipeline execution has completed successfully, navigate to CloudFormation > Stacks in the AWS Console and you will see four newly deployed CloudFormation templates representing our pipeline infrastructure, Cloud9 IDE, canary test suite, and first canary test.
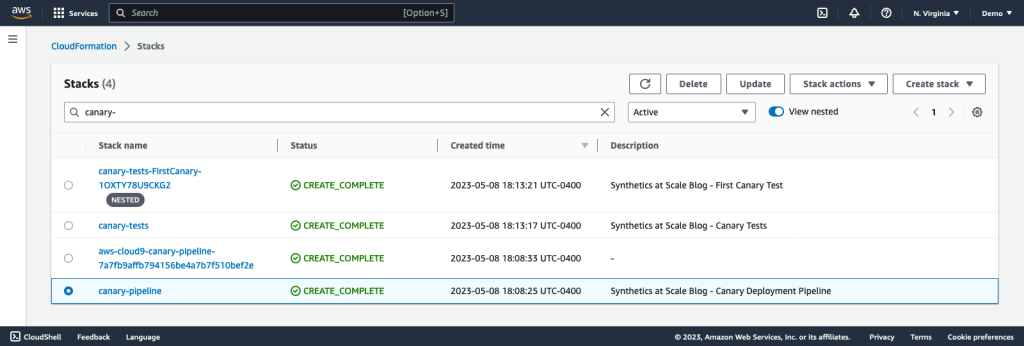
Figure 6: CloudFormation stack list including canary pipeline and canary tests stacks
Navigate to CloudWatch > Synthetics Canaries in the AWS Console to confirm that you have a single canary test deployed in both your primary and secondary regions. Each canary is displayed within the canary group that we created in our CloudFormation script.
Groups can be used to organize canaries into meaningful collections and you can view aggregated run results for all canaries in a group. This is especially helpful in identifying regional performance issues and outages. In Figure 7 you can see a breakdown of canary results by canary group.
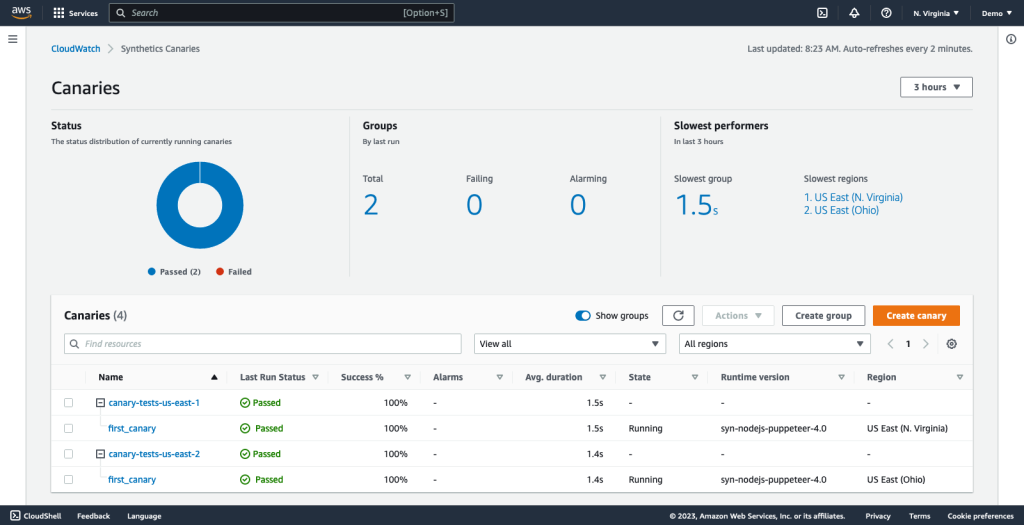
Figure 7: CloudWatch Synthetics Canaries Dashboard with first canary
Step 2: Clone and explore the canary tests repository
Now that our canary pipeline and initial canary test have been deployed, we’ll take a look at the source code behind the project and walk through the steps to deploy a second canary test.
Cloud9 is a cloud-based integrated development environment (IDE) that lets you write, run, and debug your code from a browser. We are using Cloud9 for this example so there’s no software for you to install, and you can leverage the pre-authenticated AWS Command Line Interface. While we are using Cloud9 throughout this example, you can also use the developer tools you’re most comfortable with.
Go to Cloud9> Environments in the AWS Console and select Open for the IDE environment that was just created. The IDE name will match the stack name you entered during deployment, in our case canary-pipeline.
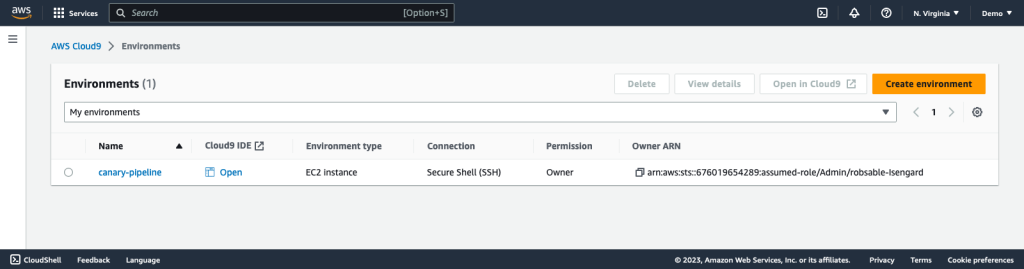
Figure 8: Cloud9 IDE environments list
Once the cloud IDE interface loads, you’ll see a Welcome message that you can close. You can re-open it at any time by going to the AWS Cloud9 menu and selecting Welcome Page.
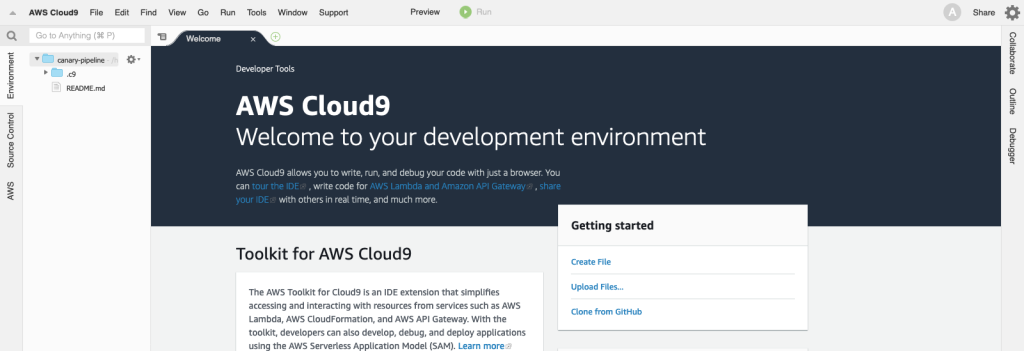
Figure 9: The Cloud9 integrated development environment
Git associates a user identity with each commit, so we’ll start by configuring a name and email address in our environment. Go to Window > New Terminal and run the following commands in the terminal window. These details will be associated to your future Git commits.
git config --global user.name <YOUR_NAME>
git config --global user.email <YOUR_EMAIL>
Next, we’ll clone our new CodeCommit repository. If you used a different AWS Region or Repository Name, you’ll need to adjust the URL accordingly. You can find the URL to your repository in the AWS Console by navigating to CodeCommit > Repositories. Select the HTTPS option to copy the URL to your clipboard.
In your terminal window, clone the repository into your Cloud9 workspace:
git clone <YOUR_REPOSITORY_URL>Once the process completes, you’ll see the project structure displayed on the left side of the IDE. The root directory for the project matches your Repository Name, in this case canary-tests.
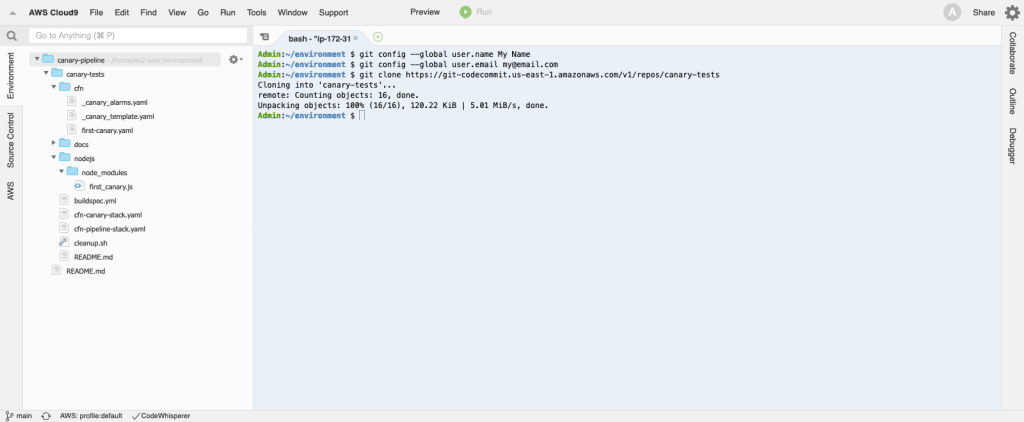
Figure 10: Cloning a Git repository from the Cloud9 terminal
The cfn-pipeline-stack.yaml file in the project’s root directory is the same CloudFormation template that was used to deploy the environment we’re working in. You won’t need to deploy this stack again, but can review the contents of the template to gain a deeper understanding of the resources created.
The cfn-canary-stack.yaml CloudFormation template is used to deploy our CloudWatch Synthetics canaries as part of our automated build and release process. To demonstrate how easy it is to write and deploy canary tests, we’ll walk through the process of creating a second canary test.
Step 3: Define the new canary test
Double-click on the cfn-canary-stack.yaml file to open it and find the resource named FirstCanary. Right below this section, we’ll add the definition for our second canary. The new section should be indented one level and align with the first canary as highlighted in this example. In this section we are declaring a new nested CloudFormation stack. Each time a nested stack is added, a unique resource name should be used to avoid conflicts. Save the file once you’re done making changes.
FirstCanary:
  Type: AWS::CloudFormation::Stack
  Properties:
  Parameters:
    CanaryName: "first_canary"
    CanarySchedule: "rate(60 minutes)"
  TemplateURL: !Sub 'https://${RepositoryName}-scripts-${AWS::AccountId}-${AWS::Region}.s3.amazonaws.com/cfn/first-canary.yaml'

SecondCanary: Type: AWS::CloudFormation::Stack Properties: Parameters: CanaryName: "second_canary" CanarySchedule: "rate(60 minutes)" TemplateURL: !Sub 'https://${RepositoryName}-scripts-${AWS::AccountId}-${AWS::Region}.s3.amazonaws.com/cfn/second-canary.yaml'
In this case we’ve named our new stack SecondCanary and we reference a CloudFormation template through the TemplateURL. We will create this CloudFormation template in a moment. There are two parameters that have been exposed for each canary:
CanaryName
The canary name that is used to identify each unique test case.
CanarySchedule
The canary schedule that specifies how often the test should run.
Next, we’ll create the CloudFormation template that defines the nested stack we just declared. Rather than writing the template from scratch we’ll duplicate the existing canary test in our project’s cfn directory. To do this, right-click on the first-canary.yaml file and select Duplicate from the popup menu. Right-click on the new file that was created, select Rename from the popup menu, and name the file second-canary.yaml.
Double-click on the file name to open it for editing. Start by updating the Description section of the template to indicate this is our second test. In the next section you will see four parameters being declared. The CanaryName and CanarySchedule parameters do not have values because they are being passed in from our parent stack (cfn-canary-stack.yaml). The CodeRepoName and ExecRole parameters use dynamic references to retrieve their values from SSM Parameter Store. The benefit of externalizing these parameters is that changes can be centrally managed and are automatically reflected across all CloudFormation templates that use each parameter.
In the Resources section of our template we are leveraging the AWS::Include transform, a macro hosted by AWS CloudFormation. CloudFormation template macros allow you to perform custom processing on templates. In this case, we are leveraging the capability to design reusable snippets that can be included in multiple CloudFormation templates. This will reduce the amount of scripting required for each canary test, and improve the long-term maintainability of our templates.
The first resource in the template needs a unique name so we’ll start by changing that. To maintain consistency, we use the same name we used for our Nested Stack: SecondCanary.
SecondCanary:
  Fn::Transform:
    Name: AWS::Include
    Parameters:
      Location: !Sub 's3://${CodeRepoName}-scripts-${AWS::AccountId}-${AWS::Region}/cfn/_canary_template.yaml'
When creating or updating CloudFormation stacks that reference AWS::Include, CloudFormation inserts the contents of the specified file at the location of the transform in the template. In this case, the contents of the _canary_template.yaml snippet will be inserted within our SecondCanary resource. We make use of the AWS::Include transform a second time to include the _canary_alarms.yaml snippet.
Fn::Transform:
  Name: AWS::Include Parameters:
  Location: !Sub 's3://${CodeRepoName}-scripts-${AWS::AccountId}-${AWS::Region}/cfn/_canary_alarms.yaml'
Dynamically inserting the snippets into the template decreases our long-term maintenance burden by preventing us from repeating the same code across many canary tests. We’ll look at the contents of these snippets later in this post.
We have one final section of our template, Outputs, where we return the Amazon Resource Name (ARN) for our new CloudWatch Synthetics canary. We’ll reference this output information later in our parent stack.
Outputs:
  CanaryArn:
    Value: !Sub 'arn:${AWS::Partition}:synthetics:${AWS::Region}:${AWS::AccountId}:canary:${SecondCanary}'
At this point you should have a completed second-canary.yaml CloudFormation template as shown in Figure 11.
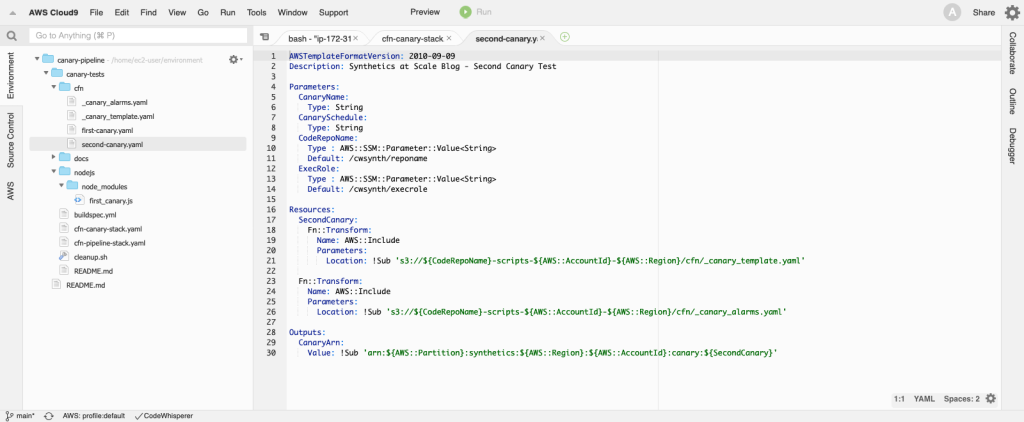
Figure 11: Completed second canary CloudFormation template
Step 4: Explore canary templates
CloudWatch Synthetics Canary
Before moving on, let’s review the _canary_template.yaml file in more detail. In this snippet we define an AWS::Synthetics::Canary CloudFormation resource. You will see the intrinsic function Ref used throughout the script which allows us to use other CloudFormation parameters and resources that have already been declared. It’s important to note that when using the AWS::Include transform, shorthand function notations are not supported. Any YAML snippet being included should use the full function name syntax when using intrinsic functions (e.g., Fn::Sub: rather than !Sub).
The Code entity is used to identify the script code that will be used for the canary. Script code can either be included in the CloudFormation template using the Script property, or it can be stored externally in an S3 bucket. In this case we are storing all of our script code in a .zip file on S3. When our script code is updated and deployed, the contents of that .zip file will be updated with the latest build. But because no changes are being made to a property of our canary resource, the new script code won’t be deployed. To solve for this, we’ve added automatic tagging of canary versions to our template. We create a Version tag that is automatically updated as part of the build process.
Tags:
  - Key: Version
    Value: '{{VERSION}}'
During our automated build, a unique version will be generated and inserted into the targeted files, replacing the {{VERSION}} string token with the current timestamp. When the new build is deployed, the change in value of the Version tag will be recognized by CloudFormation and the latest version of canary code will be installed. We’ll discuss how this replacement works later in this post.
CloudWatch Alarms
Open _canary_alarms.yaml in Cloud9 to explore. Here we declare two CloudWatch alarms that watch metrics published by our canaries and alert us of abnormal results.
CanarySuccessAlarm
An alarm based on a static threshold used to watch the SuccessPercent metric.
CanaryDurationAlarm
An alarm based on anomaly detection on the Duration metric.
Automating the creation of these alarms for each canary again helps to drive consistency and minimize duplication. By using anomaly detection, we avoid hard-coding performance thresholds and can reuse the same alarm definition for other canary tests.
As the number of test cases grow and requirement vary, you may need to develop multiple canary and alarm templates that can be pieced together as appropriate. For example, you may use different canary templates for REST API testing and web workflow testing. And a different set of alarms based on the metrics and thresholds being monitored.
Step 5: Write the canary test script
Now that we have the CloudFormation template which will deploy our canary, we need to write the canary script itself. Synthetics supports multiple runtime versions. In this example we’re using a Node.js runtime with the Puppeteer framework, but the same type of approach can be taken with Python runtimes and the Selenium Webdriver framework.
The Node.js script must be located under the nodejs/node_modules directory when packaging your canary files, so we’ve replicated that directory structure within our project. Your canary’s script entry point (handler function name) must match the file name of the script. We’ll create our new script by duplicating the first_canary.js file and renaming it second_canary.js. Then we’ll open it for editing in Cloud9. You will need to change the function name and handler reference to second_canary so that it matches the second_canary.js file name.
In order to simplify management of the URL we’re testing against, we’ve defined another string token in our canary scripts called {{HOST_URL}}. The URL parameter we previously set in our canary-pipeline CloudFormation stack will automatically be inserted into each canary script during our build process, preventing us from having to make changes in each individual test script.
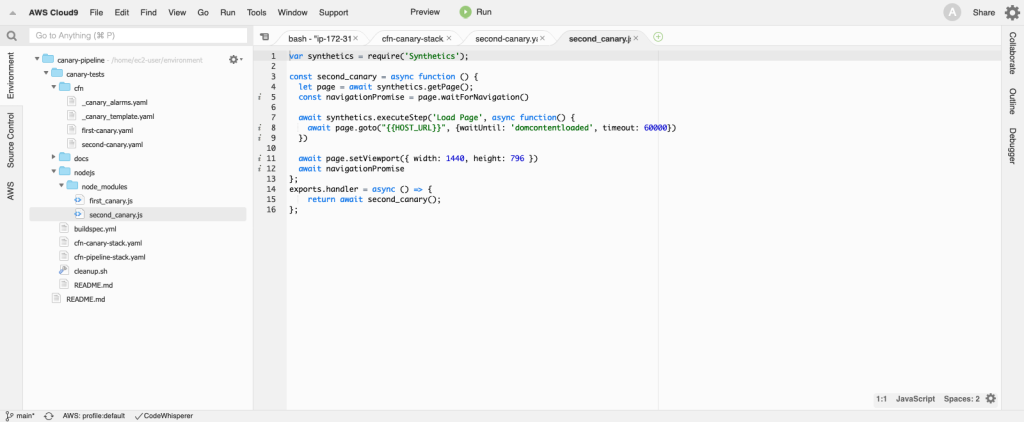
Figure 12: CloudWatch Synthetics canary test script written in Node.js for Puppeteer
Step 6: Add the canary to a group
Finally, back in the cfn-canary-stack.yaml template where we defined our canaries, we’ll add the new canary to our existing Canary Group by referencing the output value we defined in second-canary.yaml and then save the file.
CanaryGroup:
  Type: AWS::Synthetics::Group
  Properties:
    Name: !Sub ${RepositoryName}-${AWS::Region}
    ResourceArns:
      - !GetAtt FirstCanary.Outputs.CanaryArn
      - !GetAtt SecondCanary.Outputs.CanaryArn
Step 7: Build and deploy changes
We’re now ready to push the following changes we’ve made to our CodeCommit repository:
- Added second-canary.yaml CloudFormation template.
- Added second_canary.js test script.
- Added SecondCanary nested stack.
- Added SecondCanary to the Canary group.
To push the changes, return to the Terminal window within Cloud9 and run the following commands:
cd canary-tests
git add .
git commit -m "add second canary"
git push origin main
As soon the local changes have been pushed to our remote repository, EventBridge receives an event detailing what occurred. This event will be recognized by our EventBridge rule and used to invoke CodePipeline. The latest source code will be retrieved from CodeCommit and then our build process will begin.
The commands run as part of our build process are dictated by our Buildspec file. This snippet from the buildspec.yml file shows how we use sed to replace the {{VERSION}} token in our CloudFormation templates, and the {{HOST_URL}} in our canary scripts. Remember that we defined these string tokens previously so they can be replaced by dynamic values that are determined at build time. You can explore the full buildspec.yml file in the Cloud9 environment.
Check the progress of the build in the AWS Console by navigating to Developer Tools > CodePipeline > History where you’ll see the pipeline execution in progress. Select an Execution ID to drill in for more details on the pipeline stages and status.

Figure 13: CodePipeline pipeline execution actions
Once the pipeline execution has completed, navigate back to CloudFormation > Stacks to see the new nested stack (canary-tests-SecondCanary) that has been deployed.
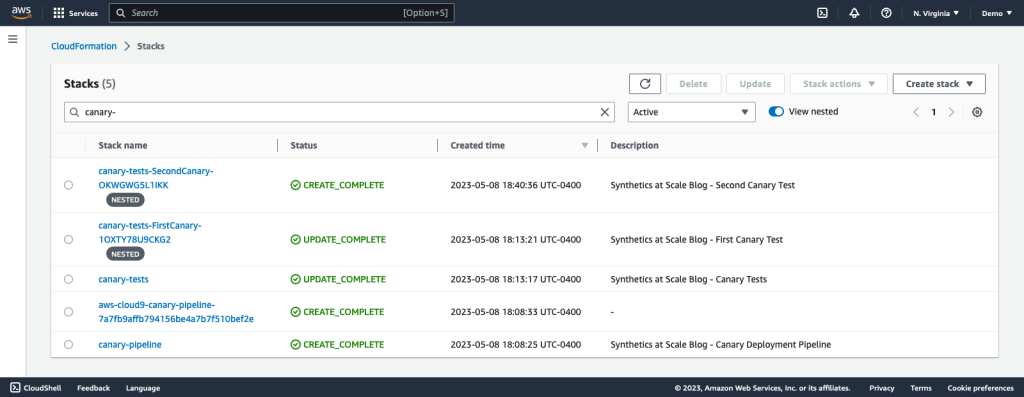
Figure 14: CloudFormation stack list including new canary test
And if you return to CloudWatch > Synthetics Canaries, you’ll see our second canary script, second_canary, listed in each region.
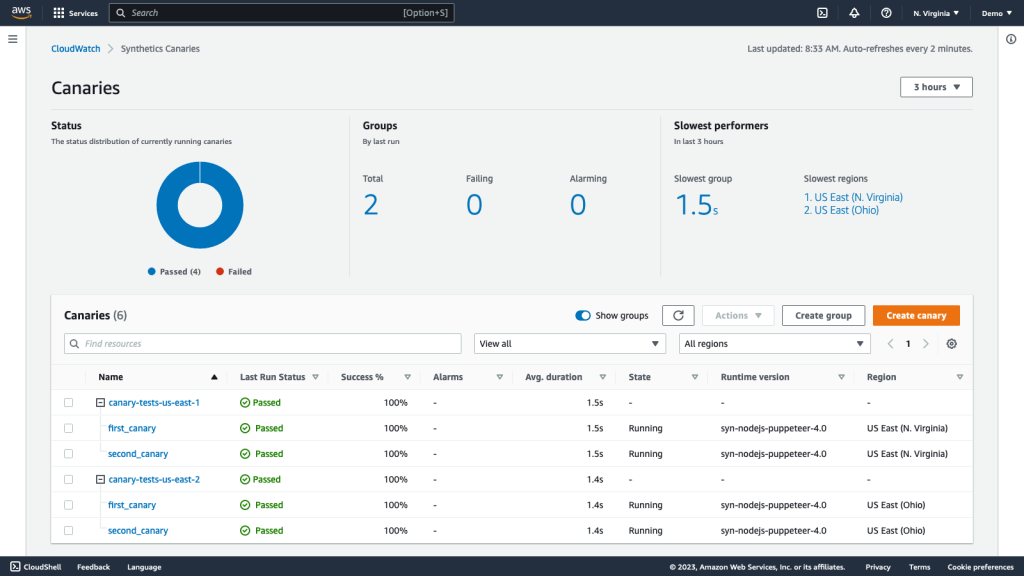
Figure 15: CloudWatch Synthetics Canaries Dashboard with first and second canaries
With this foundation in place, you’ll have the ability to add new canaries to your library of tests, knowing that they will be automatically built and deployed by your continuous delivery pipeline.
Costs
The services used in this solution have no required minimum commitments and no long-term contracts; you simply pay for what you use. The total cost of running the solution is based on the number of Synthetics canary runs along with other services. Each canary run also launches a Lambda function and writes logs and results to CloudWatch Logs and S3.
If you are working in a new AWS account, you can operate within the AWS Free Usage Tier limits for a limited time. You can learn more about the AWS Free Usage Tier here. The End user monitoring with Synthetics example on the CloudWatch pricing detail page contains a detailed cost breakdown for more extended use. The estimated cost to continue running the canaries we’ve setup as configured is $2-3 monthly, but cost will vary based on the number and complexity of tests you deploy.
Each canary run also runs an AWS Lambda function and writes logs and results to CloudWatch Logs and the designated Amazon S3 bucket. Your automated delivery pipeline and Cloud9 IDE will be leveraged as you update and deploy your canaries. For details on related AWS service pricing including AWS Lambda, Amazon S3, and CloudWatch Logs, AWS CodeCommit, AWS CodeBuild, AWS CodePipeline, AWS Cloud9, and AWS Systems Manager Parameter Store, see the pricing section of the relevant AWS service detail pages.
Complete the following clean up steps to avoid incurring ongoing costs associated with this solution.
Cleaning Up
When you’re done exploring the automated deployment pipeline and canary test results, follow these steps to remove this project from both the primary and secondary deployment regions. Starting in your Cloud9 workspace, open cleanup.sh and edit these values to match the values for your CloudFormation Stack, CodeCommit Repository, and AWS account number.
Then run the following script in your Cloud9 terminal window to remove the canary tests, alarms, S3 buckets and artifacts, and the canary pipeline.
sh cleanup.shAt some point soon after the script begins running, your Cloud9 instance will terminate and you will see an error message saying “Unable to access your environment”. This is expected. Select Return to dashboard to continue.
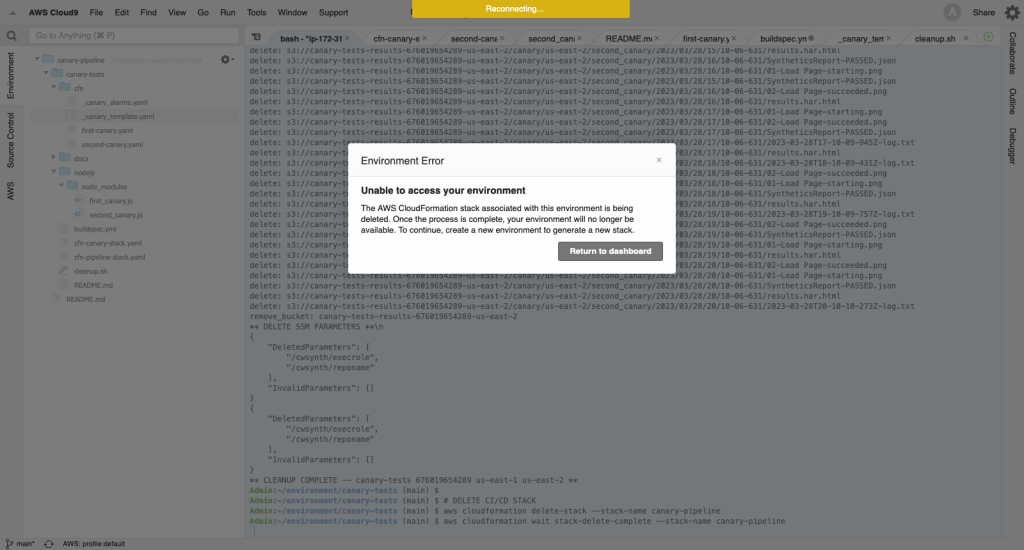
Figure 16: Running cleanup.sh from the Cloud9 terminal
Back in the AWS Console, navigate to CloudFormation > Stacks to confirm that the CloudFormation stacks we previously deployed have been deleted.
After the cleanup.sh script has finished running, CloudWatch Logs data generated by the solution will still be available. To remove log data, navigate to CloudWatch > Logs > Log Groups and filter log groups beginning with cwsyn- from the list. Choose log groups and select Actions > Delete log group(s). Take these steps in both AWS Regions you used.
Lastly, we’ll remove the IAM Role that was used by CloudFormation. Navigate to IAM > Roles and search for a role named <STACK_NAME>-CloudFormationDeployRole-<STACK_ID>. Check the role and select Delete.
Conclusion
By storing canary scripts in a source code repository and deploying them through automated CI/CD pipelines, software developers and application teams can reduce the amount of time spent writing and maintaining test scripts. The solution we explored provides a repeatable process for developing, deploying, and maintaining CloudWatch Synthetics canaries at scale. We encourage you to use it as the foundation for your own suite canary tests in order to:
- Minimize time spent authoring and maintaining canary scripts.
- Maintain consistency as new canaries are written.
- Simplify AWS infrastructure management.
- Efficiently perform mass updates of settings across all canaries.
- Automate canary deployments using a CI/CD pipeline.
Automated testing of your APIs and web workflows will allow you to move fast while proactively ensuring a positive user experience – at scale.
To learn more about synthetic monitoring with CloudWatch, see the CloudWatch Synthetics user guide.
To learn more about setting up an automated continuous delivery pipeline, see Getting Started with AWS CodePipeline.
To learn more about AWS observability functionalities and gain hands-on experience, see the AWS One Observability Workshop.
About the authors: