Networking & Content Delivery
Building Resilient Multi-cluster Applications with Amazon EKS, Part 1: Implementing Cross-cluster Load Balancing with NLB
This three-part series explores design patterns and strategies to enhance application resiliency through multi-cluster deployment on Amazon Elastic Kubernetes Service (EKS). In this first part, we address a common challenge when using a Network Load Balancer (NLB) in multi-cluster environments.
Organizations increasingly rely on Kubernetes—whether through Amazon Elastic Kubernetes Service (EKS) or self-managed clusters on Amazon Web Services (AWS)—to power and scale their mission-critical applications. While operating workloads on a single EKS cluster offers convenience, it presents challenges in maintaining high availability during critical operations. Activities such as cluster upgrades, add-on updates, and workflow changes can potentially compromise workload resilience and application availability, making it essential to address these concerns proactively.
To mitigate these challenges, users often deploy applications across multiple EKS clusters. This multi-cluster approach offers several key benefits:
- Blue-green upgrades: Zero-downtime upgrades through blue-green deployments, allowing gradual traffic migration between clusters.
- Cluster upgrades and add-on updates: Staggered cluster and add-on updates across clusters, minimizing system-wide disruptions.
- Workload resilience: Enhanced workload resilience against accidental cluster deletions.
- Failover and disaster recovery: Improved disaster recovery with cross-cluster failover capabilities.
While these benefits are compelling, implementing effective load balancing across multiple clusters has historically been challenging. However, AWS Load Balancer Controller (LBC) v2.10+ now addresses this gap by introducing support for cross-cluster traffic distribution through multi-cluster TargetGroupBinding, a powerful feature that we’ll explore in detail throughout this post. This solution is particularly valuable for client-server communication patterns and scenarios where organizations manage their own Layer 7 proxy configurations, as Network Load Balancers (NLBs) provide the necessary flexibility and performance for these use cases.
Enhanced NLB Target Group Binding: Supporting Multi-cluster EKS Deployments
This new feature enables an NLB to register targets (TargetGroupBinding) from different EKS clusters into the same target group of the NLB, making sure that traffic is distributed seamlessly.
How this feature works
With LBC version 2.10+, the new feature enables efficient target management across multiple EKS clusters. Using a ConfigMap for each TargetGroupBinding allows the controller to seamlessly support multi-cluster deployments.
A new parameter, multiClusterTargetGroup, allows the NLB to handle targets across multiple clusters. When enabled, this flag makes sure that each cluster manages its targets independently, enhancing reliability and streamlining load balancing across clusters.
The following figure shows the reference architecture:
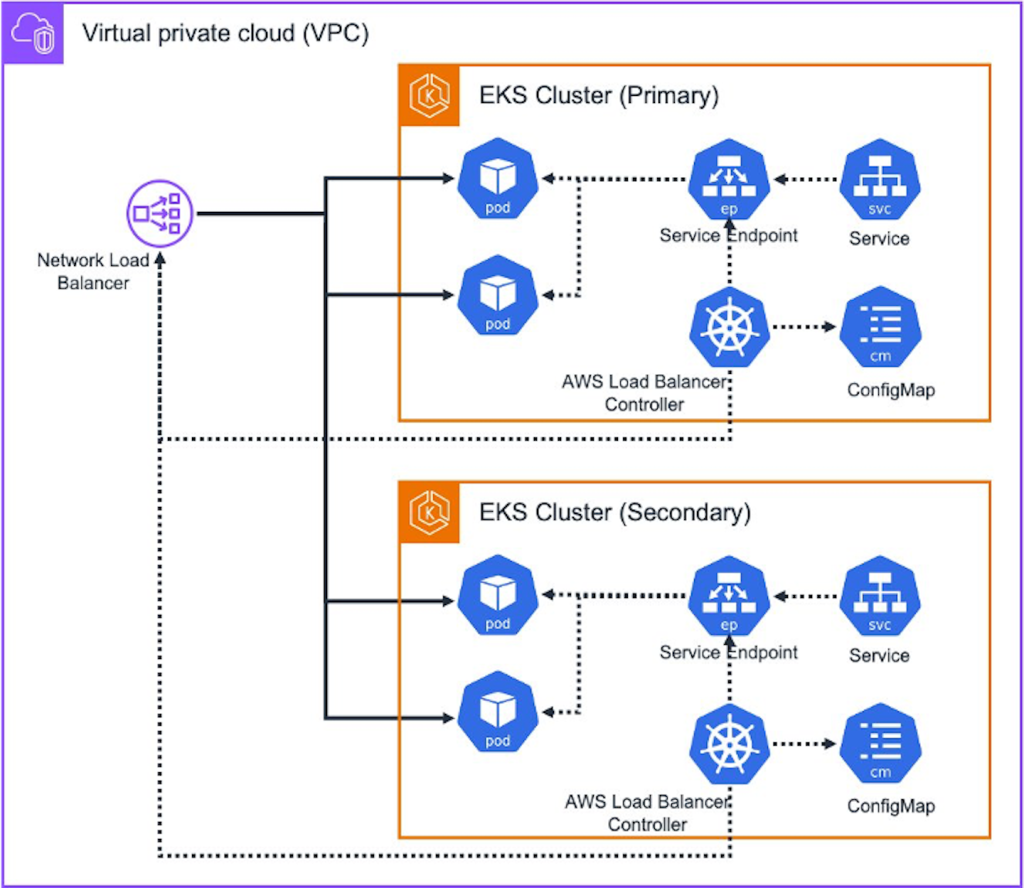
Figure 1 – Architecture
Here’s how the process works:
- Managing targets: For each EKS cluster, the LBC maintains a separate ConfigMap that tracks the targets for that cluster’s service endpoints. This makes sure that only the targets specific to a particular cluster are registered or deregistered from the NLB, avoiding any accidental changes to other clusters.
- Pod registrations: When a new pod is initiated, the LBC updates the ConfigMap during its reconciliation loop. The new target is registered in the NLB, making sure that traffic can route correctly to the new pod.
- Pod deletions: Similarly, when a pod is deleted, the LBC updates the ConfigMap to reflect the change and deregisters the deleted target from the NLB, keeping the system consistent and avoiding errors.
- Reconciliation process: LBC regularly reconciles service endpoints with NLB targets, adding new endpoints and removing outdated ones while using ConfigMap to maintain cluster separation. When changes occur, the LBC updates the entire ConfigMap object as a single operation. The controller does not support partial updates or patching functionality.
Now, let’s implement this multi-cluster configuration.
Prerequisites
For this walkthrough, you should have an AWS account with the appropriate AWS Identity and Access Management (IAM) permissions to create EKS clusters and IAM roles, and be able to launch the provided AWS CloudFormation template. For detailed pricing information, refer to the official AWS Pricing page.
Deploy the solution with CloudFormation
We use a CloudFormation stack to deploy this solution. The stack creates all necessary resources, such as the following:
- Networking components such as Amazon Virtual Private Cloud (Amazon VPC), subnets, and NAT Gateway.
- Two EKS clusters: Each EKS cluster with two worker nodes (Amazon EC2) deployed within the same VPC.
To get started, complete the following steps:
- Sign in to the AWS Management Console.
- Choose Launch Stack in any AWS Region and open it in a new tab:

- On the Create stack page, proceed with all the default values.
- Choose the check box to acknowledge the creation of IAM resources.
- Choose Create stack.
- Wait for the stack creation to complete. This step may take up to 15 minutes to complete.
At this point, you have Primary and Secondary EKS clusters ready. Configure the LBC add-on on both clusters and deploy a sample application to demonstrate multi-cluster load balancing.
From the Console, launch AWS CloudShell:

Figure 2 – Launching CloudShell from the AWS Console
Using CloudShell, run the following command:
The script successfully deploys three nginx pods with a NLB LoadBalancer service on the Primary EKS cluster (pri-eks-clu1), while the Secondary EKS cluster (sec-eks-clu1) is initialized and ready for further configuration.
We cover two scenarios in the following sections:
- Scenario 1 (existing workload): Using an existing NLB to route traffic to an
nginxservice running across both the primary and secondary EKS clusters. - Scenario 2 (new workload): Creating a new NLB to route traffic to an
nginxservice running on both primary and secondary EKS clusters.
Each scenario demonstrates how to distribute traffic seamlessly across multiple clusters using a single NLB setup.
We begin with Scenario 1 for existing workloads.
Scenario 1: Extending existing NLB configuration for multi-cluster support
In this scenario, you work with an existing NLB and its associated Target Group and TargetGroupBinding configured on the Primary EKS cluster. You update the TargetGroupBinding on the Primary EKS cluster to enable multi-cluster support. Then, you create a new TargetGroupBinding on the Secondary EKS cluster for the nginx service. This configuration allows the existing NLB to distribute traffic between nginx services running on both Primary and Secondary EKS clusters using the same Target Group. This approach makes sure of seamless traffic distribution across both clusters while maintaining the existing load balancer infrastructure.
Step 1: Verify multi-cluster support in LBC
Using CloudShell, verify that both Primary and Secondary EKS clusters have the aws-load-balancer-controller installed with multi-cluster feature enabled by running these commands:
kubectl --context pri-eks-clu1 explain targetGroupBinding.spec.multiClusterTargetGroup
kubectl --context sec-eks-clu1 explain targetGroupBinding.spec.multiClusterTargetGroup
The successful output should display the multiClusterTargetGroup field definition in the TargetGroupBinding spec for both clusters, confirming LBC’s multi-cluster capability is properly enabled. If this field is missing, ensure you have the latest LBC version installed.
Step 2: Enable multi-cluster support and delete protection on NLB
Using CloudShell, run the following command to add delete protection and enable multi-cluster target group using annotation on the Primary EKS cluster:
The successful output shows service/nginx patched.
Step 3: Verify multi-cluster configuration in TargetGroupBinding
Using CloudShell, run the following command to verify that the targetGroupBinding was updated with the multiClusterTargetGroup flag:
The successful output shows true.
Step 4: Verify target registration in ConfigMap
When the TargetGroupBinding’s multiClusterTargetGroup flag is updated, the LBC creates a ConfigMap object containing the list of targets and reconciles the target Pods with the NLB Target.
Using CloudShell, run these commands to verify the ConfigMap creation and target registration:
The successful output shows a ConfigMap containing registered targets, confirming LBC’s target reconciliation between the nginx pods and NLB.
Step 5: Deploy nginx application on Secondary EKS cluster
Using CloudShell, run the following commands to create a deployment and a service object of type ClusterIP on the Secondary EKS cluster:
The successful output shows a nginx deployment with 2 running pods and a ClusterIP service created on the Secondary cluster.
Step 6: Create multi-cluster TargetGroupBinding on Secondary EKS cluster
Using CloudShell, run the following to create TargetGroupBinding with the multiClusterTargetGroup flag on the Secondary EKS cluster:
Step 7: Verify ConfigMap creation on the Secondary EKS cluster
Using CloudShell, run the following commands to verify the ConfigMap object and its contents created by the controller alongside the targetGroupBinding:
The successful output shows a ConfigMap aws-lbc-targets-nginx containing the IP addresses and ports of the nginx targets.
Step 8: Verify target registration across both EKS clusters
Using CloudShell, run the following command to verify that the NLB has registered targets from both the Primary and Secondary EKS clusters:
The successful output shows healthy targets distributed across Primary and Secondary EKS clusters, confirming successful multi-cluster configuration.
Step 9: Verify traffic distribution across EKS clusters
Using CloudShell, run the following commands to perform a synthetic workload test and verify traffic distribution to Pods on both the Primary and Secondary EKS clusters:
The successful output shows HTTP requests logged in both clusters, confirming that the NLB is properly distributing traffic across all nginx pods on Primary and Secondary EKS clusters.
Cleaning up: Using CloudShell, run the following commands:
You have successfully tested the migration of existing workloads in Scenario 1. In Scenario 2, you can explore how to implement multi-cluster load balancing for new deployments.
Scenario 2: Implementing multi-cluster load balancing for new deployments
In this scenario, you create a new NLB designed to support multi-cluster traffic distribution from the beginning. This implementation needs LBC 2.10 or higher installed on both EKS clusters.
Step 1: Deploy nginx with LoadBalancer Service on the Primary EKS cluster
Using CloudShell, run the following commands:
Step 2: Verify ConfigMap creation by LBC
Using CloudShell, run the following commands to verify the ConfigMap object and its contents created alongside the targetGroupBinding:
The successful output shows a ConfigMap containing IP addresses and ports of nginx targets, confirming LBC’s proper configuration.
Step 3: Deploy nginx service on the Secondary EKS cluster
Using CloudShell, run the following commands to create an nginx deployment and a ClusterIP service on the Secondary EKS cluster:
Step 4: Configure TargetGroupBinding on the Secondary EKS cluster
Using CloudShell, run the following commands to create a TargetGroupBinding with multi-cluster support:
Step 5: Verify ConfigMap on the Secondary EKS cluster
Using CloudShell, run the following commands to verify the ConfigMap object and its contents created by the controller:
The successful output shows a ConfigMap containing the Secondary EKS cluster’s nginx target IPs and ports.
Step 6: Verify target registration across both EKS clusters
Using CloudShell, run the following command to verify that the NLB has successfully registered targets from both the Primary and Secondary EKS clusters:
Expected output:
The output shows healthy targets distributed across primary and secondary EKS Clusters, confirming successful multi-cluster configuration.
Cleaning up: Using AWS CloudShell, run the following commands to clean up all resources:
This demonstration showed how the NLB multi-cluster feature enhances service resilience by enabling traffic distribution across multiple EKS clusters for both existing and new load balancer deployments.
Considerations
- This feature currently supports only active-active, equal distribution across targets in both EKS clusters. Weighted target load balancing is not yet supported.
- Existing VPC account limits, API limits, and NLB limits remain in effect with this feature.
- As a best practice, enable delete protection on the NLB to prevent accidental deletions.
- Each service has a one-to-one mapping with a ConfigMap object, making sure of precise management of TargetGroupBindings per service.
- LBC writes all targets to the ConfigMap (1MB limit) in a single update rather than incrementally. Monitor EKS control plane health accordingly.
Conclusion
In this first part of our series, we’ve demonstrated how to achieve resiliency across multiple Amazon EKS clusters using the new NLB feature with a declarative approach. As organizations increasingly migrate and modernize their applications to Kubernetes environments, implementing robust and scalable solutions becomes critical for maintaining high availability. Distributing workloads across clusters not only enhances fault tolerance but also streamlines upgrades and strengthens disaster recovery capabilities. Visit our EKS Best Practices Hub for architecture patterns, security guidelines, and cost optimization strategies for production workloads
Stay tuned for the next posts in this series, where we explore more design patterns to further improve the resiliency of workloads operating on Amazon EKS.
About the authors
 |
Krishna Sarabu is a Senior Database Engineer with AWS. He focuses on containers, application modernization, infrastructure, and open-source database engines Amazon RDS for PostgreSQL and Amazon Aurora PostgreSQL. He enjoys working with users to help design, deploy, and optimize relational database workloads on AWS. |
 |
Anuj Butail is a principal solutions architect at AWS. He is based out of San Francisco and helps users in San Francisco and Silicon Valley design to build large scale applications on AWS. He has expertise in the area of AWS, edge services, and containers. He enjoys playing tennis, reading, and spending time with his family. |
 |
Pushkar Patil is a Product Owner in the AWS networking team based out of California. He has over a decade of experience driving product innovation and strategic planning in cloud computing and infrastructure. Pushkar has successfully launched many new products by understanding users’ needs and delivering innovative solutions. When not working, you can find this cricket enthusiast traveling with his family. |