Networking & Content Delivery
Protect your Amazon Route 53 DNS zones and records
Amazon Route 53 powers mission-critical DNS services for millions of applications worldwide, and protecting your DNS infrastructure is an important step for securing your applications.. An unintended DNS configuration change or deletion can disrupt the availability of your applications and impact your business operations causing lost revenue and more. To help safeguard your DNS from unintended modifications, you must put in controls to mitigate any unintended changes to your zones and records.
In this post, we show you how to safeguard your Route 53 DNS hosted zones and record sets while maintaining consistent DNS resolution for your applications. We will start with implementing a solution for automated backup of your Route 53 data, and then we examine more ways to protect your Route 53 data, such as controls and alerts you can put in place to protect your DNS zones and records.
Prerequisites
Before you begin, you should be familiar with the following services:
- An AWS account with administrative access to Amazon Route 53, AWS Identity and Access Management (IAM), AWS Lambda, Amazon EventBridge, and Amazon S3
- Existing Route 53 public or private hosted zone data to be backed up
- Basic familiarity with AWS services and Python scripting including Amazon EventBridge, AWS Lambda functions, AWS IAM roles and permissions
Route 53 automated backup
DNS backups serve as a historical record of your infrastructure. Not only can you restore your DNS configuration in the event of accidental deletion or data breach, you can also track changes over time, which is invaluable for auditing, compliance, and understanding your system’s evolution. This solution protects against data loss by automating backups of Route 53 on a defined schedule, making sure that you can restore your DNS configuration to a known good state. The example code we provide is configured to backup Route 53 hosted zones daily, but you can adjust the schedule as needed using Amazon EventBridge Scheduler to whatever frequency you need. Another option could be to run this solution whenever the Route 53 ChangeResourceRecordSet API is invoked.
The architecture is shown in the following diagram.
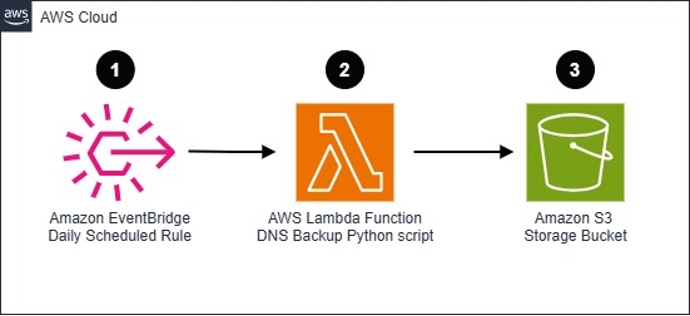
Figure 1: Overview of DNS backup solution
The detailed workflow of the automated Route 53 backup solution is as follows:
- EventBridge triggers the Amazon Web Services (AWS) Lambda function on a specified schedule.
- Lambda executes a Python script to read and record all Route 53 DNS record data.
- DNS data is stored in an Amazon S3 bucket in both JSON and CSV formats.
A detailed sample of this solution including all related code and an AWS CloudFormation script to build it can be found in this AWS Samples repository.
Implementation steps for DNS backups
In the following sections we walk through the steps to implement this backup solution at a high level.
Set up IAM permissions
First, you create the IAM policy and role to grant the Lambda function the necessary permissions. You want to make sure that the Lambda function has access to read the necessary Route 53 DNS data and that it also has write permissions to your S3 bucket and to Amazon CloudWatch for logging purposes.
When the IAM policy has been created, next you need to create an IAM role and attach the IAM policy to the newly created role. This role is used as the execution role for your Lambda function in the next step.
Deploy the Lambda function
Next you create the Lambda Function to backup the Route 53 data, which is executed using the IAM role that you just created. We recommend using the following settings to work with the provided sample code on AWS Samples.
- Runtime: Python 3.13
- Architecture: x86_64
- Under the Change default execution role menu choose Use an existing role and choose the IAM role you created.
- Under the Configuration tab in General configuration, set the timeout to at least one minute to allow for the function to run through all your Route 53 records. Larger zones of 50k records or more may need a larger timeout. For example, when we tested a zone with 50,002 records it took roughly two minutes to complete.
Schedule automated backups with EventBridge
When the Lambda function is deployed, the last step is to create the EventBridge rule that triggers your Lambda function on a defined schedule to run the backup script.
- Create an IAM role with permissions to execute the Route 53 backup Lambda function from the previous step.
- Using EventBridge, create a new recurring schedule with your Lambda function as the target and the newly created IAM role as the execution role.
Output
When it’s deployed, the solution creates a structured backup in your S3 bucket with the following format:
bucket-name/
└── YYYY-MM-DDThh:mm:ssZ/
    └── zone-name_zone-id/
        ├── zone_info_zone-name.json  # Zone configuration
        ├── zone-name.json            # DNS records in JSON
        └── zone-name.csv             # DNS records in CSV
Monitoring and maintenance
Here are a few more steps you can take to monitor and maintain your solution to verify it is working as expected:
- Monitor the Lambda function’s execution in CloudWatch Logs
- Review backup files in Amazon S3 regularly
- Consider implementing Amazon S3 lifecycle policies to manage backup retention
- Set up CloudWatch Alarms to notify you of any backup failures
- If you have a large amount of Route 53 zones and records, then changes made to DNS while the script is running may not be recorded due to the amount of time it can take to complete.
Another option would be to trigger the Route 53 backup Lambda on an event instead of a schedule. For example you could create an EventBridge rule to trigger the Lambda every time a change is made to Route 53 using the following configurations:
- Rule type: Rule with an event pattern
- Events
- Event source: AWS events or EventBridge partner events
- Event Pattern:
- Event Source: AWS services
- AWS Service: Route 53
- Event Type: AWS API Call through AWS CloudTrail
- Specific operation(s): Enter ChangeResourceRecordSets
Refer to this Route 53 GitHub for a code sample of this backup solution.
Proactive protection strategies for Route 53
Although backing up DNS data provides a safety net and the ability to restore records, preventing unauthorized deletions is crucial for maintaining your DNS infrastructure. In this section we explore some more protection layers you can implement to apply more safeguards for your Route 53 configurations:
- CloudTrail event monitoring with EventBridge alerts
- IAM policies with least-privilege access
- Organization-wide controls using Service Control Policies (SCPs)
The next three sections walk through implementing these solutions step by step.
Implementing real-time alerts
Monitoring your DNS records for accidental or malicious activity is another critical step in being able to protect your applications. Detecting and alerting when a record is deleted can allow for proactive remediation and reduced downtime before an issue impacts your applications. You can also use a similar architecture to alert on any DNS related event (new zones, new records, etc.) and not just deletions. In this example we use EventBridge and Amazon Simple Notification Service (Amazon SNS) to set up automated notifications for Route 53 hosted zone deletions by monitoring CloudTrail activity. The architecture is shown in the following diagram.
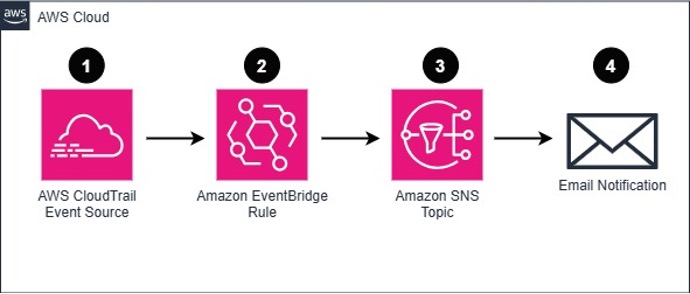
Figure 2: Real-time Route 53 Monitoring and Alerts
1. Navigate to the Amazon SNS console
- In the left pane choose Topics
- Choose Create topic
- Type: Standard
- Give the topic a name: Route53Deletion
- Choose Create topic
2. Enable the EventBridge service to trigger your SNS topic.
- In the Amazon SNS console find the topic you just created and copy the Amazon Resource Name (ARN).
- Choose Edit to edit your topic.
- In the Access policy section use the JSON editor to replace the policy with the following sample policy, which allows EventBridge to trigger this topic. Replace <SNS_TOPIC_ARN> with the ARN of your SNS topic:
{
  "Version": "2012-10-17",
  "Statement": [
    {
      "Effect": "Allow",
      "Principal": {
        "Service": "events.amazonaws.com"
      },
      "Action": "sns:Publish",
      "Resource": "<SNS_TOPIC_ARN>"
    }
  ]
}- Choose Save changes
3. Subscribe an email address to the topic where you would like to receive the alerts.
- Choose your SNS topic and choose Create subscription
- In the drop down under Protocol: choose Email
- Under Endpoint: Enter in your email address
- Choose Create subscription
- You must confirm your email before you can receive alerts
4. You must create and configure the EventBridge rule to detect the CloudTrail event when a Hosted Zone is deleted. Navigate to the EventBridge console and choose Create rule.
- Name the rule: Route53ZoneDeletion
- Rule type: Rule with an event pattern, choose Next
- Event source: AWS Events or EventBridge partner events
- For Creation method choose Custom pattern and paste in the following code:
{
  "source": [
    "aws.route53"
  ],
  "detail-type": [
    "AWS API Call via CloudTrail"
  ],
  "detail": {
    "eventSource": [
      "route53.amazonaws.com"
    ],
    "eventName": [
      "DeleteHostedZone"
    ]
  }
}- Choose Next
5. Add the SNS Target to the EventBridge rule.
- Target type: AWS service
- Select a target in the drop down and choose target type: SNS topic
- Choose Target in this account and in the drop down choose the SNS topic that you created in Step 1
- Choose Next, Next again, then Create rule
This configuration sends an email alert for a DeleteHostedZone event, but you can also customize this to alert for other Route 53 events. For a full list of events you can reference the Route 53 API documentation and adjust your EventBridge rule pattern accordingly.
Implementing IAM-based protection using least privilege access
Implementing the principle of least privilege access is an important step for strengthening Route 53 security. This fundamental concept involves providing users with only the minimum permissions necessary to perform their specific tasks in Route 53. When users have restricted access rights, the potential damage from security breaches or internal threats is limited. Let’s examine how applying least privilege access can minimize your exposure to risk and strengthen your DNS infrastructure’s security.
In this example we demonstrate how to use IAM policies to enforce least privilege access controls for Route 53 to protect your DNS infrastructure from accidental or unauthorized deletions. Following these steps allows you to create and apply IAM policies that restrict hosted zone deletions while maintaining necessary operational access.
1. Start by creating the base IAM Policy used to restrict Hosted Zone deletions
- Open the AWS Management Console and navigate to IAM.
- Choose Policies from the left navigation pane
- Choose Create policy
- Choose the JSON tab and paste this sample base policy:
{
  "Version": "2012-10-17",
  "Statement": [
    {
      "Effect": "Allow",
      "Action": [
        "route53:*"
      ],
      "Resource": "*"
    },
    {
      "Effect": "Deny",
      "Action": [
        "route53:DeleteHostedZone"
      ],
      "Resource": "*"
    }
  ]
}- Choose “Next”
- Name the policy ‘Route53ProtectZoneDeletion’ and choose “Create policy”.
This policy works by first allowing all Route 53 actions route53:*, then explicitly denying the action to delete hosted zones route53:DeleteHostedZone. The explicit DENY overrides any ALLOW permissions, making sure that users can’t delete Hosted Zones even if they have other policies granting them full Route 53 access.
2. You can further customize the IAM policy by implementing stricter controls by replacing route53:* under the previous Allow section with specific actions. Here are a few examples of allowed actions:
"Action": [
"route53:ListHostedZones",
"route53:GetHostedZone",
"route53:ChangeResourceRecordSets",
"route53:ListResourceRecordSets"
]
3. You can also allow or restrict access to specific Route 53 resources by specifying the ARN instead of using a wildcard:
"Resource": [
"arn:aws:route53:::hostedzone/ZONE1ID",
"arn:aws:route53:::hostedzone/ZONE2ID"
]
When you have completed your policy don’t forget to apply, test, and validate that the policy is working as expected in a non-production environment first. For a full list of Route 53 Actions you can refer to the Route 53 API Reference Documentation.
Implementing organization-wide DNS protection with SCPs
SCPs provide a powerful way to protect your Route 53 configurations across your entire AWS Organization. SCPs use policies, similar to what was created in the previous section, but are applied at the Organization root, Organizational Unit (OU), or specific account level instead of to users or roles. For example, when you apply an SCP at the OU level, all member accounts and OUs inherit that policy.
We recommend thoroughly testing SCPs in a non-production environment before applying to your production accounts or OUs. This guide walks you through implementing DNS deletion protection using SCPs.
1. Create the SCP:
- Sign in to the Organizations console
- In the left pane choose Policies
- Choose Service control policies
- Choose Create policy
- Enter a policy name: Route53DeletionProtection
- Paste this sample policy in the JSON editor:
{
  "Version": "2012-10-17",
  "Statement": [
    {
      "Sid": "DenyRoute53HostedZoneDeletion",
      "Effect": "Deny",
      "Action": [
        "route53:DeleteHostedZone"
      ],
      "Resource": "*"
    }
  ]
}- Choose Create policy to create and save the SCP
2. Now test the SCP by applying it to a non-production AWS Account
- Navigate to the Service control policies menu under Organizations
- Choose the Route53DeletionProtection you created by choosing the checkbox next to it
- Under the Actions menu, choose the arrow to drop down the menu and choose Attach Policy
- Choose a non-production account and choose Attach Policy at the bottom
When you validate the SCP is working as expected, you can customize it further like we did in the previous IAM policy example. Just like IAM policies, a deny statement in an SCP overrides any explicit Allow statements. If you want to allow certain trusted users to still be able to delete hosted zones, then you would need to create a more complex SCP that includes conditions, or manage this at the IAM level within individual accounts as mentioned earlier in the post, because SCPs take precedence over IAM policies. For documentation of an SCP with IAM conditions, you can refer to this Organization User Guide.
You can remove the policy by navigating to AWS Accounts in the Organizations console and choosing the account with the policy. When in the Account menu, choose the Policies tab, choose the policy you want to remove and choose Detach.
Clean Up
Don’t forget to clean up any test resources you created as they might incur charges if left running in your AWS accounts.
Conclusion
Protecting your DNS infrastructure is crucial for maintaining the availability and reliability of your applications. In this post we reviewed multiple strategies for protecting your Amazon Route 53 DNS infrastructure such as backing up your Route 53 zone, configuring alerts, using IAM policies, and using SCPs. Implementing these protection strategies allows you to create multiple layers of defense against unintended DNS changes. Furthermore, make sure to test these controls thoroughly in a non-production environment before applying them to your production accounts.
Remember that DNS protection is a shared responsibility:
- AWS manages the underlying infrastructure and provides tools such as SCPs and IAM Policies
- You’re responsible for implementing more safeguards, such as the backup solution and access restrictions that we’ve outlined.
Further reading
- CloudTrail logs could contain information you can use to manually recreate Route 53 records if backups aren’t in place. You can refer to this guide about Recovering deleted Route 53 records for more details. https://repost.aws/knowledge-center/route-53-recover-dns-record
- More information on AWS Organizations SCPs.
- More information on Route 53 API Reference.
About the authors

Tracy Honeycutt
Tracy Honeycutt, a Solutions Architecture Manager based in Atlanta, serves as a trusted guide for Financial Services Industry (FSI) customers on their cloud transformation journeys. With deep expertise in networking and DNS, he specializes in accelerating cloud migrations, modernizing legacy workloads, and helping organizations embrace innovative operational practices. Tracy is particularly passionate about supporting customers in the early stages of their cloud adoption, providing the foundation they need for successful digital transformation.

Jason Polce
Jason is a Senior Solutions Architect supporting Enterprise Financial Services customers, where he helps clients solve complex challenges using modern, cloud-based solutions. As a member of the AWS Networking community, he works closely with customers to tackle unique networking problems using his experience designing cloud-native, on-premises, and hybrid environments across various industries. When he’s not working, he enjoys traveling the world, always seeking out new experiences to try.