Networking & Content Delivery
Signed cookie-based authentication with Amazon CloudFront and AWS Lambda@Edge: Part 2 – Authorization
In this two-part blog series, you will learn how to use email addresses and domain names for user authentication. With this method, you restrict credentials-free user access to a static website.
In this second part of the blog series, you will learn how to implement the authorization mechanism. In the previous blog post, you learnt how to implement the authentication mechanism. If you read part one of the blog post, skip the introduction and continue reading at Prerequisites.
For this solution, you will store your content in Amazon Simple Storage Service (S3) and distribute your content via Amazon CloudFront. You process authentication to your end-user via AWS Lambda@Edge. For login-based authentication with AWS Lambda@Edge and Amazon Cognito, view this blog.
This alternative authentication solution provides 4 benefits:
- Provide credentials-free authentication for your users accessing restricted content
- No database management with user information
- Your users don’t need to sign up
- The solution is serverless, eliminating infrastructure management tasks, such as server or cluster provisioning, patching, operating system maintenance, and capacity provisioning
This solution is General Data Protection Regulation (GDPR) compliant. GDPR compliance is bound to user data, and while this solution processes the user’s email, this information will not be saved.
AWS is committed to offering services and resources to customers to help them comply with GDPR requirements that may apply to their activities. Still, per the Shared Responsibility Model it is your responsibility that the application running on AWS is GDPR compliant.
Overview of solution
Figure 1 below shows the authentication and authorization workflow as listed below:
- Your user navigates to the login page and is presented with a simple form asking for the user’s corporate email
- The user enters their corporate email address and clicks on Login
- Submitting the form invokes an API call. The API call is delegated to an AWS Lambda@Edge function that checks the email address domain the user submits
- If an allowed domain matches, the function generates a signed URL and sends it to the user’s email using Amazon Simple Email Service
- Clicking on the link routes the user to the restricted content with the URL signature
- With a valid signed URL, Amazon CloudFront invokes an AWS Lambda@Edge function that returns a signed cookie. The browser redirects the user to the restricted content
- The signed cookie is used on subsequent requests and grants access to the files stored in Amazon S3. This allows a seamless browsing experience through the gated content
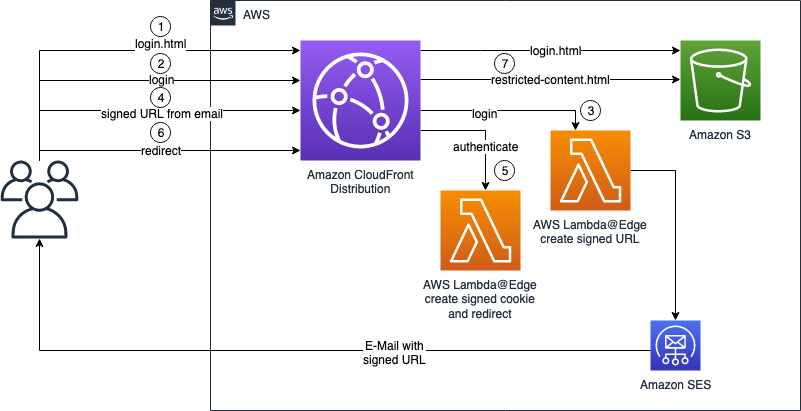
Figure 1: Authentication and authorization workflow
Walkthrough
Using Amazon CloudFront and AWS Lambda@Edge to secure your content without using credentials has three steps:
- Restrict your content with Amazon CloudFront (Accessing content)
- Create an AWS Lambda@Edge function for domain checking and generating a signed URL (Authentication)
- Create an AWS Lambda@Edge function, which is called by visiting the signed URL for generating a signed cookie (Authorization)
Code snippets are provided throughout the blog post.
In this blog post, you will learn how to implement step 3.
Prerequisites
To start this walkthrough, you will need to first implement the authentication mechanism from part 1 of this blog series.
The rest of this blog focuses on the authorization mechanism with signed URLs and signed Cookies.
Authorization mechanism
The signed URL helps you to access the secure content. The signed URL is unreadable, long, and expires after one hour. You need a repeatable way to access the secure content. Therefore, you are going to use cookies. Cookies store the login information for a specific site. You don’t need to authenticate every time you access the site. For security reasons, you need to sign the cookies. A bad actor can’t use the cookie to access restricted content.
For authorization, the viewer request invokes the logic and sets a signed cookie in the request header. Create a /auth path pattern behavior in the Amazon CloudFront distribution. This behavior prevents invoking an AWS Lambda@Edge function for every request.
When a signed URL points you to a path, such as https://dxxxxxxxxxxxxx.cloudfront.net/auth?<signed URL information>, Amazon CloudFront recognizes that a secured path is being accessed. Once the URL is confirmed to be providing the correct authentication information, Amazon CloudFront allows the request to be processed. The /auth behavior has an AWS Lambda@Edge function attached responsible for evaluating the request’s content. The AWS Lambda@Edge function includes the signed cookie and a redirection status in the response header for the request made with the signed URL. The browser redirects the request to the restricted content such as restricted-content.html. The browser stores the signed cookie for subsequent requests. It is important to understand that authorized requests invoke the AWS Lambda@Edge function. A signed URL or a signed cookie is needed. If neither of them is available, Amazon CloudFront answers with an Access Denied message and an HTTP error code of 403 (Forbidden). The following Figure 2 shows the authorization flow:

Figure 2: Authorization workflow for accessing restricted content
The logic for the AWS Lambda@Edge function looks like this:
const AWS = require('aws-sdk');
const ssm = new AWS.SSM({ region: '<your-region>' });

// Either defined as a constant or retrieved from AWS Systems Manager Parameter Store
const SIGNING_URL = '<your-cloudfront-url>';

const cache = {}

const loadParameter = async(key, WithDecryption = false) => {
    const { Parameter } = await ssm.getParameter({ Name: key, WithDecryption: WithDecryption }).promise();
    return Parameter.Value;
};

const policyString = JSON.stringify({
    'Statement': [{
        'Resource': `http*://${SIGNING_URL}/*`,
        'Condition': {
            'DateLessThan': { 'AWS:EpochTime': getExpiryTime() }
        }
    }]
});

function getSignedCookie(publicKey, privateKey) {
    const cloudFront = new AWS.CloudFront.Signer(publicKey, privateKey);
    const options = { policy: policyString };
    return cloudFront.getSignedCookie(options);
}

function getExpirationTime() {
    const date = new Date();
    return new Date(date.getFullYear(), date.getMonth() + 1, 0, 23, 59, 59);
}

function getExpiryTime() {
    return Math.floor(getExpirationTime().getTime() / 1000);
}

exports.handler = async(event) => {
    if (cache.publicKey == null) cache.publicKey = loadParameter('publicKey');
    if (cache.privateKey == null) cache.privateKey = loadParameter('privateKey', true);

    const { publicKey, privateKey } = cache;

    const signedCookie = getSignedCookie(publicKey, privateKey);

    return {
        status: '302',
        statusDescription: 'Found',
        headers: {
            location: [{
                key: 'Location',
                value: `https://${SIGNING_URL}/restricted-content.html`,
            }],
            'cache-control': [{
                key: "Cache-Control",
                value: "no-cache, no-store, must-revalidate"
            }],
            'set-cookie': [{
                key: "Set-Cookie",
                value: `CloudFront-Policy=${signedCookie['CloudFront-Policy']};Domain=${SIGNING_URL};Path=/;Expires=${getExpirationTime().toUTCString()};Secure;HttpOnly;SameSite=Lax`
            }, {
                key: "Set-Cookie",
                value: `CloudFront-Key-Pair-Id=${signedCookie['CloudFront-Key-Pair-Id']};Domain=${SIGNING_URL};Path=/;Expires=${getExpirationTime().toUTCString()};Secure;HttpOnly;SameSite=Lax`
            }, {
                key: "Set-Cookie",
                value: `CloudFront-Signature=${signedCookie['CloudFront-Signature']};Domain=${SIGNING_URL};Path=/;Expires=${getExpirationTime().toUTCString()};Secure;HttpOnly;SameSite=Lax`
            }]
        },
    };
};
Having a look at the code, you have to decide if you use a canned or a custom policy for the signed cookie. For demonstration purposes, you are going to use custom policies. The documentation lists a comparison between canned and custom policies. As a prerequisite, Amazon CloudFront must be defined with the trusted key group. This was done when you set up your new Amazon CloudFront distribution. Read this documentation to learn more about signed cookies.
The SIGNING_URL constant defines, which URL the cookie accesses. You have additional options available to specify resources such as protocol specification, query string parameters, and setting the expiration date and time. Have a look at the documentation to learn more about the options.
The AWS Lambda@Edge function is invoked if the request is made from a signed URL or if the request’s header presents a signed cookie. As the /auth path’s request is coming from the signed URL, the request is processed by the AWS Lambda@Edge function. The AWS Lambda@Edge function creates a signed cookie and passes it as a header in the response.
The getSignedCookie method takes the custom policy as an argument and returns a signed cookie with three values: CloudFront-Policy, CloudFront-Signature and the CloudFront-Key-Pair-Id. CloudFront-Policy contains the policy statement in a base64 encoded JSON. When you create the policy statement, you must define two mandatory fields:
- Base URL (Resource)
- URL’s expiration date and time in Unix time format (DateLessThan)
For this demonstration, you only use the mandatory fields.
The Amazon CloudFront specific cookie value must be set in the response header under the Set-Cookie header. It is essential that these three values must be the first parameter in the Set-Cookie header’s value section. Otherwise, the cookie cannot be read by the browser and will not be available for subsequent requests. For this blog post, you will use the Domain, Path, Expires, Secure, HttpOnly, and SameSite cookie attributes. The official documentation describes all Set-Cookie response headers. The modified response is the returning value of the AWS Lambda@Edge function.
Setting the status field to 302 and adding the location header forces the browser to redirect the request to specific restricted content. The browser receives the response and uses the signed cookie for subsequent requests.
The signed cookie is valid for the remaining month unless you delete the browser cache and the cookie. You cannot access the restricted content anymore and you have to re-authenticate with the mechanism described above. To make the AWS Lambda@Edge function available at the edge, it has to be rolled out to the distribution. Amazon CloudFront only allows concrete versions of the AWS Lambda function to be published to the edge.
On the Actions menu, you deploy the AWS Lambda@Edge function to the Amazon CloudFront distribution. A new Amazon CloudFront trigger has to be created every time a viewer request is made. Choose the correct Amazon CloudFront distribution and check the check box to create a new version of the function. Then hit the Deploy button as shown in Figure 3 below.

Figure 3: Deploy AWS Lambda@Edge to Amazon CloudFront distribution
After a couple of minutes, the distribution is updated, and the AWS Lambda@Edge function is deployed to your distribution. The new mechanism of providing authenticated users with a signed cookie is available.
Data Protection
Security is AWS’s top priority. In this blog post, we outlined one method for preventing unauthorized users from accessing restricted content. For highly sensitive data AWS and AWS partners offer hundreds of tools and features to help you meet your security objectives, ranging from network security, configuration management, access control, and data encryption. You audit access and other operations on AWS resources such as an Amazon S3 bucket or sending an email with Amazon Simple Email Service with AWS CloudTrail. AWS is committed to offering services and resources to customers to help them comply with GDPR requirements that may apply to their activities.
Cleaning up
To avoid incurring future charges, delete the Amazon CloudFront distribution, the Amazon S3 bucket, and the AWS Lambda functions.
Conclusion
In this blog post, you walked through the authorization part for securing a static website. You learnt how to authorize users without managing users by leveraging functionalities such as signed URLs and signed Cookies to prevent anonymous users from accessing restricted content
The two-part blog series provides an alternative method for accessing restricted content without entering a password or a token. Security solutions always depend on what kind of content will be restricted. Encrypt confidential data always at rest and in transit with our security services.
If you want to leverage JSON Web Token or Amazon CloudFront headers for a failover, consider having a look at the following blog posts:
- Leverage JSON Web Token to enhance your web application security
- Leverage JSON Web Token in combination with cookies to secure your content
- Leverage Amazon CloudFront headers to redirect clients to a failover page
If you have any questions or suggestions, please leave a comment.

Aleksandar Tolev
Aleksandar Tolev is a Solutions Architect Manager at Amazon Web Services with passion for Manufacturing and Automotive customers. With technical guidance and as trusted advisor he helps Automotive customers during their cloud journey. Prior to joining AWS, he worked as a Cloud Architect for an Automotive-OEM.

Marco Staufer
Marco Staufer is a Global Account Representative at Amazon Web Services working with customers in the automotive industry.