AWS Storage Blog
Scale your AWS Storage Gateway AL2023 migration with infrastructure as code
Amazon Linux 2 (AL2) reaches end of standard support on June 30, 2026. All AL2-based AWS Storage Gateway appliances must be migrated to Amazon Linux 2023 (AL2023) before that date, after which they will no longer receive software updates, security patches, or bug fixes. Storage Gateway continues to expand its hybrid cloud storage capabilities, and some upcoming features require the latest gateway virtual machine (VM). For a full list of affected versions, see Storage Gateway AL2 to AL2023 Migration Campaign.
There is no in-place upgrade path from AL2 to AL2023. Migration involves stopping applications, detaching and reattaching cache disks, launching new instances, initiating the migration API call, and verifying the result. For enterprises operating hundreds of gateways across multiple accounts and AWS Regions, doing this manually is time-consuming, error-prone, and difficult to scale.
To address this, we are releasing a new migration example within the AWS Storage Gateway Terraform module that automates the AL2-to-AL2023 upgrade. Combined with an Ansible playbook for orchestrating the disk-swap and migration API steps, this solution provides a repeatable, auditable, and scalable approach for migrating your entire fleet. In this post, we walk through the end-to-end solution for automating an Amazon S3 File Gateway migration on Amazon Elastic Compute Cloud (Amazon EC2), preserving cache disk data and the existing gateway ID.
Solution overview
The migration follows the procedure detailed in Replacing your existing S3 File Gateway with a new instance, which preserves the cache disk and gateway ID. This method is ideal for gateways with large caches or latency-sensitive applications, because cached data doesn’t need to be re-downloaded from Amazon Simple Storage Service (Amazon S3). This method requires 1–2 hours of downtime per gateway during the migration window, so we recommend performing the migration during a planned maintenance window to reduce impact to end users or applications.
The new AL2023 gateway instance will receive a new private IP address. If neither a DNS name nor an Elastic IP (EIP) is configured, clients will need to remount file shares using the new gateway’s IP address after migration. To avoid this, we recommend referencing your gateway by a DNS name or an EIP before proceeding.If your existing gateway uses a DNS name, update the DNS record to point to the new instance’s IP address after migration—clients resolve the new IP automatically with no remount required. If your existing gateway has an EIP associated, disassociate it from the old instance and associate it with the new one after migration is complete—clients continue connecting without any changes.
The following code disassociates an EIP from an old instance:
# aws ec2 disassociate-address --association-id The following code associates an EIP with a new instance:
# aws ec2 associate-address --instance-id --allocation-idThe solution is split into two phases:
- Phase 1: Infrastructure provisioning (Terraform) – You use the Storage Gateway Terraform module to provision a new AL2023 gateway EC2 instance alongside the existing gateway. The only required input is the existing
gateway_id(for example,sgw-12A3456B). A helper script uses the gateway ID to look up the underlying EC2 instance using the Storage Gateway API, and Terraform then pulls all networking and configuration details—Amazon Virtual Private Cloud (VPC), subnet, Availability Zone, security group, SSH key, and root disk settings—directly from that instance. Terraform doesn’t modify the old instance or its volumes. - Phase 2: Migration execution (Ansible) – The Ansible playbook handles the actual migration process: stopping the old instance, detaching and reattaching Amazon Elastic Block Store (Amazon EBS) volumes (cache disks and old root) to the new instance, triggering the migration API, detaching the old root volume, and optionally rejoining the gateway to Active Directory if previously joined.
The following diagram illustrates the Storage Gateway migration architecture.
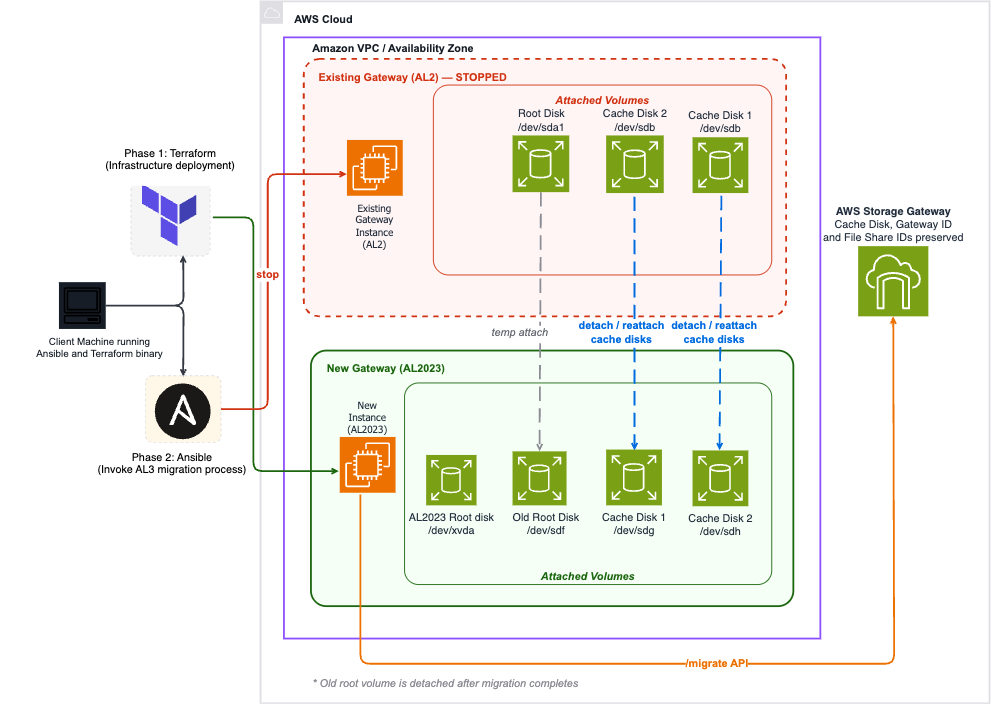
Figure 1: Storage Gateway migration architecture
At a high level, the automated migration performs the following:
- Terraform reads the existing AL2 gateway’s configuration (instance type, VPC, subnet, cache volumes) using only the gateway ID.
- Terraform provisions a new AL2023-based EC2 instance using the latest Storage Gateway Amazon Machine Image (AMI), in the same VPC and subnet.
- Ansible stops the old instance and detaches all volumes.
- Ansible attaches cache volumes and the old root volume to the new instance.
- Ansible triggers the migration using the HTTP API (
http://<ip>/migrate?gatewayId=<id>). - Ansible detaches the old root volume and restarts the new instance.
- Ansible rejoins the gateway to Active Directory (if previously joined).
In the following sections, we walk through the steps to complete the migration:
- Clone the module repository.
- Configure the Terraform variables.
- Apply the Terraform configuration.
- Complete the migration with Ansible.
Prerequisites
Before you begin, ensure you have the following:
- An AWS account with permissions to create and manage Amazon EC2, Amazon EBS, Storage Gateway, AWS Identity and Access Management (IAM), and Amazon Virtual Private Cloud (Amazon VPC) resources. See Changing permissions for an IAM user for guidance.
- Terraform version 1.0 or greater and AWS Provider version 5.0 or greater.
- Python 3 and Ansible installed (pip install ansible).
- The AWS Command Line Interface (AWS CLI) configured with credentials that have access to the target account and Region.
- jq installed (used by the helper script to discover the EC2 instance from the gateway ID).
- Your existing AL2 gateway is updated to the latest software version. To check, open the Storage Gateway console, choose Gateways in the navigation pane, choose your gateway, and choose Update Now if available.
- The CachePercentDirty metric for your gateway is 0. Monitor this on the Monitoring tab on the Storage Gateway console. All cached data must be fully uploaded to Amazon S3 before migration.
- All applications writing to the gateway are stopped.
- Port 80 connectivity from where you run Ansible to the new gateway instance (required for the migration API call).
- Gateway ID (for example, sgw-12A3456B).
The EC2 instance ID, VPC ID, subnet, and other configuration details are automatically discovered from the gateway.
Clone repository
Clone the Storage Gateway Terraform module and navigate to the migration example:
git clone https://github.com/aws-ia/terraform-aws-storagegateway.git
cd terraform-aws-storagegateway
The migration-specific resources are located in the following directory structure:
Change into the migration example directory:
cd examples/s3-filegateway-migration-ec2Configure Terraform variables
Copy the example variables file and edit it with your gateway-specific values:
cp terraform.tfvars.example terraform.tfvarsEdit terraform.tfvars with your preferred text editor. The only required variable is gateway_id:
| Variable | Description | Required | Default |
|---|---|---|---|
gateway_id |
The Storage Gateway ID to migrate (for example, sgw-12A3456B) |
Yes | — |
gateway_type |
Gateway type: FILE_S3 |
No | FILE_S3 |
instance_type |
Instance type for the new gateway (for example, m7i.xlarge) | No | Same as old gateway |
user_data |
User data script for network configuration using admincli |
No | null |
root_block_device |
Root disk configuration (size, type, AWS KMS key) | No | Matches old gateway |
Configure DNS for Active Directory joined gateways
For Active Directory authenticated (SMB) gateways, you might need to configure the Active Directory DNS server on the new instance for the domain join to succeed. Use the user_data variable to run a script at instance launch:
The network interface name depends on the instance platform: Nitro-based instances use ens5, Xen-based instances use eth0.
Recommended instance types
For AL2023 Storage Gateways, AWS recommends upgrading to the latest generation instance types when migrating. The following table summarizes the instance types and their recommended upgrades.
| Old Type | Recommended Replacement | vCPUs | RAM |
|---|---|---|---|
| m5.xlarge | m7i.xlarge | 4 | 16 GB |
| m5.2xlarge | m7i.2xlarge | 8 | 32 GB |
| m5.4xlarge | m7i.4xlarge | 16 | 64 GB |
| r5.xlarge | r7i.xlarge | 4 | 32 GB |
| r5.2xlarge | r7i.2xlarge | 8 | 64 GB |
Apply Terraform configuration
Before applying, configure your AWS CLI credentials for the target account and Region. Then complete the following steps:
- Run
terraform initto download the modules and initialize the directory. - Run
terraform planand examine the output to confirm the following: - A new AL2023 EC2 instance will be created in the same subnet or Availability Zone as the old gateway.
- The existing security group from the old instance will be reused.
- No new cache volume or EIP will be created (volumes are migrated from the old instance).
- Run
terraform applyand allow the apply to complete.
If the Terraform apply is successful, the output will appear as shown in the following screenshot.
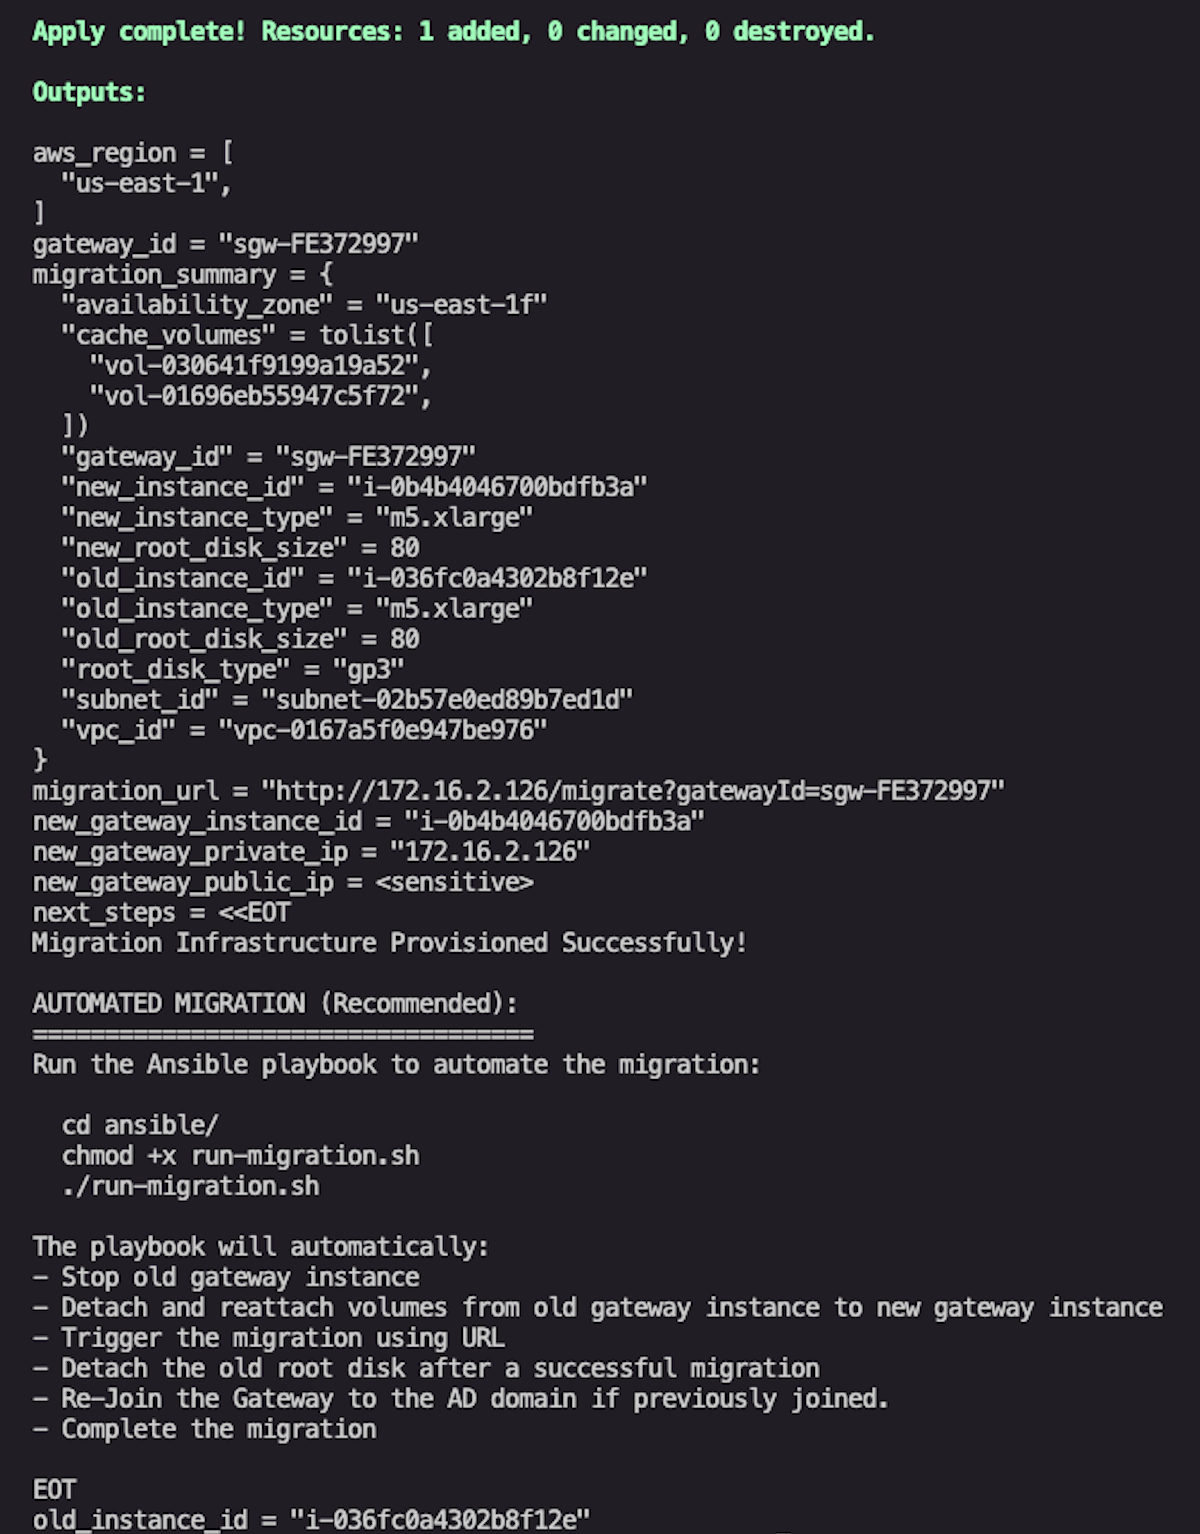
Figure 2: Example successful output after terraform apply
View the Terraform outputs:
# View the full migration summary
terraform output migration_summary

# Get the new instance ID
terraform output new_gateway_instance_id

# Get the migration URL
terraform output migration_url

# View detailed next steps
terraform output next_steps
The following code is an example output:
At this point, Terraform has provisioned the new AL2023 gateway instance and prepared the infrastructure. The remaining steps involve the disk-swap and migration API call, which require sequential Amazon EC2 operations that are best handled by the Ansible playbook.
Complete migration with Ansible
The provided Ansible playbook automates the remaining operational steps in the correct sequence. This is the recommended approach, especially when migrating multiple gateways.
Install the required Ansible collections:
cd ansible/
ansible-galaxy collection install -r requirements.yml
Run the migration:
chmod +x run-migration.sh
./run-migration.sh
The run-migration.sh script extracts Terraform outputs, validates prerequisites, and runs the Ansible playbook. The playbook performs the following steps automatically:
- Discovers the old instance ID from the gateway ID.
- Checks the
CachePercentDirtymetric and warns if data hasn’t been fully flushed. - Verifies port 80 connectivity to the new gateway instance.
- Discovers and classifies volumes (root vs. cache) attached to the old instance.
- Stops the old AL2 gateway instance.
- Detaches all volumes from the old instance.
- Attaches cache volumes to the new AL2023 instance.
- Attaches the old root volume temporarily (required for migration).
- Triggers the migration using the HTTP API (
http://<ip>/migrate?gatewayId=<id>). - Stops the new instance and detaches the old root volume.
- Starts the new instance in its final configuration.
- Checks SMB settings and Active Directory domain join status.
- Rejoins the gateway to Active Directory (if previously joined, prompts for credentials).
The entire automated process takes approximately 15–30 minutes per gateway, depending on instance startup times and network conditions. Detailed logs are saved to ansible/logs/ with timestamped filenames.
Verify migration
After completing the migration, verify success through the following methods:
- AWS Management Console – On the Storage Gateway console, choose Gateways in the navigation pane, choose your gateway, and navigate to the Details tab. The deprecation warning should no longer appear.
- AWS CLI – Use the
DescribeGatewayInformationAPI and confirm the deprecation date field is absent:
aws storagegateway describe-gateway-information \
--gateway-arn "arn:aws:storagegateway:REGION:ACCOUNT:gateway/sgw-12A3456B"- Software version – Verify the gateway software version has incremented (S3 File Gateway should now show version 2.x).
- File share access – Test that clients can mount and access file shares:
If neither a DNS name nor an EIP is configured for the new gateway, clients will need to remount file shares using the new gateway’s IP address after migration:
# NFS
showmount -e <NEW_GATEWAY_IP>

# SMB
smbclient -L <NEW_GATEWAY_IP> -U username- Amazon CloudWatch metrics – Monitor the Amazon CloudWatch metrics
CacheUsed,CacheHitPercent, andCachePercentDirtyto confirm the gateway is operating normally.
Troubleshooting
The following table discusses common issues and how to troubleshoot them.
| Issue | Solution |
|---|---|
| Can’t find EC2 instance ID for gateway | Verify the gateway ID is correct and AWS credentials have storagegateway:DescribeGatewayInformation permission. Ensure jq is installed. |
CachePercentDirty is not 0 |
Wait for all cached data to upload to Amazon S3. Monitor the metric in CloudWatch. |
| Volume attachment failed | Ensure volumes are detached from the old instance and in the same Availability Zone. Check with aws ec2 describe-volumes. |
| Migration URL not responding | Verify the new instance is running, the security group allows port 80, and you can reach the instance IP. |
| Cache disk count mismatch | The migration API expects all original cache volumes attached. Verify all cache disks are attached to the new instance. |
Clean up
After a successful migration, the old AL2 instance and its root volume are no longer needed. Stop the old instance and delete orphaned volumes to avoid unnecessary costs:
# Get the old instance ID from Terraform output
terraform output old_instance_id

# Terminate the old instance (after verifying migration success)
aws ec2 terminate-instances --instance-ids i-0old987654321dcba

# Delete the old root volume (shown in migration_summary output)
aws ec2 delete-volume --volume-id vol-0oldroot123456
Do not run terraform destroy after a successful migration—this will delete your new AL2023 gateway. Only use terraform destroy if the migration failed and you need to roll back.
Rollback and recovery
The recoverability of the migration depends on where in the process a failure occurs:
- Before the migration API is called (Steps 1–9 of Ansible playbook) – Fully reversible. The old instance is stopped and its volumes are detached, but nothing destructive has happened. To roll back, detach the volumes from the new instance, reattach them to the old instance at their original device paths, and start the old instance—the gateway comes back as it was. The playbook saves a
migration-volumes-<epoch>.txtfile that records the original device mappings for this purpose. - During or after the migration API call (Step 10+ of Ansible playbook) – The Ansible playbook includes automatic recovery. If rerun after a partial failure, it detects that volumes have already been moved to the new instance and skips the detach and attach steps, retrying the migration API directly.
Conclusion
In this post, we walked through automating the Storage Gateway migration from Amazon Linux 2 to Amazon Linux 2023 using the Storage Gateway Terraform module and Ansible. The solution preserves gateway identity, file shares, and cached data while providing a repeatable, auditable process that scales from a single gateway to hundreds.This approach offers the following key benefits:
- Minimal configuration – Only the gateway ID is required — all other settings are auto-discovered
- Preserved cache data – No need to re-download cached data from Amazon S3
- Active Directory support – Automatic Active Directory domain rejoin for SMB gateways
- Auditable – Detailed logs and Terraform state for compliance requirements
- Scalable – Run the same process across hundreds of gateways
With AL2 end of standard support approaching on June 30, 2026, we encourage you to begin planning your migration today. The Terraform module and Ansible playbooks are available in the AWS Storage Gateway Terraform module GitHub repository.
Have questions or feedback? Leave a comment or open an issue in the GitHub repository.