AWS Big Data Blog
Implement perimeter security in Amazon EMR using Apache Knox
Perimeter security helps secure Apache Hadoop cluster resources to users accessing from outside the cluster. It enables a single access point for all REST and HTTP interactions with Apache Hadoop clusters and simplifies client interaction with the cluster. For example, client applications must acquire Kerberos tickets using Kinit or SPNEGO before interacting with services on Kerberos enabled clusters. In this post, we walk through setup of Apache Knox to enable perimeter security for Amazon EMR clusters.
It provides the following benefits:
- Simplify authentication of various Hadoop services and UIs
- Hide service-specific URLs/Ports by acting as a Proxy
- Enable SSL termination at the perimeter
- Ease management of published endpoints across multiple clusters
Overview
Apache Knox
Apache Knox provides a gateway to access Hadoop clusters using REST API endpoints. It simplifies client’s interaction with services on the Hadoop cluster by integrating with enterprise identity management solutions and hiding cluster deployment details.
In this post, we run the following setup:
- Create a virtual private cloud (VPC) based on the Amazon VPC
- Provision an Amazon EC2 Windows instance for Active Directory domain controller.
- Create an Amazon EMR security configuration for Kerberos and cross-realm trust.
- Set up Knox on EMR master node and enable LDAP authentication
Visually, we are creating the following resources:
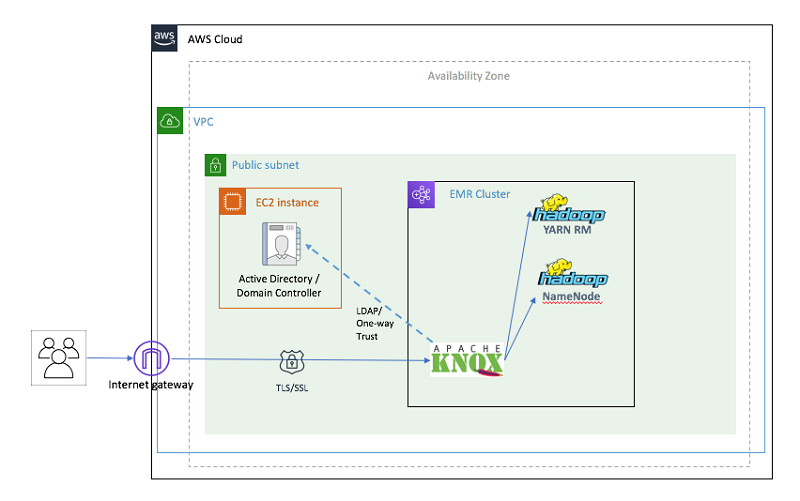
Figure 1: Provisioned infrastructure from CloudFormation
Prerequisites and assumptions
Before getting started, the following prerequisites must be met:
- An AWS account that provides access to AWS services.
- An AWS Identity and Access Management (IAM) user with an access key and secret access key to configure the AWS CLI.
IMPORTANT: The templates use hardcoded user name and passwords, and open security groups. They are not intended for production use without modification.
NOTE:
- Single VPC has been used to simplify networking
- CloudFormationtemplates use hardcoded user names and passwords and open security groups for simplicity.
Implementation
Single-click solution deployment
If you don’t want to set up each component individually, you can use the single-step AWS CloudFormation template. The single-step template is a master template that uses nested stacks (additional templates) to launch and configure all the resources for the solution in one operation.
To launch the entire solution, click on the Launch Stack button below that directs you to the console. Do not change to a different Region because the template is designed to work only in US-EAST-1 Region.
![]()
This template requires several parameters that you must provide. See the table below, noting the parameters marked with *, for which you have to provide values. The remaining parameters have default values and should not be edited.
| For this parameter | Use this | |
| 1 | Domain Controller Name | DC1 |
| 2 | Active Directory domain | awsknox.com |
| 3 | Domain NetBIOS name | AWSKNOX (NetBIOS name of the domain (up to 15 characters). |
| 4 | Domain admin user | User name for the account to be added as Domain administrator. (awsadmin) |
| 5 | Domain admin password * | Password for the domain admin user. Must be at least eight characters containing letters, numbers, and symbols – for example, CheckSum123 |
| 6 | Key pair name * | Name of an existing EC2 key pair to enable access to the domain controller instance. |
| 7 | Instance type | Instance type for the domain controller EC2 instance. |
| 8 | LDAP Bind user name | LDAP Bind user name.
Default value is: CN=awsadmin,CN=Users,DC=awsknox,DC=com |
| 9 | EMR Kerberos realm | EMR Kerberos realm name. This is usually the VPC’s domain name in upper case letters Eg: EC2.INTERNAL |
| 10 | Cross-realm trust password * | Password for cross-realm trust Eg: CheckSum123 |
| 11 | Trusted Active Directory Domain | The Active Directory domain that you want to trust. This is same as Active Directory in name, but in upper case letters. Default value is “AWSKNOX.COM” |
| 12 | Instance type | Instance type for the domain controller EC2 instance. Default: m4.xlarge |
| 13 | Instance count | Number of core instances of EMR cluster. Default: 2 |
| 14 | Allowed IP address | The client IP address that can reach your cluster. Specify an IP address range in CIDR notation (for example, 203.0.113.5/32). By default, only the VPC CIDR (10.0.0.0/16) can reach the cluster. Be sure to add your client IP range so that you can connect to the cluster using SSH. |
| 15 | EMR applications | Comma-separated list of applications to install on the cluster. By default it selects “Hadoop,” “Spark,” “Ganglia,” “Hive” and “HBase” |
| 16 | LDAP search base | LDAP search base: Only value is : “CN=Users,DC=awshadoop,DC=com” |
| 17 | LDAP search attribute | Provide LDAP user search attribute. Only value is : “sAMAccountName” |
| 18 | LDAP user object class | Provide LDAP user object class value. Only value is : “person” |
| 19 | LDAP group search base | Provide LDAP group search base value. Only value is : “dc=awshadoop, dc=com” |
| 20 | LDAP group object class | Provide LDAP group object class. Only value is “group” |
| 21 | LDAP member attribute | Provide LDAP member attribute. Only value is : “member” |
| 22 | EMRLogDir * | Provide an Amazon S3 bucket where the EMRLogs are stored. Also provide “s3://” as prefix. |
| 23 | S3 Bucket | Amazon S3 bucket where the artifacts are stored. In this case, all the artifacts are stored in “aws-bigdata-blog” public S3 bucket. Do not change this value. |
Deploying each component individually
If you used the CloudFormation Template in the single-step solution, you can skip this section and start from the Access the Cluster section. This section describes how to use AWS CloudFormation templates to perform each step separately in the solution.
1. Create and configure an Amazon VPC
In this step, we set up an Amazon VPC, a public subnet, an internet gateway, a route table, and a security group.
In order for you to establish a cross-realm trust between an Amazon EMR Kerberos realm and an Active Directory domain, your Amazon VPC must meet the following requirements:
- The subnet used for the Amazon EMR cluster must have a CIDR block of fewer than nine digits (for example, 10.0.1.0/24).
- Both DNS resolution and DNS hostnames must be enabled (set to “yes”).
- The Active Directory domain controller must be the DNS server for instances in the Amazon VPC (this is configured in the next step).
To launch directly through the console, choose Launch Stack.
![]()
2. Launch and configure an Active Directory domain controller
In this step, you use an AWS CloudFormation template to automatically launch and configure a new Active Directory domain controller and cross-realm trust.
Next, launch a windows EC2 instance and install and configure an Active Directory domain controller. In addition to launching and configuring an Active Directory domain controller and cross realm trust, this AWS CloudFormation template also sets the domain controller as the DNS server (name server) for your Amazon VPC.
To launch directly through the console, choose Launch Stack.
![]()
3. Launch and configure EMR cluster with Apache Knox
To launch a Kerberized Amazon EMR cluster, first we must create a security configuration containing the cross-realm trust configuration. For more details on this, please refer to the blog post, Use Kerberos Authentication to integerate Amazon EMR with Microsoft Active Directory.
In addition to the steps that are described in the above blog, this adds an additional step to the EMR cluster, which creates a Kerberos principal for Knox.
The CloudFormation script also updates the below parameters in core-site.xml, hive-site.xml, hcatalog-webchat-site.xml and oozie-site.xml files. You can see these in “create_emr.py” script. Once the EMR cluster is created, it also runs a shell script as an EMR step. This shell script downloads and installs Knox software on EMR master machine. It also creates a Knox topology file with the name: emr-cluster-top.
To launch directly through the console, choose Launch Stack.
![]()
Accessing the cluster
API access to Hadoop Services
One of the main reasons to use Apache Knox is the isolate the Hadoop cluster from direct connectivity by users. Below, we demonstrate how you can interact with several Hadoop services like WebHDFS, WebHCat, Oozie, HBase, Hive, and Yarn applications going through the Knox endpoint using REST API calls. The REST calls can be called on the EMR cluster or outside of the EMR cluster. However, in a production environment, EMR cluster’s security groups should be set to only allow traffic on Knox’s port number to block traffic to all other applications.
For the purposes of this blog, we make the REST calls on the EMR cluster by SSH’ing to master node on the EMR cluster using the LDAP credentials:
Replace <EMR-Master-Machine-Public-DNS> with the value from the CloudFormation outputs to the EMR cluster’s master node. Find this CloudFormation Output value from the stack you deployed in Step 3 above.
You are prompted for the ‘awsadmin’ LDAP password. Please use the password you selected during the CloudFormation stack creation.
NOTE: In order to connect, your client machine’s IP should fall within the CIDR range specified by “Allowed IP address” in the CloudFormation parameters. If you are not able to connect to the master node, check the master instance’s security group for the EMR cluster has a rule to allow traffic from your client. Otherwise, your organizations firewall may be blocking your traffic.
Demonstrating access to the WebHDFS service API:
Here we will invoke the LISTSTATUS operation on WebHDFS via the knox gateway. In our setup, knox is running on port number 8449. The below command will return a directory listing of the root directory of HDFS.
You can use both “localhost” or the private DNS of the EMR master node.
You are prompted for the password. This is the same “Domain admin password” that was passed as the parameter into the CloudFormation stack.
Demonstrating access Resource Manager service API:
The Resource manager REST API provides information about the Hadoop cluster status, applications that are running on the cluster etc. We can use the below command to get the cluster information.
You are prompted for the password. This is the same “Domain admin password” that was passed as the parameter into the CloudFormation stack.
Demonstrating connecting to Hive using Beeline through Apache Knox:
We can use Beeline, a JDBC client tool to connect to HiveServer2. Here we will connect to Beeline via Knox.
Use the following command to connect to hive shell
Use the following syntax to connect to Hive from beeline
NOTE: You must update the <EMR-Master-Machine-Public-DNS> with the public DNS name of the EMR master node.
Demonstrating submitting an Spark job using Apache Livy through Apache Knox
You can use the following command to submit a spark job to an EMR cluster. In this example, we run SparkPi program that is available in spark-examples.jar.
You can use both “localhost” or the private DNS of EMR master node.
Securely accessing Hadoop Web UIs
In addition to providing API access to Hadoop clusters, Knox also provides proxying service for Hadoop UIs. Below is a table of available UIs:
| Application Name | Application URL | |
| 1 | Resource Manager | https://<EMRClusterURL>:8449/gateway/emr-cluster-top/yarn/ |
| 2 | Ganglia | https://<EMRClusterURL>:8449/gateway/emr-cluster-top/ganglia/ |
| 3 | Apache HBase | https://<EMRClusterURL>:8449/gateway/emr-cluster-top/hbase/webui/master-status |
| 4 | WebHDFS | https://<EMRClusterURL>:8449/gateway/emr-cluster-top/hdfs/ |
| 5 | Spark History | https://<EMRClusterURL>:8449/gateway/emr-cluster-top/sparkhistory/ |
On the first visit of any UI above, you are presented with a drop-down for login credentials. Enter the login user awsadmin and the password you specified as a parameter to your CloudFormation template.

You can now browse the UI as you were directly connected to the cluster. Below is a sample of the Yarn UI:

And the scheduler information in the Yarn UI:

Ganglia:

Spark History UI:

Lastly, HBase UI. The entire URL to the “master-status” page must be provided
Troubleshooting
It’s always clear when there is an error interacting with Apache Knox. Below are a few troubleshooting steps.
I cannot connect to the UI. I do not get any error codes.
- Apache Knox may not be running. Check that its running by logging into the master node of your cluster and running “ps -ef | grep knox”. There should be a process running.
If the process is not running, start the process by running “/home/knox/knox/bin/gateway.sh start” as the Knox user (sudo su – knox).
- Your browser may not have connectivity to the cluster. Even though you may be able to SSH to the cluster, a firewall rule or security group rule may be preventing traffic on the port number that Knox is running on. You can route traffic through SSH by building an SSH tunnel and enable port forwarding.
I get an HTTP 400, 404 or 503 code when accessing a UI:
- Ensure that the URL you are entering is correct. If you do not enter the correct path, then Knox provides an HTTP 404.
- There is an issue with the routing rules within Apache Knox and it does not know how to route the requests. The logs for Knox are at INFO level by default and is available in /home/knox/knox/logs/. If you want to change the logging level, change the following lines in /home/knox/knox/conf/gateway-log4j.properties:log4j.logger.org.apache.knox.gateway=INFO
#log4j.logger.org.apache.knox.gateway=DEBUGto#log4j.logger.org.apache.knox.gateway=INFO
log4j.logger.org.apache.knox.gateway=DEBUGThe logs will provide a lot more information such as how Knox is rewriting URL’s. This could provide insight whether Knox is translating URL’s correctly.You can use the below “ldap”, “knoxcli” and “curl” commands to verify that the setup is correct. Run these commands as “knox” user. - To verify search base, search attribute and search class, run the below ldap command
- Replace “<Active-Directory-Domain-Private-IP-Address>” with the private IP address of the Active Directory EC2 instance. You can get this IP address from the output of second CloudFormation template.
- To verify the values for server host, port, username, and password, run the below ldap command.
- Replace “<Active-Directory-Domain-Private-IP-Address>” with the private IP address of the Active Directory EC2 instance. You can get this IP address from the output of second CloudFormation template.
- It should display the below output:

- To verify the System LDAP bind successful or not:
- Here “emr-cluster-top” is the topology file that defines the applications that are available and the endpoints that Knox should connect to service the application.
- The output from the command should return the below output:
“System LDAP Bind successful!”
- To verify LDAP authentication successful or not, run the below command.
- Here “emr-cluster-top” is the topology file name that we created.
- The output the command should return the below output:
“LDAP authentication successful!”
- Verify if WebHDFS is reachable directly using the service
- First, we must get a valid Kerberos TGT, for that we must use the kinit command as below:
- For example: EMR-Master-Machine-Private-DNS appears in this format: ip-xx-xx-xx-xx.ec2.internal
- It should return a JSON object containing a “Path” variable of the user’s home directory.
![]()
Cleanup
Delete the CloudFormation stack to clean up all the resources created for this setup. If you used the nested stack, CloudFormation deletes all resources in one operation. If you deployed the templates individually, delete them in the reverse order of creation, deleting the VPC stack last.
Conclusion
In this post, we went through the setup, configuration, and validation of Perimeter security for EMR clusters using Apache Knox. This helps simplify Authentication for various Hadoop services. In our next post, we will show you how to integrate Apache Knox and Apache Ranger to enable authorization and audits.
Stay tuned!
Related
- Implementing Authorization and Auditing using Apache Ranger on Amazon EMR
- Use Kerberos Authentication to Integrate Amazon EMR with Microsoft Active Directory
- Metadata classification, lineage, and discovery using Apache Atlas on Amazon EMR
About the Authors
 Varun Rao is a enterprise solutions architect
. He works with enterprise customers in their journey to the cloud with focus of data strategy and security. In his spare time, he tries to keep up with his 4-year old.
Varun Rao is a enterprise solutions architect
. He works with enterprise customers in their journey to the cloud with focus of data strategy and security. In his spare time, he tries to keep up with his 4-year old.
 Mert Hocanin is a big data architect with AWS, covering several products, including EMR, Athena and Managed Blockchain. Prior to working in AWS, he has worked on Amazon.com’s retail business as a Senior Software Development Engineer, building a data lake to process vast amounts of data from all over the company for reporting purposes. When not building and designing data lakes, Mert enjoys traveling and food.
 Srikanth Kodali is a Sr. IOT Data analytics architect at Amazon Web Services. He works with AWS customers to provide guidance and technical assistance on building IoT data and analytics solutions, helping them improve the value of their solutions when using AWS.