AWS Architecture Blog
Serverless Scheduling with Amazon EventBridge, AWS Lambda, and Amazon DynamoDB
Many applications perform scheduled tasks. For instance, you might want to automatically publish an article at a given time, change prices for offers which were defined weeks in advance, or notify customers 8 hours before a flight. These might be one-off tasks, or recurring ones.
On Unix-like operating systems, you might have opted for the cron utility. There are also similar alternatives for many web application frameworks, as well as advanced libraries, to schedule future one-off tasks. In a single server environment, this might seem like a simple solution. However, when you run dozens of instances of your application server, it gets harder to rely on those libraries to schedule tasks reliably at least once, without taking up too many resources. If you decide to build a serverless application, you need a new approach all together.
This post shows how you can build a scalable serverless job scheduler. You can use this method to scale to thousands, or even millions, of distributed jobs per minute. Because you are using serverless technologies, the underlying infrastructure is fully managed by AWS and you only pay for what you use. You can use this solution as an addition to your existing applications, regardless if they already use serverless technologies.
Similarly to a cron job running on a single instance, this solution uses an Amazon EventBridge rule, which starts new events periodically on a schedule. For recurring jobs, you would use this capability to start specific actions directly. This will work if you have only a few dozen periodic tasks, whose execution cycle can be defined as a cron expression. However, remember that there are limits to how many rules can be defined per event bus, and rules with a scheduled expression can only be defined on the default event bus. This post describes a method to multiplex a single Amazon EventBridge rule via an AWS Lambda function and Amazon DynamoDB, to scale beyond thousands of jobs. While this example focuses on one-off tasks, you can use the same approach for recurring jobs as well.
Overview of solution
The following diagram shows the architecture of the serverless scheduling solution.
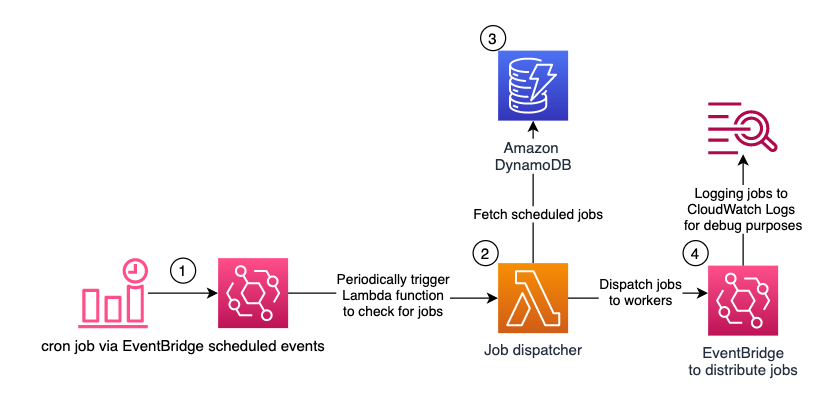
Figure 1 – Architecture diagram showing Serverless Scheduling with Amazon EventBridge, AWS Lambda, and Amazon DynamoDB
Amazon EventBridge with scheduled expressions periodically starts an AWS Lambda function. An Amazon DynamoDB table stores the future jobs. The Lambda function queries the table for due jobs and distributes them via Amazon EventBridge to the workers.
The following services are used:
Amazon EventBridge: to initiate the serverless scheduling solution. Amazon EventBridge is a serverless event bus that makes it easier to build event-driven applications at scale. It can also schedule events based on time intervals or cron expressions.
In this solution, you’ll use EventBridge for two things:
- to periodically start the AWS Lambda function, which checks for new jobs to be executed, and
- to distribute those jobs to the workers.
Here, you can control the granularity of your job executions. The fastest rate possible is once every minute. But if you don’t need a 1-minute precision, you can also opt for once every 5 minutes, or even once every hour. Remember that you cannot control at which second the event is started. It might be at the beginning of the minute, in the middle, or at the end.
AWS Lambda: to execute the scheduler logic. AWS Lambda is a serverless, event-driven compute service that lets you run code without provisioning or managing servers. The Lambda function queries the jobs from DynamoDB and distributes them via EventBridge. Based on your requirements, you can adjust this to use different mechanisms to notify the workers about the jobs, such as HTTP APIs, gRPC calls, or AWS services like Amazon Simple Notification Service (SNS) or Amazon Simple Queue Service (SQS).
Amazon DynamoDB: to store scheduled jobs. Amazon DynamoDB is a fully managed, serverless, key-value NoSQL database designed to run high-performance applications at any scale. Defining the right data model is important to be able to scale to thousands or even millions of scheduled and processed jobs per minute. The DynamoDB table in this solution has a partition key “pk” and a sort key “sk”. For the Lambda function, to be able to query all due jobs quickly and efficiently, jobs must be partitioned. For this, they are grouped together based on their scheduled times in intervals of 5 minutes. This value is the partition key “pk”. How to calculate this value is explained in detail, when you will test the solution.
The sort key “sk” contains the precise execution time concatenated with a unique identifier, such as a job ID, because the combination of “pk” and “sk” must be unique. To schedule a job in this example, you write it manually into the DynamoDB table. In your production code you can abstract the synchronous DynamoDB access, by implementing it in a shared library, or using Amazon API Gateway. You could also schedule jobs from a Lambda function reacting to events in your system.
Amazon EventBridge: to distribute the jobs. The Lambda function uses Amazon EventBridge as an example to distribute the jobs. The workers which should receive the jobs, must configure the corresponding rules upfront. For testing purposes, this solution comes with a rule which logs all events from the Lambda function into Amazon CloudWatch Logs.
Walkthrough
In this section, you will deploy the solution and test it.
- An AWS account
- An AWS user, which has access to the AWS Management Console and has the IAM permissions to launch the AWS CloudFormation stack and create the aforementioned resources.
Deploying the solution
To deploy it in your account:
1. Select Launch Stack.

2. Select the Region where you want to launch your serverless scheduler.
3. Define a name for your stack. Leave the parameters with the default values for now and select Next.

4. At the bottom of the page, acknowledge the required Capabilities and select Create stack.
5. Wait until the status of the stack is CREATE_COMPLETE, this can take a minute or two.
Testing the solution
In this section, you test the serverless scheduler. First, you’ll schedule a job for some time in the near future. Afterwards you will check that the job has been logged in CloudWatch Logs at the time, it was scheduled.
1. In the AWS Management Console, navigate to the DynamoDB service and select the Items sub-menu on the left side, between Tables and PartiQL editor.
2. Select the JobsTable which you created via the CloudFormation Stack; it should be empty for now:

3. Select Create item. Make sure you switch to the JSON editor at the top, and disable View DynamoDB JSON. Now copy this item into the editor:
{
  "pk": "j#2015-03-20T09:45",
  "sk": "2015-03-20T09:46:47.123Z#564ade05-efda-4a2e-a7db-933ad3c89a83",
  "detail": {
    "action": "send-reminder",
    "userId": "16f3a019-e3a5-47ed-8c46-f668347503d1",
    "taskId": "6d2f710d-99d8-49d8-9f52-92a56d0c6b81",
    "params": {
      "can_skip": false,
      "reminder_volume": 0.5
    }
  },
  "detail_type": "job-reminder"
}

This is a sample job definition. You will need to adjust it, to be started a few minutes from now. For this you need to adjust the first 2 attributes, the partition key “pk” and the sort key “sk”. Start with “sk”, this is the UTC timestamp for the due date of the job in ISO 8601 format (YYYY-MM-DDTHH:MM:SS), followed by a separator (“#”) and a unique identifier, to make sure that multiple jobs can have the same due timestamp.
Afterwards adjust “pk”. The “pk” looks like the ISO 8601 timestamp in the “sk” reduced to date and time in hours and minutes. The minutes for the partition key must be an integer multiple of 5. This value represents the grouping of the jobs, so they can be queried quickly and efficiently by the Lambda function. For instance, for me 2021-11-26T13:31:55.000Z is in the future and the corresponding partition would be 2021-11-26T13:30.
Note: your local time zone might not be UTC. You can get the current UTC time on timeanddate.com.
You can find in the following table for every “sk” minute the corresponding “pk” minute:

The corresponding python code would be:
f'{(sk_minutes – sk_minutes % 5):02d}'
4. Now that you defined your event in the near future, you can optionally adjust the content of the “detail” and “detail_type” attributes. These are forwarded to EventBridge as “detail” and “detail-type” and should be used by your workers to understand which task they are supposed to perform. You can find more details on EventBridge event structure in our documentation. After you configured the job correctly, select Create item.
5. It is time to navigate to CloudWatch Log groups and wait for the item to be due and to show up in the debug logs.

For now, the log streams should be empty:

After the item was due, you should see a new log stream with the item “detail” and “detail_type” attributes logged.
If you don’t see a new log stream with the item, check back in your DynamoDB table, if the “sk” is in the UTC time zone and the minutes of the “pk” are a multiple of 5. You can consult the table at the end of step 3, to check for the correct “pk” minutes based on your “sk” minutes.

You might notice that the timestamp of the message is within a minute after the job was scheduled. In my example, I scheduled the job for 2021-11-26T13:31:55.000Z and it was put into EventBridge at 2021-11-26T13:32:33Z. The delay comes from the Lambda function only starting once per minute. As I mentioned in the beginning, the function also isn’t started at second 00 but at a random second within that minute.
Exploring the Lambda function
Now, let’s have a look at the core logic. For this, navigate to AWS Lambda in the AWS Management console and open the SchedulerFunction.

In the function configuration, you can see that it is triggered by EventBridge via a scheduled expression at the rate, which was defined in the CloudFormation Stack.

When you open the Code tab, you can see that it is less than 100 lines of python code. The main part is the lambda_handler function:
def lambda_handler(event, context):
    event_time_in_utc = event['time']
    previous_partition, current_partition = get_partitions(event_time_in_utc)

    previous_jobs = query_jobs(previous_partition, event_time_in_utc)
    current_jobs = query_jobs(current_partition, event_time_in_utc)
    all_jobs = previous_jobs + current_jobs

    print('dispatching {} jobs'.format(len(all_jobs)))

    put_all_jobs_into_event_bridge(all_jobs)
    delete_all_jobs(all_jobs)

    print('dispatched and deleted {} jobs'.format(len(all_jobs)))
The function starts by calculating the current and previous partitions. This is done to ensure that no jobs stay unprocessed in the old partition, when a new one starts. Afterwards, jobs from these partitions are queried up to the current time, so no future jobs will be fetched from the current partition. Lastly, all jobs are put into EventBridge and deleted from the table.
Instead of pushing the jobs into EventBridge, they could be started via HTTP(S), gRPC, or pushed into other AWS services, like Amazon Simple Notification Service (SNS) or Amazon Simple Queue Service (SQS). Also remember that the communication with other AWS services is synchronous and does not use batching options when putting jobs into EventBridge or deleting them from the DynamoDB table. This is to keep the function simpler and easier to understand. When you plan to distribute thousands of jobs per minute, you’d want to adjust this, to improve the throughput of the Lambda function.
Cleaning up
To avoid incurring future charges, delete the CloudFormation Stack and all resources you created.
Conclusion
In this post, you learned how to build a serverless scheduling solution. Using only serverless technologies which scale automatically, don’t require maintenance, and offer a pay as you go pricing model, this scheduler solution can be implemented for use cases with varying throughput requirements for their scheduled jobs. These could range from publishing articles at a scheduled time to notifying hundreds of passengers per minute about their upcoming flight.
You can adjust the Lambda function to distribute the jobs with a technology more fitting to your application, as well as to handle recurring tasks. The grouping interval of 5 minutes for the partition key, can be also adjusted based on your throughput requirements. It’s important to note that for this solution to work, the interval by which the jobs are grouped must be longer than the rate at which the Lambda function is started.
Give it a try and let us know your thoughts in the comments!