AWS Big Data Blog
Set up and monitor AWS Glue crawlers using the enhanced AWS Glue UI and crawler history
A data lake is a centralized, curated, and secured repository that stores all your data, both in its original form and prepared for analysis. Setting up and managing data lakes today involves a lot of manual, complicated, and time-consuming tasks. AWS Glue and AWS Lake Formation make it easy to build, secure, and manage data lakes. As data from existing data stores is moved in the data lake, there is a need to catalog the data to prepare it for analytics from services such as Amazon Athena.
AWS Glue crawlers are a popular way to populate the AWS Glue Catalog. AWS Glue crawlers are a key component that allow you to connect to data sources or targets, use different classifiers to determine the logical schema for the data, and create metadata in the Data Catalog. You can run crawlers on a schedule, on demand, or triggered based on an Amazon Simple Storage Service (Amazon S3) event to ensure that the Data Catalog is up to date. Using S3 event notifications can reduce the cost and time a crawler needs to update large and frequently changing tables.
The AWS Glue crawlers UI has been redesigned to offer a better user experience, and new functionalities have been added. This new UI provides easier setup of crawlers across multiple sources, including Amazon S3, Amazon DynamoDB, Amazon Redshift, Amazon Aurora, Amazon DocumentDB (with MongoDB compatibility), Delta Lake, MariaDB, Microsoft SQL Server, MySQL, Oracle, PostgreSQL, and MongoDB. A new AWS Glue crawler history feature has also been launched, which provides a convenient way to view crawler runs, their schedules, data sources, and tags. For each crawl, the crawler history offers a summary of data modifications such as changes in the database schema or Amazon S3 partition changes. Crawler history also provides DPU hours that can reduce the time to analyze and debug crawler operations and costs.
This post shows how to create an AWS Glue crawler that supports S3 event notification using the new UI. We also show how to navigate through the new crawler history section and get valuable insights.
Overview of solution
To demonstrate how to create an AWS Glue crawler using the new UI, we use the Toronto parking tickets dataset, specifically the data about parking tickets issued in the city of Toronto between 2017–2018. The goal is to create a crawler based on S3 events, run it, and explore the information showed in the UI about the run of this crawler.
As mentioned before, instead of crawling all the subfolders on Amazon S3, we use an S3 event-based approach. This helps improve the crawl time by using S3 events to identify the changes between two crawls by listing all the files from the subfolder that triggered the event instead of listing the full Amazon S3 target. For this post, we create an S3 event, Amazon Simple Storage Service (Amazon SNS) topic, and Amazon Simple Queue Service (Amazon SQS ) queue.
The following diagram illustrates our solution architecture.

Prerequisites
For this walkthrough, you should have the following prerequisites:
- An AWS account
- An AWS Identity and Access Management (IAM) user with access to the following services:
- Amazon S3
- AWS Glue
- Amazon SNS
- Amazon SQS
- AWS CloudFormation
If the AWS account you use to follow this post uses Lake Formation to manage permissions on the AWS Glue Data Catalog, make sure that you log in as a user with access to create databases and tables. For more information, refer to Implicit Lake Formation permissions.
Launch your CloudFormation stack
To create your resources for this use case, complete the following steps:
- Launch your CloudFormation stack in
us-east-1:

- Under Parameters, enter a name for your S3 bucket (include your account number).
- Select I acknowledge that AWS CloudFormation might create IAM resources with custom names.
- Choose Create stack.

- Wait until the creation of the stack is complete, as shown on the AWS CloudFormation console.

- On the stack’s Outputs tab, take note of the SQS queue ARN—we use it during the crawler creation process.

Launching this stack creates AWS resources. You need the following resources from the Outputs tab for the next steps:
- GlueCrawlerRole – The IAM role to run AWS Glue jobs
- BucketName – The name of the S3 bucket to store solution-related files
- GlueSNSTopic – The SNS topic, which we use as the target for the S3 event
- SQSArn – The SQS queue ARN; this queue is going to be consumed by the AWS Glue crawler
Create an AWS Glue crawler
Let’s first create the dataset that is going to be used as the source of the AWS Glue crawler:
- Open AWS CloudShell.

- Run the following command:

This action triggers an S3 event that sends a message to the SNS topic that you created using the CloudFormation template. This message is consumed by an SQS queue that will be input for the AWS Glue crawler.Now, let’s create the AWS Glue crawler.
- On the AWS Glue console, choose Crawlers in the navigation pane.
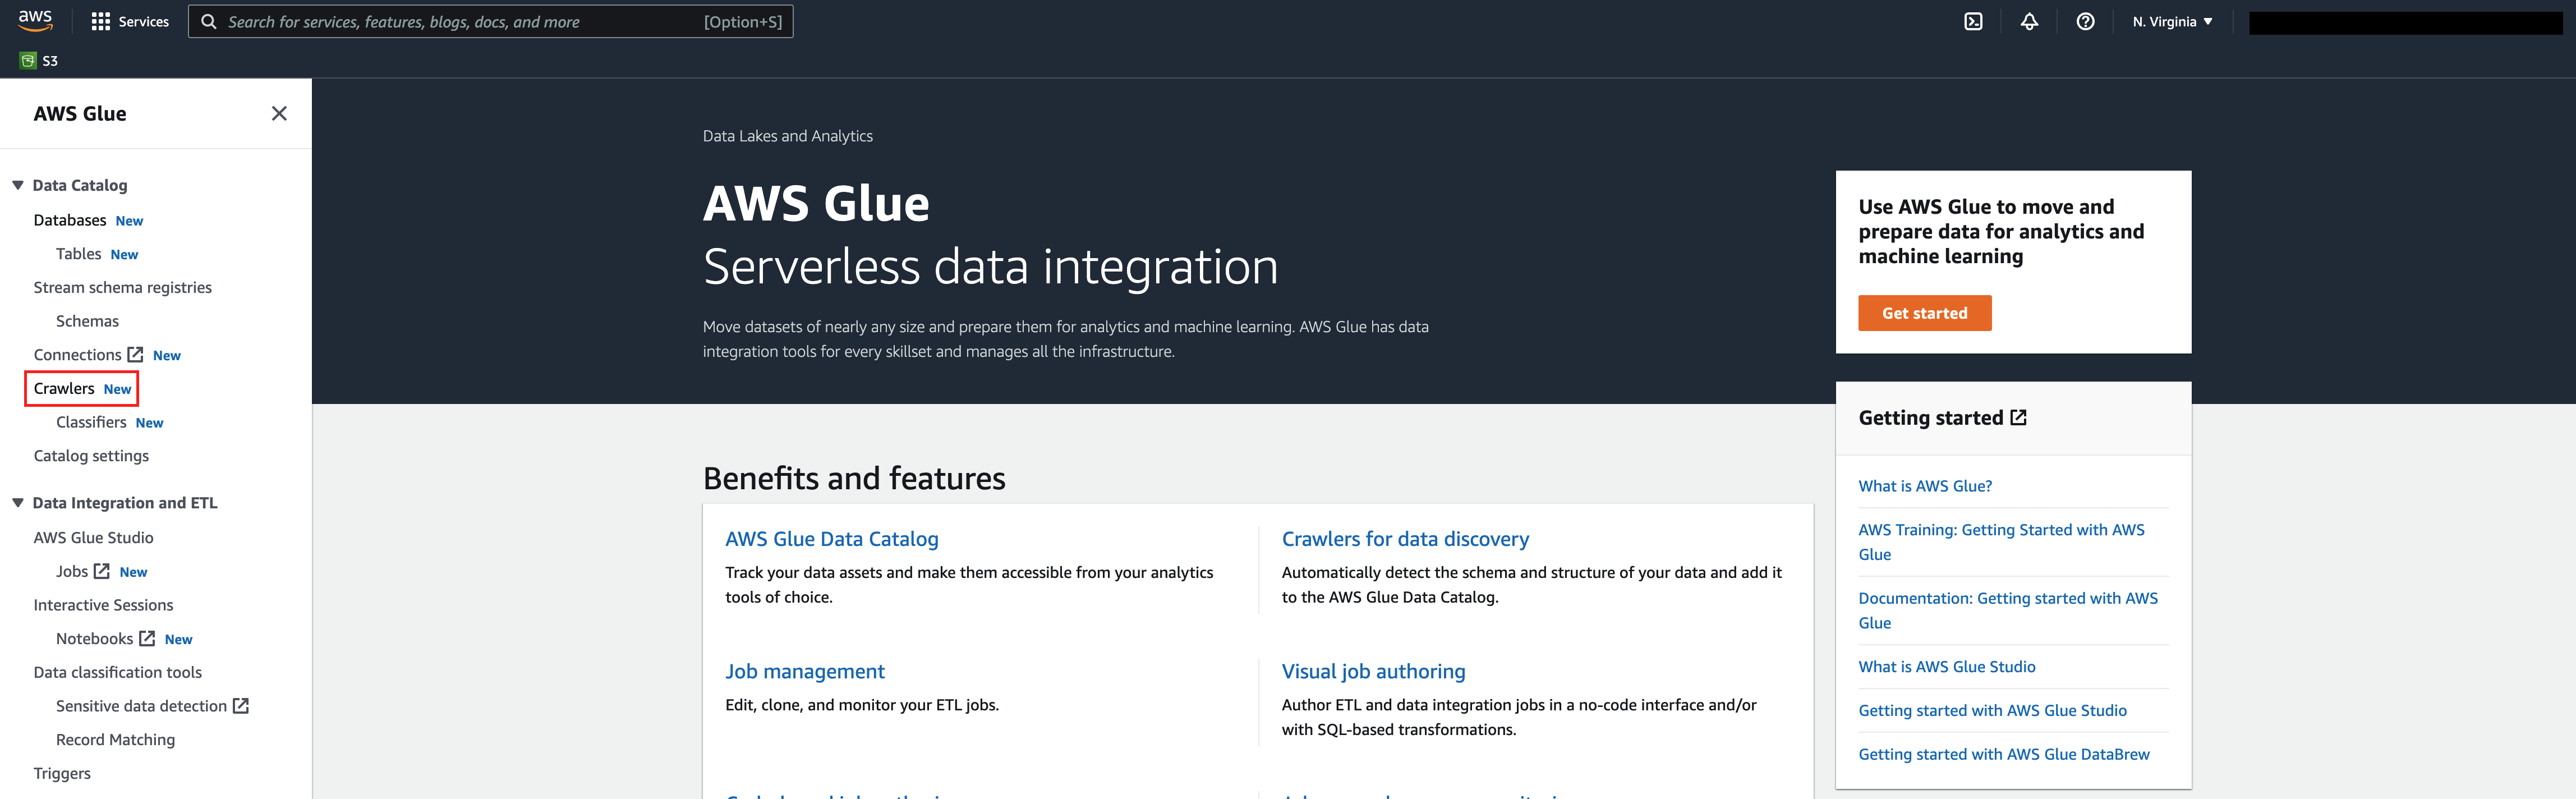
- Choose Create crawler.

- For Name, enter a name (for example,
BlogPostCrawler). - Choose Next.

- For Is your data already mapped to Glue tables, select Not yet.
- In the Data sources section, choose Add data source.
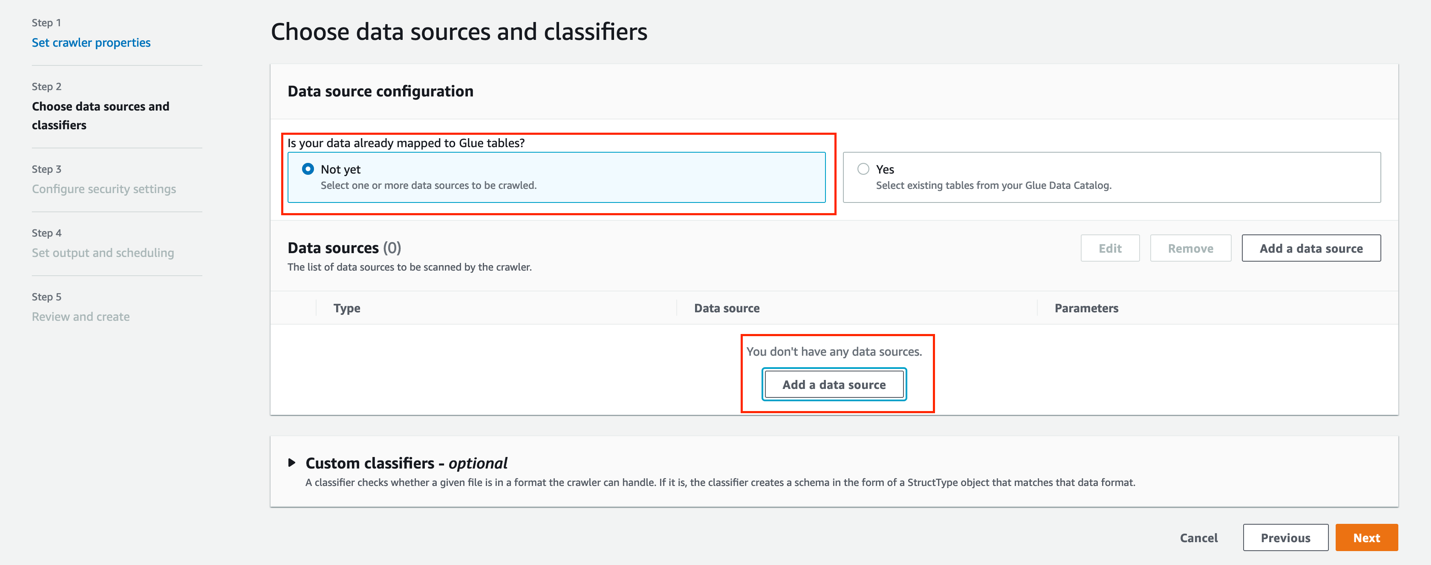
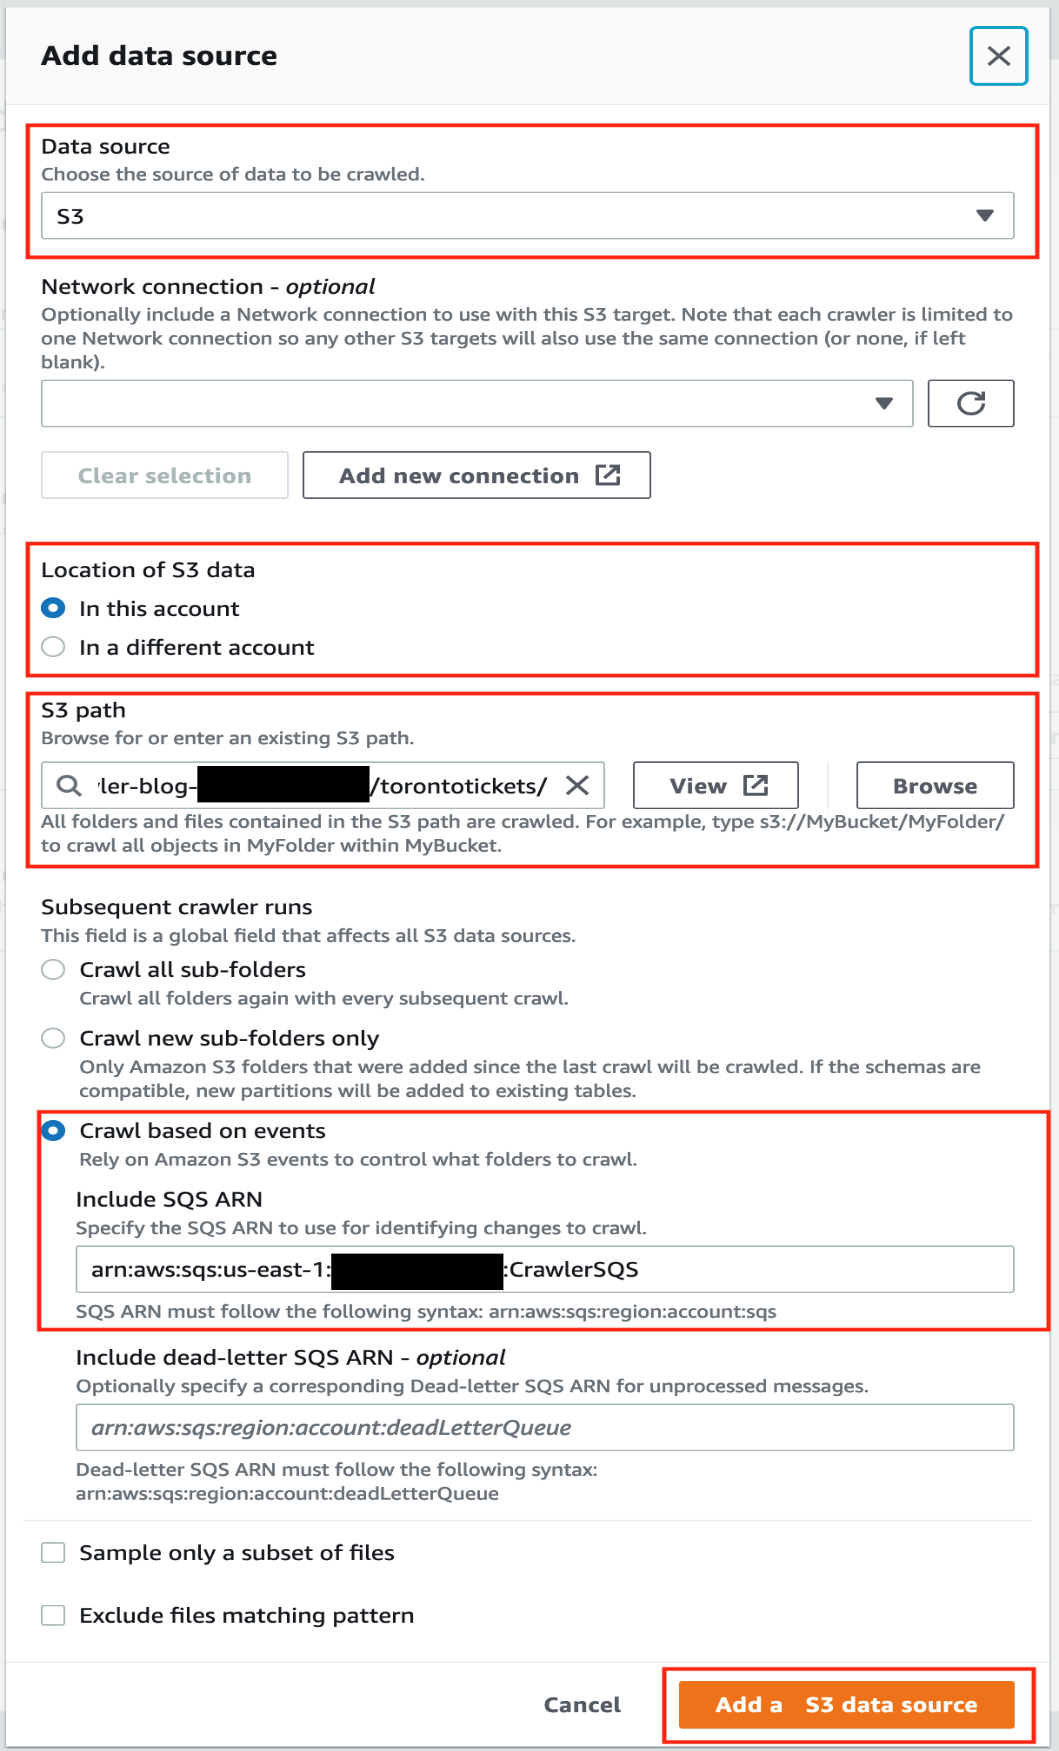
For this post, you use an S3 dataset as a source. - For Data source, choose S3.
- For Location of S3 data, select In this account.
- For S3 path, enter the path to the S3 bucket you created with the CloudFormation template (
s3://glue-crawler-blog-YOUR ACCOUNT NUMBER/torontotickets/). - For Subsequent crawler runs, select Crawl based on events.
- Enter the SQS queue ARN you created earlier.
- Choose Add a S3 data source.
- Choose Next.
- For Existing IAM role¸ choose the role you created (
GlueCrawlerBlogRole). - Choose Next.

Now let’s create an AWS Glue database. - Under Target database, choose Add database.
- For Name, enter
blogdb. - For Location, choose the S3 bucket created by the CloudFormation template.
- Choose Create database.

- On the Set output and scheduling page, for Target database, choose the database you just created (
blogdb). - For Table name prefix, enter
blog. - For Maximum table threshold, you can optionally set a limit for the number of tables that this crawler can scan. For this post, we leave this option blank.
- For Frequency, choose On demand.
- Choose Next.

- Review the configuration and choose Create crawler.

Run the AWS Glue crawler
To run the crawler, navigate to the crawler on the AWS Glue console.

Choose Run crawler.
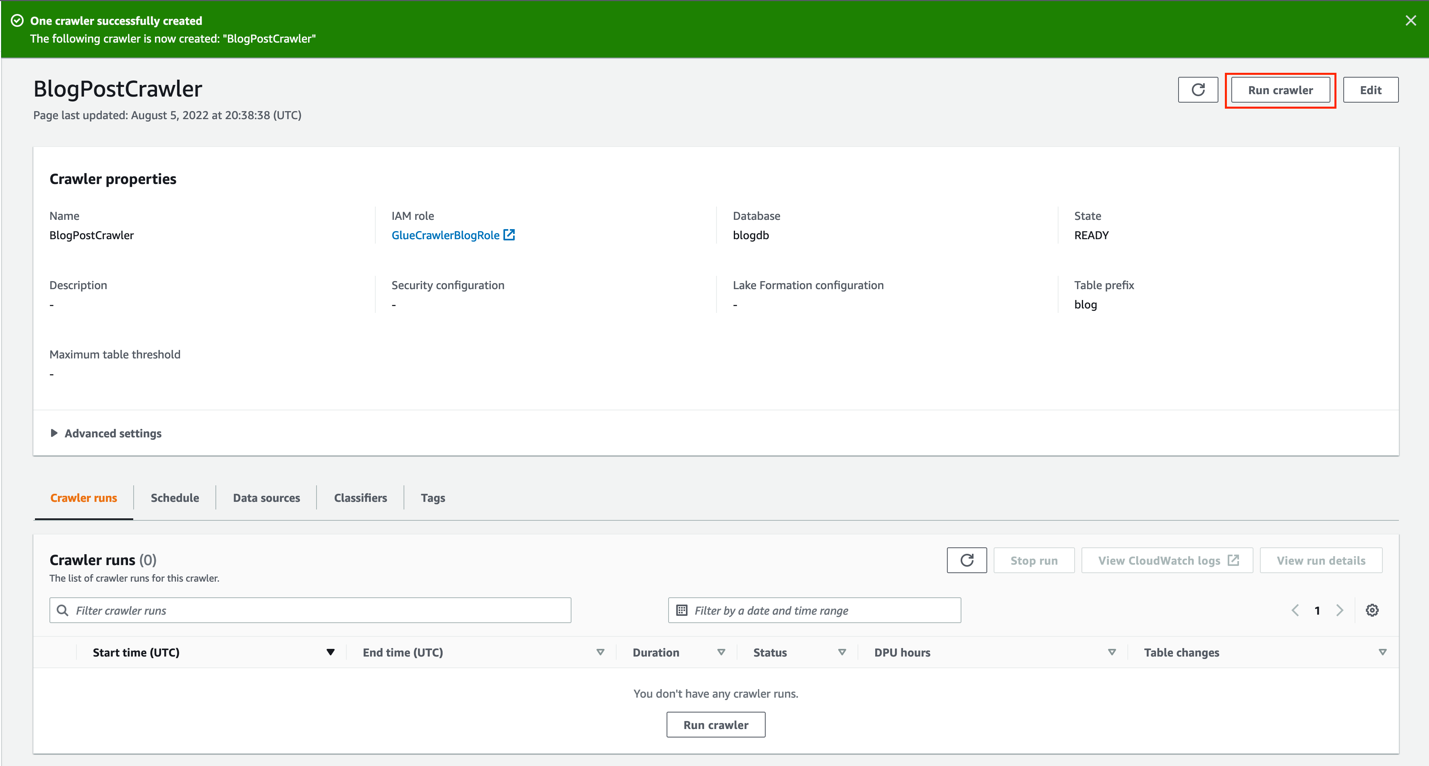
On the Crawler runs tab, you can see the current run of the crawler.

Explore the crawler run history data
When the crawler is complete, you can see the following details:
- Duration – The exact duration time of the crawler run
- DPU hours – The number of DPU hours spent during the crawler run; this is very useful to calculate costs
- Table changes – The changes applied to the table, like new columns or partitions

Choose Table changes to see the crawler run summary.

You can see the table blogtorontotickets was created, and also a 2017 partition.
Let’s add more data to the S3 bucket to see how the crawler processes this change.
- Open CloudShell.

- Run the following command:
- Choose Run crawler to run the crawler one more time.


You can see the second run of the crawler listed.

Note that the DPU hours were reduced by more than half; this is because only one partition was scanned and added. Having an event-based crawler helps reduce runtime and cost.
You can choose the Table changes information of the second run to see more details.

Note under Partitions added, the 2018 partition was created.
Additional notes
Keep in mind the following considerations:
- Crawler history is supported for crawls that have occurred since the launch date of the crawler history feature, and only retains up to 12 months of crawls. Older crawls will not be returned.
- To set up a crawler using AWS CloudFormation, you can use following template.
- You can get all the crawls of a specified crawler by using list-crawls APIs.
- You can update existing crawlers with a single Amazon S3 target to use this new feature. You can do this either via the AWS Glue console or by calling the update_crawler API.
Clean up
To avoid incurring future charges, and to clean up unused roles and policies, delete the resources you created: the CloudFormation stack, S3 bucket, AWS Glue crawler, AWS Glue database, and AWS Glue table.
Conclusion
You can use AWS Glue crawlers to discover datasets, extract schema information, and populate the AWS Glue Data Catalog. AWS Glue crawlers now provide an easier-to-use UI workflow to set up crawlers and also provide metrics associated with past crawlers run to simplify monitoring and auditing. In this post, we provided a CloudFormation template to set up AWS Glue crawlers to use S3 event notifications, which reduces the time and cost needed to incrementally process table data updates in the AWS Glue Data Catalog. We also showed you how to monitor and understand the cost of crawlers.
Special thanks to everyone who contributed to the crawler history launch: Theo Xu, Jessica Cheng and Joseph Barlan.
Happy crawling!
About the authors
 Leonardo Gómez is a Senior Analytics Specialist Solutions Architect at AWS. Based in Toronto, Canada, He has over a decade of experience in data management, helping customers around the globe address their business and technical needs. Connect with him on LinkedIn.
 Sandeep Adwankar is a Senior Technical Product Manager at AWS. Based in the California Bay Area, he works with customers around the globe to translate business and technical requirements into products that enable customers to improve how they manage, secure, and access data.