AWS for M&E Blog
Build a reliable HLS live channel with AWS Elemental MediaStore
For resilient live streams, you usually have two encoders, which creates two master manifests. However, that on its own is not enough. If one of the encoders suffers a failure – let’s say encoder 1 – the manifests for encoder 1 becomes stale (no longer updated), while encoder 2’s manifests and A/V segments continue to update and write to your container.
This is a problem because the player has no way to reference the other set of manifests and A/V segments, which leads to an interruption in the live streaming channel.
In this blog I am going to show how to design and implement a reliable HTTP Live Stream (HLS) using AWS Elemental MediaLive and AWS Elemental MediaStore.
In order to achieve resilience, we first need to understand how HLS is streamed, distributed, and consumed by HLS video players.
HLS is composed by the master manifest, that references the child manifest playlists. The child manifest playlists reference the video and audio segments for each Adaptive Bitrate Rendition (ABR).
The following image depicts the HLS manifest representation and the A/V segments.
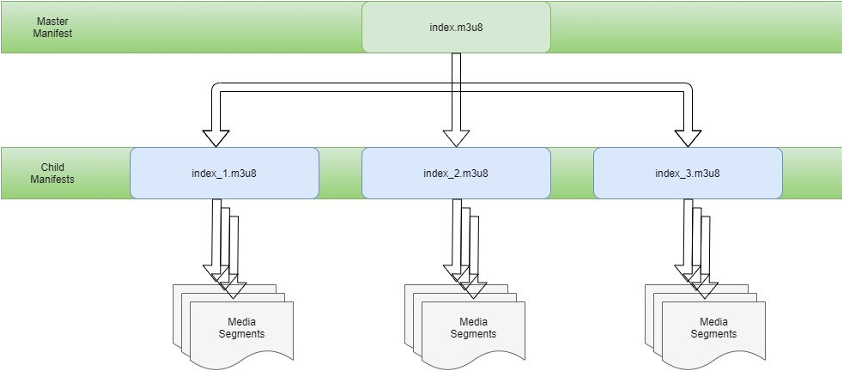
The player on the end device requests the master manifest and, depending on the available bandwidth, requests the corresponding child manifest that references the video and audio segments.
Merged Manifest Playlists
The merged or redundant manifest playlists feature provided in AWS Elemental MediaLive or AWS Elemental Live allow us to reference and index both segment sets provided by the two encoders or encoding pipelines.
Merged manifests allow the player to reference both sets in case of a failure in one of the encoding pipelines. Once a 404 HTTP status error is received, the player requests the redundant child manifest and A/V segments.
The following is the architecture of the resilient live workflow, which encodes and delivers an HLS Live stream using MediaStore:

Overview of steps to create a resilient live workflow:
- Create an AWS Elemental MediaStore Container
a. Create Container
b. Setup a container policy on your new container
c. Add an optional CORS policy if you want to play the stream via an HTML HLS or HTML Dash video player
d. Set up the container object lifecycle policy (to remove segments and child manifests in case of pipeline failure) - Create Amazon CloudFront Distribution
a. Setup the Origins
b. Setup Origin Redundancy Groups - Setup AWS Elemental MediaLive
a. Specific MediaLive settings for Manifest Redundancy
Part 1: Create an AWS Elemental MediaStore container
a. Create the container
From the AWS Management Console search for MediaStore. Click “Create Container” and choose a name for your MediaStore container. After the container is done creating, move to the next step.
b. Set up the container policy
Next, add the following policy to only allow access to your live stream via CloudFront.
After selecting the newly created container, click on the “Container Policy” button. Copy the following JSON container policy into the box labeled “your container policy,” and make sure to replace AWS_ACCOUNT_NUMBER and CONTAINER_NAME with the name of your container and your AWS account number.
Also replace YOUR_SECRET_STRING with a string of characters at your choice (found on the top right of your AWS console).
Container Policy
{
"Version" : "2012-10-17",
"Statement" : [ {
"Sid" : "MediaStoreFullAccess",
"Effect" : "Allow",
"Principal" : {
"AWS" : "arn:aws:iam::AWS_ACCOUNT_NUMBER:root"
},
"Action" : "mediastore:*",
"Resource" : "arn:aws:mediastore:eu-west-1:AWS_ACCOUNT_NUMBER:container/CONTAINER_NAME/*",
"Condition" : {
"Bool" : {
"aws:SecureTransport" : "true"
}
}
}, {
"Sid" : "CloudFrontRead",
"Effect" : "Allow",
"Principal" : "*",
"Action" : [ "mediastore:GetObject", "mediastore:DescribeObject" ],
"Resource" : "arn:aws:mediastore:eu-west-1:AWS_ACCOUNT_NUMBER:container/CONTAINER_NAME/*",
"Condition" : {
"StringEquals" : {
"aws:UserAgent" : "SharedSecret"
},
"Bool" : {
"aws:SecureTransport" : "true"
}
}
} ]
}
c. (Optional) set up a CORS policy
CORS stands for Cross-Origin Resource Sharing. CORS policies are used to grant permission to access selected resources when the request is from a server at a different origin.
If you want to view your live stream on the HLS JS video player demo page, you need to add a CORS policy to your container. To do so, click the “Edit CORS policy” button. Without the CORS policy, you can still view your live stream in desktop players such as VLC or Quicktime.
CORS policy
[
{
"AllowedHeaders": [
"*"
],
"AllowedMethods": [
"GET"
],
"AllowedOrigins": [
"*"
],
"MaxAgeSeconds": 3000
}
]
d. Set up object lifecycle policy
The object lifecycle policy is set up to remove stale manifests if there is an encoding pipeline failure.
The numeric value defined for the seconds_since_create should be greater than the segment size set up in the MediaLive segment settings.
The rule to set up the value of second_since_create should be 1.5 x the segment size.
{
"rules": [
{
"definition": {
"path": [
{
"wildcard": "hls/index_a_*.m3u8"
},
{
"wildcard": "hls/index_b_*.m3u8"
}
],
"seconds_since_create": [
{"numeric": [ ">", 8 ]}
]
},
"action": "EXPIRE"
}
]
}
Part 2: Set up Amazon CloudFront distribution
a. Create web distribution
- For the Origin Domain Name, select the MediaStore container you created in Part 2 from the dropdown list.
- For the Origin Path, enter the directory where you plan to store your manifests written by the Primary Encoder (ex. hls)
- For Origin Protocol Policy, select HTTPS Only
- For Origin Custom Headers, enter the following
- Header Name: User-Agent
- Value: SharedSecret (the string you defined in your Container Policy for SharedSecret)
- For Object Cache select Customize and enter the following values
- Minimum TTL: 5
- Maximum TTL: 5
- Default TTL: 5
- Click Create Distribution button at the bottom right of the page
b. Create custom error response
- Select the tab Error Pages
- Click Create Custom Error Response
- From the dropdown select 404: Not Found
- For the Error Caching Minimum TTL set 1
- Click Create
Part 3: Set up AWS Elemental MediaLive
AWS Elemental MediaLive
For detailed instructions on how to create a live channel in MediaLive, refer to this blog post: https://aws.amazon.com/blogs/media/part1-how-to-send-live-video-to-aws-elemental-mediastore/
a. Specific MediaLive settings for Manifest Redundancy
The settings to enable HLS outputs with manifest redundancy, and write redundant outputs to the same container, are:
- For the HLS group destination A and HLS group destination B.
- Enter the endpoints for your MediaStore container:
- “mediastoressl://container_data_endpoint/hls/index_a” for output A
- “mediastoressl://container_data_endpoint/hls/index_b” for output B
- In the CDN Settings select Hls media store
- In the HLS settings configure the Input Loss behavior to Pause the output.
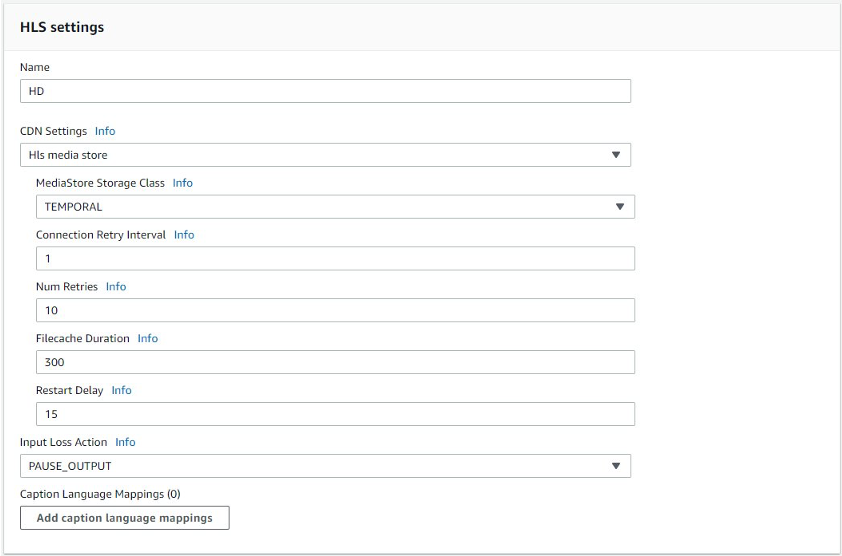
The preceding picture depicts MediaLive HLS Group Settings
- Enable Redundant Manifest in the Manifest and Segments settings
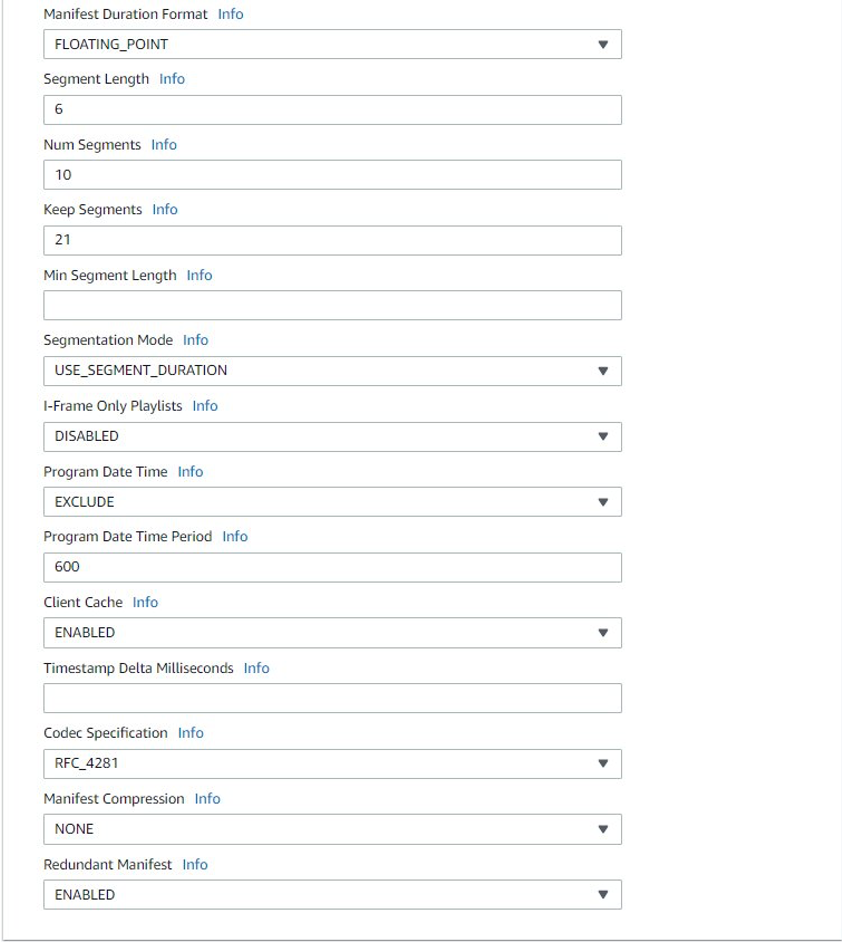
The preceding picture depicts MediaLive Manifest and Segments Settings
By enabling the Pause Output, if there is input loss in one of the pipelines (for example, on pipeline 0) and the Input loss action field is set to PAUSE_OUTPUT, the Standard MediaLive channel does the following:
- It removes the listing for the child manifests for pipeline 0.
- It sends a request to the child manifest location for pipeline 0 to delete the child manifests.
The result for the downstream system reading the main manifest on pipeline 0 is either:
- The system is unable to find a listing for the child manifests for pipeline 0. The system looks in the pipeline 0 main manifest for an alternative child manifest. If it finds the child manifest for pipeline 1, it switches to reading that child manifest.
- Downstream systems that are reading the main manifest for pipeline 1 are not affected because these systems are probably reading the child manifests for pipeline 1 (because these appear first in the manifest).
We now have to consider the scenario where one of the encoding pipelines of the Standard Medialive channel service fails.
When a pipeline or encoder fails (for example, pipeline 0), the following happens:
- Output stops.
- The main manifest for pipeline 0 doesn’t get deleted. It still contains a listing for the child manifests for pipeline 0.
- The child manifests are not updated because no new media files are being produced. The child manifests are stale.
- The main manifest for pipeline 1 doesn’t change. It still contains a listing for the child manifests for pipeline 0 (and for pipeline 1).
The result for the downstream system reading the main manifest for pipeline 0:
- The system finds a listing for child manifests for pipeline 0, but that manifest is stale. If the system can detect that the manifest is stale, it can return to the pipeline 0 main manifest and search for an alternative child manifest. If it finds the child manifest for pipeline 1, it switches to reading that child manifest.
- For this scenario, we set up the Object Life-cycle Policy at the MediaStore Container level to remove the stale child manifests if they are not updated after a certain amount of time that is greater than the segment length.
Set up the CloudFront base URL Manifest and Content so the player requests them through the CloudFront distribution and not directly through the MediaStore Container URL
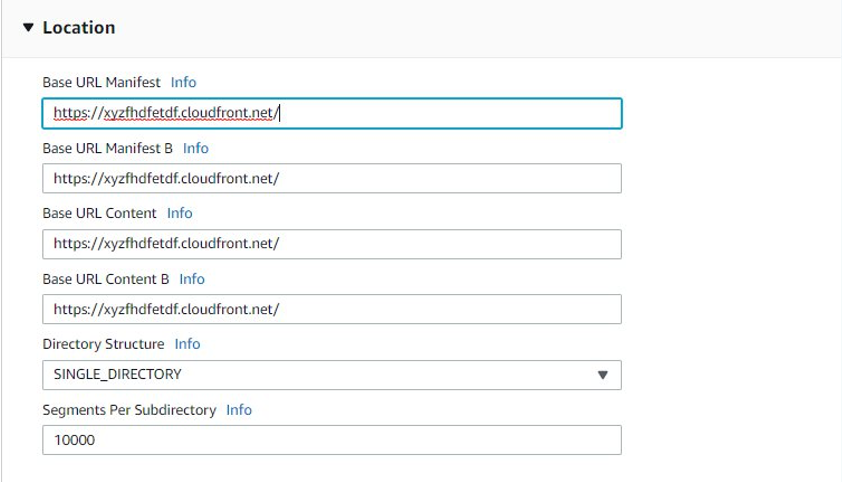
The preceding picture depicts MediaLive Location Settings
- Now click Create Channel
Start your Medialive Channel and verify that you have Manifests being written to your MediaStore Container.
Play the Content
You can play the content through the CloudFront URL: https://xyzfhdfetdf.cloudfront.net/index_a.m3u8
To verify the failover, you can stop the input contribution feeds from the primary pipeline. The player shows the automatic failover to the backup without a refresh to the player or webpage.
Clean up
To avoid incurring future charges, delete the MediaStore container and MediaLive services you created as part of this example.
Conclusion
This post detailed how to set up a resilient Live Stream channel using MediaLive Merged Manifests with MediaStore.
To learn how to create a Live Streaming CloudWatch dashboard with MediaStore, check out this blog: Create a Live Streaming CloudWatch Dashboard using AWS Elemental MediaStore Access Logs