Networking & Content Delivery
Signed cookie-based authentication with Amazon CloudFront and AWS Lambda@Edge: Part 1 -Authentication
In this two-part blog series, you will learn how to use email addresses and domain names for user authentication. With this method, you restrict credentials-free user access to a static website.
In this first blog, you will learn how to implement the authentication mechanism. In the second blog post, you will learn how to implement the authorization mechanism and complete the solution.
For this solution, you will store your content in Amazon Simple Storage Service (S3) and distribute your content via Amazon CloudFront. You process authentication to your end-user via AWS Lambda@Edge. For login-based authentication with AWS Lambda@Edge and Amazon Cognito, view this blog.
This alternative authentication solution provides four benefits:
- Provide credentials-free authentication for your users accessing restricted content
- No database management with user information
- Your users don’t need to sign up
- The solution is serverless, eliminating infrastructure management tasks, such as server or cluster provisioning, patching, operating system maintenance, and capacity provisioning
This solution is General Data Protection Regulation (GDPR) compliant. GDPR compliance is bound to user data, and while this solution processes the user’s email, this information will not be saved.
AWS is committed to offering services and resources to our customers to help them comply with GDPR requirements that may apply to their activities. Still, per the Shared Responsibility Model it is your responsibility that the application running on AWS is GDPR compliant.
Overview of solution
Figure 1 below shows the authentication and authorization workflow as listed below:
- Your user navigates to the login page and is presented with a simple form asking for the user’s corporate email
- The user enters their corporate email address and clicks on Login
- Submitting the form invokes an API call. The API call is delegated to an AWS Lambda@Edge function that checks the email address domain the user submits
- If an allowed domain matches, the function generates a signed URL and sends it to the user’s email using Amazon Simple Email Service
- Clicking on the link routes the user to the restricted content with the URL signature
- With a valid signed URL, Amazon CloudFront invokes an AWS Lambda@Edge function that returns a signed cookie. The browser redirects the user to the restricted content
- The signed cookie is used on subsequent requests and grants access to the files stored in Amazon S3. This allows a seamless browsing experience through the gated content
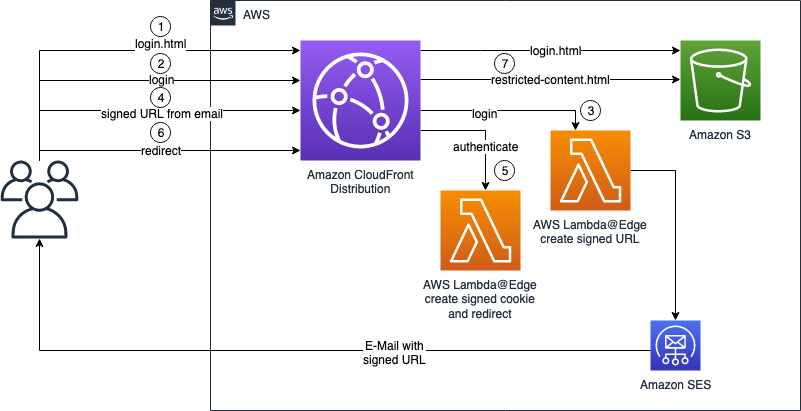
Figure 1: Authentication and authorization workflow
Walkthrough
Using Amazon CloudFront and AWS Lambda@Edge to secure your content without using credentials has three steps:
- Restrict your content with Amazon CloudFront (Accessing content)
- Create an AWS Lambda@Edge function for domain checking and generating a signed URL (Authentication)
- Create an AWS Lambda@Edge function, which is invoked by visiting the signed URL for generating a signed cookie (Authorization)
Code snippets are provided throughout the blog post.
In this blog post, you will learn how to implement step 1 and 2.
Prerequisites
To start this walkthrough, you will need to have first taken the following steps:
- Open an AWS account
- Create an Amazon S3 bucket to store your static website
- Block public access for the Amazon S3 bucket to prevent users from directly accessing content
- Create an Amazon CloudFront distribution
- Restrict access to Amazon S3 content by using an Origin Access Identity
- Create a key pair, which is going to be used for signing the URL and the cookie
The rest of this blog focuses on the authentication mechanism with signed URLs and signed Cookies.
Accessing content
Amazon CloudFront is going to be the main component for this solution and has to be configured appropriately so that:
- The login page is accessed without any restrictions (/login.html)
- The secure content is accessed with a valid signed URL or a signed Cookie (/restricted-content.html)
- Public assets are accessed from the login page and from the secured content (/assets/*)
You will configure three behaviors for unauthenticated users and two behaviors for authenticated users to fulfill above requirements. The three Amazon CloudFront behaviors for unauthenticated users are:
- login.html
- /assets/*
- /login
The two Amazon Cloudfront behaviors for authenticated users are:
- /auth
- Default(*)
Let’s have a look at how to configure the three Amazon CloudFront behaviors for unauthenticated users:
- Log in to the Amazon CloudFront console
- Select your previously created distribution and select Distribution settings
- On the Distribution settings page, select the tab Behaviors
- Select Create Behavior
- In the Cache Behavior Settings, fill login.html as Path Pattern
- For Restrict Viewer Access (Use Signed URLs or Signed Cookies), select No and Save
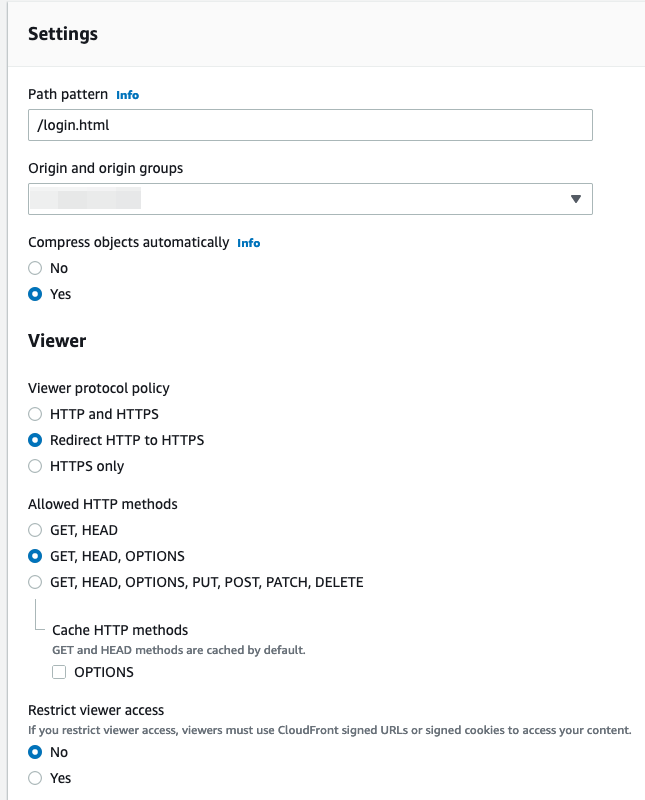
Figure 2: Cache Behavior Settings
Publicly accessible assets such as CSS or JavaScript files are stored in the assets folder. Configure the asset behavior in the same way as the login.html:
- Select Create Behavior
- In the Cache Behavior Settings, fill /assets/* as Path Pattern
- For Restrict Viewer Access (Use Signed URLs or Signed Cookies) select No as shown in the preceding Figure 2 and Save
For the three behaviors for unauthenticated users, you have to configure your login path. The login path invokes an AWS Lambda@Edge function, which creates the signed URL and sends an email:
- Select Create Behavior
- In the Cache Behavior Settings, fill /login as Path Pattern
- For Restrict Viewer Access (Use Signed URLs or Signed Cookies), select No and Save
Now you configure the restricted content to only be accessible for authenticated users:
- Select Create Behavior
- In the Cache Behavior Settings, fill /auth as Path Pattern. With this path the signed URL accesses the signed cookie generated by an AWS Lambda@Edge function
- For Restrict Viewer Access (Use Signed URLs or Signed Cookies), select Yes
- Select Trusted Key Groups and select one of the defined Trusted Key Groups. The documentation explains how to create a key pair for signing the requests and how to add a trusted key group to your Amazon CloudFront distribution
- Click Save
Amazon CloudFront creates a Default behavior that implicitly allows access to all resources. Follow the steps below to restrict all remaining content:
- Select the “Default” Behavior and click Edit
- Change Restrict Viewer Access (Use Signed URLs or Signed Cookies) to Yes as shown in the following Figure 3
- Select the same Trusted Key Groups and select one of the defined Trusted Key Groups
- Add the selected Trusted Key Group to the behavior and save your changes
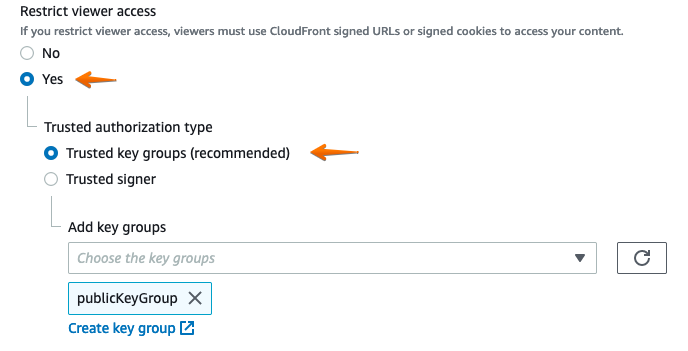
Figure 3: Restrict Viewer Access with Trusted Key Groups
The following Figure 4 shows the restricted access behavior. The Default and the /auth behavior indicate restricted viewer access. Having the publicKeyGroup in the Trusted Key Groups column indicates that the Default and /auth path pattern are restricted in terms of access. The precedence is important. The Default behavior must have the last precedence as Amazon CloudFront takes the first match in the precedence list.
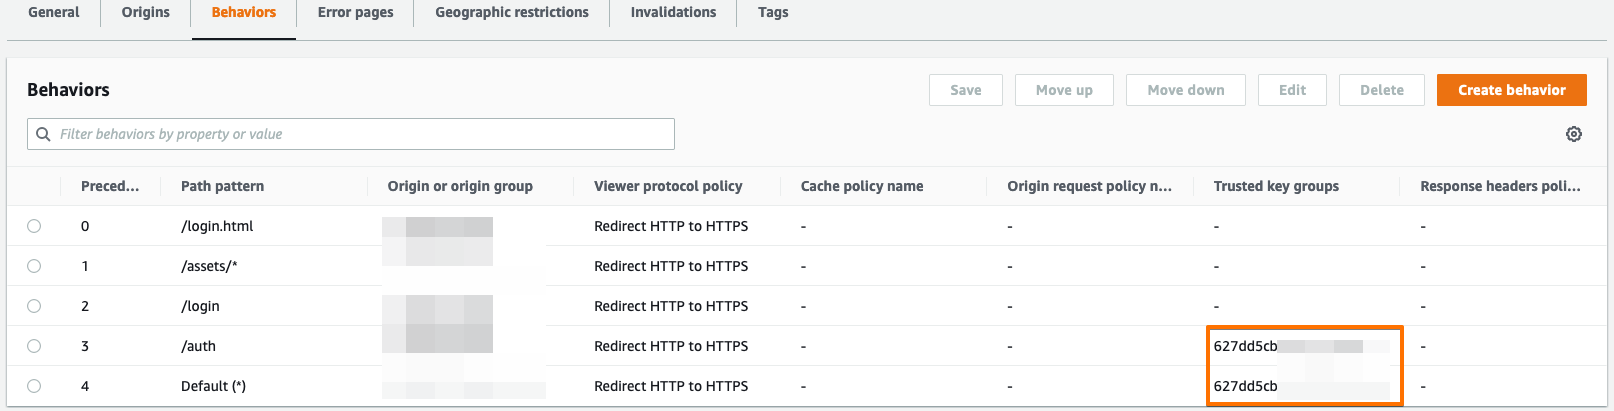
Figure 4: Restricted access behavior for the Amazon CloudFront distribution
With that configuration setup, try to access the login.html page. Using the Amazon CloudFront Domain Name and the path to the login.html e.g., https://dxxxxxxxxxxxxx.cloudfront.net/login.html, you are able to access the login page without any restrictions as shown in the following Figure 5. The page renders as the assets folder containing all the CSS styles are accessible.
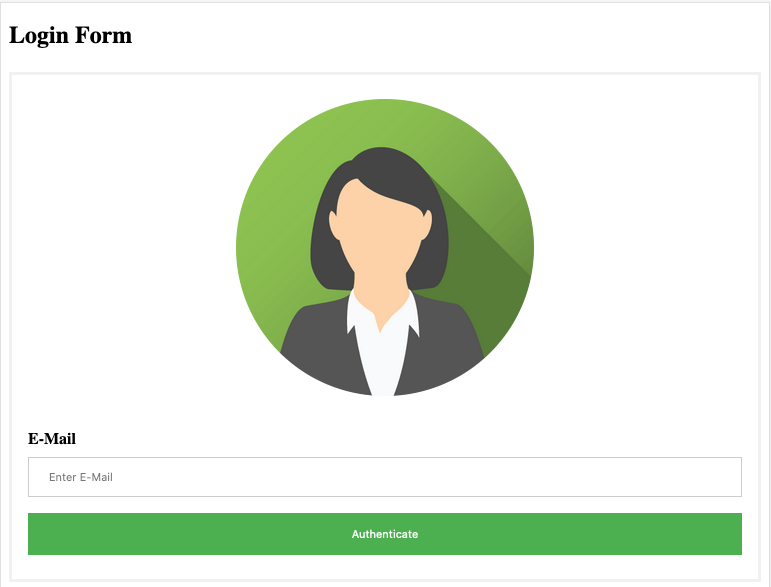
Figure 5: Login Form
Any other content is restricted and should not be accessible from the browser e.g., https://dxxxxxxxxxxxxx.cloudfront.net/restricted-content.html. You get the message shown in the following Figure 6:
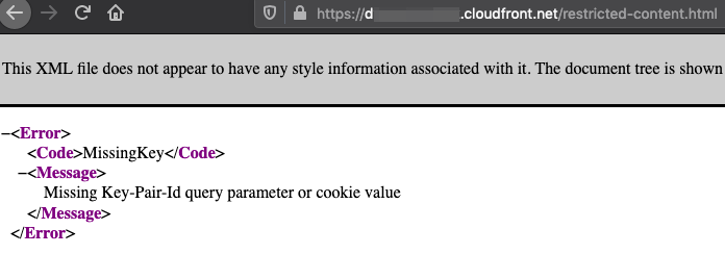
Figure 6: Missing key pair to access restricted content
This informs you that you have no access to this content. This is the default error response for Amazon CloudFront. The request does not contain the signing policy metadata or signed token. If you want to set a custom error page depending on a specific HTTP status code, look at this documentation. You should set the login.html page as a Custom Error Page. Every time a request returns an HTTP status code of 403 (Forbidden), the login.html page is rendered.
Authentication mechanism
Full-fledged identity management is not needed. Still, you need a setup to authenticate your users.
Amazon CloudFront performs the authentication. Using Amazon CloudFront, you check if your user has provided the needed login information such as a signed URL or a signed cookie. Amazon CloudFront invokes functions at the edge using AWS Lambda@Edge or Amazon CloudFront Functions. In this blogpost we use AWS Lambda@Edge functions as they provide a more powerful creation of functions.
You use AWS Lambda@Edge functions to change Amazon CloudFront requests and responses at the following points:
- After CloudFront receives a request from a viewer (viewer request)
- Before CloudFront forwards the request to the origin (origin request)
- After CloudFront receives the response from the origin (origin response)
- Before CloudFront forwards the response to the viewer (viewer response)
One way of restricting content is to share a signed URL. A signed URL include extra information for verification, such as an expiration date and time, or the client IP address. You provide users a form where they input their email address. Submitting the email address leads to an API call that is delegated to an AWS Lambda@Edge function.
The API call invokes an AWS Lambda@Edge function (viewer request) with the following steps:
- Check if the email has the right format via a regular expression
- Check if the email domain belongs to a specific set of allowed domains (specify format: @domain.tld). This list is embedded in the code or retrieved via AWS Systems Manager Parameter Store. For this blog post, you are using AWS Systems Manager Parameter Store. If you are going to use the provided code samples, don’t forget to add the following permissions to your AWS Lambda function role:
- ssm:GetParameter
- Create a signed URL for the restricted content with an expiration date. The signed URL will include the /auth path
- Create an email, which includes the signed URL
For the sake of the blog post, the code snippets provided omit logging and exception handling but we recommend to properly log and handle errors.
The complete AWS Lambda function looks like this:
const AWS = require('aws-sdk');
const ses = new AWS.SES({ region: '<your-region>' });
const ssm = new AWS.SSM({ region: '<your-region>' });

// Either defined as a constant or retrieved from AWS Systems Manager Parameter Store
const SENDER = '<your-sender-email-address>';

// Either defined as a constant or retrieved from AWS Systems Manager Parameter Store
const SIGNING_URL = '<your-cloudfront-url>';

const signingUrl = `https://${SIGNING_URL}/auth`;

const content = `
<\!DOCTYPE html>
<html lang="en">
  <head>
    <meta charset="utf-8">
    <title>Successful request</title>
  </head>
  <body>
    <p>Email with authentication token sent</p>
  </body>
</html>
`;

const response = {
    status: '200',
    statusDescription: 'OK',
    headers: {
        'cache-control': [{
            key: 'Cache-Control',
            value: 'max-age=100'
        }],
        'content-type': [{
            key: 'Content-Type',
            value: 'text/html'
        }]
    },
    body: content,
};

const error = {
    body: 'Email is not valid',
    bodyEncoding: 'text',
    headers: {
        'content-type': [{
            key: 'Content-Type',
            value: 'text/html'
        }]
    },
    status: '204',
    statusDescription: 'Error'
};

const cache = {}

const loadParameter = async(key, withDecryption = false) => {
    const { Parameter } = await ssm.getParameter({ Name: key, WithDecryption: withDecryption }).promise();
    return Parameter.Value;
};

const validateEmail = (allowedDomains, email) => {
    if (!allowedDomains) return false;
    const re = /\S+@\S+\.\S+/;
    return re.test(email) && allowedDomains.indexOf(email.substring(email.indexOf("@"))) >= 0;
};

const sendEmail = async(publicKey, privateKey, email) => {
    const cloudFront = new AWS.CloudFront.Signer(publicKey, privateKey);
    const signedUrl = cloudFront.getSignedUrl({
        url: signingUrl,
        expires: Math.floor((new Date()).getTime() / 1000) + (60 * 60 * 1) // Current Time in UTC + time in seconds, (60 * 60 * 1 = 1 hour)
    });

    const params = {
        Destination: {
            ToAddresses: [
                email
            ]
        },
        Message: {
            Body: {
                Html: {
                    Data: signedUrl,
                    Charset: 'UTF-8'
                }
            },
            Subject: {
                Data: '[stars on AWS] Login credentials for ' + email,
                Charset: 'UTF-8'
            }
        },
        Source: SENDER
    };
    await ses.sendEmail(params).promise();
};

exports.handler = async(event, context, callback) => {
    if (cache.allowedDomains == null) cache.allowedDomains = loadParameter('allowedDomains')
    if (cache.publicKey == null) cache.publicKey = loadParameter('publicKey');
    if (cache.privateKey == null) cache.privateKey = loadParameter('privateKey', true);

    const { allowedDomains, publicKey, privateKey } = cache;

    const request = event.Records[0].cf.request;
    if (request.method === 'GET') {
        const parameters = new URLSearchParams(request.querystring);
        if (parameters.has('email') === false) return error;
        const email = parameters.get('email');
        if (!validateEmail(allowedDomains, email)) return error;
        else {
            await sendEmail(publicKey, privateKey, email);
            return response;
        }
    }
    return error;
};
The main handler of the AWS Lambda@Edge function retrieves all relevant parameterized keys:
- A list of allowed email domains.
- Public and private key pair for signing the URL
The allowed email domain list is stored as a StringList in AWS Systems Manager Parameter Store. Hard coding confidential information is an anti-pattern. Store the public key ID and the private key (created as a prerequisite) for signing the URL in AWS Systems Manager Parameter Store. The public key ID is stored as a String, and the private key is stored as a SecureString.
Store the public key ID in AWS Systems Manager Parameter Store with the following command:
aws ssm put-parameter --name "publicKeyId" --type String --value "<your-public-key-id>" --region us-east-1
Store the private key in AWS Systems Manager Parameter Store with the following command:
aws ssm put-parameter --name "privateKey" --type SecureString --value "$(cat <private-key-file>.pem)" --region us-east-1
After loading all relevant parameters, the handler method parses the query string if the request is a GET method. First, the query string contains the entered email address. The handler validates the email address. Next, the email is tested against a regular expression to see if the email belongs to a specific set of allowed domains. Finally, if all validation steps succeed, the signed URL is created.
The AWS SDK provides a mechanism to sign URLs for Amazon CloudFront. The method takes two significant parameters, the URL to sign and the expiration date. The signed URL is included in the email, which is sent out to the recipient. To mitigate sharing the signed URL to third parties, decrease the expiration time from 1 hour to a couple of minutes. Store the signed URL in an Amazon DynamoDB table and check if that signed URL has been used. The recipient’s email address is included as part of the API call’s query string. The TTL for Amazon CloudFront has to be set to the value of the expiration time. This prevents users from accessing cached files after the signed URLs expires.
Verify an email address in Amazon Simple Email Service, which is used as a sender. Once you receive the email, you use the signed URL to access the secure content. Amazon CloudFront requires a specific response from the AWS Lambda@Edge function. Therefore, you should specify a response for successful processing and an error object to indicate a wrong behavior.
Conclusion
In this blog post, you walked through the authentication mechanism for securing a static website. You learnt how to authenticate users without managing users by leveraging functionalities such as signed URLs and signed Cookies to prevent anonymous users from accessing restricted content. Even though the signed URL is only valid for a specific period of time, a signed URL can be shared with third parties. To mitigate the risk of sharing the URL, decrease the expiration time from 1 hour to 5-10 minutes. Implement a process for checking if a user already used a signed URL. You can do this with AWS Lambda@Edge which checks already created signed URLs from an Amazon DynamoDB table. With this additional check, a signed URL is not used several times when it is valid.
Read the second part of this blog to learn how to implement the authorization mechanism granting people with proper access rights to access the restricted content. The second part completes the solution.
If you have any questions or suggestions, please leave a comment.

Aleksandar Tolev
Aleksandar Tolev is a Solutions Architect Manager at Amazon Web Services with passion for Manufacturing and Automotive customers. With technical guidance and as trusted advisor he helps Automotive customers during their cloud journey. Prior to joining AWS, he worked as a Cloud Architect for an Automotive-OEM.

Marco Staufer
Marco Staufer is a Global Account Representative at Amazon Web Services working with customers in the Automotive industry.