Amazon Web Services ブログ

AWS Deadline Cloud のサービスマネージドフリートで 3ds Max を使う方法

本記事は 2025 年 8 月 14 日 に公開された「How to use 3ds Max with service-managed fleets on AWS Deadline Cloud」を翻訳したものです。

AWS Deadline Cloud のマネージドインフラストラクチャを活用しつつ、Autodesk 3ds Max をワークフローで使い続けたいスタジオやアーティストにとって、両立は難しい課題となる場合があります。本記事では、設定スクリプト(host config script)を使ってサービスマネージドフリート (SMF) 上で 3ds Max を有効にする方法を紹介します。これによってマネージドインフラストラクチャの利便性と 3ds Max の機能を組み合わせ、レンダーノードを自前で管理する負荷を軽減しながら、レンダリングパイプラインの柔軟性を高めることができます。

前提条件

開始前に、以下を準備してください。

  • AWS Deadline Cloud を使用するための AWS アカウント。
  • Windows インスタンスを使用する SMF が 1 つ関連付けられたキューを持つ Deadline Cloud ファーム。既存環境への影響を避けるため、3ds Max 専用のキューを新規作成することを推奨します。
  • Deadline Cloud モニターがインストール済みで、ファーム用のプロファイルが作成済みであること。
  • Autodesk からダウンロードした 3ds Max 2024 のインストールファイル (フォルダのルートに Setup.exe があることを確認してください)。
  • 3ds Max 2024 がインストールされた Windows ワークステーション
  • 3ds Max 用 Deadline Cloud サブミッター

注意: Autodesk 3ds Max には AWS とは別のライセンス要件があります。作業を進める前に、適切なライセンスを保有していることを確認してください。詳細は Autodesk Cloud Rights for 3ds Max を参照してください。

3ds Max インストールパッケージの準備

まず、フリートワーカーにデプロイするための 3ds Max インストールファイルを準備します。

  1. 3ds Max 2024 のインストールフォルダを 3ds_max_2024_full.zip という名前の zip パッケージに圧縮します。

A Windows File Explorer window displays two panes showing the 3ds Max installation compression process. The left pane contains a '3dsMax2024' folder with a compressed zip file named '3ds_max_2024_full', while the right pane shows the source installation directory containing multiple folders such as 3rdParty, Content, manifest, and various installer files. This demonstrates the process of compressing the 3ds Max installation folder into a zip file for upload.installation directory. The directory contains multiple folders including 3rdParty, Content, manifest, ODIS, SetupRes, x64, and x86. Various installer and configuration files are also visible in the directory.

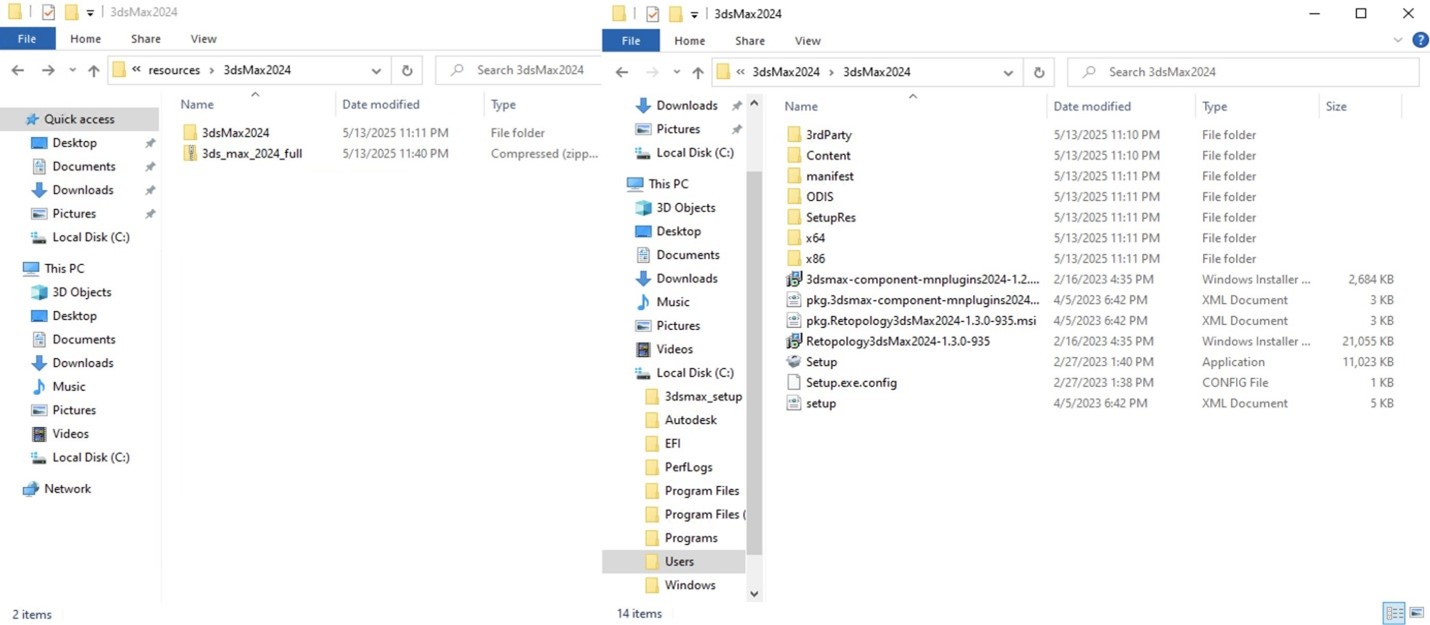
図 1: 3ds Max インストールフォルダを zip ファイルに圧縮する。

  1. AWS Deadline Cloud コンソールに移動し、Farms and other resources に進みます。
  2. ファームを選択し、次にキューを選択します。
  3. キューの詳細ビューで、Job Attachments を選択します。
  4. バケット名をクリックして S3 コンソールでバケットを開きます。
  5. バケット内に resources という新しいフォルダを作成します。
  6. 作成した resources フォルダに 3ds_max_2024_full.zip ファイルをアップロードします。

The AWS S3 console displays the resources folder within an S3 bucket, showing the Objects tab with one uploaded file. The zip file named '3ds_max_2024_full.zip' appears in the objects table with a size of 4.9 GB and Standard storage class. The S3 console interface shows various action buttons including Upload, Download, Delete, and Create folder at The Resources window showing where the zip folder can be accessed and selected as an object.

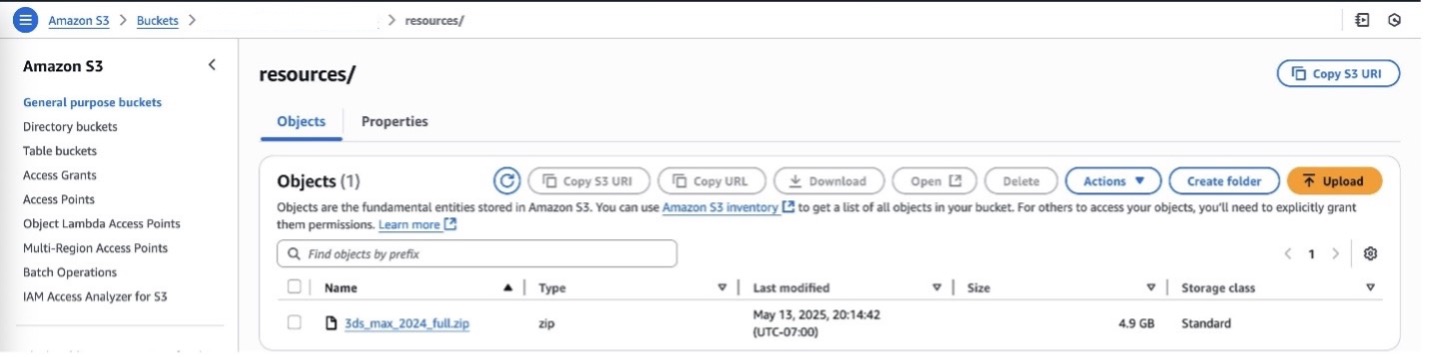
図 2: 3ds Max インストール zip ファイルを S3 バケットにアップロードする。

S3 バケットの権限設定

設定スクリプトはフリートの IAM ロールで実行されます。フリートワーカーが 3ds Max インストールファイルにアクセスできるよう、フリートの IAM ロールに適切な S3 バケット権限を付与する必要があります。

  1. AWS Deadline Cloud コンソールに移動し、ファームおよび他のリソース(Farms and other resources) に進みます。
  2. ファームを選択し、次にフリートを選択します。
  3. フリートの詳細画面内からFleetサービスロールへのリンクをクリックします。
  4. ロールの許可ポリシーに以下のインラインポリシーを追加します。<your-bucket-name> と <your-account-id> 部分の記述を実際の値に置き換えてください。
{
    "Version": "2012-10-17",
    "Statement": [{
        "Effect": "Allow",
        "Action": [
            "s3:GetObject",
            "s3:PutObject",
            "s3:ListBucket",
            "s3:GetBucketLocation"
        ],
        "Resource": [
            "arn:aws:s3:::<your-bucket-name>",
            "arn:aws:s3:::<your-bucket-name>/resources/*"
        ],
        "Condition": {
            "StringEquals": {
                "aws:ResourceAccount": "<your-account-id>"
            }
        }
    }]
}

The AWS IAM console shows the permissions page for a Deadline Cloud Fleet role with three attached policies displayed in a table. An expanded view reveals the 'InstallationResources' inline policy containing JSON code that grants S3 permissions including GetObject, PutObject, ListBucket, and GetBucketLocation actions for a specific S3 bucket and its resources folder.

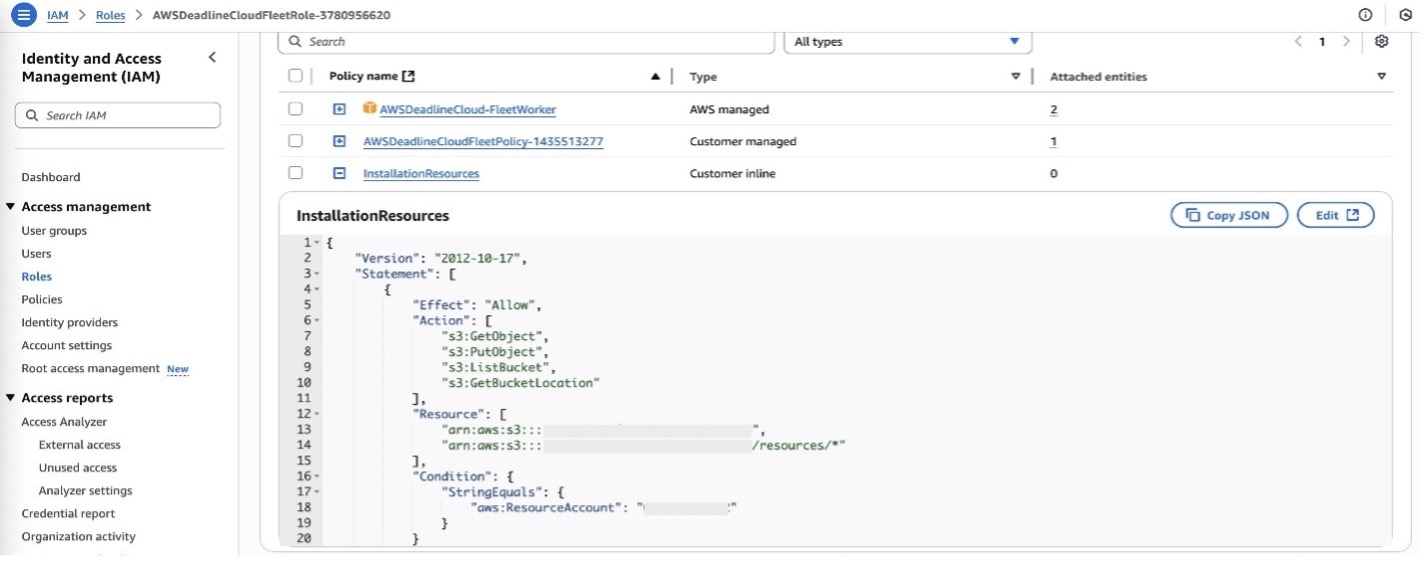
図 3: フリート IAM ロールに S3 権限を追加する。

ワーカー設定スクリプトの作成

次に、フリートワーカーの起動時に 3ds Max をインストールするワーカー設定スクリプトを作成します。

  1. AWS Deadline Cloud コンソールに移動し、ファームおよび他のリソース(Farms and other resources)に進みます。
  2. ファームを選択し、次にフリートを選択します。
  3. フリートの詳細画面内で、設定Configurations) タブを選択します。
  4. 「ワーカー設定スクリプト(Worker configuration script)」セクションで、スクリプトを作成(Create)または編集(Edit) をクリックします。

The AWS Deadline Cloud fleet configuration interface displays the Configurations tab with a Worker configuration script section. The section shows "No worker configuration script" with a description explaining it configures Windows and Linux workers using elevated permissions for tasks like software installation. A blue "Create" button is available to add a new worker configuration script.

図 4: フリート設定でワーカー設定スクリプトにアクセスする。

  1. スクリプトエディタに以下の PowerShell スクリプトを貼り付けます。<your-bucket-name> を S3 バケット名に置き換えてください。
mkdir C:\3dsmax_setup

Write-Host " --- Downloading from S3 --- "
aws s3 cp --no-progress s3://<your-bucket-name>/resources/3ds_max_2024_full.zip C:\3dsmax_setup\3dsmax.zip

Write-Host " --- Expanding Archive --- "
Expand-Archive C:\3dsmax_setup\3dsmax.zip C:\3dsmax_setup\

Write-Host " --- Starting Install --- "
Start-Process -FilePath "C:\3dsmax_setup\3dsMax2024\Setup.exe" -ArgumentList "-q" -Wait -PassThru

Write-Host " --- Post install setup --- "
[Environment]::SetEnvironmentVariable("Path", "C:\Program Files\Autodesk\3ds Max 2024;" + [Environment]::GetEnvironmentVariable("Path", "Machine"), "Machine")

& "C:\Program Files\Autodesk\3ds Max 2024\Python\python.exe" -m ensurepip
& "C:\Program Files\Autodesk\3ds Max 2024\Python\python.exe" -m pip install deadline-cloud-for-3ds-max
[Environment]::SetEnvironmentVariable("3DSMAX_EXECUTABLE", "C:\Program Files\Autodesk\3ds Max 2024\3dsmaxbatch.exe", "Machine")
[Environment]::SetEnvironmentVariable("PYTHONPATH", "C:\Program Files\Autodesk\3ds Max 2024\Python;C:\Program Files\Autodesk\3ds Max 2024\Python\Scripts", "Machine")
[Environment]::SetEnvironmentVariable("Path", "C:\Program Files\Autodesk\3ds Max 2024\Python;C:\Program Files\Autodesk\3ds Max 2024\Python\Scripts;" + [Environment]::GetEnvironmentVariable("Path", "Machine"), "Machine")

The worker configuration script editor shows a PowerShell script with numbered lines containing commands for automated 3ds Max installation on worker nodes. The script downloads the 3ds Max zip file from S3, extracts it, runs the silent installation, and configures environment variables for proper software functionality.

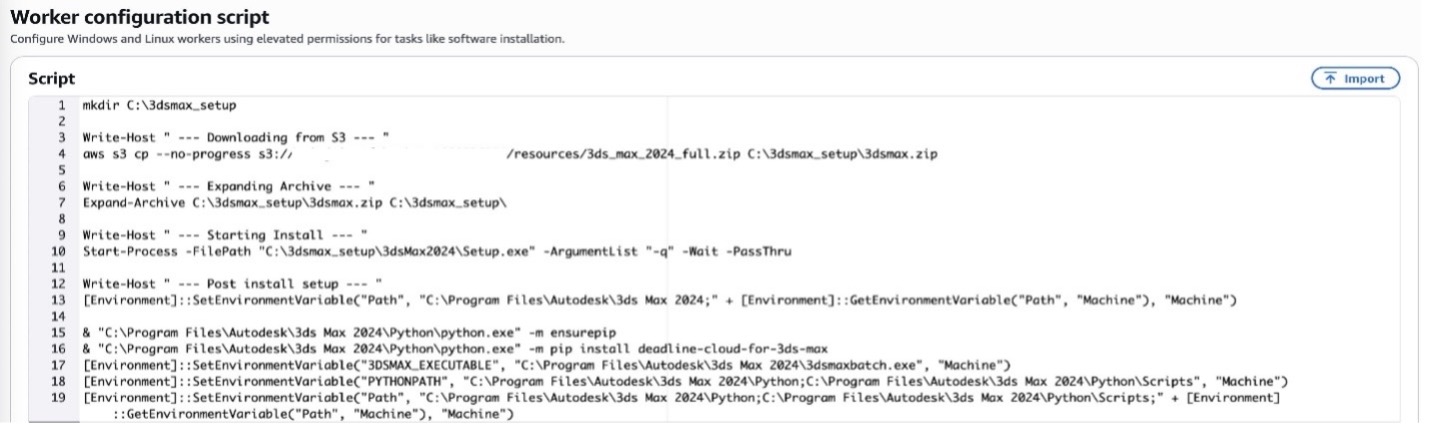
図 5: 3ds Max インストールコマンドでワーカー設定スクリプトを編集する。

  1. 重要: 3ds Max のインストールが完了するまで十分な時間を確保するため、スクリプトのタイムアウトを 1200 秒 (20 分) に更新してください。
  2. スクリプトを作成(Create)、または保存(Save) をクリックして変更を適用します。

The timeout configuration section displays an input field set to 1200 seconds with a description explaining this is the duration before the script times out and loses elevated permissions. The interface shows validation text indicating the value must be between 300 and 3600 seconds, with Cancel and Create buttons at the bottom right.

図 6: スクリプトのタイムアウトを 1200 秒に設定する。

注意: スクリプトはフリートワーカーの起動時に実行されます。フリート内に既に実行中のワーカーがある場合、新しく設定したスクリプトは実行しないでください。

キュー環境(Queue environments)の設定

デフォルトのキュー環境は、サブミットされたジョブに必要なソフトウェア依存関係をインストールする仕組みです。サブミッターはデフォルトのキュー環境の定義を認識し、いくつかのソフトウェア依存関係を自動設定します。3ds Max の場合、Condaのサポートがないため、サブミッターが利用できないソフトウェア依存関係を誤って設定してしまいます。

設定スクリプトが必要な依存関係のインストールを処理するため、これ自体は問題ありませんが、ジョブ定義が存在しないCondaなどの依存関係を要求すると、ジョブが失敗します。

この問題を回避するため、デフォルトのキュー環境(Conda)を削除します。

  1. フリートの詳細ビューで、Associated queues タブを選択し、キューを選択します。
  2. キューの詳細ビューで、Queue environments タブを選択します。
  3. デフォルトのキュー環境が存在する場合、デフォルトのキュー環境(Conda)を選択して 削除(Delete) をクリックします。

The Queue environments tab displays a table showing one environment named 'Conda' with priority 10 and YAML template type, with its checkbox selected for deletion. The interface includes Delete, Edit, and Actions buttons at the top right, demonstrating the process of removing the default queue environment.

図 7: デフォルトのキュー環境が存在する場合は削除する。

注意: デフォルトのキュー環境が必要な場合はそのまま引き続き使用できますが、サブミッターの値が自動で設定されるため、サブミッター内の Conda Packages プロパティを手動で上書きします。これはジョブをサブミットするたびに操作が必要です。

3ds Max レンダリングジョブのサブミット

フリートが 3ds Max をサポートするよう設定できたので、レンダリングジョブをサブミットできます。フルレンダリングジョブをサブミットする前に、設定が正しく動作しているか検証することを推奨します。

  1. ワークステーションで 3ds Max を開き、最小限の 3ds Max シーン (基本的なシーンの 1 フレームをレンダリングするなど) でテストジョブを準備します。
  2. 3ds Max 用 Deadline Cloud サブミッターを使用して、設定済みのフリートに関連付けられたキューにジョブをサブミットします。

The 3ds Max interface shows the 'Submit to AWS Deadline Cloud' dialog with job configuration settings and a progress window displaying successful submission completion. Green progress bars indicate 100% completion for both hashing and upload processes, with detailed processing statistics shown below.

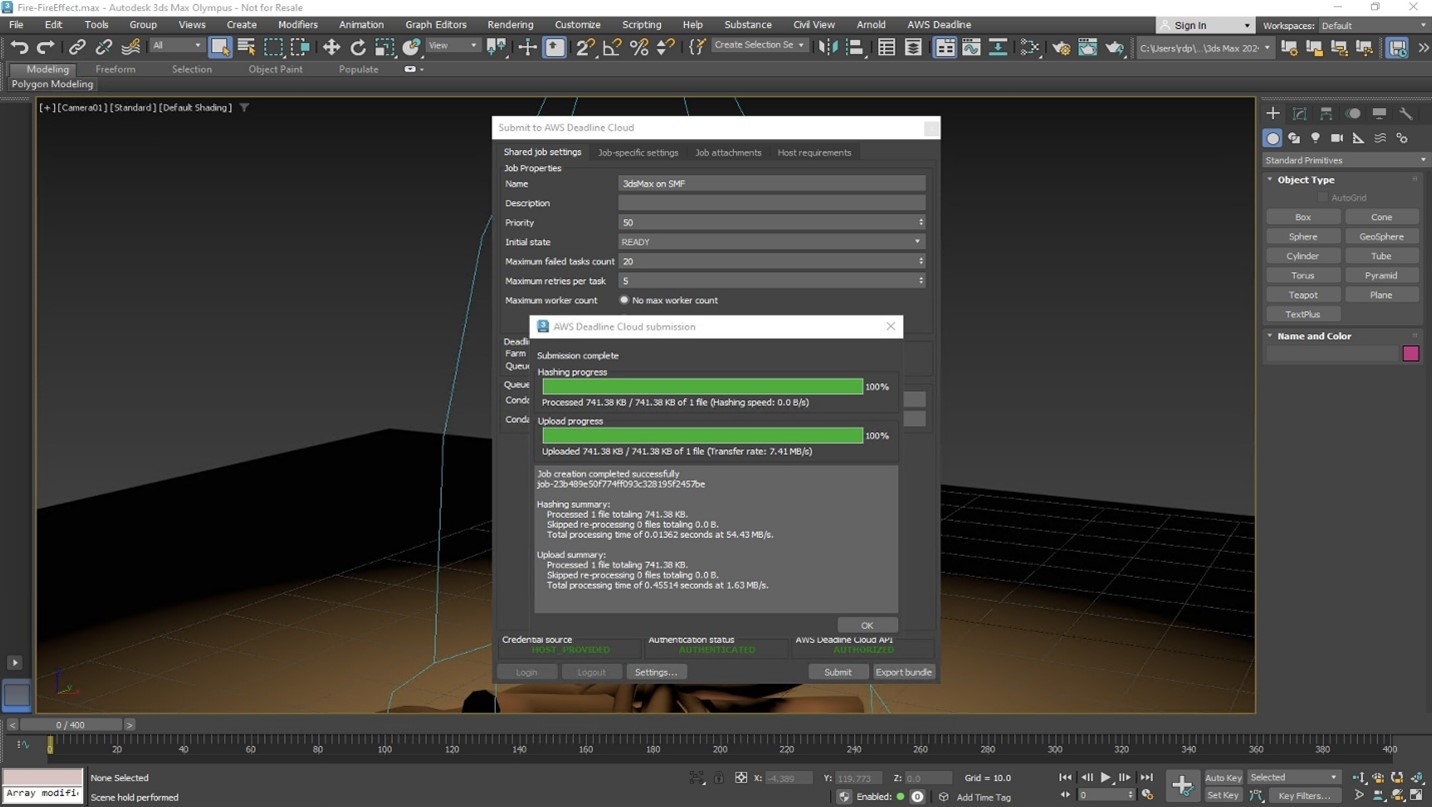
図 8: 3ds Max から Deadline Cloud にレンダリングジョブをサブミットする。

  1. Deadline Cloud モニターを開き、ジョブモニター(Job Monitor) 画面に移動してジョブの進捗を確認します。

The AWS Deadline Cloud monitor displays the job monitoring interface for a farm named 'ruizjaircmf farm' with a job called '3dsMax on SMF' showing 0% progress and 'Ready' status. The interface includes three panels showing Jobs, Steps, and Tasks sections, with the job currently in a ready state with priority 50 and no current workers assigned.

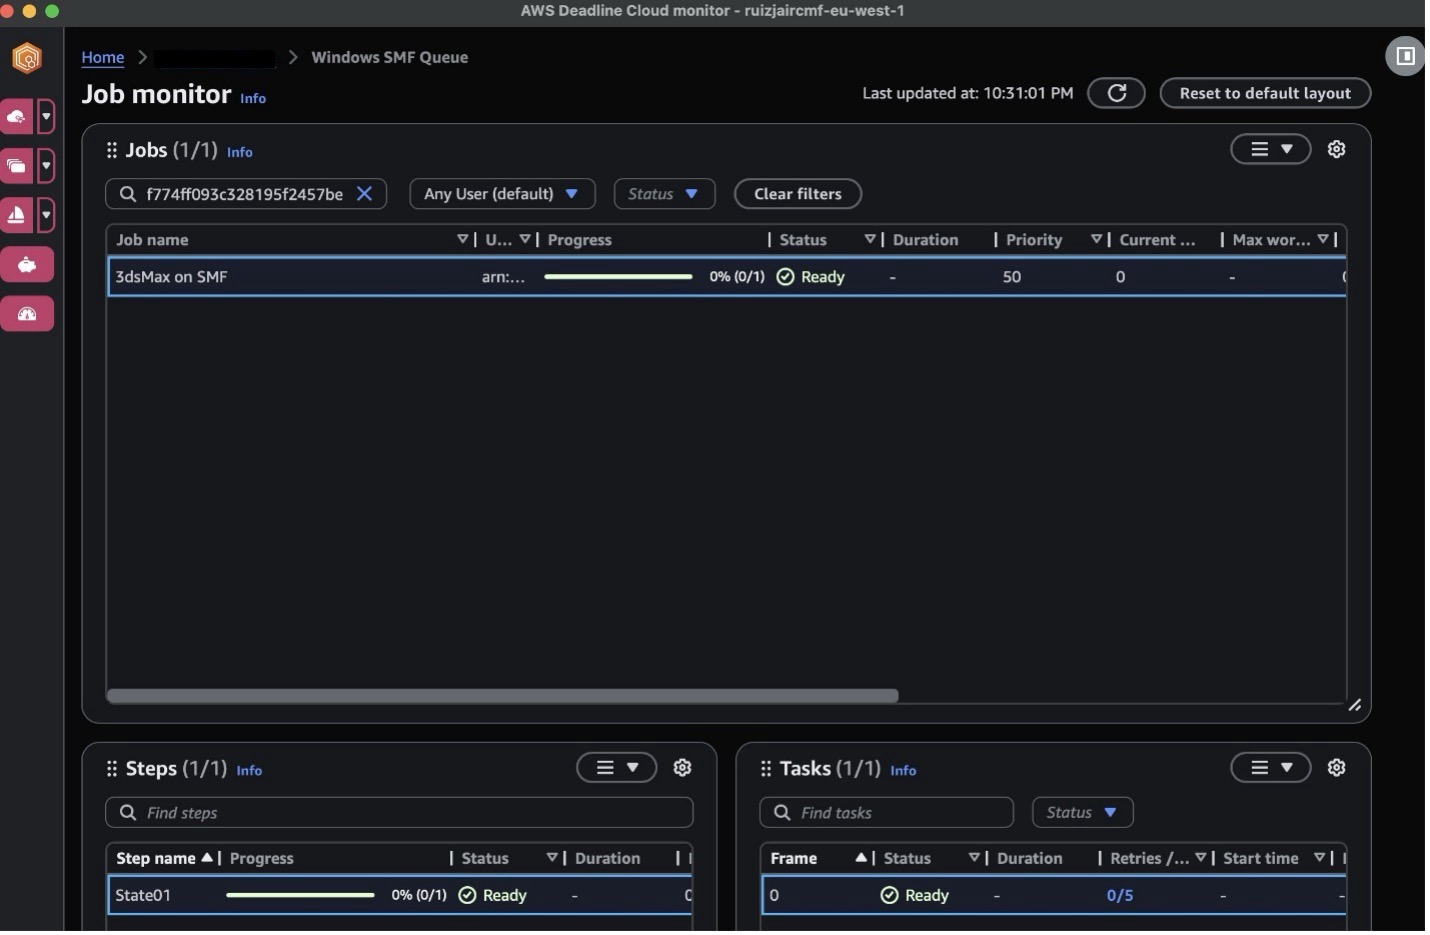
図 9: Deadline Cloud モニターで 3ds Max レンダリングジョブを監視する。

メリット

設定スクリプトを使って AWS Deadline Cloud で 3ds Max レンダリングを実装すると、クラウドのスケーラビリティと既存の 3ds Max ワークフローを両立できます。パフォーマンス、コスト効率、運用の効率化をバランスよく実現でき、現在のプロセスを大きく変更する必要はありません。

AWS Deadline Cloud の柔軟性を活かし、マネージドサービスの恩恵を受けながら、レンダリング環境を要件に合わせてカスタマイズできます。

このアプローチのメリットは以下のとおりです。

  • レンダーノードを自前で管理する運用負荷が削減。
  • 需要に応じたレンダリングキャパシティの自動スケーリング。
  • 既存の 3ds Max ワークフローとの互換性の維持。

トラブルシューティング

3ds Max レンダリングジョブで問題が発生した場合の一般的なトラブルシューティング手順を紹介します。

  • インストールの失敗: Deadline Cloud コンソールのワーカーログを確認し、3ds Max のインストールプロセスでエラーが発生していないか確認してください。
  • 依存関係の不足: 3ds Max のプラグインや機能によっては、追加の依存関係が必要な場合があります。ワーカー設定スクリプトを変更して、必要な依存関係をインストールします。
  • タイムアウトの問題: タイムアウトによりインストールが繰り返し失敗する場合は、スクリプトのタイムアウトを 1200 秒以上に増やしてください。失敗しなくなるか、1 時間の上限に達するまで 300 秒ずつ増やしてみてください。
  • 権限エラー: フリートの IAM ロールに S3 バケットと 3ds Max インストールファイルへのアクセスに必要な権限が正しく設定されているか確認してください。

まとめ

本記事では、設定スクリプトを使って AWS Deadline Cloud のサービスマネージドフリートで Autodesk 3ds Max を有効にする方法を紹介しました。このアプローチにより、マネージドインフラストラクチャの利便性を活かしつつ、レンダリングパイプラインで 3ds Max を使用できます。

ビジネスの加速を支援する方法については、AWS の担当者にお問い合わせください。

関連リソース

3ds Max 向け設定スクリプトの最新の活用方法は、Deadline Cloud Samples リポジトリで確認できます。

さらに詳しく知りたい場合は、以下のリソースを参照してください。

Jair Ruiz

Jair Ruiz

Jair Ruiz is a Software Engineer building products for digital content creation at AWS.

参考リンク
AWS Media Services
AWS Media & Entertainment Blog (日本語)
AWS Media & Entertainment Blog (英語) 
AWS のメディアチームの問い合わせ先: awsmedia@amazon.co.jp

※ 毎月のメルマガをはじめました。最新のニュースやイベント情報を発信していきます。購読希望は上記宛先にご連絡ください。

翻訳は Visual Compute SSA 森が担当しました。原文はこちらをご覧ください。