AWS Open Source Blog
Distributed TensorFlow training using Kubeflow on Amazon EKS
Training heavy-weight deep neural networks (DNNs) on large datasets ranging from tens to hundreds of GBs often takes an unacceptably long time. Business imperatives force us to search for solutions that can reduce the training time from days to hours. Distributed data-parallel training of DNNs using multiple GPUs on multiple machines is often the right answer to this problem. The main focus of this post is how to do such distributed training using open source frameworks and platforms on Amazon Web Services (AWS).
TensorFlow is an open source machine learning library. Kubernetes is an open source platform for managing containerized applications. Kubeflow is an open source toolkit that simplifies deploying machine learning workflows on Kubernetes. Amazon Elastic Kubernetes Service (Amazon EKS) makes it is easy to deploy, manage, and scale containerized applications using Kubernetes on AWS. Using Kubeflow on Amazon EKS, we can do highly-scalable distributed TensorFlow training leveraging these open source technologies.
We will first provide an overview of the key concepts, then walk through the steps required to do distributed TensorFlow training using Kubeflow on EKS. An earlier blog post discussing Kubeflow on EKS offers a broader perspective on this topic.
Overview of concepts
While many of the distributed training concepts presented in this post are generally applicable across many types of TensorFlow models, to be concrete, we will focus on distributed TensorFlow training for the Mask R-CNN model on the Common Object in Context (COCO) 2017 dataset.
Model
The Mask R-CNN model is used for object instance segmentation, whereby the model generates pixel-level masks (Sigmoid binary classification) and bounding-boxes (Smooth L1 regression) annotated with object-category (SoftMax classification) to delineate each object instance in an image. Some common use cases for Mask R-CNN include perception in autonomous vehicles, surface defect detection, and analysis of geospatial imagery.
There are three key reasons for selecting the Mask R-CNN model for this post:
- Distributed training of Mask R-CNN on large datasets compresses training time.
- There are many open source TensorFlow implementations available for the Mask R-CNN model. In this post, we will use the Tensorpack Mask/Faster-RCNN implementation as our primary example, but a highly optimized AWS Samples Mask-RCNN is also recommended.
- The Mask R-CNN model is submitted as part of MLPerf results as a heavyweight object detection model
A schematic outline of the Mask R-CNN deep neural network (DNN) architecture is shown below:

Figure 1. Schematic of Mask R-CNN DNN architecture (see Mask R-CNN paper: https://arxiv.org/pdf/1703.06870.pdf)
Synchronized All-reduce of gradients in distributed training
The central challenge in distributed DNN training is that the gradients computed during back propagation across multiple GPUs need to be all-reduced (averaged) in a synchronized step before the gradients are applied to update the model weights at multiple GPUs across multiple nodes.
The synchronized all-reduce algorithm needs to be highly efficient, otherwise any training speedup gained from distributed data-parallel training would be lost to the inefficiency of synchronized all-reduce step.
There are three key challenges to making the synchronized all-reduce algorithm highly efficient:
- The algorithm needs to scale with increasing numbers of nodes and GPUs in the distributed training cluster.
- The algorithm needs to exploit the topology of high-speed GPU-to-GPU inter-connects within a single node.
- The algorithm needs to efficiently interleave computations on a GPU with communications with other GPUs by efficiently batching the communications with other GPUs.
Uber’s open-source library Horovod was developed to address these challenges:
- Horovod offers a choice of highly efficient synchronized all-reduce algorithms that scale with increasing numbers of GPUs and nodes.
- The Horovod library leverages the Nvidia Collective Communications Library (NCCL) communication primitives that exploit awareness of Nvidia GPU topology.
- Horovod includes Tensor Fusion, which efficiently interleaves communication with computation by batching data communication for all-reduce.
Horovod is supported with many machine-learning frameworks, including TensorFlow. TensorFlow distribution strategies also leverage NCCL and provide an alternative to using Horovod to do distributed TensorFlow training. In this post, we will use Horovod.
Amazon EC2 p3.16xlarge and p3dn.24xlarge instances with eight Nvidia Tesla V100 GPUs, 128 – 256 GB GPU memory, 25 – 100 Gbs networking inter-connect and high-speed Nvidia NVLink GPU-to-GPU inter-connect are ideally suited for distributed TensorFlow training.
Kubeflow Messaging Passing Interface (MPI) Training
The next challenge in distributed TensorFlow training is appropriate placement of training algorithm worker processes across multiple nodes, and association of each worker process with a unique global rank. Messaging Passing Interface (MPI) is a widely used collective communication protocol for parallel computing and is very useful in managing a group of training algorithm worker processes across multiple nodes.
MPI is used to distribute training algorithm processes across multiple nodes and associate each algorithm process with a unique global and local rank. Horovod is used to logically pin an algorithm process on a given node to a specific GPU. The logical pinning of each algorithm process to a specific GPU is required for synchronized all-reduce of gradients.
The specific aspect of the Kubeflow machine learning toolkit that is relevant to this post is Kubeflow’s support for Message Passing Interface (MPI) training through Kubeflow’s MPI Job Custom Resource Definition (CRD) and MPI Operator Deployment. Kubeflow’s MPI Job and MPI Operator enable distributed TensorFlow training on Amazon EKS. TensorFlow training jobs are defined as Kubeflow MPI Jobs, and Kubeflow MPI Operator Deployment observes the MPI Job definition to launch Pods for distributed TensorFlow training across a multi-node, multi-GPU enabled Amazon EKS cluster. Because of our limited focus on using Kubeflow for MPI training, we do not need a full deployment of Kubeflow for this post.
Kubernetes resource management
To do distributed TensorFlow training using Kubeflow on Amazon EKS, we need to manage Kubernetes resources that define MPI Job CRD, MPI Operator Deployment, and Kubeflow MPI Job training jobs. In this post, we will use Helm charts for managing Kubernetes resources defining distributed TensorFlow training jobs for Mask R-CNN models.
Step-by-step walk through
Below we walk through the steps required to do distributed TensorFlow DNN training using Kubeflow in EKS. We will start by creating an EKS cluster, then package code and frameworks into a Docker image, stage the COCO 2017 dataset on an Amazon Elastic File System (Amazon EFS) shared file system and, finally, launch the training job using Kubeflow in EKS.
Prerequisites
- Create and activate an AWS Account or use an existing AWS account.
- Subscribe to the EKS-optimized AMI with GPU Support from the AWS Marketplace.
- Manage your service limits so you can launch at least four EKS-optimized GPU-enabled Amazon EC2 P3 instances.
- Create an AWS Service role for an EC2 instance and add AWS managed policy for power user access to this IAM Role, or create a least-privileged role consistent with the IAM permissions required to execute the steps in this post.
- We need a build environment with AWS CLI and Docker installed. Launch an m5.xlarge Amazon EC2 instance from an AWS Deep Learning AMI (Ubuntu), using an EC2 instance profile containing the IAM Role created in Step 4. The root EBS volume of the EC2 instance must be at least 200 GB. All steps described below must be executed on this EC2 instance.
- Clone this GitHub repository in your build environment and execute the steps below. All paths are relative to the Git repository root. See the Git repository README for detailed instructions.
- Use any AWS Region that supports Amazon EKS, Amazon EFS, and EC2 P3 instances. Here we assume use of us-west-2 AWS region.
- Create an S3 bucket in your AWS region.
Create GPU-enabled Amazon EKS cluster and node group
The first step to enable distributed TensorFlow training using Kubeflow on EKS is, of course, to create an Amazon EKS cluster. There are multiple cloud infrastructure automation options that can be used to do this, including: eksctl, Terraform, etc. Here we will use Terraform. A high-level understanding of Terraform may be helpful, but is not required. To get started, Install Terraform in your build environment. While the latest version of Terraform may work, this post was tested with Terraform v0.12.6.
Install and configure Kubectl
Install kubectland aws-iam-authenticatoron a Linux machine, from the eks-cluster directory:
./install-kubectl-linux.shThe script verifies that aws-iam-authenticator is working by displaying the help contents of aws-iam-authenticator.
Create EKS cluster and worker node group
In the eks-cluster/terraform/aws-eks-cluster-and-nodegroup directory in the accompanying Git repository, create an EKS cluster:
terraform initFor the azs variable below, as noted earlier, we are assuming use of AWS region us-west-2. If you select a different AWS region, modify the azs variable accordingly. Some AWS availability zones may not have the required EC2 P3 instances available, in which case the commands below will fail; retry with different availability zones.
You may specify the Kubernetes version using the k8s_version variable, as shown below, While the latest Kubernetes version is expected to work just as well, this post was developed with version 1.13. The next command requires an Amazon EC2 key pair. If you have not already created an EC2 key pair, create one and substitute the key pair name for <key-pair> in:
terraform apply -var="profile=default" -var="region=us-west-2" \
	-var="cluster_name=my-eks-cluster" \
	-var='azs=["us-west-2a","us-west-2b","us-west-2c"]' \
	-var="k8s_version=1.13" -var="key_pair=<key-pair>"
Save the summary output of terraform apply command . Below is example summary output that has been obfuscated:
EKS Cluster Summary:
vpc: vpc-xxxxxxxxxxxx
subnets: subnet-xxxxxxxxxxxx,subnet-xxxxxxxxxxxx,subnet-xxxxxxxxxxxx
cluster security group: sg-xxxxxxxxxxxxxx
endpoint: https://xxxxxxx.gr7.us-west-2.eks.amazonaws.com

EKS Cluster NodeGroup Summary:
node security group: sg-xxxxxx
node instance role arn: arn:aws:iam::xxxxxxx:role/quick-start-test-ng1-role

EFS Summary:
file system id: fs-xxxxxxxx
dns: fs-xxxxxxxx.efs.us-west-2.amazonaws.com
Create Persistent Volume and Persistent Volume Claim for EFS
As part of creating the Amazon EKS cluster, an instance of the Amazon EFS is also created. We will use this EFS shared file-system to stage training and validation data. To access data from training jobs running in Pods, we need to define a Persistent Volume and a Persistent Volume Claim for EFS.
To create a new Kubernetes namespace named kubeflow:
kubectl create namespace kubeflowYou will need the summary output of the terraform apply command you saved in a previous step. In the eks-cluster directory, in the pv-kubeflow-efs-gp-bursting.yaml file, replace <EFS file-system id> with the EFS file system id summary output you saved and replace <AWS region> with AWS region you are using (e.g. us-west-2) and execute:
kubectl apply -n kubeflow -f pv-kubeflow-efs-gp-bursting.yamlCheck to see that the Persistent Volume was successfully created:
kubectl get pv -n kubeflowYou should see output showing that the Persistent Volume is available.
Execute:
kubectl apply -n kubeflow -f pvc-kubeflow-efs-gp-bursting.yamlto create an EKS Persistent Volume Claim. Verify that Persistent Volume Claim was successfully bound to Persistent Volume:
kubectl get pv -n kubeflowBuild Docker image
Next, we need to build a Docker image containing TensorFlow, the Horovod library, the Nvidia CUDA toolkit , the Nvidia cuDDN library, the NCCL library, the Open MPI toolkit, and the Tensorpack implementation of the Mask R-CNN training algorithm code. The Dockerfile used for building the container image uses the AWS deep learning container image as the base image. In the container/build_tools folder, customize the build_and_push.sh shell script for AWS region. By default, this script pushes the image to the AWS region configured in your default AWS CLI profile. You can change that in the script and set the region to us-west-2. Execute:
./build_and_push.shto build and push the Docker image to Amazon Elastic Container Registry (ECR) in your AWS region.
Optimized Mask R-CNN
To use the optimized Mask R-CNN model, use the container-optimized/build_tools folder and customize and execute:
./build_and_push.shStage COCO 2017 dataset
Next, we stage the COCO 2017 dataset needed for training the Mask R-CNN model. In the eks-cluster folder, customize the prepare-s3-bucket.sh shell script to specify your Amazon S3 bucket name in S3_BUCKET variable and execute:
./prepare-s3-bucket.shThis will download the COCO 2017 dataset and upload it to your Amazon S3 bucket. In the eks-cluster folder, customize the image and S3_BUCKET variables in stage-data.yaml . Use the ECR URL for the Docker image you created in the previous step as the value for image. Execute:
kubectl apply -f stage-data.yaml -n kubeflowto stage data on the selected Persistent Volume claim for EFS. Wait until the stage-data Pod started by previous apply command is marked Completed. This can be checked by executing:
kubectl get pods -n kubeflowTo verify data has been staged correctly:
kubectl apply -f attach-pvc.yaml -n kubeflow
kubectl exec attach-pvc -it -n kubeflow -- /bin/bash
You will be attached to a Pod with the mounted EFS Persistent Volume Claim. Verify that the COCO 2017 dataset is staged correctly under /efs/data on the attached Pod. Type exit when you are done verifying the dataset.
Create the Mask R-CNN training job
Before we proceed further, let us recap what we have covered so far. We have created the EKS cluster, EKS node group, Persistent Volume, and Persistent Volume Claim for EFS, and staged the COCO 2017 dataset on the Persistent Volume.
Next, we define a Kubeflow MPI Job that is used to launch the Mask R-CNN training job,. We define the Kubeflow MPI Job using a Helm chart. Helm is an application package manager for Kubernetes. Next, we install and initialize Helm.
Install and initialize HELM
After installing Helm, initialize it as described below:
In eks-cluster folder, execute:
kubectl create -f tiller-rbac-config.yamlYou should see following two messages:
serviceaccount "tiller" created
clusterrolebinding "tiller" created
Execute:
helm init --service-account tiller --history-max 200Define MPI Job CRD
First, we install the Helm chart that defines Kubeflow MPI Job CRD by executing following command in charts folder:
helm install --debug --name mpijob ./mpijob/Start training job
In charts/maskrcnn/values.yaml file, customize the image value:
image: # ECR image idUse the ECR URL for the Docker image you created in a preceding step as value for the image. Start the training job by executing the following command in the charts folder:
helm install --debug --name maskrcnn ./maskrcnn/You can monitor the status of training Pods by executing:
kubectl get pods -n kubeflowYou should see Worker Pods and a Launcher Pod. The Launcher Pod is created after all Worker Pods enter Running status. Once training is completed, Worker Pods will be destroyed automatically and the Launcher Pod will be marked Completed. You can inspect the Launcher Pod logs using kubectl to get a live output of training logs.
Optimized Mask-RCNN model training
To train the optimized Mask R-CNN model, in charts/maskrcnn-optimized/values.yaml file, customize the image value to the relevant ECR URL and execute:
helm install –-debug --name maskrcnn-optimized ./maskrcnn-optimized/Visualizing Tensorboard summaries
The Tensorboard summaries for the training job can be visualized through the Tensorboard service deployed in EKS:
kubectl get services -n kubeflow \
    -o=jsonpath='{.items[0].status.loadBalancer.ingress[0].hostname}{"\n"}'
Use the public DNS address for Tensorboard service and access it in a browser (http://<Tensorboard service dns name>/) to visualize the summaries. Visualization of various algorithm specific metrics through Tensorboard while the Kubeflow job is running allows us to verify that training metrics are converging in the right direction. If training metrics indicate a problem, we can abort the training early. Below, we illustrate Tensorboard graphs from an experiment running the Mask R-CNN training job using Kubeflow on EKS. These graphs show the Mask R-CNN specific algorithm metrics over 24 epochs of training.
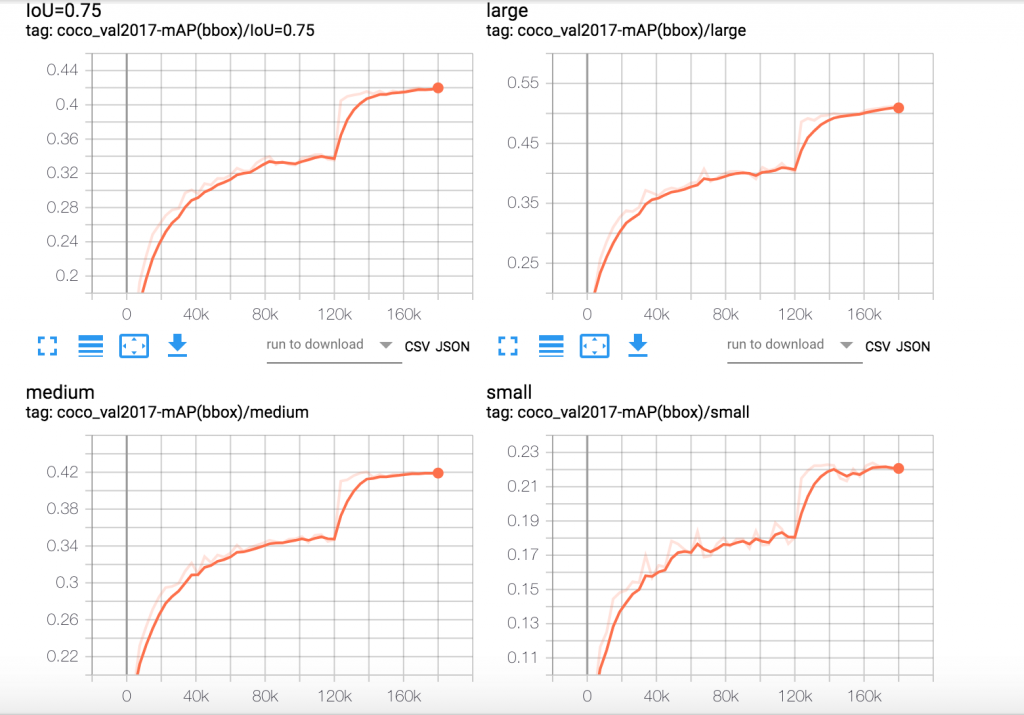
Figure 2. Mask R-CNN Bounding Box mAP
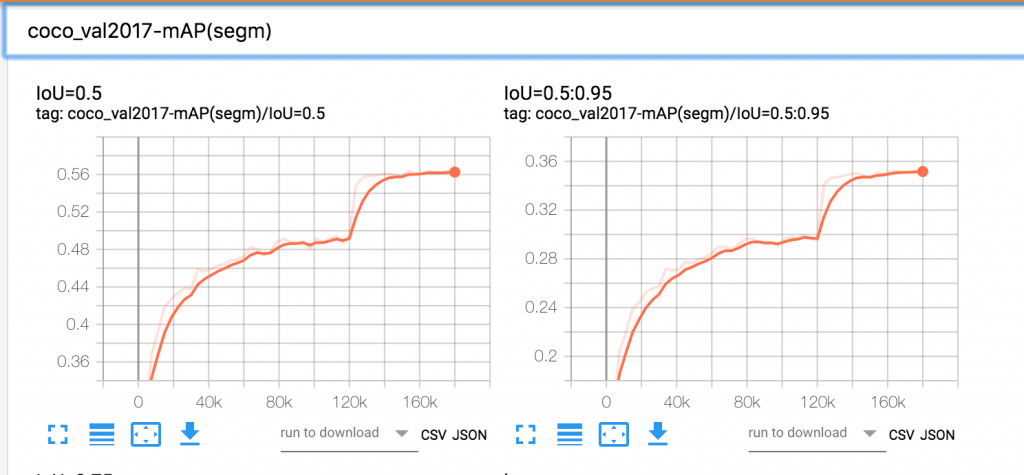
Figure 3. Mask R-CNN Segmentation mAP
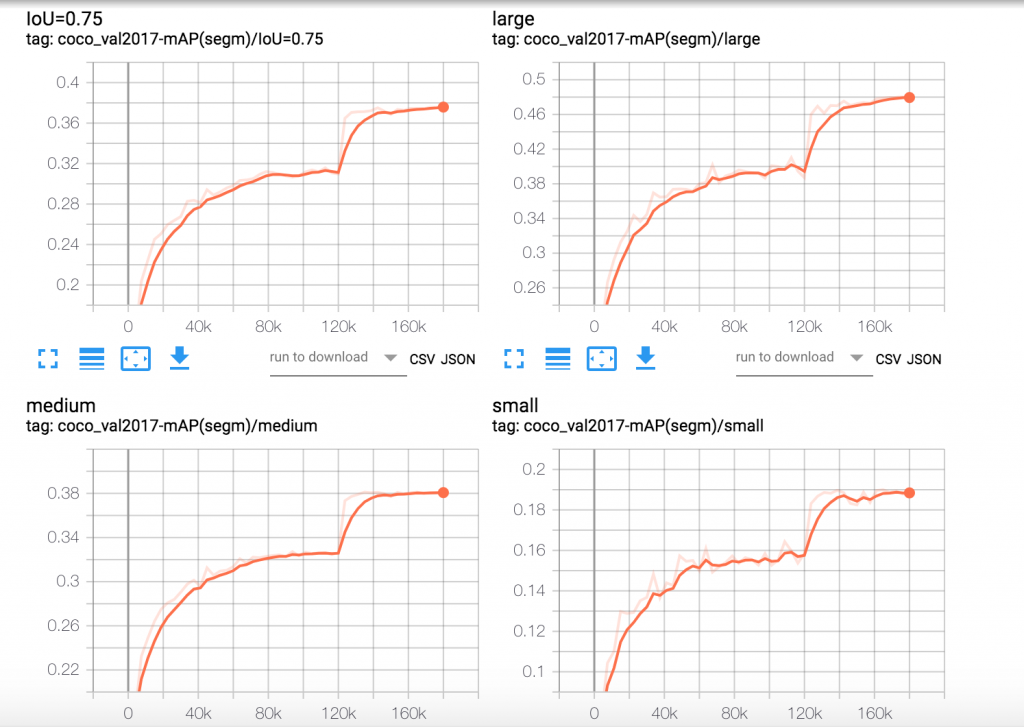
Figure 4. Mask R-CNN segmentation mAP
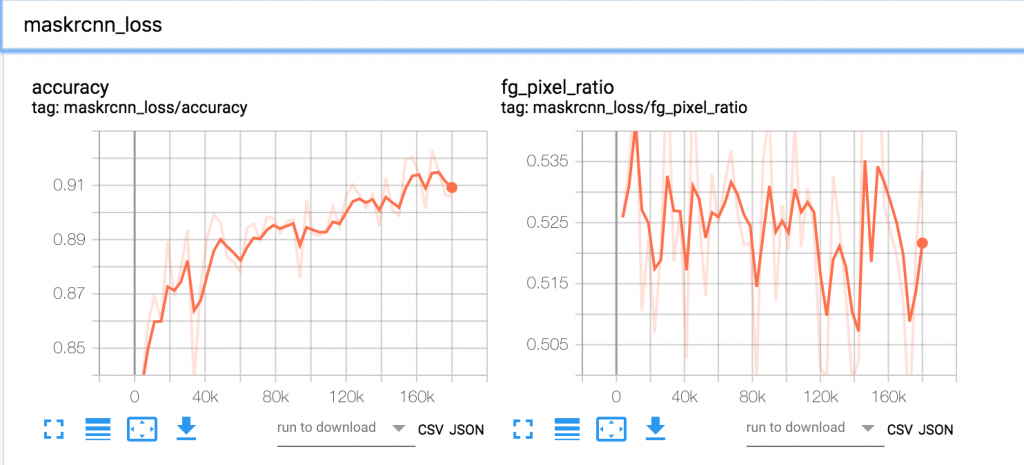
Figure 5. Mask R-CNN Loss
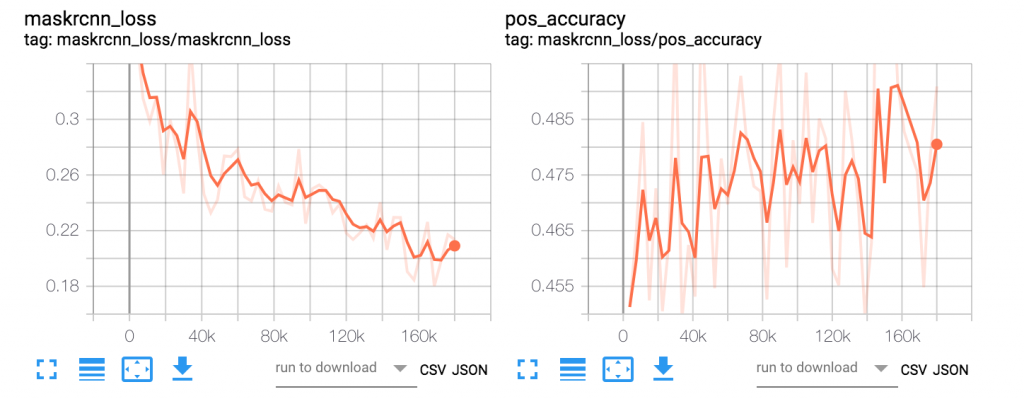
Figure 6. Mask R-CNN Loss
Cleanup
Once the training job is completed, the Worker Pods are destroyed automatically. To purge the training job from Helm:
helm del --purge maskrcnnTo destroy the EKS cluster and worker node group, execute following command in the eks-cluster/terraform/aws-eks-cluster-and-nodegroup directory, using the same argument values you used in the terraform apply command above:
terraform destroy -var="profile=default" -var="region=us-west-2" \
	-var="cluster_name=my-eks-cluster" \
	-var='azs=["us-west-2a","us-west-2b","us-west-2c"]' \
	-var="k8s_version=1.13" -var="key_pair=<key-pair>"
Conclusion
Doing distributed data-parallel training using multiple GPUs on multiple machines is the often the best solution for reducing training time for heavy weight DNNs when training on large datasets.
Kubeflow on Amazon EKS provides a highly available, scalable, and secure machine learning environment based on open source technologies that can be used for all types of distributed TensorFlow training. In this post, we walked through a step-by-step tutorial on how to do distributed TensorFlow training using Kubeflow on Amazon EKS.