AWS Security Blog
Automated Response and Remediation with AWS Security Hub
June 2, 2021: The instructions in this blog post have been implemented in an AWS Solution, AWS Security Hub Automated Response and Remediation, that includes remediations for more than 20 security controls. To learn more about implementing the solution, see How to deploy the AWS Solution for Security Hub Automated Response and Remediation.
AWS Security Hub is a service that gives you aggregated visibility into your security and compliance status across multiple AWS accounts. In addition to consuming findings from Amazon services and integrated partners, Security Hub gives you the option to create custom actions, which allow a customer to manually invoke a specific response or remediation action on a specific finding. You can send custom actions to Amazon CloudWatch Events as a specific event pattern, allowing you to create a CloudWatch Events rule that listens for these actions and sends them to a target service, such as a Lambda function or Amazon SQS queue.
By creating custom actions mapped to specific finding type and by developing a corresponding Lambda function for that custom action, you can achieve targeted, automated remediation for these findings. This allows a customer to specifically decide if he or she wants to invoke a remediation action on a specific finding. A customer can also use these Lambda functions as the target of fully automated remediation actions that do not require any human review.
In this blog post, I’ll show you how to build custom actions, CloudWatch Event rules, and Lambda functions for a dozen targeted actions that can help you remediate CIS AWS Foundations Benchmark-related compliance findings. I’ll also cover use cases for sending findings to an issue management system and for automating security patching. To promote rapid deployment and adoption of this solution, you’ll deploy a majority of the necessary components via AWS CloudFormation.
Note: The full repository for current and future response and remediation templates is hosted on GitHub and includes additional technical guidance for expanding the solution provided in this post.
Solution architecture
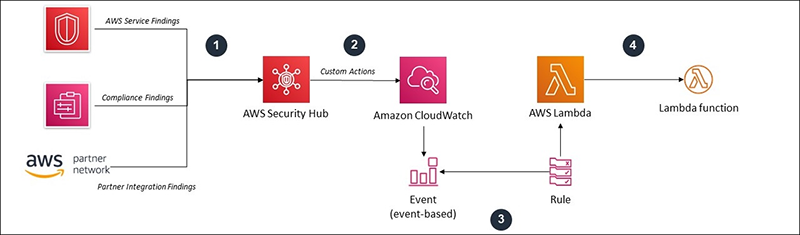
Figure 1 – Solution Architecture Overview
Figure 1 shows how a finding travels from an integrated service to a custom action:
- Integrated services send their findings to Security Hub.
- From the Security Hub console, you’ll choose a custom action for a finding. Each custom action is then emitted as a CloudWatch Event.
- The CloudWatch Event rule triggers a Lambda function. This function is mapped to a custom action based on the custom action’s ARN.
- Dependent on the particular rule, the Lambda function that is invoked will perform a remediation action on your behalf.
For the purpose of this blog post, I’ll refer to the end-to-end combination of a custom action, a CloudWatch Event rule, a Lambda function, plus any supporting services needed to perform a specific action as a “playbook.” To demonstrate how a remediation solution works end-to-end, I’ll show you how to build your first playbook manually. You’ll deploy the remainder of the playbooks via CloudFormation.
I’ll also show you how to modify four of the playbooks (three of which are appended by an asterisk), as they use AWS Lambda environment variables to perform their actions, we’ll walk through populating these later.
Based on feedback from Security Hub customers, the following controls from the CIS AWS Foundations Benchmark will be supported by this blog post:
- 1.3 – “Ensure credentials unused for 90 days or greater are disabled”
- 1.4 – “Ensure access keys are rotated every 90 days or less”
- 1.5 – “Ensure IAM password policy requires at least one uppercase letter”
- 1.6 – “Ensure IAM password policy requires at least one lowercase letter”
- 1.7 – “Ensure IAM password policy requires at least one symbol”
- 1.8 – “Ensure IAM password policy requires at least one number”
- 1.9 – “Ensure IAM password policy requires a minimum length of 14 or greater”
- 1.10 – “Ensure IAM password policy prevents password reuse”
- 1.11 – “Ensure IAM password policy expires passwords within 90 days or less”
- 2.2 – “Ensure CloudTrail log file validation is enabled”
- 2.3 – “Ensure the S3 bucket CloudTrail logs to is not publicly accessible”
- 2.4 – “Ensure CloudTrail trails are integrated with Amazon CloudWatch Logs”*
- 2.6 – “Ensure S3 bucket access logging is enabled on the CloudTrail S3 bucket”*
- 2.7 – “Ensure CloudTrail logs are encrypted at rest using AWS KMS CMKs”
- 2.8 – “Ensure rotation for customer created CMKs is enabled”
- 2.9 – “Ensure VPC flow logging is enabled in all VPCs”*
- 4.1 – “Ensure no security groups allow ingress from 0.0.0.0/0 to port 22”
- 4.2 – “Ensure no security groups allow ingress from 0.0.0.0/0 to port 3389”
- 4.3 – “Ensure the default security group of every VPC restricts all traffic”
You’ll also deploy and modify an additional playbook, “Send findings to JIRA.” You can find the high-level description of each playbook in each custom action creation script, as well as in the CloudFormation resource descriptions.
Note: If you want to send Security Hub findings to a security information and event management tool (SIEM) such as Amazon ElasticSearch Service or a third-party solution, you must change the CloudWatch Events event pattern to match all findings and use different targets such as Amazon Kinesis Data Streams to Kinesis Data Firehose to load your SIEM. This process is out of scope for this post.
Prerequisites
Ensure you have Security Hub and AWS Config turned on in your Region. Also, note that the solution in this blog post is meant to support a single account and will not support cross-account remediation as deployed. Refer to the Knowledge Center article How can I configure a Lambda function to assume a role from another AWS account? for basic information on cross-account roles for Lambda.
For the playbook “Apply Security Patches,” your EC2 instances must be managed by Systems Manager. For more information on managed instances, see AWS Systems Manager Managed Instances in the AWS Systems Manager User Guide.
Manually create a remediation playbook
To demonstrate the end-to-end process of building a playbook, I’ll first show you how to create one manually, before you deploy the remaining playbooks via CloudFormation. You’ll build a playbook to remediate Control 2.7 of the AWS Foundations Benchmark, “ensure CloudTrail logs are encrypted at rest using AWS Key Management Service (KMS) Customer Managed Keys (CMK).” Configuring CloudTrail to use KMS encryption (called SSE-KMS) provides additional confidentiality controls on you log data. To access your CloudTrail logs, users must not only have S3 read permissions for the corresponding log bucket, they now must be granted decrypt permissions by the KMS key policy.
Important note: The way this remediation, and all other remediation code is written, you can only target one finding at a time via the Action Menu.
You’ll achieve automated remediation by using a Lambda function to create a new KMS CMK and alias which identifies the non-compliant CloudTrail trail. You’ll then attach a KMS key policy that only allows the AWS account that owns the trail to decrypt the logs by using the IAM condition for StringEquals: kms:CallerAccount. You only need to run this playbook once per non-compliant CloudTrail trail.
To get started, follow these steps:
- Navigate to the Security Hub console, select Settings from the navigation pane, then select the Custom Actions tab.
- Choose Create custom action and enter values for Action name, Description, and Custom action ID, then choose Create custom action again, as shown in Figure 2.For the purpose of this blog post, I’ll refer to my action name as “CIS 2.7 RR” where the “RR” stands for “Response and remediation.”

Figure 2 – Create custom action
- Copy the Amazon resource number (ARN) down, as you’ll need it in step 11.
- Navigate to the Lambda console and select Create function.
- Enter a function name, choose Python 3.7 runtime, and under Permissions select Create a new role with basic Lambda permissions. Then choose Create function.
- Scroll down to Execution role and select the hyperlink under Existing role. This will open a new tab in the IAM console.
- From the IAM console, select Add inline policy, then select the JSON tab, paste in the below IAM policy JSON, and select Review Policy.
- Give the in-line policy a name and select Create policy.
- Back in the Lambda console, increase Timeout to 1 minute and Memory to 256MB. Scroll up to Function code, paste in the below code, and select Save.
- Navigate to the CloudWatch console, and choose Events, then Create rule.
- On the left, next to Event Pattern Preview, select Edit.
- Under Event Source, find Build custom event pattern and paste the JSON below into the text box. Replace the ARN under “resources” with the ARN of the custom action you created in step 3.
- On the same screen, under Targets on the right, select add Target, choose the Lambda function you created in step 4, then select Configure details.
- On the next screen, enter values for Name and Description, then select Create rule.
- Back in the Security Hub console, select Compliance standards from the menu on the left, then select View results to see the CIS AWS Benchmarks.
- Find rule 2.7 Ensure CloudTrail logs are encrypted at rest using KMS CMKs and select the hyperlink to see all findings related to that control.
- Select a finding that is FAILED, with a Resource type that reads AwsCloudTrailTrail.
- From the top right, select the Actions dropdown menu, then select CIS 2.7 RR (or whatever you named this action in step 2), as shown in Figure 3.Selecting this action will execute the rule you created in step 13, which will invoke the Lambda function you created in step 9.

Figure 3 – Security Hub Custom Actions
- Navigate to the CloudTrail console to ensure your CloudTrail trail is updated with SSE-KMS.
This creation flow via the console is universal for all playbook development with Security Hub. You’ll use the Actions menu in the same way to trigger the playbooks you deploy via CloudFormation in the next section of this walkthrough.
Note: To monitor the actions that are taken by the playbooks’ Lambda functions, refer to the functions’ logs. Both success and error messages will appear to help you diagnose as needed.
Deploy remediation playbooks via CloudFormation
Download the CloudFormation template from GitHub and create a CloudFormation stack. For more information about how to create a CloudFormation stack, see Getting Started with AWS CloudFormation in the AWS CloudFormation User Guide.
After your stack has finished deploying, navigate to the Resources tab and select the hyperlink for each resource to be taken to their respective consoles. The logical ID for each resource will be prepended by the action the resource corresponds to. For example, in figure 4, CIS13RRCWEPermissions denotes CloudWatch Event permissions for AWS CIS Benchmark Control 1.3. This logical ID structure is used throughout the template.
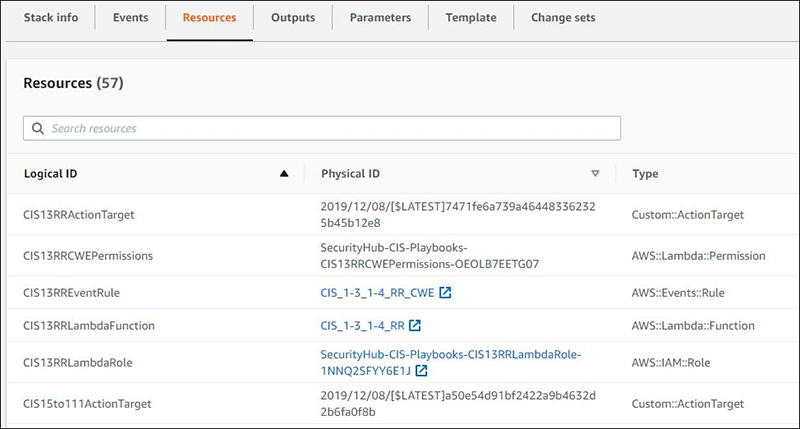
Figure 4 – CloudFormation Resources
Next, I’ll show you how to modify the Lambda functions associated with the following playbooks: “Send findings to JIRA,” CIS 2.4, CIS 2.6, and CIS 2.9.
Playbook modification: send findings to JIRA
Note: If you don’t currently have a JIRA Software Data Center deployment set up in your account, you can deploy one with a free evaluation period by following this Quick Start. If you are not interested in using JIRA or you use a different issue management tool, you can skip this section.
This playbook works by using the associated Lambda function to execute a Systems Manager automation document called AWS-CreateJiraIssue.
This Systems Manager document will in turn deploy a CloudFormation stack and create a custom Lambda function to map environmental variables (listed below) into JIRA via your playbook’s Lambda function.
Once complete, the CloudFormation stack will self-delete and the automation will be complete. To see this flow, refer to figure 5, below:
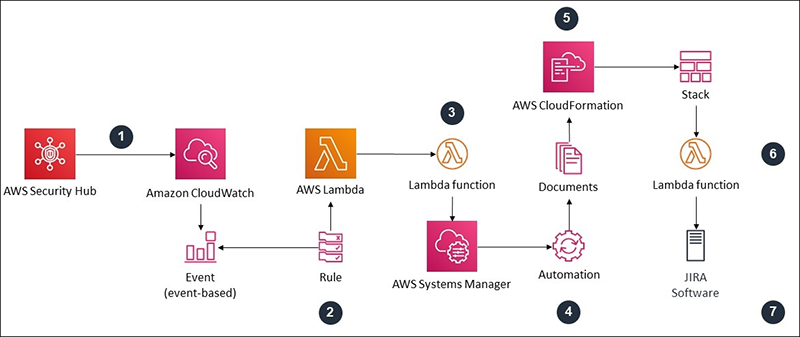
Figure 5 – Send to JIRA Architecture Diagram
- A finding is selected and the custom action “Create JIRA Issue” is invoked, which triggers a CloudWatch Event.
- The CloudWatch Event rule will trigger a Lambda function.
- Lambda will invoke the AWS-CreateJiraIssue document via Systems Manager Automation.
- Systems Manager Automation will pass your Lambda environmental variables and Security Hub finding as document parameters.
- The document will create a CloudFormation Stack that contains another custom Lambda to invoke JIRA APIs for creating issues.
- The document’s Lambda function uses your parameters to create an issue in JIRA.
- JIRA will send back a response to note failure or success, and the CloudFormation stack will self-delete.
To get started, navigate to the Lambda console and find the function named SendToJIRA, then scroll down to Environmental variables: You should see 4, with the text “placeholder” next to each. The following steps walk you through how to populate them:
- Fill out the JIRA_API_PARAMETER field:
- Refer to Atlassian’s instructions to generate a JIRA API token
- Follow the Systems Manager Parameter Store walkthrough to create a parameter.
- In Step 6 of the linked instructions, choose Secure String and choose the default KMS key.
- In Step 7 of the linked instructions, paste in your newly generated JIRA API token.
- Copy the name of the parameter and paste it as the value of the JIRA_API_PARAMETER field.
- Fill out the JIRA_PROJECT field by pasting in your JIRA Software project’s Project Key.
- Fill out the JIRA_SECURITY_ISSUE_USER field:
- This value maps to a user in JIRA Software; refer to Atlassian’s instructions for how to create a user. Use the API key you generated in step 1.A as this user’s password.
- Paste the user name into the JIRA_SECURITY_ISSUE_USER field.
- Fill out the JIRA_URL field:
- From JIRA Software navigate to the System sub-menu of JIRA Administration and look for the Base URL field, underneath Settings – General Settings (see figure 6).
- Copy the Base URL value and paste it into the JIRA_URL field.

Figure 6 – Base URL in JIRA
- When finished, select Save at the top of the Lambda console, then navigate to the Security Hub console and select Findings from the left-hand menu.
- Select any finding, and then, from the Actions dropdown in the top right, select Create JIRA Issue.
- Navigate to your JIRA instance and wait a few minutes for the new issue to appear, as shown in Figure 7.

Figure 7 – Security Hub Finding in JIRA
Note: If your issue hasn’t populated in JIRA after a few minutes, refer to the Systems Manager Automation console or CloudFormation console to find the stack that was created by Systems Manager and refer to the failure messages to troubleshoot further.
CIS 2.4 response & remediation playbook modification
CIS Control 2.4 is “Ensure CloudTrail trails are integrated with Amazon CloudWatch Logs.” The intent of this recommendation is to ensure that API activity recorded by CloudTrail is available to query in near real-time for the purpose of troubleshooting or security incident investigation with CloudWatch.
To send your CloudTrail logs to CloudWatch, the Lambda function for this playbook will create a brand new CloudWatch Logs group that has the name of the non-compliant CloudTrail trail in it for easy identification and then update your non-compliant CloudTrail trail to send its logs to the newly created log group.
To accomplish this, CloudTrail needs an IAM role and permissions to be allowed to publish logs to CloudWatch. To avoid creating multiple new IAM roles and policies via Lambda, you’ll populate the ARN of this IAM role in the Lambda environmental variables for this playbook.
Note: If you don’t currently have an IAM role for CloudTrail, follow these instructions from the CloudTrail user guide to create one.
To update this playbook:
- Navigate to the Lambda console and find the function named CIS_2-4_RR, then scroll down to Environmental variables.
- Find the variable CLOUDTRAIL_CW_LOGGING_ROLE_ARN with text that reads “placeholder” as the value.
- Paste the ARN of the IAM role into the field for this value, then select Save.
CIS 2.6 response & remediation playbook modification
CIS Control 2.6 is “Ensure S3 bucket access logging is enabled on the CloudTrail S3 bucket.” An access log record contains details about the request, such as the request type, the resources specified in the request worked, and the time and date the request was processed. AWS recommends that you enable bucket access logging on the CloudTrail S3 bucket. By enabling S3 bucket logging on target S3 buckets, you can capture all the events that might affect objects in the bucket. Configuring logs to be placed in a separate bucket enables centralized collection of access log information, which can be useful in security and incident response workflows.
Note: Security Hub supports CIS AWS Foundations controls only on resources in the same Region and owned by the same account as the one in which Security Hub is enabled and being used. For example, if you’re using Security Hub in the us-east-2 Region, and you’re storing CloudTrail logs in a bucket in the us-west-2 Region, Security Hub cannot find the bucket in the us-west-2 Region. The control returns a warning that the resource cannot be located. Similarly, if you’re aggregating logs from multiple accounts into a single bucket, the CIS control fails for all accounts except the account that owns the bucket.
To ensure the S3 bucket that contains your CloudTrail logs has access logging enabled, the Lambda function for this playbook invokes the Systems Manager document AWS-ConfigureS3BucketLogging. This document will enable access logging for that bucket. To avoid statically populating your S3 access logging bucket in the Lambda function’s code, you’ll pass that value in via an environmental variable.
Note: If you do not currently have an S3 bucket configured to receive access logs, follow the directions from the S3 user guide to create one.
To update this playbook:
- Navigate to the Lambda console and find the function named CIS_2-6_RR, then scroll down to Environmental variables.
- Find the variable ACCESS_LOGGING_BUCKET with text that reads ‘placeholder’ as the value.
- Paste the name of the S3 bucket that will receive the access logs into the field for this value and select Save.
CIS 2.9 response & remediation playbook modification
CIS Control 2.9 is “Ensure VPC flow logging is enabled in all VPCs.” The Amazon Virtual Private Cloud (VPC) flow logs feature enables you to capture information about the IP traffic going to and from network interfaces in your VPC. After you’ve created a flow log, you can view and retrieve its data in CloudWatch Logs. AWS recommends that you enable flow logging for packet rejects for VPCs. Flow logs provide visibility into network traffic that traverses the VPC and can detect anomalous traffic or provide insight into your security workflow.
To enable VPC flow logging for rejected packets, the Lambda function for this playbook will create a new CloudWatch Logs group. For easy identification, the name of the group will include the non-compliant VPC name. The Lambda function will programmatically update your VPC to enable flow logs to be sent to the newly created log group.
Similar to CloudTrail logging, VPC flow log need an IAM role and permissions to be allowed to publish logs to CloudWatch. To avoid creating multiple new IAM roles and policies via Lambda, you’ll populate the ARN of this IAM role in the Lambda environmental variables for this playbook.
Note: If you don’t currently have an IAM role that VPC flow logs can use to deliver logs to CloudWatch, follow the directions from the VPC user guide to create one.
To update this playbook:
- Navigate to the Lambda console and find the function named CIS_2-9_RR, then scroll down to Environmental variables.
- Find the variable flowLogRoleARN with text that reads ‘placeholder’ as the value.
- Paste in the ARN of the VPC flow logs IAM role the field for this value, and select Save.
Conclusion
In this blog post, I showed you how to create, deploy, and execute response and remediation playbooks for Security Hub. By combining custom actions, CloudWatch Event rules, and Lambda functions, you can quickly remediate non-compliant resources. I also showed you how to take pre-defined actions such as sending findings to JIRA, and how to deploy an additional seven playbooks via CloudFormation.
You can create playbooks that take other actions, such as updating Network Access Control Lists to help block malicious traffic from a TOR exit node via the UnauthorizedAccess:EC2/TorIPCaller finding from GuardDuty. Using playbooks with Security Hub is one more way to build toward the security and compliance of your AWS resources.
To avoid incurring additional charges from AWS resources, delete the CloudFormation stack you deployed as well as the resources you manually created for the CIS 2.7 response and remediation playbook.
If you have feedback about this blog post, submit comments in the Comments section below. If you have questions about this blog post, start a new thread on the Security Hub forum or contact AWS Support.
Want more AWS Security how-to content, news, and feature announcements? Follow us on Twitter.