How to Recover an Unreachable Linux Instance
This article is a walkthrough that describes how to recover an unreachable Linux instance. It shows the reader how to mount the root drive to another instance and then correct a network setting before re-booting the now-fixed instance. While the reader may have other types of errors to fix, the principles are the same.
Submitted By: Mike Culver
AWS Products Used: Amazon EC2
Created On: October 03, 2013
Sometimes a Linux instance can become unreachable; most often, the reason is that a boot script does something to make the system non-functional, or that someone made a networking change that caused the instance to be inaccessible. A common network settings issue is when someone sets a static IP address, which Amazon EC2 ignores per AWS policy.
In this exercise, you will create a problem in a Linux instance by setting a static IP address, and then fix that issue. This technique only works forAmazon EBS-backed instances because there is no way to temporarily stop an Amazon S3 instance.
The basic technique is to mount the problem server's root file system as an ordinary data drive on a second, functional server. After it is mounted as a data drive, you can access that "data" drive and edit the files that control the behavior of the server.
The steps that follow assume an intermediate level of computer skill. The instuctions initially walk you thru the steps and commands to launch and access a server. However when steps get repeated, these instructions assume that repeat screen shots are not needed because you have enopugh experience to figure out the repeated steps on your own.
Connect to the Server
Log in to the AWS Management Console, and then navigate to the Amazon EC2 console. The steps in this walkthrough work in any region, as long as all steps are performed in the same region and Availability Zone.
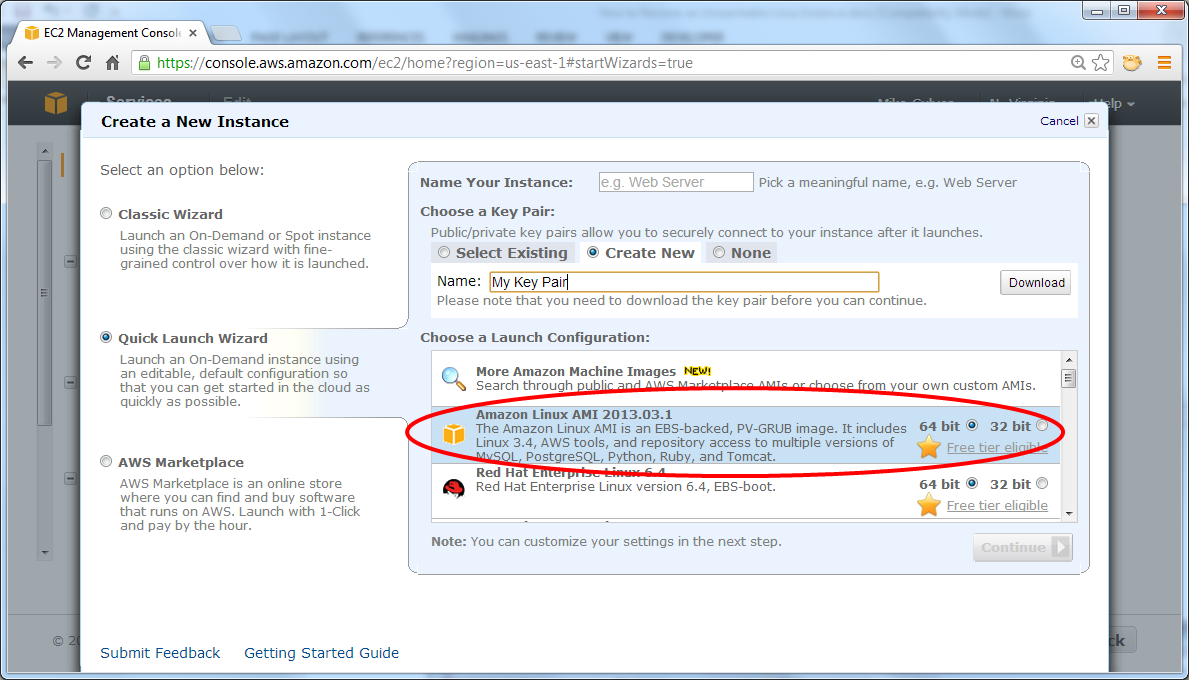
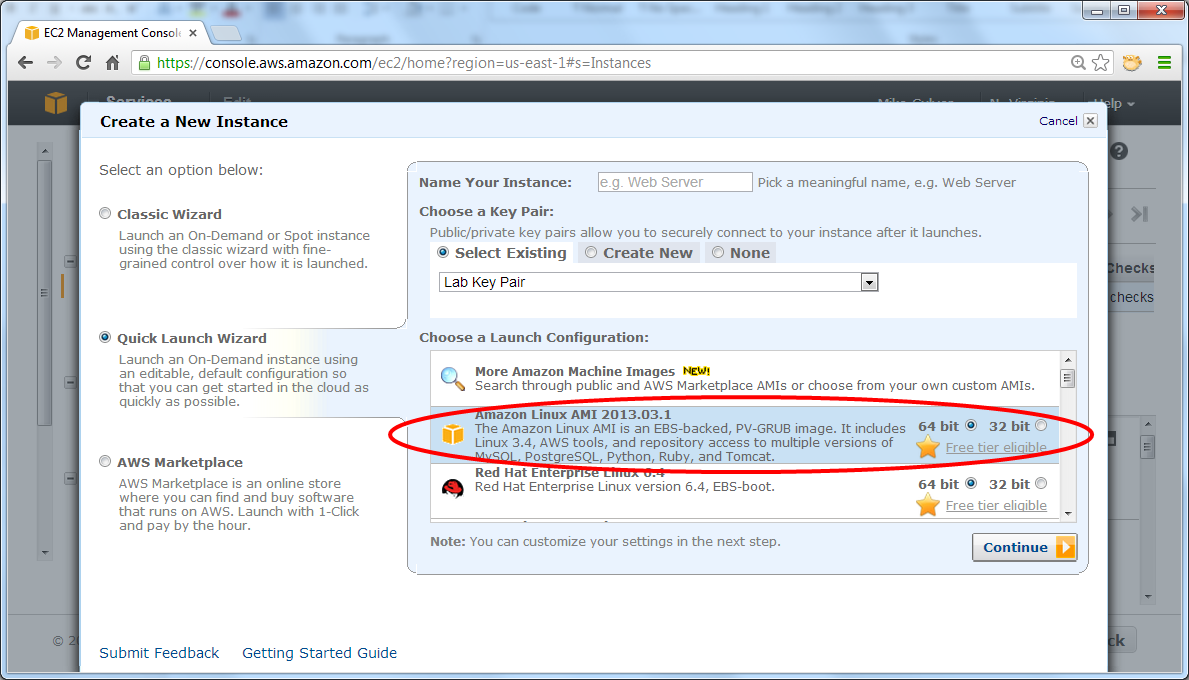
Click Launch Instances. It is not particularly important which instance you start, as long as it is an EBS-backed Linux instance.

You need a key pair to log in to your instances. If you already have one, feel free to use it; otherwise, you need to create and download a new keypair now. The name is not important, but you must successfully download it to your local computer in a location that you can find later. The example below shows "My Key Pair".

Next, pick an AMI to launch and click Continue.
On the Create a New Instance page, click Edit details.

Launch a single instance of any instance type; for this walkthrough, you can launch a t1.micro instance and take advantage . It is important to name the server so as to avoid later confusion. The example below shows "Sacrificial Server".
Accept all the default settings, including No preference for the Availability Zone, and then click Save Details.

Launch the server.

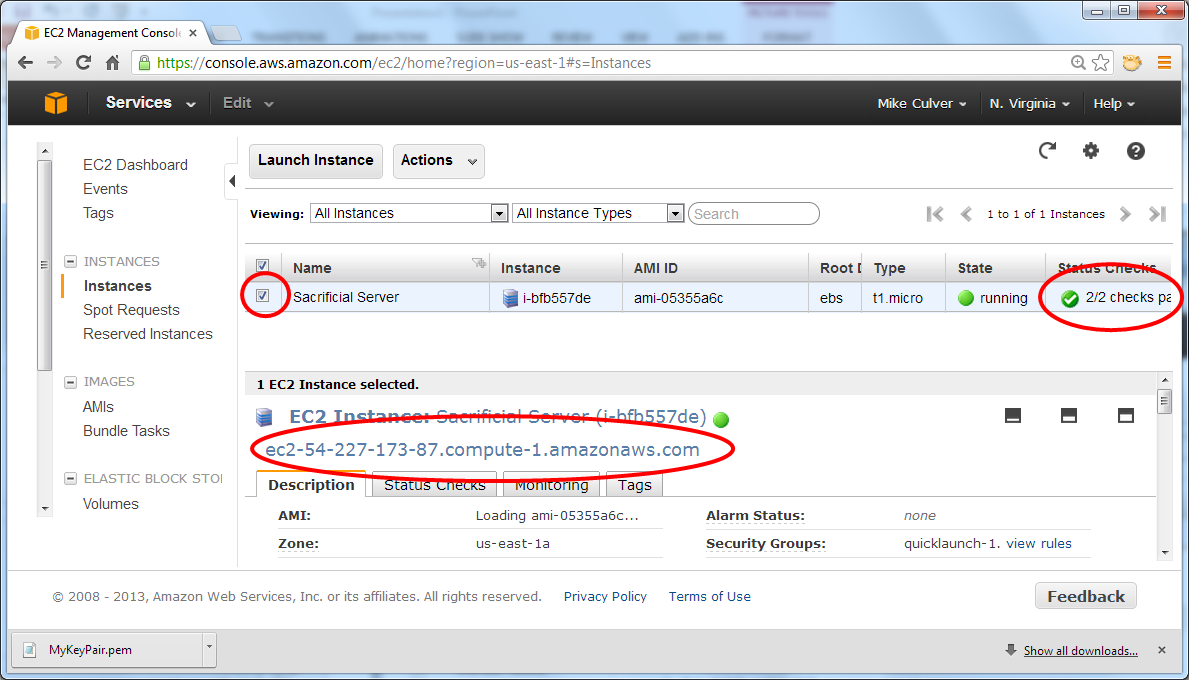
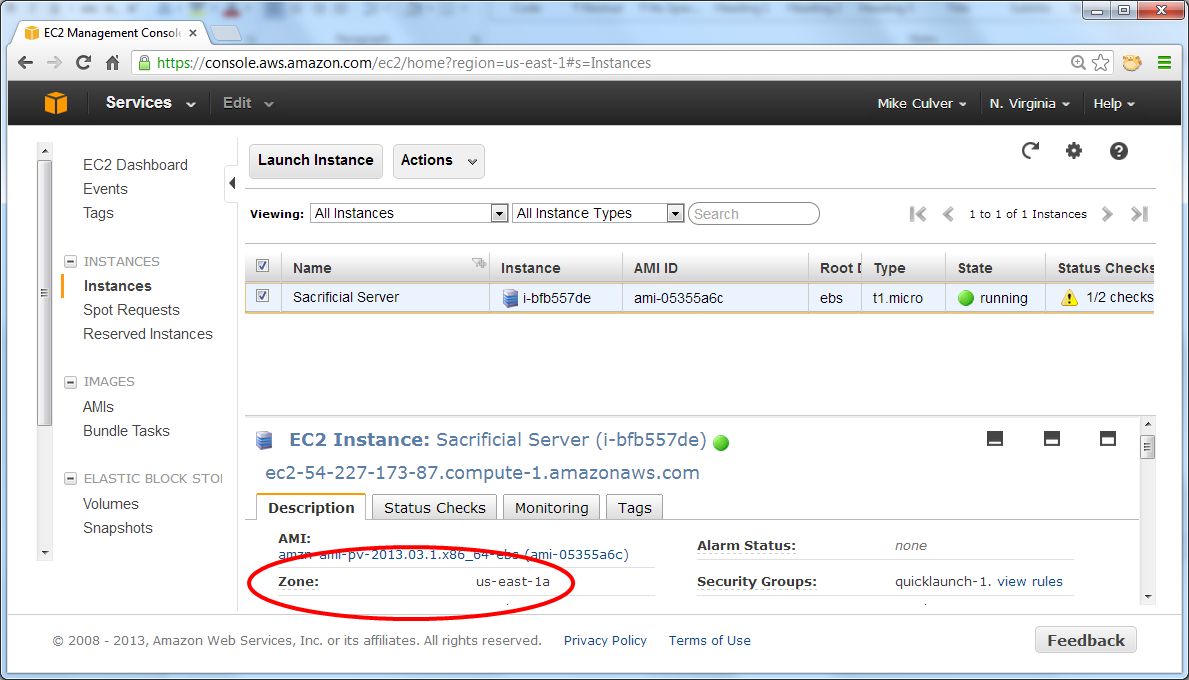
After the server is running, copy the DNS address from the console. The server is running smoothly when 2/2 checks pass; select the checkbox in front of the server name to display the server details.
Connect to the Server
To connect to the server in this walkthrough, we use PuTTY, which as a SSH client for Windows; however, you can just as easily connect using SSH directly from a Mac or another Linux system. The following sections list instructions for connecting from either environment using the key pair.
Access the Server from a Mac or Linux System
Copy the key pair to the .ssh directory under your home directory, and then set things up to use the keypair file automatically. In the following example, the key name is specified in the command line for expediency.
ssh -i /path/to/MyKeyPair ec2-user@ec2-your-dns-address.compute-1.amazonaws.com
Note: While the original example key pair name ("My Key Pair") had spaces in it, the AWS Management Console removed them as spaces cause problems in Linux commands.
Access the Server from a Windows System Using PuTTY
This walkthrough assumes that you already have a SSH client installed. For more information about PuTTY setup instructions, see the PuTTY download page.
Because PuTTY does not understand Linux key pairs by default, start by converting the .pem file format to .ppk.
Launch PuTTYGen, and then click Conversions -> Import Key. Find the file and import it.
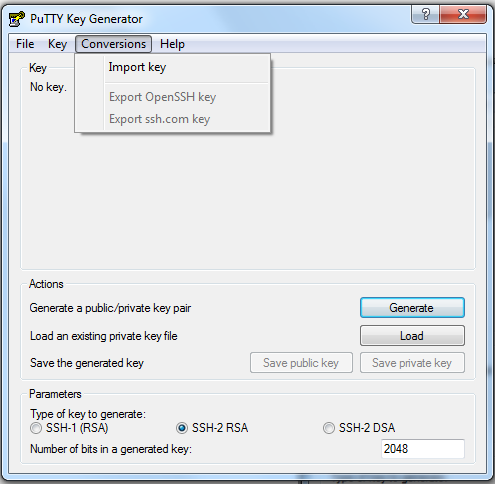
Click File -> Save Private Key. You can ignore the warning that you have not protected your key with a password. Save the key pair using the same name as the key that you imported, changing the file extension to .ppk. In the example key pair, the file name becomes MyKeyPair.ppk. Exit the program.

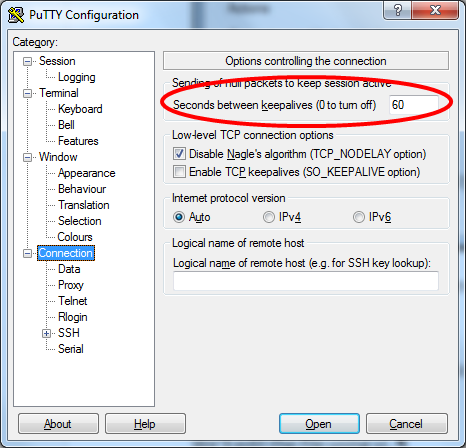
Launch PuTTY, to set three options.
First, navigate to Connection and set Seconds between keepalives (0 to turn off) to 60. This means that every 60 seconds, PuTTY sends the server a message to let it know that you are still connected, avoiding annoying timeouts that could log you off the server.
Next, navigate to the Auth subsection of SSH and click Browse to find and load the private key that you just created in PuTTYGen (ending in .ppk).

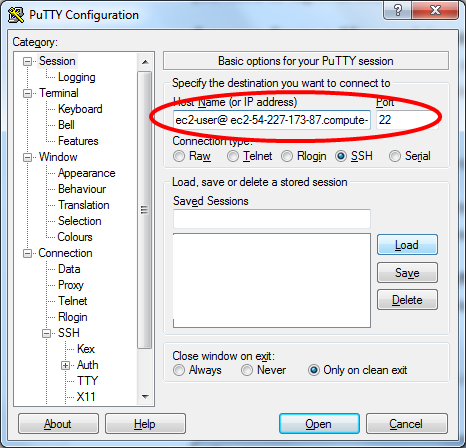
Navigate back to the top of the tree and enter
ec2-user@ec2-your-dns-address
in the Host Name (or IP
address) field.
If you wish, you can save this configuration for later use.
Click Open to connect.
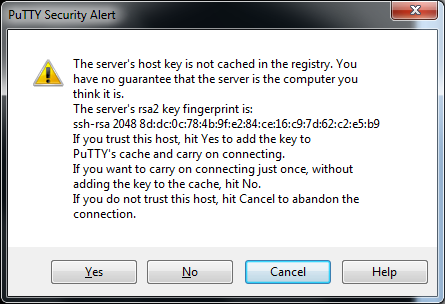
When you see the security alert, click Yes. This message is expected when you connect to a new host for the first time.
Screw Up the Server
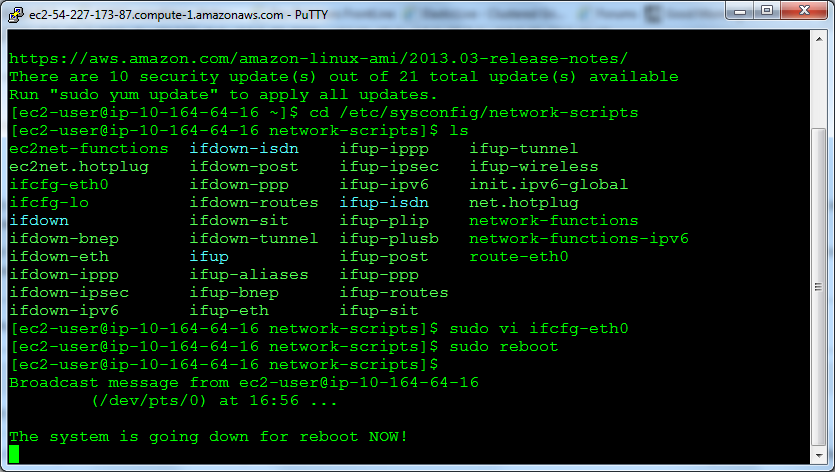
In this section, you change the network settings to use a static IP address. This is a common mistake that happens in Amazon EC2 AWS doesn't allow static addresses in the public network, and while they are permitted in Amazon VPC networks, it is still not a good idea to hardwire the operating system because then the AMI can only be used for that one address. All of the changes take place in /etc/sysconfig/network-scripts.
Change the directory:
cd /etc/sysconfig/network-scripts
Edit ifcfg-eth0
Edit the file using vi, a text editor. You need superuser privileges to do this, so start vi as follows:
sudo vi ifcfg-eth0
In the file, you need to make several changes to set a static address. You need to modify the BOOTPROTO line and add the other bold lines.
DEVICE=eth0
BOOTPROTO=none
ONBOOT=yes
TYPE=Ethernet
USERCTL=yes
PEERDNS=yes
IPV6INIT=no
PEERDNS=yes
NETMASK=255.255.255.0
IPADDR=192.168.0.100
GATEWAY=192.168.0.1
If you are not familiar with vi, here's how to modify the file:
- Enter i for insert mode.
- Use the arrow keys to navigate to the end of the line that says BOOTPROTO=dhcp.
- Backspace out "dhcp" and replace it "no", so that the line now reads BOOTPROTO=no.
- Use the arrow keys to navigate to the last line in the file, then add the other bold lines as per above. You can set the address to any static address.
- Press ESC to exit insert mode.
- Use :wq to save the file and exit vi.
Reboot the Server
These changes are read at boot time, so reboot now:
$ sudo reboot
Use SSH to Connect to the Server Again
You won't be able to connect.

Start a Debug Linux Instance
What you start is not particularly important; however, it does need to be in the same region and Availability Zone as the sacrificial server. In the following example, we used the base 64-bit Amazon Linux AMI that is available in the Amazon EC2 console, just like the one above. Follow the same steps as documented above to start this new server, paying attention to the following two exceptions:
- Make sure that it is running in the
same Availability Zone as the sacrificial server. Your own server may
or may not be running in the same Availability Zone as the example
below, so make sure that you gather information from your instance of
the AWS
Management Console.
- Name this instance "Debug".

After you launch the new server, the status shows failed checks due to the network stack issue that you created.

Fix the Sacrificial Server
The following steps stop but do not terminate the sacrificial server, and then mount its root disk drive as a normal data drive on the debug server, to get access to the errant file.
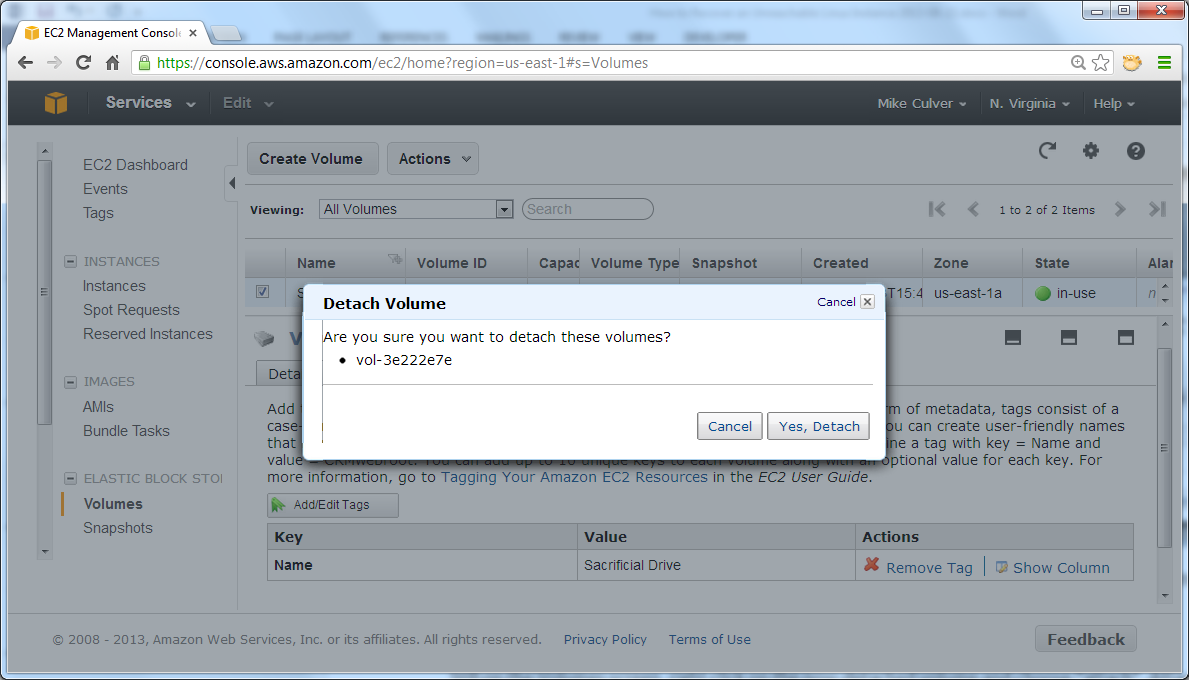
In the AWS Management Console, stop (do not terminate) the sacrificial server. Make note of the instance ID associated with this server.

Click Volumes, and find the volume associated with this instance ID. Look in the Attachment Information column to locate the server name.

Right-click on the volume and choose Add/Edit tags. Set the name to "Sacrificial Drive", to help keep things straight.

Right-click the same volume, click Detach Volume, and then click Yes, Detach. Click the refresh button on this page to see the volume state as detached.
Attach the Volume to the Debug Instance
In the AWS Management Console, refresh the screen to display current information about volume status.
Right-click the now-detached volume and click Attach Volume.
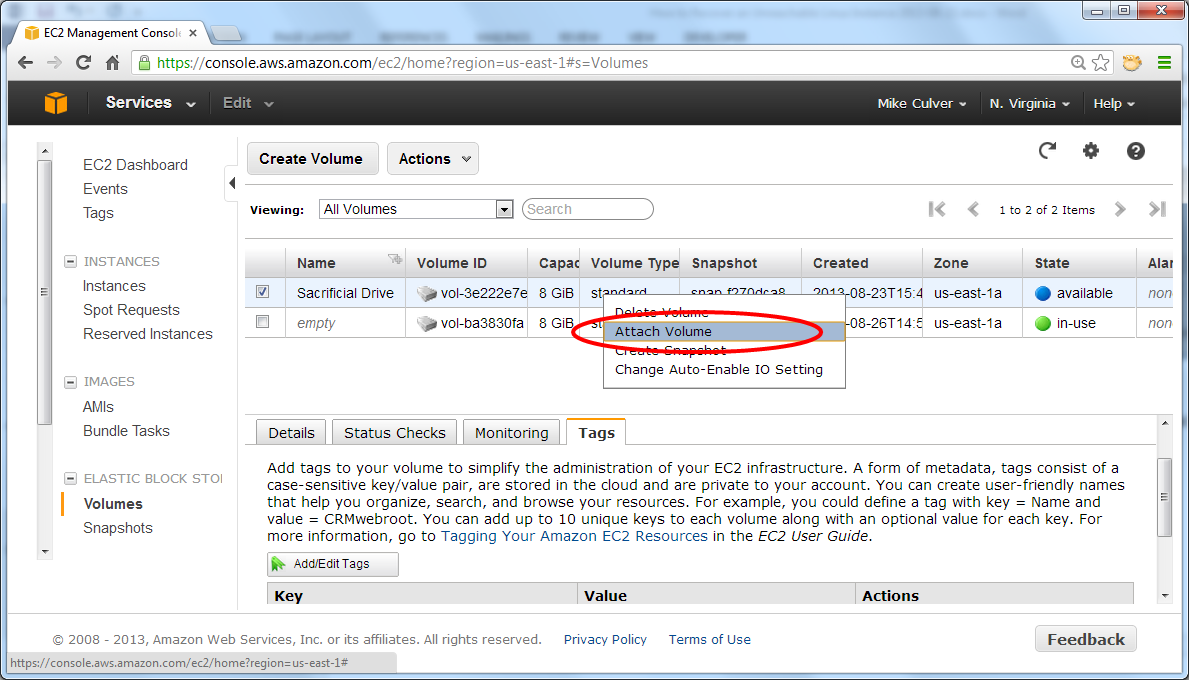
Attach it to the running debug instance as /dev/sdf.

Mount the Drive
Connect to the debug instance using SSH, and remember to log in as ec2-user. We are leaving out screen shots on the assumption that you know how to locate the DNS name, start a SSH session, etc.
Create a mount point for the bad drive. For simplicity, create this mount point directly under the root.
 $ cd /
 $ sudo mkdir bad
 $ sudo mount /dev/xvdf /bad
Note: Most systems use the syntax sudo mount /dev/sdf /bad; however, this particular AMI rewrites /dev/sdf as /dev/xvdf.
Make certain that the drive mounted successfully. The following command shows the contents of the root.
 $ cd /bad
 $ ls
Caution: Both the debug server's root drive and the sacrificial server's drive that is now mounted under /bad have the same file system layout. Be careful to modify the sacrificial server's file system, not the running server's file system.
Fix the Errant File
        $ cd /bad/etc/sysconfig/network-scripts
        $ sudo vi ifcfg-eth0
Change the file to appear as follows. The bold line needs to be modified, the ones at the bottom need to be deleted.
DEVICE=eth0
BOOTPROTO=dhcp
ONBOOT=yes
TYPE=Ethernet
USERCTL=yes
PEERDNS=yes
IPV6INIT=no
PERSISTENT_DHCLIENT=yes
NETMASK=255.255.255.0
IPADDR=192.168.0.100
GATEWAY=192.168.0.1
In vi, edit the file as follows:
- Use the arrow keys to position the cursor on the last line.
- Enter dd to delete the extra lines, one time per line.
- Position the cursor on the BOOTPROTO line, using the arrow keys.
- Enter i for insert mode.
- Modify the line and press ESC.
- Enter :wq to save the file and exit.
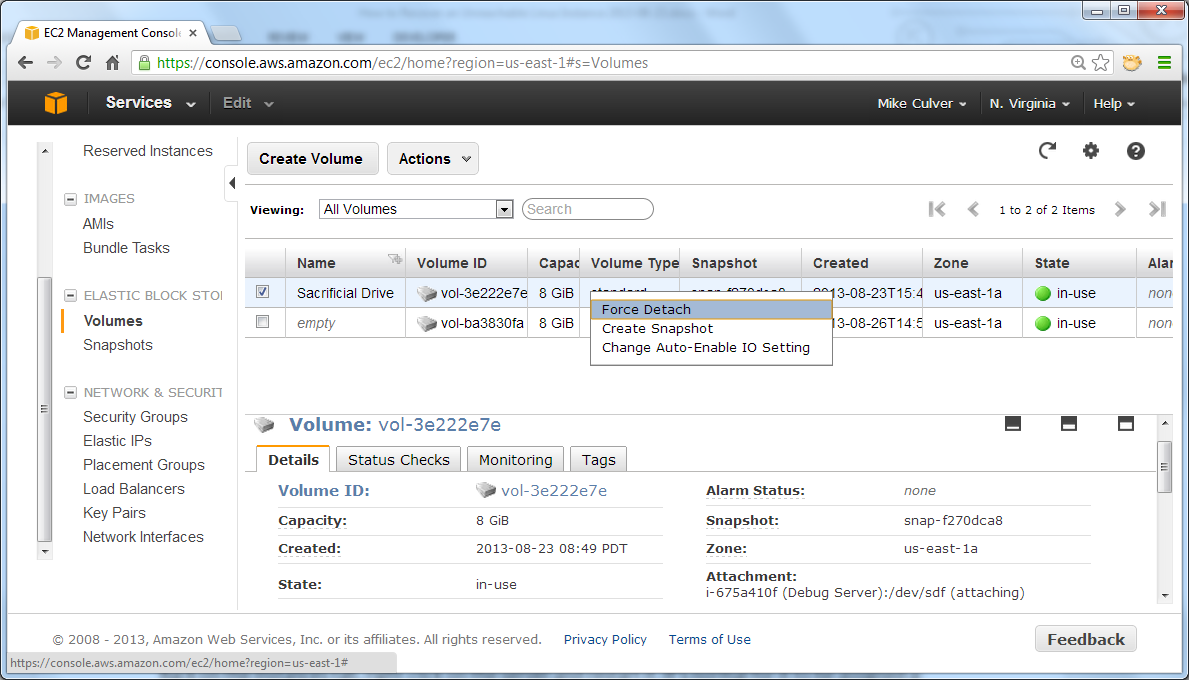
Detach the Volume and Reattach to the Stopped Instance
In the SSH session, enter the following command:
$ cd /In the AWS Management Console, on the Volume page, detach the sacrificial volume from the debug server.
$ sudo umount /bad
Refresh the console to verify that it is up-to-date regarding volume status.

Right-click the volume again and attach it to the stopped instance as /dev/sda1.

Restart the Server and Confirm the Status
On the Instances page, right-click the server and restart it. It's normal for the server to be assigned a new DNS name and IP address upon startup.

Connect to the server using SSH. If you can connect, your instance is reachable again.

That's the end of the walkthrough. Don't forget to terminate both servers in order to avoid incurring any further charges..

Conclusion
There are a number of other situations where this technique will save the day. For example, if a server won't boot you can mount the root drive using this approach and then look at the boot scripts and system log to determine if there is a command that fails, or a service that is misbehaving.
And if all else fails, at least you will be able to recover the data on the drive!