Overlay Multicast in Amazon Virtual Private Cloud
This article provides details on how to establish multicast traffic within Amazon Elastic Compute Cloud (Amazon EC2) instances. The article describes how to install and configure the software and the tools needed for this solution. The solution described in this article is just one of many ways to implement multicast on EC2.
Submitted By: Kevin Miller, Steve Morad, Minoo Duraipandy
AWS Products Used: Amazon VPC
Created On: April 01, 2015
MULTICAST OVERVIEW
Multicast is a network capability that allows one-to-many distribution of data. With multicasting one or more sources can transmit network packets to subscribers that typically reside within a multicast group. Multicast groups can have zero or more subscribers that wish to receive content from the sources. Subscribers may join a group to begin receiving network packets or leave a group to stop receiving network packets. Traditionally multicast is implemented in physical networks using hardware replication along a distribution tree.
INTRODUCING OVERLAY MULTICAST
Overlay multicast is a method of building IP level multicast across a network fabric supporting unicast IP routing, such as Amazon Virtual Private Cloud (Amazon VPC). In this article, we focus on an overlay multicast topology implemented using built-in features of Linux. This enables us to deploy multicast-aware applications in Amazon VPC.
In this article we establish multicast communication by creating point to point to network tunnels with other Amazon Elastic Compute Cloud (Amazon EC2) peers. The intent to participate in multicast is implemented via Amazon EC2 tags. All multicast packet replication occurs at the source. For example, if there are 5 subscribers and if the application transmits 1 multicast packet, then that packet will be received by the local instance kernel, replicated 5 times, and forwarded to each subscriber. This means that an instance transmitting a 1000 packet-per-second (pps) stream to 10 subscribers would consume 10,000 pps of the instance's network capacity. This is one of the principal differences from traditional multicast, and it's a key consideration when implementing overlay multicast.
LINUX IMPLEMENTATION DETAILS
Amazon Web Services (AWS) engineers have built a proof-of-concept to dynamically configure overlay multicast in Linux. The software is named "mcd," and works with any Linux flavor that has the IP_GRE tunnel module available or built-in to the kernel. Ubuntu 12.04 and 14.04 were used to test the implementation of this software.
The mcd software dynamically establishes connectivity in a full mesh among all configured multicast peers (known as a community). Any multicast group (224.0.0.0/4) can be used. This software runs continuously in the background at one-minute intervals and invokes Amazon EC2 APIs to dynamically discover other instances within the community. After discovery, it configures bridges and generic routing encapsulation (GRE) interfaces required to multicast over GRE tunnels.
POC SOFTWARE DETAILS
The following sections discuss the proof of concept (POC) implementation details for the mcd software that runs in a Linux Amazon EC2 instance. After mcd is installed, it can be part of the base Amazon Machine Image (AMI) for future deployments.
Linux's Ethernet bridge support is used for packet replication. A bridge acts like a layer-2 Ethernet switch. The mcd software creates bridges named 'mcbr-COMMUNITY', and mcd also takes care of creating the bridge and tunnels for every Amazon EC2 instance within a multicast community. The following sections identify the specific commands mcd runs to configure overlay multicast.
The bridge is set up using:- brctl addbr mcbr-COMMUNITY (COMMUNITY name will be set using an Amazon EC2 tag)
- ebtables -P FORWARD DROP
- ip addr add IP_ADDRESS dev mcbr-COMMUNITY
- ip link set mcbr-COMMUNITY up
- brctl show mcbr-COMMUNITY
- ifconfig mcbr-COMMUNITY
- Or simply use 'brctl show' and look for the 'mcbr-COMMUNITY' bridge name.
- ip link set dev mcbr-COMMUNITY down
- brctl delbr mcbr-COMMUNITY
The bridge watches Internet Group Management Protocol (IGMP) traffic to identify subscribers for traffic. This is controlled in: /sys/devices/virtual/net/$bridge/bridge/multicast_snooping).
Creating GRE tunnels between Amazon EC2 instances in a multicast community:
For each peer member of the community, a GRE tunnel is created and bound to this bridge. The GRE tunnel is established between the IP addresses of the instances in the VPC. The specific commands mcd invokes to create the tunnels are:
- ip link add INTF_NAME type gretap local LOCAL_ETH0_IP remote REMOTE_ETH0_IP
- ip link set dev INTF_NAME up
- brctl addif mcbr-COMMUNITY INTF_NAME
After creation is complete, applications can be bound to the IP address of the multicast bridge and use this bridge for multicast communication with other members of the bridge. An example scenario follows.
Example Consider a VPC with an IP address range 10.0.0.0/16 and three subnets: subnet 1: 10.0.1.0/24, subnet 2: 10.0.2.0/24, subnet 3: 10.0.3.0/24 (assume each subnet is in a separate Availability Zone.) In each subnet there is one instance. Assume those instances have a single elastic network interface (ENI) (eth0) with IP addresses: 10.0.1.5, 10.0.2.6, 10.0.3.7. The multicast COMMUNITY is 'foo'. For multicast purposes well use subnet 172.16.0.0/24, and the instances will respectively have IP addresses 172.16.0.3, 172.16.0.4, and 172.16.0.5.
Set up bridge
Instance 1 (subnet 1)
brctl addbr mcbr-foo
ebtables -P FORWARD DROP
ip addr add 172.16.0.3/24 dev mcbr-foo
ip link set mcbr-foo up
Instance 2 (subnet 2)
brctl addbr mcbr-foo
ebtables -P FORWARD DROP
ip addr add 172.16.0.4/24 dev mcbr-foo
ip link set mcbr-foo up
Instance 3 (subnet 3)
brctl addbr mcbr-foo
ebtables -P FORWARD DROP
ip addr add 172.16.0.5/24 dev mcbr-foo
ip link set mcbr-foo up
Configure GRE tunnels and bind to the bridge
Instance 1 (subnet 1)
ip link add gretap-2-6 type gretap local 10.0.1.5 remote 10.0.2.6
ip link set dev gretap-2-6 up
brctl addif mcbr-foo gretap-2-6
ip link add gretap-3-7 type gretap local 10.0.1.5 remote 10.0.3.7
ip link set dev gretap-3-7 up
brctl addif mcbr-foo gretap-3-7
Instance 2 (subnet 2)
ip link add gretap-1-5 type gretap local 10.0.2.6 remote 10.0.1.5
ip link set dev gretap-1-5 up
brctl addif mcbr-foo gretap-1-5
ip link add gretap-3-7 type gretap local 10.0.2.6 remote 10.0.3.7
ip link set dev gretap-3-7 up
brctl addif mcbr-foo gretap-3-7
Instance 3 (subnet 3)
ip link add gretap-1-5 type gretap local 10.0.3.7 remote 10.0.1.5
ip link set dev gretap-1-5 up
brctl addif mcbr-foo gretap-1-5
ip link add gretap-2-6 type gretap local 10.0.3.7 remote 10.0.2.6
ip link set dev gretap-2-6 up
brctl addif mcbr-foo gretap-2-6
SETUP AND CONFIGURATION OF AWS IAM ROLE AND SECURITY GROUP
CREATING AN IAM ROLE FOR AMAZON EC2 INSTANCES
Amazon EC2 instances have to be associated with an AWS Identity and Access Management (IAM) role for proper functioning of mcd.
- Following security best practices, an IAM role limited to permissions to describe Amazon EC2 Instances, tags, and regions has to be created for proper functioning of 'mcd'. This can be created by using a custom policy, an example follows, with an Amazon EC2 service role -
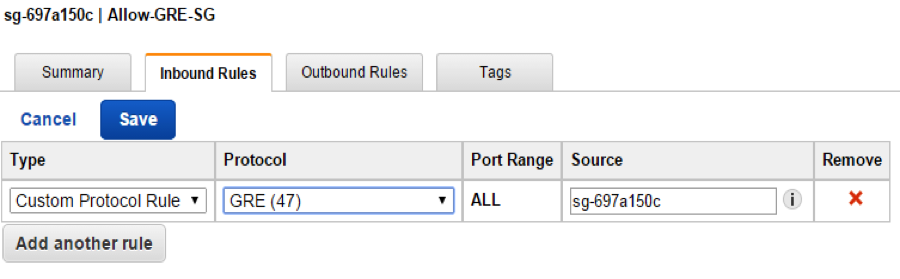
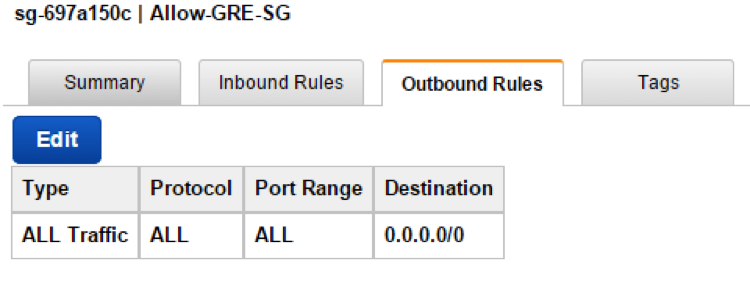
- Create an Amazon VPC security group that allows "Custom Protocol Rule" with "GRE (47)" for inbound rules for all members of this security group. Leave outbound rules at the default or allow outbound access for the same custom protocol. Security group rules required for SSH access or internet access are not shown here.
By default security group policy for Outbound Rules is fully open to allow all traffic.
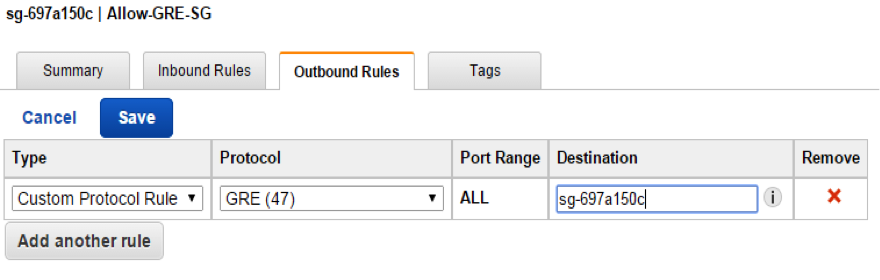
If the default outbound rule is too open, allow egress of Custom Protocol Rule GRE (47).
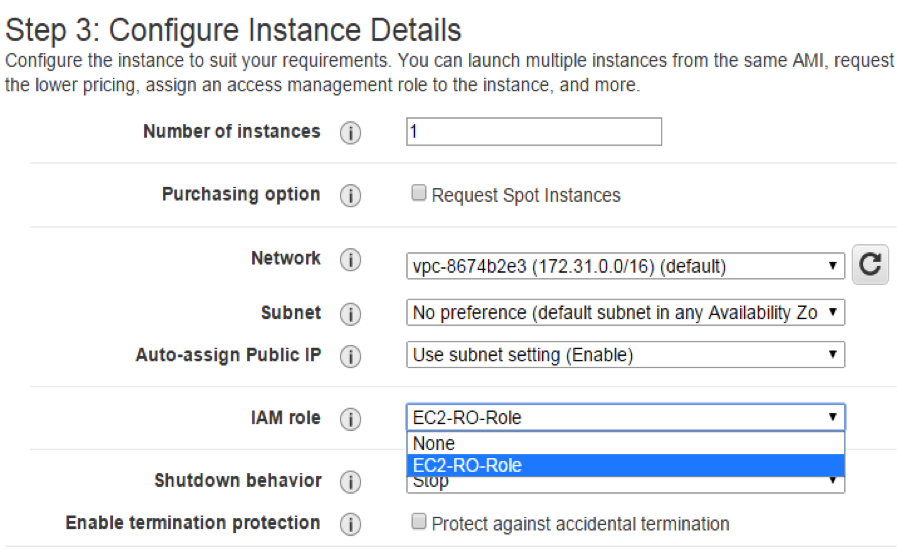
- Launch a Linux Amazon EC2 instance (in this case, Ubuntu 14.04 64 bit version), with the role mentioned earlier, and into the security group created in step 2. Note that Amazon EC2 instances will require Internet access to query Amazon EC2 APIs.
- Create an instance tag with Key as "multicast" and Value as "COMMUNITY,IP-Addr/Subnet Mask". You should keep the community name to 6 characters or less. The IP address specified here should be unique to each Amazon EC2 instance. This IP address becomes the multicast IP address for that Amazon EC2 instance. Bind your application to this IP address to be able to multicast. The community name will be used during discovery process. An example value is: foo,172.16.0.7/24.

{
  "Version": "2012-10-17",
  "Statement": [
    {
      "Sid": "Stmt1414071732000",
      "Effect": "Allow",
      "Action": [
        "ec2:DescribeInstances",
        "ec2:DescribeTags",
        "ec2:DescribeRegions"
      ],
      "Resource": [
        "*"
      ]
    }
  ]
}
INSTALLING MCD CODE AND ITS DEPENDENCIES
The mcd software requires the installation of the following packages on every Amazon EC2 Linux instance that needs to run this software. The commands for installing these packages follow. The instructions assume use of Ubuntu 14.04.
Alternatively, an AWS CloudFormation JSON script and a shell script can be downloaded here for automated installation.
INSTALLING PACKAGES REQUIRED FOR MCD
- Log in to the Amazon EC2 instance and install the following packages that are needed for proper installation and operation of mcd software. The steps that follow are provided to show the prerequisites needed for running mcd. Feel free to use your own set of commands or your own script.
- a. sudo apt-get install libxslt1.1
- sudo apt-get install libxml-ruby
- sudo apt-get install ruby1.9.1-dev
- sudo apt-get install ruby1.9.1-full
- sudo apt-get update --fix-missing
- sudo apt-get install make
- sudo apt-get install rubygems-integration
- sudo gem1.9.1 install daemons
- sudo apt-get -y install zlib1g-dev
- sudo gem1.9.1 install aws-sdk-v1 (let Nokogiri use its built-in libraries for libxml2. Don't try to make it use libxml by doing this "gem install nokogiri -- --use-system-libraries")
- sudo apt-get install -y bridge-utils ebtables curl
- To test multicast communication, OMPING utility has to be installed. As 'root' user, do the following -
- wget https://fedorahosted.org/releases/o/m/omping/omping-0.0.4.tar.gz
- tar zxf omping-0.0.4.tar.gz
- cd omping-0.0.4; make
- Make sure the following packages are present -
- dpkg --get-selections | grep ruby
- dpkg --get-selections | grep libxml2
- dpkg --get-selections | grep libxml
- dpkg --get-selections | grep libxslt1-dev
- dpkg --get-selections | grep aws-sdk-v1
- dpkg --get-selections | grep gem
- dpkg --get-selections | grep make
- dpkg --get-selections | grep ebtables
- dpkg --get-selections | grep bridge-utils
- dpkg --get-selections | grep curl
INSTALLING THE MCD DAEMON
A zipped folder containing mcd code can be downloaded from here.
- As 'root' user do the following -
- Make a directory name 'mcast' in /opt → mkdir -p /opt/mcast
- Copy all files from 'mcd-code-2014-07-11' folder to /opt/mcast directory
- Make sure that the files copied have the following permissions and that they are owned by 'root' user. Execute 'chown -R root:root /opt/mcast' if the files aren't owned by 'root' user.
- Make sure the files 'mcd' and 'mcd.init' have 755 file permission. If not execute 'chmod 755 mcd*' for proper permissions.
- In the /opt/mcast folder copy mcd.conf file to /etc/init folder. Copy can be by executing 'cp mcd.conf /etc/init' command.
- Starting/stopping 'mcd' -
- sudo start mcd
- sudo stop mcd
- To troubleshoot if above command didn't start mcd: Go to the /opt/mcast folder and run mcd directly from there (./mcd). This will show if the scripts throw any error.
- After it starts, check to see if the process is running by running 'ps -ef | grep mcd'. You should see 'mcd' running as root under /opt/mcast/mcd

- Logs for mcd can be found in /var/log/syslog. Use 'tail -f /var/log/syslog | grep mcd'.
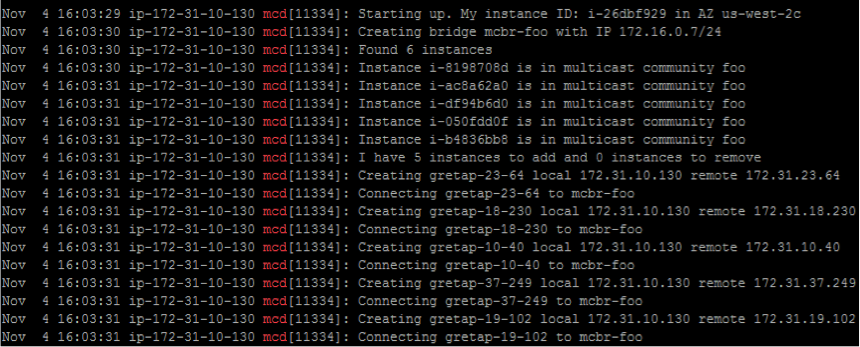
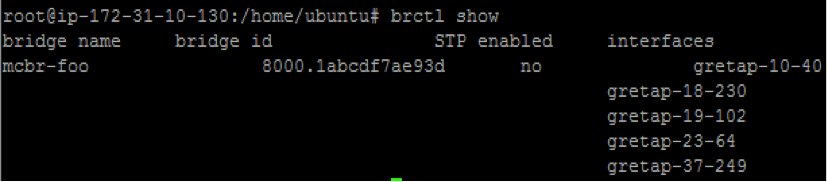
- Use 'brctl show' to look for tunnels (should see 'gretap-XX-XXX')
To check if route exists → route -n (should see a route for interface 'mcbr-
') 
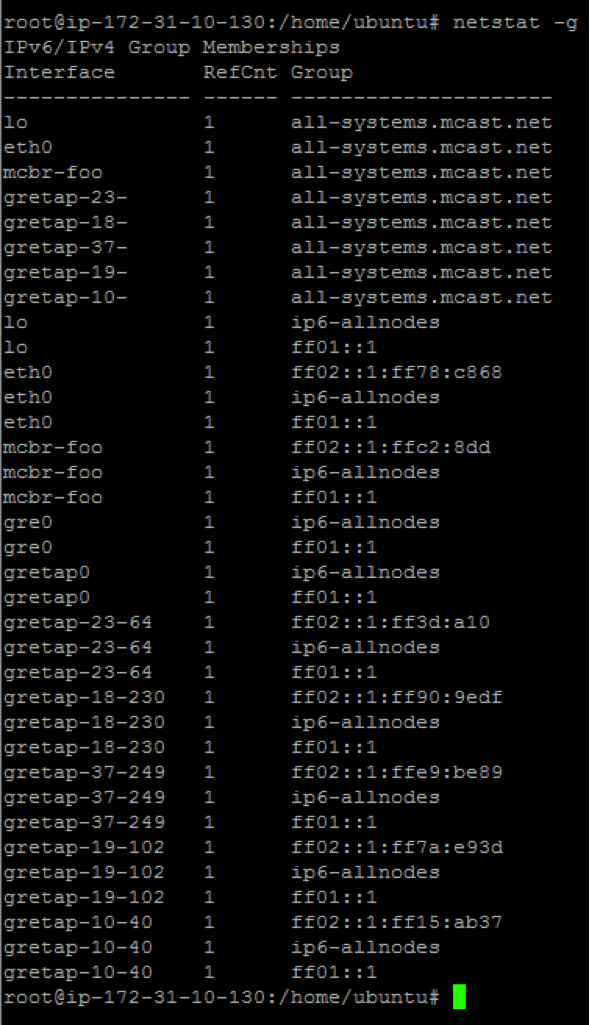
To check Group Memberships → netstat -g (should see gretap tunnels and mcbr-
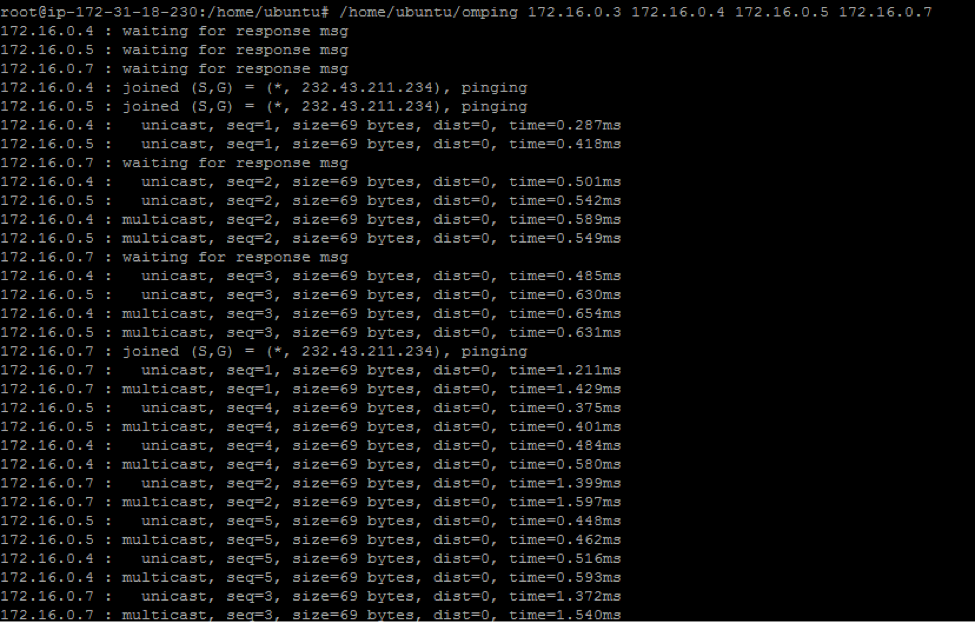
- To test if multicast communication works using 'omping': From all machines that are in the same multicast community run /home/Ubuntu/omping
→ you should be able to see machines getting added to the multicast community. The following example shows IP addresses 172.16.0.4, 172.16.0.5, and 172.16.0.7 are being added to the multicast community from an Amazon EC2 instance with broadcast IP 172.16.0.3.
KNOWN LIMITATIONS
The mcd software requires the Linux kernel to support IP_GRE module built for the OS. With Ubuntu it is available out of the box.
The approach described in this article requires that applications use the multicast bridge interface for multicast communication; multicast cannot be sent directly from the eth0 IP address to other subscribers. It may be possible to achieve this with NAT and/or additional routes; this has not been explored. Applications may tunnel additional traffic through the multicast bridge (for example, unicast communication).
The GRE tunneling used in this proof-of-concept requires additional packet headers, reducing the effective MTU by 38 bytes. For example, if the eth0 MTU is 1500 bytes, applications binding to the multicast bridge interface will see an MTU of 1462. Feel free to change this according to your requirements.
This approach has only been tested on Linux. Other operating systems that support Ethernet bridges and GRE tunneling (or other forms of tunneling that supports multicast forwarding) could likely use the techniques described here.
Notices
© 2014, Amazon Web Services, Inc. or its affiliates. All rights reserved. This document is provided for informational purposes only. It represents AWS's current product offerings as of the date of issue of this document, which are subject to change without notice. Customers are responsible for making their own independent assessment of the information in this document and any use of AWS's products or services, each of which is provided "as is" without warranty of any kind, whether express or implied. This document does not create any warranties, representations, contractual commitments, conditions or assurances from AWS, its affiliates, suppliers or licensors. The responsibilities and liabilities of AWS to its customers are controlled by AWS agreements, and this document is not part of, nor does it modify, any agreement between AWS and its customers.