Getting Started with AWS Elastic Beanstalk Deployment in Eclipse
This guide introduces the AWS Elastic Beanstalk deployment feature of the AWS Toolkit for Eclipse and provides a walkthrough for getting started with AWS Elastic Beanstalk deployment for developers using the Eclipse IDE.
Submitted By: TimT@AWS
AWS Products Used: AWS Elastic Beanstalk, Amazon S3, Amazon EC2
Language(s): Java
Created On: January 19, 2011
This guide introduces the AWS Elastic Beanstalk deployment feature of the AWS Toolkit for Eclipse and provides a walkthrough for getting started with AWS Elastic Beanstalk deployment for developers using the Eclipse IDE.
When you finish reading this guide, you will be able to develop and easily deploy a Java web application to Elastic Beanstalk.
Introduction to the AWS Toolkit for Eclipse
The AWS Toolkit for Eclipse is an open source plug-in for the Eclipse Java IDE that makes it easier to develop and debug Java applications using Amazon Web Services, and now includes the Elastic Beanstalk deployment feature. With the Elastic Beanstalk deployment feature, developers can use Eclipse to deploy Java web applications to AWS Elastic Beanstalk and within minutes access their applications running on AWS infrastructure services. For more information about Elastic Beanstalk, go to https://aws.amazon.com/documentation/elasticbeanstalk/.
Begin Using AWS Elastic Beanstalk
Before you can begin, you must subscribe for the Elastic Beanstalk service. Using Elastic Beanstalk also automatically signs you up for Amazon Elastic Compute Cloud (Amazon EC2) and Amazon Simple Storage Service (Amazon S3), which are closely integrated with Elastic Beanstalk. You are not charged for any of these products unless you use them.
To begin using AWS Elastic Beanstalk
- Go to https://aws.amazon.com/elasticbeanstalk/ and click Begin using AWS Elastic Beanstalk.
- Follow the on-screen instructions.
Note: The sign-up procedure for Elastic Beanstalk may include receiving a telephone call and entering a PIN using the telephone keypad.
Prerequisites
- Requires Java 1.5 or higher.
- Requires Eclipse IDE for Java Developers 3.5 or higher. Eclipse IDE for Java EE Developers 3.6 is recommended.
- Eclipse Web Tools Platform 2.0 or higher, based on the requirements of your Eclipse distribution. The Eclipse IDE for Java EE Developers has the Web Tools Platform preinstalled.
Install the Amazon Toolkit for Eclipse
Download and install the AWS Toolkit for Eclipse using the Eclipse Update Site: https://aws.amazon.com/eclipse/
To install the AWS Toolkit for Eclipse
- Click Help on the Eclipse file menu, and select Install New Software.
- Enter https://aws.amazon.com/eclipse in the text box labeled Work with. The Add Repository dialog box appears.
- Enter a descriptive name for the repository in the Name field, and click OK.
- Select AWS Toolkit for Eclipse from the list, and click Next.
- Accept the license agreement and restart the Eclipse IDE.
The AWS Toolkit for Eclipse overview page is displayed after Eclipse restarts.
Create a New AWS Java Web Project
Now that you are signed up for AWS Elastic Beanstalk and have installed the latest version of the AWS Toolkit for Eclipse, you are ready to create and deploy a Java web project using a simple WAR file.
The AWS Toolkit provides an AWS Java web project template for use in Eclipse. The template creates
a WTP dynamic web project including the AWS SDK for Java in the project's class path. Your AWS Account
credentials and a simple index.jsp file are included to help you get started.
To create a new AWS Java web project in Eclipse
- Click File from the Eclipse file menu, and select New.
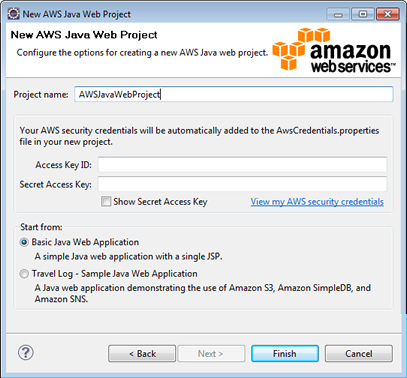
- Select AWS Java Web Project. The New AWS Java Web Project wizard appears.
- Enter the name of your AWS Java Web Project in the Project name field.
- Enter your AWS security credentials in the provided fields. If you're having trouble locating your security credentials, click the View my AWS security credentials link and follow the instructions provided.
- Click Finish.
A new AWS Java web project is created inside your Eclipse workspace. To help you get started developing
your project, a basic index.jsp file is included inside your WebContent folder.
Your AWS security credentials are included in the AwsCredentials.properties file inside
your src folder.
Deploy the Application
After you create a new AWS Java Web project, you can deploy it to an AWS Elastic Beanstalk server. The Elastic Beanstalk server is an Eclipse WTP server, with added functionality that enables you to restart, publish, and terminate your Java web application. The Elastic Beanstalk server in Eclipse represents an AWS Elastic Beanstalk environment. An environment is a running instance of an application on the AWS platform.
Before deploying your application, you must define your server and configure your application.
Define Your Server
To define your Java web application server
- Right-click your Java web project in the Project Explorer or Package Explorer view.
- Select Run As, and click Run on Server. The Run on Server wizard appears.
- Select Manually define a new server.
- Expand the Amazon Web Services item in the Server Type explorer and select the version of Tomcat you want to use.
- Enter the server's host name and server name in the provided fields. Click Next. The Configure Application and Environment options appear.

You have defined your AWS Java web application server. You must still configure your AWS Java web application before deployment.
Each application has a configuration and a version. A specific application instance is called an Environment. An environment can have only one version at a time, but you can have multiple simultaneous environments running the same or different versions. AWS resources created for an environment include one elastic load balancer, an Auto Scaling group, and one or more Amazon EC2 instances.
Configure
To configure your Amazon web application
- Select an Amazon region from the Region drop-down menu.
- Enter an application name in the provided field, and optionally provide an application description.
- Enter an environment name in the provided field, and optionally provide an environment description. The environment name must be unique within your AWS Account. Click Next.
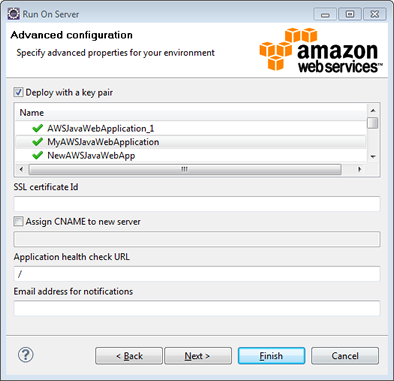
- Click Deploy with key pair.
- Right-click anywhere inside the key pair list menu and select New Key Pair... . The Create New Key Pair dialog box appears.
- Enter a key pair name in the Key Pair Name text field. Enter a private key directory in the Private Key Directory text field, or click Browse and select a directory.
- Click OK and select the newly created key pair in the key pair list menu.
- Click Finish.
After you finish the wizard, you will be prompted to enter a new version label for your application version and
then a new server will appear in the Server view. Your Java web
project will be exported as a WAR file, uploaded to Amazon S3 and registered as a new
application version with Elastic Beanstalk. The Elastic Beanstalk deployment feature will monitor
your environment until it becomes available with the newly deployed code, and will open your application
in a web browser when it's ready.
Edit the Application and Redeploy
Now that you have deployed your application, it is easy to edit your application, redeploy, and see the results in moments.
To edit and redeploy your Java web application
-
In Eclipse, locate and open the
index.jspfile in the Project Explorer or Package Explorer view. Make an edit to the source contained in the file. - Right-click your Java web project in the Project Explorer or Package Explorer view.
- Select Run As, and click Run on Server. The Run on Server wizard appears.
- Select Choose an existing server, and click Finish.
When the application has deployed successfully, index.jsp is displayed in Eclipse and
show any edits you have made.
Clean Up
You have completed the Elastic Beanstalk tasks described in this guide. To make sure you are not charged for any unwanted services, clean up by deleting any unwanted applications and environments from Elastic Beanstalk and other AWS products.
To clean up your AWS Elastic Beanstalk deployment
- In Eclipse, locate and right-click the server you defined previously in the Eclipse Server view.
- Select Stop.
You are no longer being charged for any services you used as part of this tutorial.
Congratulations! You have successfully launched, deployed, edited, and redeployed your Java web application!
Where Do I Go from Here?
The AWS Toolkit for Eclipse has other features not covered in this guide, such as Amazon EC2 Management and Amazon SimpleDB Management. This section provides links to additional resources that will help you deepen your understanding of AWS Elastic Beanstalk, the AWS Java SDK, and the AWS Toolkit for Eclipse.