Scheduled Copy of Data from Amazon S3 to Amazon Redshift Using AWS Data Pipeline
This article provides details on how to automate daily loading of an Amazon Redshift cluster from data that is being dumped to an Amazon Simple Storage Service (S3) bucket. The example uses Amazon CloudFront access logs that are stored in an Amazon S3 bucket. The data-driven workflow is managed by AWS Data Pipeline.
Submitted By: Brett Hollman
AWS Products Used: Amazon CloudFront, AWS IAM, Amazon S3, Amazon Redshift, AWS Data Pipeline
Language(s): bash
Created On: July 10, 2013
Topics:
- Overview
- Step by Step Guide
- redshift.bash script used to copy data
- SQL to Create Table for CloudFront Access Log Storage
- Troubleshooting
- Summary
Many customers have found Amazon Redshift to be an excellent repository and tool for storing and analyzing large datasets. An obstacle for many customers is getting their dataset into their Amazon Redshift cluster in a repeatable process as the dataset grows over time. The best way to ingest large amounts of data into Amazon Redshift is by copying this data from Amazon S3. When you use the Amazon S3 Copy command, each compute node in an Amazon Redshift cluster can load files into Amazon Redshift in parallel. The Copy command does not consume query resources from the leader node in the cluster and thus drain resources that are used for query and analytics. Copy also has a much higher throughput than performing inserts through the leader node in the Amazon Redshift cluster.
This article explains how to automate daily loading of an Amazon Redshift cluster from data that is being dumped to Amazon S3. The data for the example is a set of CloudFront access logs that are stored in an S3 bucket. The data-driven workflow is managed by AWS Data Pipeline.
In the following procedure, we assume that you already have a CloudFront Distribution deployment and that all access logs are being written to an S3 bucket. For information about using Amazon CloudFront, see the Amazon CloudFront Developer Guide.
-
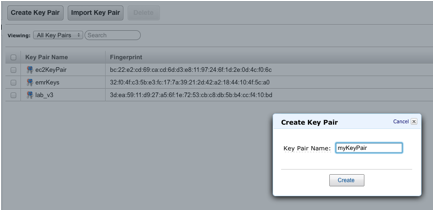
Create an Amazon Elastic Compute Cloud (EC2) key pair. You'll need the key pair to connect to your EC2 instance in order to do system administration or troubleshooting.
-
Using the base 64-bit Amazon Linux AMI, launch an EC2 instance. Perform a sudo yum update, and then load Postgres onto the instance with the following commands:
> sudo yum update
> sudo yum install postgresql - Make sure you can log in to your Amazon Redshift cluster from the
EC2 instance. You can use the following bash script to do so so you
don’t have to copy and paste all of the items each time you connect.
> psql -h my-connection-string -p my-port# -U user -d mydb
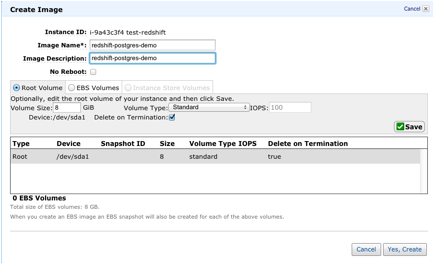
- Once Postgres has been installed on your 64-bit Amazon Linux
instance and you have validated that you can connect to Amazon
Redshift, save this instance as a Custom AMI.
-
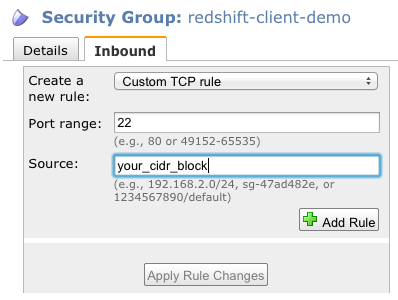
Create a security group
so your EC2 instance can connect to your Amazon Redshift cluster. For
inbound traffic, you will need to keep port 22 open to any IP addresses
you will be using to ssh into the instance.
-
Add the EC2 security group to your Amazon Redshift cluster security group to allow any EC2 instance in that security group to connect to your cluster.

-
Create an IAM EC2 Role (choose EC2 Role at the first prompt).
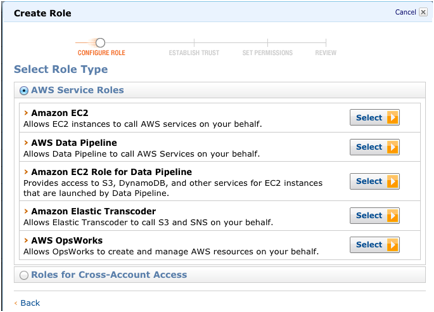
-
On the Set Permissions page, click Select next to Amazon Redshift Full Access.

- Create an S3 bucket where you will place any logs that AWS Data Pipeline generates.
- Write a bash script on your EC2 instance that will issue the
copy command to Amazon Redshift. The copy command will load your Amazon
CloudFront logs from Amazon S3 to your Amazon Redshift cluster. You can
use the following example script, which is named redshift.bash. Be sure to substitute your own information in the script as appropriate.
#!/bin/bash
DBHOST=YOUR_HOST
DBPORT=YOUR_PORT
DBNAME=YOUR_DB
DBTABLE=YOUR_TABLE_NAME
DBUSER=YOUR_DB_USER
DBPASS=YOUR_PASSWORD
S3PATH=s3://YOUR_CF_LOGS_PREFIX # {bucket-name}/{optional-prefix}{distribution-ID}
YESTERDAY=`date -d "yesterday" +"%Y-%m-%d"`
CF_LOG_PREFIX=$S3PATH.$YESTERDAY
AWS_ACCESS_KEY_ID=XXXXXXX
AWS_SECRET_ACCESS_KEY=XXXXXXXXXXXXXXX

# Secure temp files
export PGPASSFILE=`mktemp /tmp/pass.XXXXXX`
cmds=`mktemp /tmp/cmds.XXXXXX`
logs=`mktemp /tmp/logs.XXXXXX`

cat >$PGPASSFILE << EOF
$DBHOST:$DBPORT:$DBNAME:$DBUSER:$DBPASS
EOF

cat > $cmds << EOF
copy $DBTABLE from '$CF_LOG_PREFIX' CREDENTIALS 'aws_access_key_id=$AWS_ACCESS_KEY_ID;aws_secret_access_key=$AWS_SECRET_ACCESS_KEY' delimiter '\t' MAXERROR 200 IGNOREHEADER 2 gzip;
EOF

psql -d $DBNAME -h $DBHOST -p $DBPORT -U $DBUSER -f $cmds >$logs 2>&1 -
Create a table
in Amazon Redshift to capture the Amazon CloudFront logs. You can use
the following SQL command, substituting your own table name:
> create table YOUR_TABLE_NAME (logdate varchar(max), logtime varchar(max), edge varchar(40), bytes int, cip varchar(50), method varchar(50), host varchar(max), uri varchar(max), status varchar(20), creferrer varchar(max), useragent varchar(max), cs_uri_query varchar(max), cookie varchar(max), x_edge_result_type varchar(max), x_edge_request_id varchar(max));
-
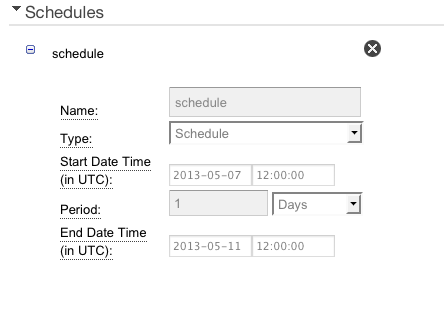
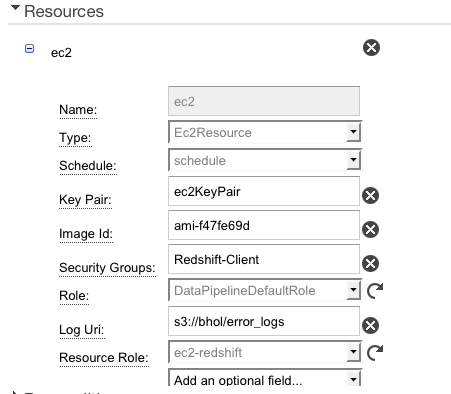
Create a data pipeline
as shown in the following figures, substituting your script URI,
schedule, image ID, security groups, EC2 resource role, and log URI.

- Save and Activate your pipeline. It always good to have tested the process manually before Activating your Pipeline.
- After the pipeline run is complete, make sure your table was
loaded with only the prior day’s Amazon CloudFront access logs.
> select * from YOUR_TABLE_NAME;
To troubleshoot, you can launch the Custom AMI you created in Step 2 above and run your bash script manually on the EC2 instance until it succeeds. If you encounter issues, take a look at your logs at /tmp/logs.* to determine issues and debug appropriately. It is much easier to debug before you have automated the process.
The example in this article can be adapted to different use cases. The SQL copy command is the most efficient way for Amazon Redshift to ingest bulk data from Amazon S3, but it is equally applicable to data stored in Amazon DynamoDB. AWS Data Pipeline greatly simplifies the process of designing and automating scheduled, data-driven workflows.