Artificial Intelligence
Build an Autonomous Vehicle Part 2: Driving Your Vehicle
This is the second blog post in our series that teaches you how to build a 1/16th scale autonomous car. You can also tune in to our Twitch streams to review concepts discussed in these blogs. After following along with us, you can bring your own car to race at the re:Invent Robocar Rally 2017, or you can use a car we provide.
1) Build an Autonomous Vehicle on AWS and Race It at the re:Invent Robocar Rally
2) Build an Autonomous Vehicle Part 2: Driving Your Vehicle
3) Building an Autonomous Vehicle Part 3: Connecting Your Autonomous Vehicle
4) Building an Autonomous Vehicle Part 4: Using Behavioral Cloning with Apache MXNet for Your Self-Driving Car
In our first blog post, we built a Donkey car and deployed a pilot server onto your Amazon EC2 instance. In this blog post, we set up a race track and teach your car to drive using Amazon EC2 Systems Manager and AWS IoT. If you powered down your Donkey Server EC2 instance, turn it on now and get its public IP address. After you have the public IP address, we will connect your car to EC2 Systems Manager to remotely access it. Then, we will connect your car to AWS IoT to track telemetry data that you can use to compare lap times against your friends’.

Track setup
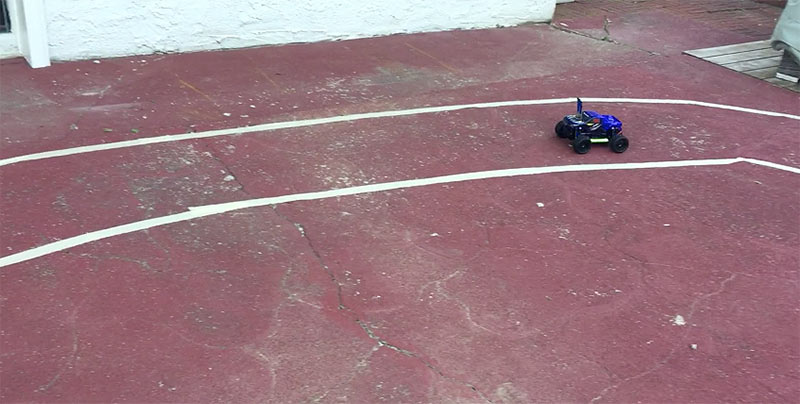
The first step in teaching your car to drive is laying out a track. After your track is ready, you’ll need to drive your car through its first round to start training its neural network. The car we’re using is rather quick and has a moderate turning radius, so you’ll want to start with a track that doesn’t have tight turns.
Beyond that, the size of the track that you build is limited by the space you have available, and the amount of tape you have on hand. Feel free to use your creativity in the design, but make sure that you incorporate both left and right hand turns of various degrees to give your neural network exposure to many different situations. Keep in mind that your car uses its front facing camera to see the track you lay out, so you’ll need to make sure the tape is easily distinguishable from the floor.
Track design tips and tricks
- Consistent lighting provided by indoor tracks will provide better results as compared to an outdoor track with varying levels of light and shade.
- Your car will typically have a minimum turning radius of 30” so keep this in mind when planning the sharpness of your corners.
- You can use white ribbon and blue painter’s tape to make a temporary track.
- You can also use a single white line as a track. The behavioral cloning method will learn to follow the line.
- Matte finish tape performs better than glossy tape.
Two two options for a more permanent track.
After you have your track ready, open up EC2 Systems Manager and activate your car.
Activate device on EC2 Systems Manager
EC2 Systems Manager provides a variety of features that are very useful for your car. Systems Manager helps you automate functions that eliminate the need to connect via SSH into the Raspberry Pi on your car. Setting up the Raspberry Pi is a straightforward process that starts with creating an activation, installing an agent, and creating documents that control certain behaviors. Systems Manager enables you to run commands without SSH and can serve as a parameter store for both plaintext and encrypted key value pairs. Systems Manager also helps ensure that the local pilot is running and ready to take commands on boot. We are going to use Systems Manager to automatically generate and download AWS IoT certificates that are needed to securely transmit telemetry to the AWS IoT service.
Go to EC2 Console and press Activations.

Choose create an activation. Enter your Activation Description. For this blog post we name it DonkeyCar Activation. Leave the limit at 1 for now. Set an expiry date for the future (no more than 30 days) and name the device myDonkeyCar. After choosing Create Activation, you will receive an Activation Code and Activation ID.

Note these down somewhere safe because you need the activation code and the activation ID to register the Raspberry Pi to EC2 Systems Manager.
Connect to your Donkey via SSH using the IP address of the Raspberry Pi running your donkey vehicle. The command to do this is as follows using the IP address of the Raspberry Pi.
ssh pi@172.20.10.7
Note that the default username is “pi” and the password is “raspberry”. We recommend that you set your own username and password.
On the device, enter the following command lines to install the EC2 Systems Manager agent, and then start the service so that it can communicate with Systems Manager. We will also install the AWS CLI as depicted here.
Note: If you’re using the Donkey Raspberry Pi Image, also run the following command to have a stable machine ID.
After the service has started, you will see the device under Managed Devices. You can remotely access it from the AWS console. For our device, we also want to grant it full SSM Permissions. Go to IAM and press Roles.
Search for AmazonEC2RunCommandRoleforManagedInstances. We want to attach AmazonSSMFullAccess policy to this role so that our Donkey Car will have full access to EC2 Systems Manager. Let’s also attach the AWSIoTConfigAccess to give our device permission to provision secure IoT certificates.
The Summary Page should look like this:

Start driving
To begin, connect to your Donkey via SSH using the IP address of the Raspberry Pi running your donkey vehicle. The command to do this is as follows using the IP address of the Raspberry Pi.
ssh pi@172.20.10.7
Note that the default user name is “pi” and the password is “raspberry”. We recommend that you choose a more unique password. Remember this password, as it is your primary means of interacting with the vehicle.
You can also automate all of this. Let’s create a Systems Manager Document to define some actions for our Raspberry Pi. We will name our document RunCar. We can leave Document Type as Command.
We can use the following JSON to define a basic update Pi script. To learn more go to Systems Manager Documents. Copy the following into Content. Press Create Document.

Note: When creating new versions of existing Documents, make sure to set newest version as the default.
To run this command, go to Run Command and press Run a Command.

Select the RunCar and manually choose your Raspberry Pi to run on (managed instances have a prefix of “mi”). This will run the commands from the Document you created on the Raspberry Pi, without needing to use SSH to connect to it.
Now, connect to IP address of the Raspberry Pi while specifying port 8887. You can use any browser, although the next part is going to be more fun and yield better results on a tablet or mobile phone.
Your browser should show a page like this:
Choose the Vehicles tab, and select your vehicle. This connects you to the control dashboard. The dashboard should look like this:
You need to manually drive the vehicle around the track using the control dashboard to start training your neural network. Before you get the car on the track, make sure you spend some time learning to control the throttle and steering angles.
There are several control modes, but we like to use the device tilt mode over the gamepad, joystick, or keyboard controls. It’s also useful to limit the max throttle based on the dimensions of the track. In our testing, we found that max throttle of 25% was required to get our car in motion, but speeds above 30% made the vehicle harder to manually control. That said, your car can learn to go faster.
Once you’re ready, connect the vehicle to its battery and choose the green Start Vehicle Button. If everything is working correctly you will see a live POV video feed from the camera with responsive angle and throttle gauges, and responsive controls. Take a few minutes getting familiar with the controls, then head over to the track. Remember, your car is going to learn from you. Make sure you stay in the lines, and don’t do any crazy turns. You’ll want to be able to complete 10 full laps without making mistakes.
After you have the track laid out, and you have the basics mastered, it’s time to start training your neural network. To do this, choose Start Recording. Your car will now grab 160×120 frames from the camera, store that image, and capture the associated metadata such as throttle and steering angle, in a separate JSON file.

As you can see, we are laying the ground work for your neural network to start learning using sample images with corresponding steering angle and throttle data. As your car gets more data, it will develop a model that enables it to read the road and react accordingly.
In order for this model to have some degree of accuracy, or precision, you will need to drive your car for several minutes to gather at least a few thousand images. The model requires sufficient training to be performed in order to collect a large enough sample set and may require 10-20 continuous full laps of good driving.
When you have collected a large enough training set, you can choose Stop Vehicle to stop collecting data. Now, it’s time to upload the session data to your deep learning framework on your EC2 instance to develop a model for your car. You could train your car using the compute power on your Raspberry Pi, but the things will go much faster on your EC2 instance.
To get started, set up an SSH session to your deep learning EC2 instance that you set up in the previous post using the following commands. This will copy and synchronize your data from your Raspberry Pi from the data folder, to the deep learning instance.
Note: Make sure your Raspberry Pi can be connected from the internet via Ethernet (public IP address). Otherwise, you’ll need to copy your DonkeyKP pem file onto the Raspberry Pi and rsync the other direction (rsync from within the Raspberry Pi).
After the data sync completes, you can now start training using your session data. As a result of the training, we will create a model that will be deployed on the Raspberry Pi
After you have created the model, you need to download the model from the instance, to your car’s Raspberry Pi.
Note: If you are syncing data from within Raspberry Pi, use the following commands instead to download the data and to download the model (given that you have downloaded the pem file for your deep learning instance onto the device).
Download data from Donkey Raspberry Pi onto the deep learning instance.
Train the model from the deep learning instance the same way we showed you earlier.
Download the model from the deep learning instance onto the Donkey Raspberry Pi:
After your model is on your Raspberry Pi you can use the model for the car to drive itself. This can be done without making an SSH connection to your Raspberry Pi. As you did earlier, just use Run Command. You can create a document as you did before or you can use the following commands.
Within Commands select AWS-RunShellScript and type the following under commands.
Now that your model is trained, return back to the tablet, refresh the browser, select your car, and select Auto Angle under Mode & Pilot. Now make sure the Donkey Car is powered on and placed on the track. Then, set max throttle to 25%, and choose Start Vehicle. You still control the throttle of your car, but it’s on its own for steering. Gently get the Donkey Car moving and watch how well it navigates your track.
As your car turns around the track, it gets more data for you to load back into your model. The more data you have, the better your car will drive.
You can also save all of your work using the EC2 Systems Manager Parameter Store.
Use Parameter Store to store configuration data and secrets
One useful feature within EC2 Systems Manager is called Parameter Store. It’s a great place to store configuration data, secrets, API Keys, and passwords instead of hard-coding the values within the code.
Instead of hard coding parameter values within our /home/pi/d2/manage.py script, we can store them within Parameter Store so that we can easily change them without needing to use SSH to connect to the deep learning instance or the Raspberry Pi.
For example, let’s create a Parameter for LEFT_PULSE. Go to Parameters, select Create Parameter. We can set it to 441 (the default setting).
After the parameter has been created, we can reference it either though get-parameters using the AWS CLI or by using the AWS SDK. Because we’re modifying manage.py, we need to use the boto3 SDK for Systems Manager.
Before you can use boto3, you need to install it by running the following on the Raspberry Pi:
In the code, let’s add the boto3 import and define our ssm client.
The get-parameter method information can be found here.
Within the manage.py code, instead of calling left_pulse=441 we can call
After your car is performing well, you can use AWS IoT to track your lap time and race against your friends.
AWS IoT Setup
Begin by opening your AWS Management Console and selecting the AWS IoT console. Using AWS IoT we will design a Fleet Monitoring service for our autonomous vehicles.
The components of the Fleet Monitoring service are color coded by logical functionality (and AWS services) to demonstrate how each component of the solution is secure, scalable, and entirely usage based.
You can use the Fleet Monitoring service to track and compare lap times, but an automobile manufacturer that wants to develop its own connected vehicle platform can also use this architecture.
This all begins with your car (shaded in green). Your device is already internet connected, which means it is capable of streaming telemetry to a centralized location, such as AWS IoT. We will discuss the collection of the telemetry data in the next post.
To make sure your car is secure, you need to generate certificates from the AWS IoT service and deploy them to your car. By using certificates, your car can securely communicate with the AWS IoT service using TLSv1.2 over MQTT. MQTT is an extremely lightweight protocol, which deals very well with low signal networks, so it can cope with connection reliability challenges.
There are two ways to create a certificate. You can create it using the AWS CLI or AWS IoT console.
Create Certificate using the AWS CLI
We will generate the certificate, public key, private key, as well the root AWS IoT CA through AWS CLI commands within a Systems Manager Document.
Create another Document following the process discussed at the start of this post, and name it RegisterCar.
To apply the actions described in this document, go back to Run Command and choose to run RegisterCar with the selected instances.
Create Certificate using the AWS IoT Console
Another way to handle security is to use the one-click certificate creation method. To do this, select Security from the left-hand side of the AWS IoT Dashboard. In the upper right-hand corner choose the blue Create button.
Click Create certificate to automatically generate the certificate, public key, and private key from the AWS IoT service certificate authority (CA).
Download each of the files, and copy them to the Raspberry Pi. Make sure that you also download the root AWS IoT CA.
Then click Activate to enable the certificate to be used.
Next click Attach a policy.
Further Optional add-ons
Consider using tagging when managing a large number of Raspberry Pis. We tag the devices by using the add-tags-to-resource API operation. This allows us to apply Run Commands by Specifying a Tag rather than manually selecting instances.

Additionally, State Manager can be used to maintain consistent configuration for your car. You can bootstrap your Raspberry Pi with specific software at start-up (such as installing the Donkey Car repository, connecting to AWS IoT, and so on).
Next Up
Join us for the next blog post in our series, in which we configure the Donkey Car to AWS to collect, analyze, and log our vehicle telemetry.