AWS Machine Learning Blog
“Greetings, visitor!” — Engage Your Web Users with Amazon Lex
All was well with the world last night. You went to bed thinking about convincing your manager to add some time in the next sprint for much-needed improvements to the recommendation engine for shoppers on your website. The machine learning models are out of date and people are complaining, but no one is looking past the one-off tickets that stream in every day. You wake up to the usual flurry of email.
But what’s this? You learn that the Chief Marketing Officer is at an industry conference where she’s heard the buzz about conversational experiences. She just tried out some chatbots, and now she wants one for the site. She wants to connect with shoppers one-on-one to offer them a personalized experience. That’s a fun technology problem. As long as the management team hires someone to help with the look and feel, you can focus on the fun part of putting the chatbot together.
In this post, we show how easy it is to create a chatbot and a personalized web experience for your customers using Amazon Lex and other AWS services.
What do you need to prove?
Personalized experience covers a lot of ground, but you have ideas. You could create a virtual shopping assistant that can answer questions about products; check colors, styles, and pricing; offer product recommendations; bring up relevant deals; remember shopping preferences; look up ratings and reviews–and, of course, you’ll need to look up the most useful and recent reviews first–or wait … maybe even talk about what the Twittiverse thinks. But you have to nail basic stuff like “Do you have this in red?,” “Where can I get it?,” and “What’s the return policy?.”
Basically, you need to prove:
- That you can build a bot quickly (check, you have Amazon Lex for that)
- That you can integrate your bot with the site (and later on, you might use AWS Lambda to connect to other apps)
- That it’s easy to monitor the bot and update it (you’re not really sure about this one)
For starters, you decide to keep it simple. You decide to build an example bot using Amazon Lex, wire it up to static HTML, connect it to a stub service, and see what it takes to update the bot. This is going to be fun!
Build an Amazon Lex bot
The specific bot isn’t important. You just want to make sure that you can put together a web experience that integrates with a service on the backend. You can start with the Amazon Lex BookTrip example. It takes a couple of minutes, but when you’re done, you’re ready to test the “Return parameters to client” (no code hooks yet) version of the bot. San Francisco for two nights, anyone?

Next, you follow the instructions to use a blueprint to create a Lambda function (BookTripCodeHook) that will serve as the code hook for initialization, data validation, and fulfillment activities. You use the Test events from the Sample event template list to confirm that the code works as expected and that you don’t have any setup or permissions issues.
Now, you incorporate the Lambda function into the Amazon Lex bot. You follow the instructions to associate the new function as the Initialization and data validation code hook and the Fulfillment code hook for both the BookCar and BookHotel intents:

You specify a Goodbye message so you’ll know for sure when the bot completes successfully as you test.

You build the bot and retest it. This time around, the Lambda function provides the room rate based on the location, the room options, and the number of nights. You tweak the code to make sure that it’s easy to integrate with an API. For example, you could integrate with a weather data source so that the user can ask about the weather in the chosen city.
Set up Amazon Cognito
You’re ready to push this out to a static website, but you want to ensure it’s not left wide open. You know Amazon Cognito will let you manage permissions and users for mobile and web apps, so you start with an Amazon Cognito federated identity pool.
From the Amazon Cognito console, you choose Manage new identity pool, and then choose Create new identity pool. You provide a pool name (botpool), choose Enable access to unauthenticated identities, and then choose Create Pool:

To create the pool and the associated AWS Identity and Access Management (IAM) roles, you choose Allow. Then, you record the IAM role names so you can modify them:

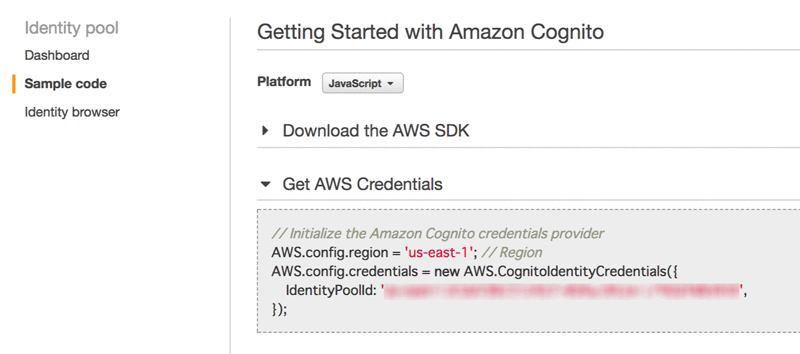
Finally, you get the pool ID that you need for the JavaScript you will use to integrate the bot.

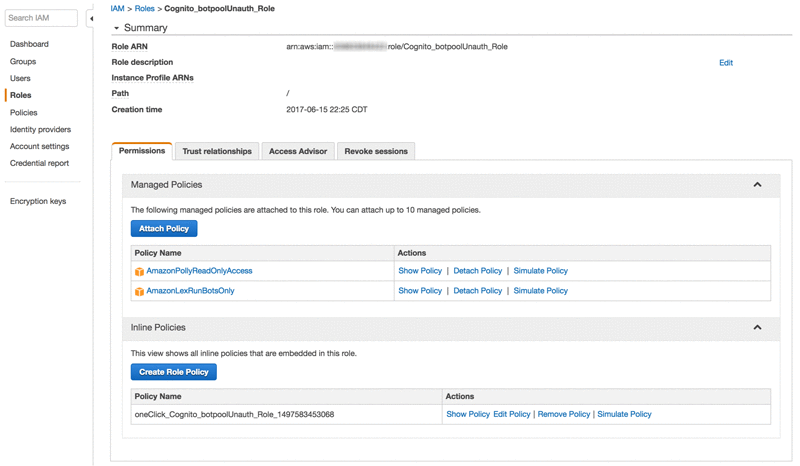
You modify the IAM roles to allow access to Amazon Lex. From the IAM console, you find the roles and change each of them to attach the AmazonLexRunBotsOnly and AmazonPollyReadOnlyAccess policies:

Test your chatbot on the web
You quickly put together an HTML file that you can use to test your bot. The pool ID is used here to establish an IAM session.
You upload the file so that you can host it on Amazon S3 as a static web site to test your chatbot on the web.

Now that’s a productive morning! You send a quick note to the team and head out for a well-deserved break.
Monitoring and feedback
By the time you get back, a few people have already tried out the bot. You check the Amazon Lex console for metrics.
You notice that some people have been saying, “hotel for 2 nights” and Amazon Lex isn’t catching that, so you add a new utterance and rebuild the bot: You realize that you can use the Model API to do this programmatically, but this will do for now. You’ve met your goal and can now demo your solution.
Conclusion
Amazon Lex makes it easy to create functioning bots in minutes. Using services like Amazon Cognito and Amazon S3, you can quickly integrate a chatbot into a web experience, but there is so much more to do. How can you tell when there are a hundred users of the new bot? Could you wire it up to the web analytics? Could you fire analytics events when the visitor gets to a certain step in the interaction?
Additional Reading
Learn how to integrate your Amazon Lex bot with any messaging service.

About the Author
 As a Solutions Architect, Niranjan Hira is often found near a white board helping our customers assemble the right building blocks to address their business challenges. In his spare time, he breaks things to see if he can put them back together.