AWS Marketplace
Deploy a containers-based application with AWS Marketplace and ECS Anywhere
Introduction
Since its launch in 2014, Amazon Elastic Container Service (Amazon ECS) has simplified ways to allow you to run containerized workloads at scale. On May 27, 2021, AWS announced Amazon ECS Anywhere (ECS Anywhere), a new launch type that allows you to run containerized workloads anywhere including on premises, on virtual machines (VMs), on bare-metal servers, and other customer-managed infrastructure. AWS Marketplace currently supports ECS Anywhere, and in this blog post, Adam, Omar, and I walk you through the process of deploying a container product from AWS Marketplace to an Amazon ECS Anywhere cluster.
AWS Marketplace is a digital catalog with thousands of software listings from independent software vendors that simplifies the way customers find, subscribe to, and deploy software that runs on AWS, and now on ECS Anywhere. To meet compliance requirements and scale your business by mitigating complex local container orchestration, you can now deploy AWS Marketplace containers products on your managed infrastructure.
In this post, we show how to use the PiXYZ Scenario Processor to prepare three-dimensional (3D) Computer Aided Design (CAD) models for real-time experiences and static 3D renderings. This product is used as an example to demonstrate the deployment process of AWS Marketplace containers application on Amazon ECS Anywhere. PiXYZ Scenario Processor takes solid models as inputs and outputs a polygonal 3D mesh. A polygonal 3D mesh is a collection of vertices, edges and faces that defines the shape of a polyhedral object. Polygonal 3D mesh outputs are required to create real-time 3D experiences.
Solution overview
Here’s how to get started with ECS Anywhere. You first create a new Amazon ECS cluster with two external worker nodes by installing Amazon ECS agents, System Manager agents, and Docker on two virtual machines (VMs). Second, you create an Amazon S3 bucket to store input and output files for the ECS task. Finally, you create AWS Identity and Access Management (IAM) roles with appropriate permissions and task definitions. This is to deploy AWS Marketplace container product on created ECS Anywhere cluster with two external worker nodes. The following diagram shows the steps to deploy this solution:
- Subscribe to PiXYZ Scenario Processor. This will incur software costs to your AWS account. You can review the product pricing at PiXYZ Scenario Processor – Pricing before subscribing.
- Create IAM role.
- Create S3 buckets.
- Create Task definition.
- Create Amazon ECS cluster and run the task definition on that Amazon ECS cluster.

Prerequisites
-
- Subscribe to AWS Marketplace PiXYZ Scenario Processor by following the instructions.
- Have two running servers or virtual machines that meet these Pixyz Studio hardware requirements.
- Pre-install the following tools on remote nodes:
-
-
- AWS CLI
- Curl
-
-
- Set up an AWS Cloud9 integrated development environment (IDE).
Solution walkthrough
This solution walkthrough has the following steps:
- Prepare the AWS resources.
- Prepare the infrastructure nodes.
- Deploy the container product.
Step 1: Prepare the AWS resources
In this step, you create an ECS Anywhere cluster to host the remote nodes and the required AWS IAM roles for the remote nodes and executing tasks.
A. Create an ECS Anywhere cluster using AWS CLI
To create an ECS Anywhere cluster, go to AWS Cloud9 integrated development environment (IDE) and enter the following:
aws ecs create-cluster \
--cluster-name awsmpdemo-ecs-cluster \
--region us-east-1
You should receive output similar to the following:
{
  "cluster": {
    "clusterArn": "arn:aws:ecs:us-east-1:xxxxxxxxxxxx:cluster/awsmpdemo-ecs-cluster",
    "clusterName": "awsmpdemo-ecs-cluster",
    "status": "ACTIVE",
    "registeredContainerInstancesCount": 0,
    "runningTasksCount": 0,
    "pendingTasksCount": 0,
    "activeServicesCount": 0,
    "statistics": [],
    "tags": [],
    "settings": [
      {
        "name": "containerInsights",
        "value": "disabled"
      }
    ],
    "capacityProviders": [],
    "defaultCapacityProviderStrategy": []
  }
}
B. Create an IAM role
Create a required IAM role “ecsAnywhereRole” for remote instances by following the instructions in IAM permissions for Amazon ECS Anywhere or the following steps:
- Open the IAM console at https://console.aws.amazon.com/iam/. In the navigation pane, choose Roles and then choose Create role.
- Choose the AWS service role type, and then choose Systems Manager. Choose the Systems Manager use case and then Next: Permissions.
- In the Attached permissions policy section, search for and select the AmazonSSMManagedInstanceCore and AmazonEC2ContainerServiceforEC2Role policies and then choose Next: Review.
- For Add tags (optional), specify any custom tags to associate with the policy and then choose Next: Review.
- For Role name, enter ECSAnywhereRole and optionally you can edit the description. Review your role information and then choose Create role.
- Perform a search for the ECSAnywhereRole and then select it to view the role details.
- On the Permissions tab, choose Attach policies. Search for the AmazonSSMManagedInstanceCore policy, select it, and then choose Attach policy.
Step 2: Prepare the infrastructure nodes
In this walkthrough, you use two virtual machines running your managed infrastructure. You can use any type of infrastructure that can run any of the operating systems supported by ECS Anywhere. This may include a physical, on-premises server. There are two virtual machines that are prepared for this tutorial, onprem-vm1 and onprem-vm2.
A. Register your virtual machines
You can follow the instructions to learn more about how to register an external instance to an AWS ESC cluster. Alternately, to register both virtual machines using the AWS Management Console, perform the following instructions:
- Open the Amazon ECS console.
- From the navigation bar, select the Region to use.
- In the navigation pane, choose Clusters.
- On the Clusters page, choose awsmpdemo-ecs-cluster to register your external instance to.
- Choose the ECS Instances tab, then choose Register external instances.
- On the Step 1: External instances activation details page, complete the following steps.
- For Activation key duration (in days), enter the number of days that the activation key remains active. After the number of days you entered passes, the key no longer works when registering an external instance.
- For Number of instances, enter the number of external instances that you want to register to your cluster with the activation key.
- For Instance role, choose the IAM role to associate with your external instances. We will use the IAM role
ecsAnywhereRolecreated in previous step. - Choose Next step.
On the Step 2: Register external instances page, copy the registration command. This command should be run on each virtual machine that you prepared.
B. Verify the ECS agent is running on both virtual machines
Once the installation completed, to verify if the ECS agent is running on both virtual machines, run the following command in your virtual machine’s console.
docker ps
You should receive output similar to the following example output:
root@onprem-vm1:/home/awsmpdemo# docker ps
CONTAINER ID IMAGE COMMAND CREATED STATUS PORTS NAMES
f17dd66f70f6 amazon/amazon-ecs-agent:latest "/agent" 2 minutes ago Up 2 minutes (healthy) ecs-agent
On the AWS Management Console, navigate to the ECS Instances tab. Your remote instances should appear there.
Step 3: Deploy container product
Once the Amazon ECS cluster and external worker nodes are up and running, you can deploy the AWS Marketplace container product. You must log in to your Cloud9 IDE to start deploying container product using AWS CLI. Your IAM user must have appropriate permission to execute the following commands.
A. Create an S3 bucket
To create new S3 bucket, run the following command in your Cloud9 IDE. Be sure to give the bucket an appropriate name. See Bucket naming rules for more information on naming S3 buckets:
aws s3 mb s3://bucket-name --region us-east-1
Next, you must enable server-side encryption to secure your bucket by entering the following command in your Cloud9 IDE:
aws s3api put-bucket-encryption \
    --bucket bucket-name \
    --server-side-encryption-configuration '{"Rules": [{"ApplyServerSideEncryptionByDefault": {"SSEAlgorithm": "AES256"}}]}'
B. Set up required IAM role for executing ECS task
Create ecsTaskExecutionRole by following the instructions at Creating the task execution IAM role.
C. Set up IAM role with required permission for container product to perform actions on your behalf
- Create an ecsPixyzTaskRole by running the following command in your Cloud9 IDE:
aws iam create-role \
--region us-east-1 \
--role-name ecsPixyzTaskRole \
--assume-role-policy-document file://iam-task-execution-role.json
- Create an inline policy document named AWSMP-Pixyz-task-role-policy.json. This allows read and writes to S3 objects of the S3 bucket created in step A. It also allows Amazon ECS’s task to perform necessary API calls to the AWS Marketplace metering service. See Amazon S3: Allows read and write access to objects in an S3 bucket and AWS managed policy: AWSMarketplaceMeteringRegisterUsage for more information on how to create the IAM policy document.
- Attach the inline policy to your IAM role ecsPixyzTaskRole by running the following command in your Cloud9 IDE:
aws iam put-role-policy \

--region us-east-1 \

--role-name ecsPixyzTaskRole \

--policy-name ExamplePolicy \

--policy-document file://AWSMP-Pixyz-task-role-policy.json
- Attach the AWSMarketplaceMeteringRegisterUsage managed policy to the IAM role ecsPixyzTaskRole by running the following command in Cloud9 IDE.
aws iam attach-role-policy \

--region us-east-1 \

--role-name ecsPixyzTaskRole \

--policy-arn arn:aws:iam::aws:policy/AWSMarketplaceMeteringRegisterUsage
D. Create ECS task definition file to deploy the container product on your ECS Anywhere cluster
See PiXYZ’s usage instructions for more information on the command arguments being passed to the container.
- Create a task definition file.
To create an example task definition for ECS Anywhere, run the following command in your Cloud9 IDE, replacing <aws-account-id> with your actual AWS account ID and <bucket-name> with the name you chose in step A. You can follow the instructions here to find your AWS Account ID.
The requiresCompatibilities value must be EXTERNAL to allow the task to be deployed on external instances.
cat<<EOF > AWSMP-Pixyz-task-execution.json
{
  "networkMode": "bridge",
  "executionRoleArn": "arn:aws:iam::aws-account-id:role/ecsTaskExecutionRole",
  "taskRoleArn": "arn:aws:iam::aws-account-id:role/ecsPixyzTaskRole",
  "containerDefinitions": [{
    "name": "awsmpdemo-pixyz",
    "image": "709825985650.dkr.ecr.us-east-1.amazonaws.com/pixyz-software/scenario-processor:2020.2.3.9",
    "essential": true,
    "command": [
      "GenericPolygonTarget",
      "s3File_with_arguments",
      "\"bucket-name\"",
      "\"input/inputFile.step\"",
      "False",
      "\"bucket-name\"",
      "\"output/outputFile.glb\"",
      "10000",
      "False",
      "False",
      "False"
    ]
  }],
  "cpu": "256",
  "memory": "512",
  "family": "awsmpdemo-external",
  "requiresCompatibilities": [
        "EXTERNAL"
    ]
}
EOF
- Register the task definition to your AWS account.
To do that, enter the following command in your Cloud9 IDE:
aws ecs register-task-definition \
--region us-east-1 \
--cli-input-json file://AWSMP-Pixyz-task-execution.json
- Run the registered task definition.
Run the registered task definition using the following command in your Cloud9 IDE:
aws ecs run-task \
--region us-east-1 \
--cluster awsmpdemo-ecs-cluster \
--launch-type EXTERNAL \
--task-definition awsmpdemo-external:1
You can monitor the progress in the Amazon ECS console until it runs successfully. My task is running successfully, as shown by the Desired task status of Running in the Tasks tab of my Amazon ECS console. Refer to the following screenshot.

Results
The results from the PiXYZ’s container process are a decimated polygonal mesh that is consumable by popular 3D rendering engines. You can find the output files in the created S3 bucket. The following images are the example result after the task is completed. The first is a CAD rendering of a black and yellow power drill. The second is the exported polygonal mesh rendering of the same drill.

Input CAD Solid (power-drill.step)
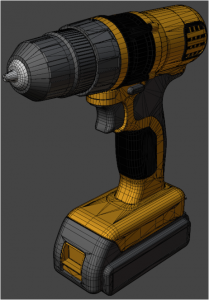
Exported Polygonal Mesh (power-drill.fbx)
Cleaning up
To avoid incurring costs from this solution, follow these steps to delete the Amazon ECS cluster and stop the running tasks:
- Open the Amazon ECS console at https://console.aws.amazon.com/ecs/.
- From the navigation bar, select the us-east-1 Region to use.
- In the navigation pane, choose Clusters.
- On the Clusters page, select the cluster named awsmpdemo-ecs-cluster to delete.
- In the upper right of the page, choose Delete Cluster. You see a confirmation prompt.
- In the confirmation box, enter delete me.
You should also delete the created S3 bucket to store the input and output files.
Conclusion
In this blog post, we have shown you how to create an ECS Anywhere cluster with external worker nodes, create the required IAM roles, and launch the AWS Marketplace container product using AWS CLI and task definitions. To learn more about Amazon ECS anywhere, you can visit the getting started blog post. If you want to learn more about the PiXYZ Scenario Processor and deploy it in more advanced use case, you can visit this AWS whitepaper, Serverless 3D Data Optimization Pipelines on AWS.
About the authors
 Linh Lam is a Senior Partner Solution Architect, ISV focusing on AWS Marketplace and is passionate about application modernization, serverless and containers technology. Outside of work he enjoys hiking, camping and building his home audio systems.
 Adam Harder is a Senior Spatial Computing Solutions Architect. He is passionate about building Augmented Reality (AR) and Virtual Reality (VR) applications and 3D data pipelines to support them. He spends his free time with his family. Together, they play on the beach, go hiking and camping, take road trips, and watch lots of movies.
 Omar Chehab is a Senior Product Manager for AWS Marketplace. Omar leads the containers initiatives on AWS Marketplace, focused on growing the business, adding sellers, and simplifying the experience for customers. When he is not writing or creating, Omar spends his time with his wife, two kids, his reef tank, and his cat.