AWS Big Data Blog
Find and acquire new data sets and retrieve new updates automatically using AWS Data Exchange
Updated 2/9/2021 – The CloudFormation stack was updated to use a new job type called ExportRevisionsToS3.
Updated 12/16/2020 – The CloudFormation stack was updated to account for an additional IAM permission introduced by AWS Data Exchange (GetAsset), which is needed to export assets.
Customers are doing some amazing things with data, such as improving medicine and tackling climate change. With AWS services, such as AWS Glue, Amazon EMR, Amazon SageMaker, Amazon QuickSight, and Amazon Athena, it is easier than ever to get data insights for your business. But how can you find the right data to fuel these analytics? This is where AWS Data Exchange steps in.
AWS Data Exchange makes it simple to exchange data in the cloud. In a few minutes, you can find and subscribe to hundreds of data products from more than 80 qualified data providers across industries such as Financial Services, Healthcare and Life Sciences, and Consumer and Retail. After subscribing, you can download data sets or copy them to Amazon S3 and analyze them with AWS’s analytics and machine learning services. With AWS Data Exchange, you can subscribe to data products and get access to data sets. Subscribers also access new data set revisions as providers publish new data.
This post uses an example scenario in which you would like to analyze daily treasury maturities in order to understand changes in the economy. We will use Rearc’s Daily Treasury Maturities | Federal Reserve Board product, which contains a data set that is updated daily with new data. This post walks through the process, from browsing the catalog and subscribing to the data products to setting up an automation to retrieve new revisions to S3 automatically, making it readily available to analyze using other AWS services.
Solution overview
The solution has three steps:
- Configure your prerequisites: an S3 bucket for your data and IAM permissions for using AWS Data Exchange.
- Subscribe to a new data product in AWS Data Exchange.
- Set up an automation using Amazon CloudWatch events to retrieve new revisions of subscribed data products in AWS Data Exchange automatically.
Prerequisites
This post assumes you have an S3 bucket to which you export your data sets. For more information, see Create a Bucket.
You also need permissions to use AWS Data Exchange and associated services to subscribe to and export data sets. You can, for example, use the AWS Data Exchange managed policy AWSDataExchangeSubscriberFullAccess, which gives you all the necessary permissions needed to use AWS Data Exchange as a subscriber. For more information, see Identity and Access Management in AWS Data Exchange.
Browsing the catalog and subscribing to data products
Browsing and subscribing to a new data product is straightforward. The first step is to determine what data products you wish to subscribe to. Complete the following steps:
- On the AWS Data Exchange console, choose Product catalog.You can search for a term and filter results by provider name and pricing plan.
- For Product catalog, enter federal reserve.
- Choose Search.You can see multiple data products listed, including a few products by Rearc and Crux Informatics. You can filter the results further by refining the results.

- Under Refine results, under Vendors, select Rearc.This post is searching for free product offerings, so filters the results further.
- Under Pricing plans, select Free.The filtered results contain Daily Treasury Maturities | Federal Reserve Board, which you can use for testing.Choosing the product name shows more product details, including its full description, which data sets are included in the product (some products offer multiple data sets in a single subscription), the product’s support contact information, as well as the its offer details, such as the data subscription agreement, available pricing options, and the refund policy. See the following screenshot of the product detail page.
 It is important to understand the offer details you are agreeing to, including the price and Data Subscription Agreement (DSA). A link to view the DSA is under the Usage tab. Read over the DSA; it is a legal agreement that defines the rights to use the data. You need to make sure that the agreement aligns with your intended usage before subscribing.
 - Choose Continue to subscribe.
- Under Complete subscription, for Pricing information, choose a subscription duration and price.
- For Renewal settings, choose whether you want to enable auto-renewal when the subscription expires.The following screenshot shows that this post chooses a subscription for 12 months, and to renew automatically.

- Choose Subscribe.The subscription process can take up to a few minutes to complete.
When your subscription is active, it is visible under the Active subscriptions tab of the Subscriptions page. Choose your subscription to view its details, including the data sets included in the subscription. You can also see the Region to which the vendor publishes the data set.

Viewing revisions and exporting assets
When you click on the data set name, you proceed to the data set page. You can view revisions under the Revisions tab. The following screenshot shows the list of revisions organized by Revision ID and time created.
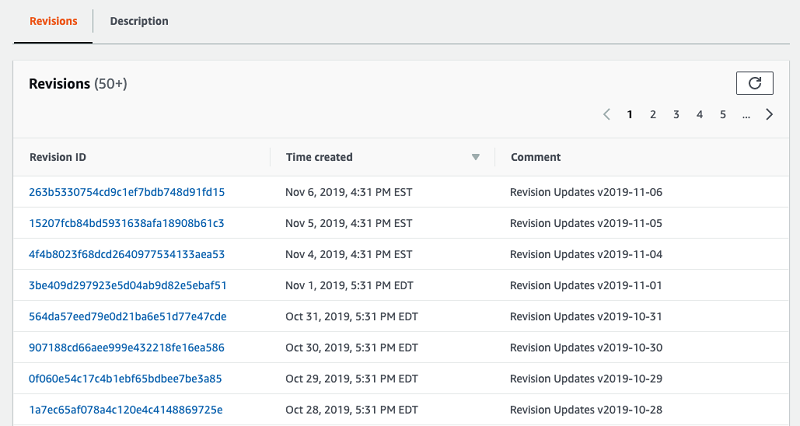
Over time, as Rearc updates the data set, you can see multiple revisions listed.
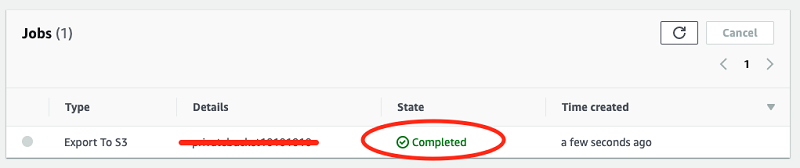
Choosing the latest Revision ID brings up all the files (called assets in AWS Data Exchange) available in the revision. To export the assets, complete the following steps:
- Choose the asset to export.
- Choose Export to Amazon S3.

- Choose an S3 Bucket in the S3 navigation modal.
- Choose Export.
AWS Data Exchange starts copying the asset to your S3 bucket. In the console, AWS Data Exchange uses the asset name as an S3 object key. View the export progress in the Jobs list. It progresses through three steps: Waiting, Processing, and Completed.
Subscription Verification
AWS Data Exchange also has a feature called Subscription Verification. Subscription Verification allows providers to approve or decline subscription requests before granting subscription to certain products. For products with Subscription Verification enabled, you need to complete a form to share some information with the provider, who has up to 45 days to approve or reject the request. The form includes information such as your contact name, email address, company name, AWS account number, and intended use case for the data. The provider uses this information (and potentially reaches out to you for more information) to decide whether to approve your subscription request. You can view your subscription request status on the Subscriptions page under the Subscription requests tab. To learn more about subscription verification, see Subscription Verification for Subscribers.
Automating the retrieval for new data set revisions
Providers update many products regularly by creating and publishing new revisions to the underlying data sets. For example, the Rearc data product is updated daily. You want your analytics and visualizations to add these revisions to their insights easily. To do so, you need to set up an automation to retrieve the new files stored in newly published revisions.
The following diagram shows the workflow of this process.
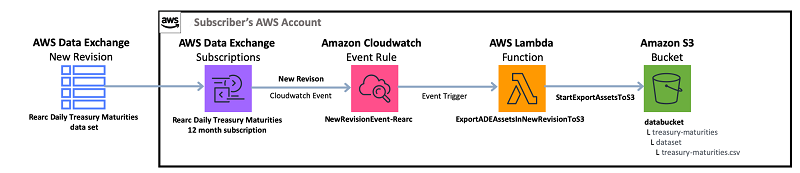
Every time a new revision is published, AWS Data Exchange publishes a CloudWatch event sourced from aws.dataexchange. Using a Cloudwatch event rule to trigger a Lambda function, an AWS Data Exchange Job exports the revision’s assets to a pre-defined S3 bucket. It is interesting to note that because AWS Data Exchange uses the asset name as a default S3 object key when exporting to Amazon S3, and since Rearc is publishing a new revision with the same asset name every day, this automation will always override the previous day’s file with a new file, allowing you to always refer to the same S3 object, which will have the latest data.
An AWS CloudFormation template packages this automation. It contains all the necessary resources, including an S3 bucket to store the data, the Lambda function to export the data, its IAM role and policy, and the CloudWatch event rule to trigger the function. Packaging this automation in an AWS CloudFormation template makes it simple to repeat the automation for each data set you subscribe to. You can configure the template using the Data Set ID, which you can retrieve from the data set page that we have seen above.
In this post, we use a Lambda layer that extends the AWS Python SDK (boto3) that is built into the Lambda Python runtime by adding the AWS Data Exchange and AWS Marketplace Catalog API SDKs as of November 13, 2019. This is an example layer published for this post; use the correct version of the AWS SDK for your needs.
Deploying the automation
Before deploying the automation, make sure you are in the Region in which the data set is located. You can find this on the Subscription details page under Data sets.

- Click this button to deploy the CloudFormation template in us-east-1 region from the CloudFormation console.

Alternatively, if you’re using a different region, you can manually create the stack in that region:- On the AWS CloudFormation console, choose Create Stack.
- On the Create stack screen, for Template source, select Amazon S3 URL, and enter this URL in the box:
https://aws-bigdata-blog.s3.amazonaws.com/artifacts/aws-blog-DataExchange/DataExchangeDownloadDataSet-v0.8.yaml

- On the stack details screen, give the Stack a name and paste in the ID of the dataset from the subscription. You can retrieve the Data Set ID from the AWS Data Exchange Console’s Subscriptions. Optionally, you can enter a Revision ID to download an existing revision to the s3 bucket immediately after stack creation. You can leave the revision ID blank, and only revisions published after this time will be downloaded to the s3 bucket. Choose Next.

- On the Configure stack options page, choose Next.
- On the Review screen, scroll down and check the three boxes in the Capabilities and transforms Then choose the Create stack button.

The stack takes 3–4 minutes to complete. Choose the refresh icon to see the latest status. You can see the created S3 bucket under the Resources tab. This is where you can see new data set revisions.

Conclusion
In this post, you have searched and subscribed to a product and deployed the automation needed to automatically export new revisions to Amazon S3. This automation makes the data readily available to catalog and analyze using other AWS services. For example, you can catalog the new data automatically with an AWS Glue crawler, which creates and updates a table in your database with the Rearc data automatically. For more information, see Build and automate a serverless data lake using an AWS Glue trigger for the Data Catalog and ETL jobs. After cataloging the data, you can run a serverless ETL job to transform it into Parquet, or use it directly as-is from Amazon Athena or Amazon QuickSight.
About the Authors
 Akram Chetibi is a Senior Product Manager of AWS Data Exchange. Akram joined AWS more than two years ago, and has launched multiple services including AWS Data Exchange and AWS Fargate.
 George Seib is an Enterprise Solutions Architect with Amazon Web Services. He helps Financial Services and Enterprise customers cost effectively scale and secure data workloads.