AWS Big Data Blog
Optimize Amazon S3 Tables queries with Amazon Redshift
Amazon S3 Tables with Amazon Redshift gives you a powerful combination for analytical workloads on Apache Iceberg tables. But as query volumes grow, small inefficiencies compound. For example, repeated queries, such as dashboards refreshing hourly or analysts running the same joins throughout the day, scan data directly from Amazon Simple Storage Service (Amazon S3) every time. The fully qualified three-part table references (database@catalog.schema.table) add friction for business intelligence (BI) tools and end users who expect simpler SQL syntax. And without tuning the way S3 Tables organizes your data files, queries read more files than necessary. When you address these three areas, your S3 Tables queries in Amazon Redshift become faster, simpler, and more cost-efficient, whether you’re powering a recurring dashboard or supporting ad hoc analysis at scale.
This is the third post in our S3 Tables and Amazon Redshift series. The first post covered getting started with querying Apache Iceberg tables, and the second post walked through enterprise-scale governance and access controls. In this post, you address those performance and usability gaps with three approaches:
- Create external schemas to simplify queries from three-part notation down to two-part notation.
- Build materialized views that store pre-computed results locally so repeated queries skip the S3 scan.
- Configure S3 Tables compaction strategies so the data file layout matches your query patterns.
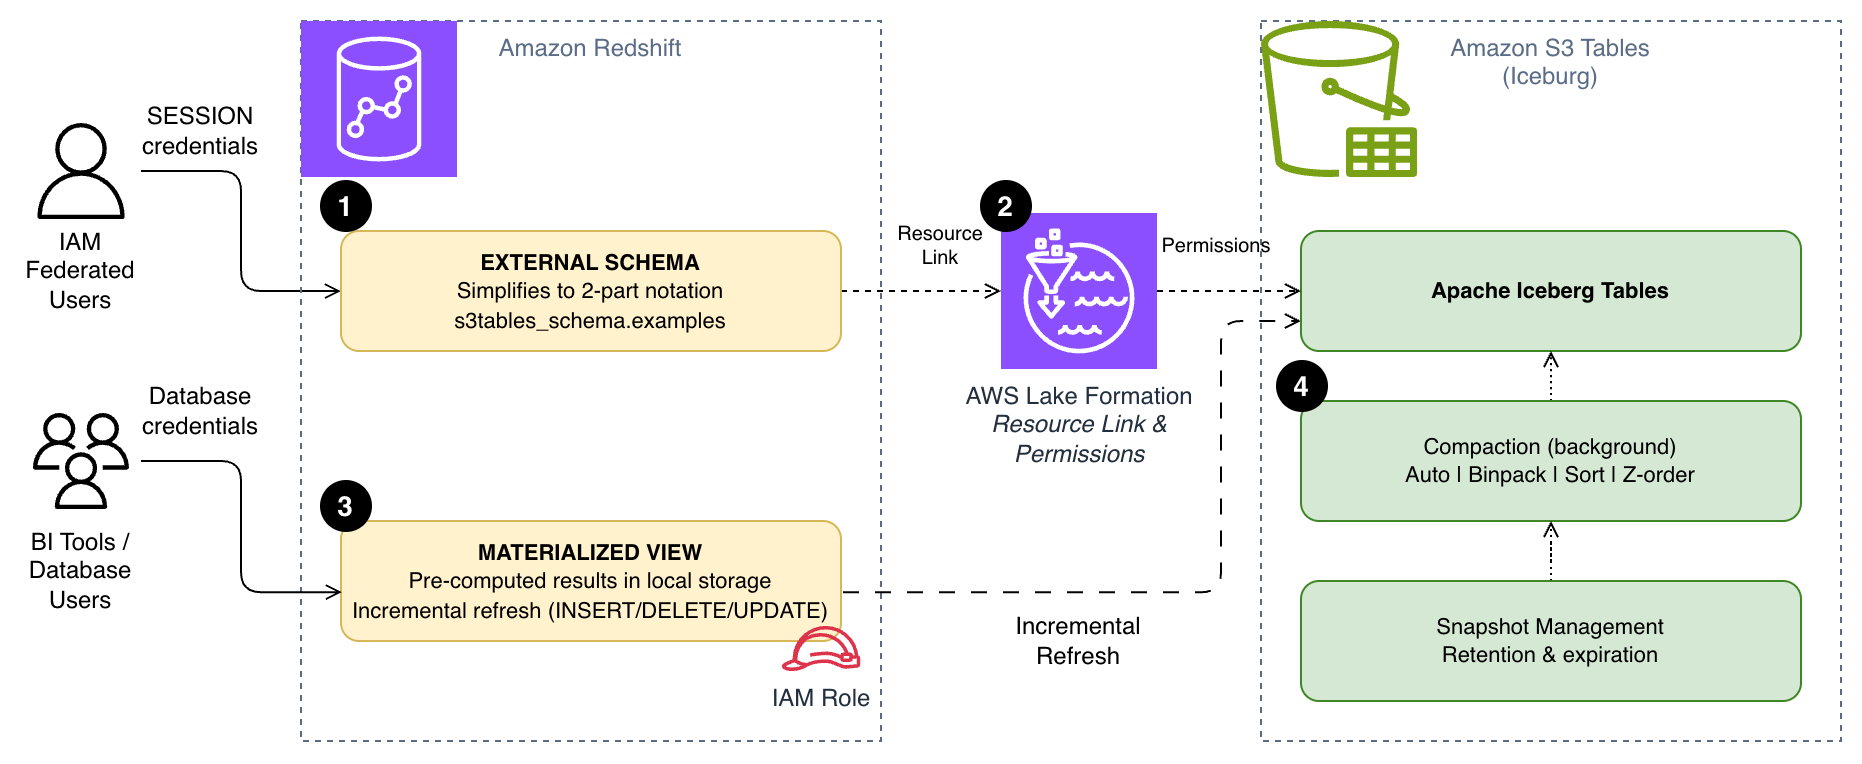
The following diagram shows how these three approaches work together. External schemas [1] simplify query syntax through AWS Lake Formation resource links [2], materialized views [3] store pre-computed results locally in Amazon Redshift, and S3 Tables compaction [4] optimizes the underlying file layout for your query patterns.
Prerequisites
Before you begin, make sure you have:
- An AWS account with permissions to manage AWS Identity and Access Management (IAM) roles, AWS Lake Formation, S3 Tables, and Redshift.
- An Amazon Redshift Serverless workgroup or Amazon Redshift provisioned cluster (patch 188 or higher).
- An S3 Table bucket with a namespace and tables created.
- Lake Formation configured with the AWSServiceRoleForRedshift service-linked role as a read-only administrator.
If you haven’t completed these steps, follow the setup instructions in the first post in this series.
Simplify queries with external schemas
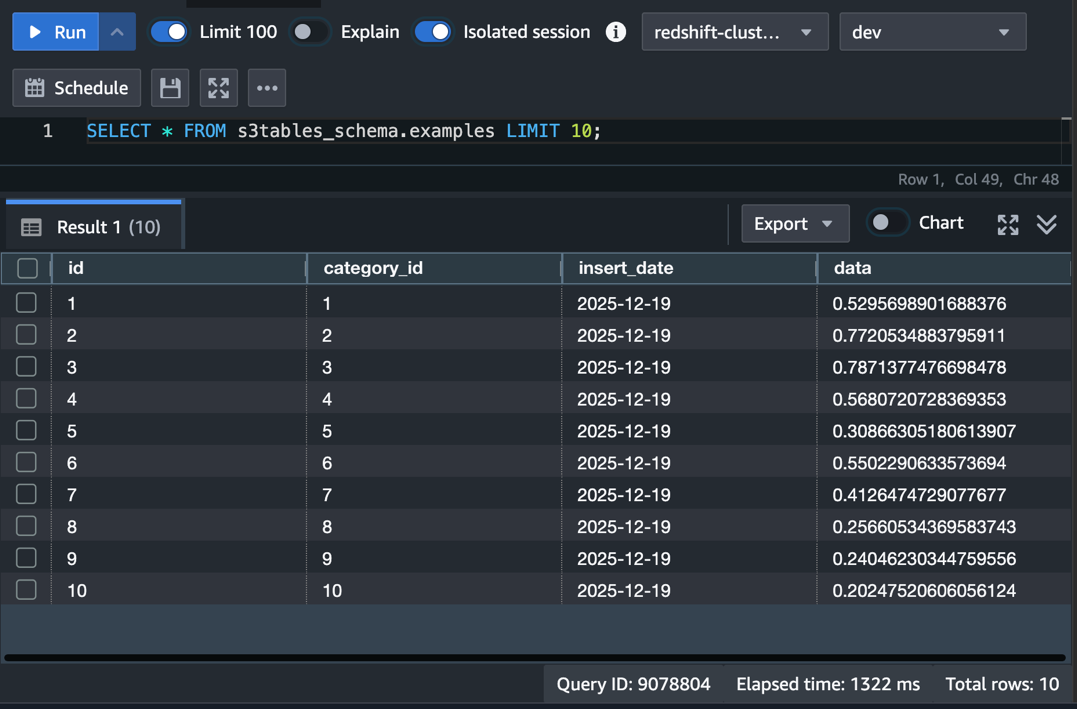
The previous posts in this series used the auto-mounted catalog to query S3 Tables with three-part notation:
You can use this syntax, but it can be cumbersome in business intelligence (BI) tools, manually typing queries, and in application code. This syntax also requires the user to use IAM federation. By creating an external schema, you can reference the same tables with a concise two-part notation:
To set this up, you create a Lake Formation resource link that maps to your S3 Tables catalog, then create an external schema in Amazon Redshift that points to that resource link. Your setup differs slightly depending on whether your users authenticate through IAM federation or database credentials. While this doesn’t change query performance, it removes a common barrier to adoption by simplifying the reference.
Create a Lake Formation resource link
Both authentication methods require a resource link in Lake Formation that points to your S3 Tables database.
- In the Lake Formation console, choose Databases under Data Catalog.
- On the Create menu, choose Resource link.
- Configure the resource link with the following settings:
- Resource link name:
s3tables_rl - Destination Catalog: Your account ID (for example,
111122223333) - Shared Database: Your S3 Tables database (for example,
icebergsons3) - Shared Database’s Catalog ID: Your S3 Table bucket in the format
111122223333:s3tablescatalog/redshifticeberg
- Resource link name:
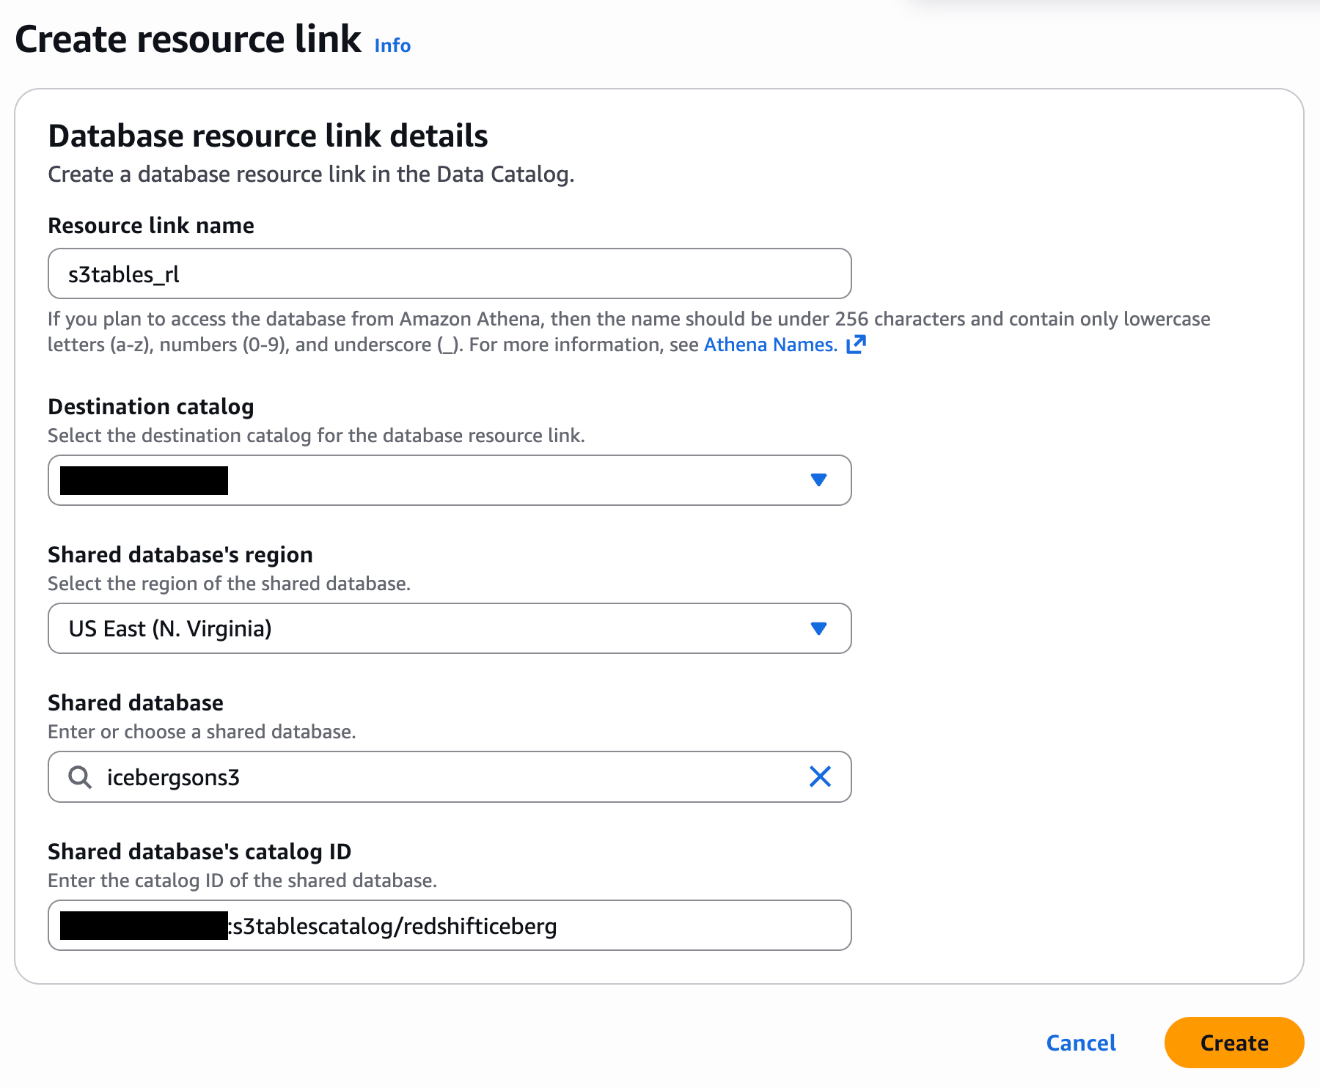
For more information, see Creating resource links in the Lake Formation documentation.
Option A: External schema for IAM federated users
If your users connect to Amazon Redshift through IAM federation, create the external schema with the SESSION keyword. This passes the federated user’s credentials through to Lake Formation for access control:
Lake Formation evaluates your permissions based on your federated user’s IAM role, and sees only the tables and columns their role allows. This is the recommended approach for new deployments because it provides fine-grained access control without additional role management.
Option B: External schema for database users
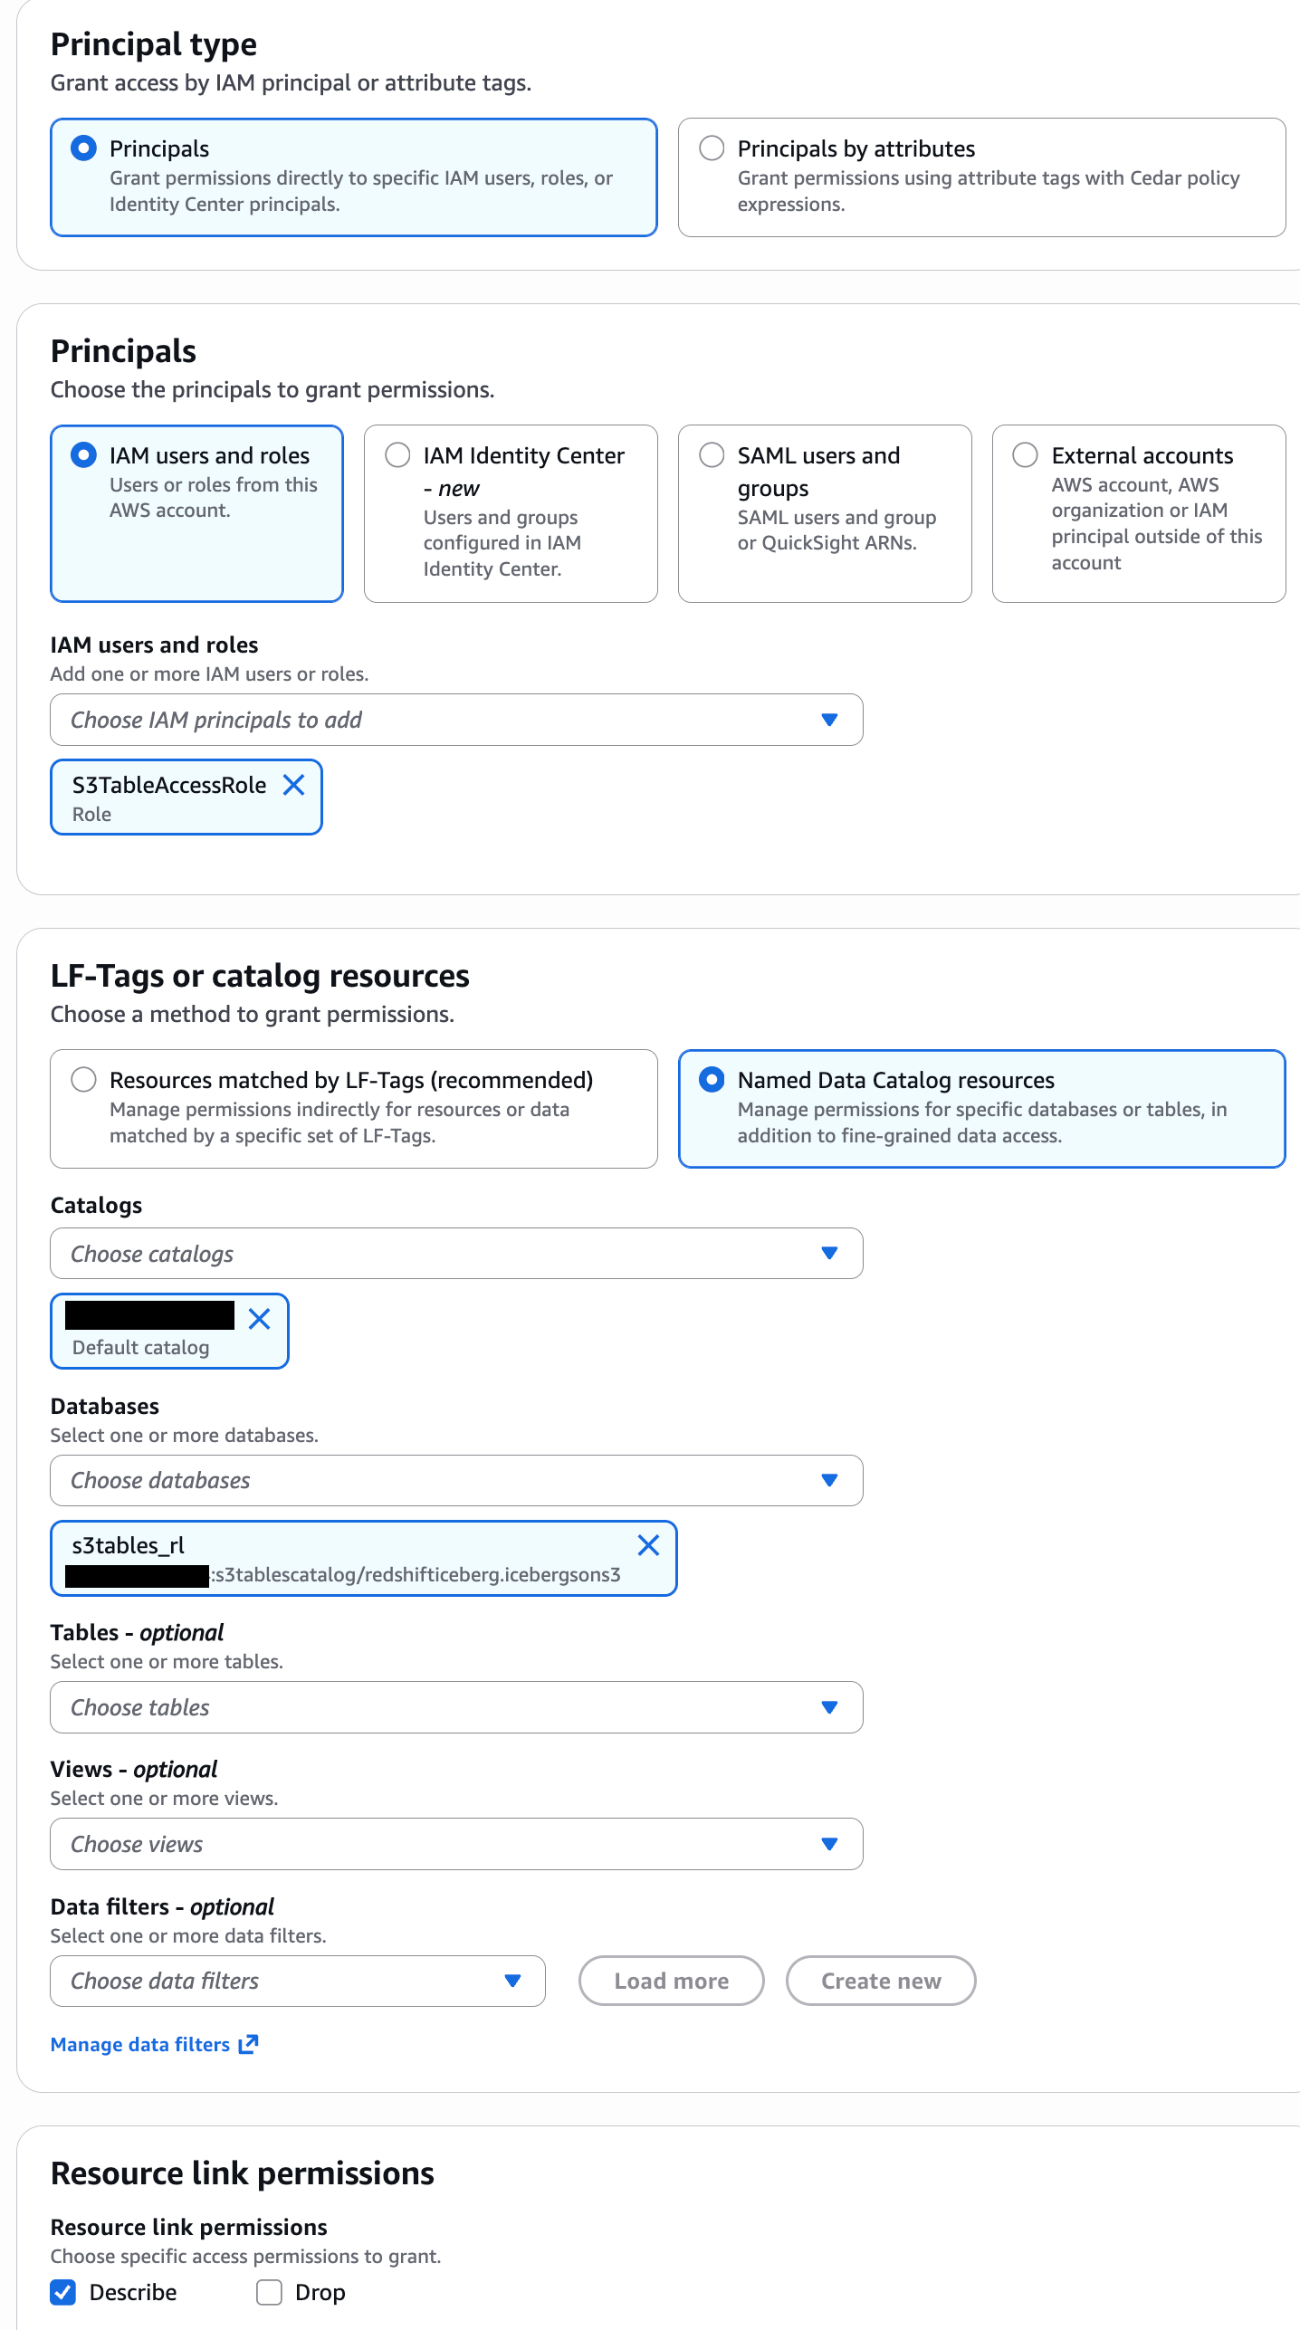
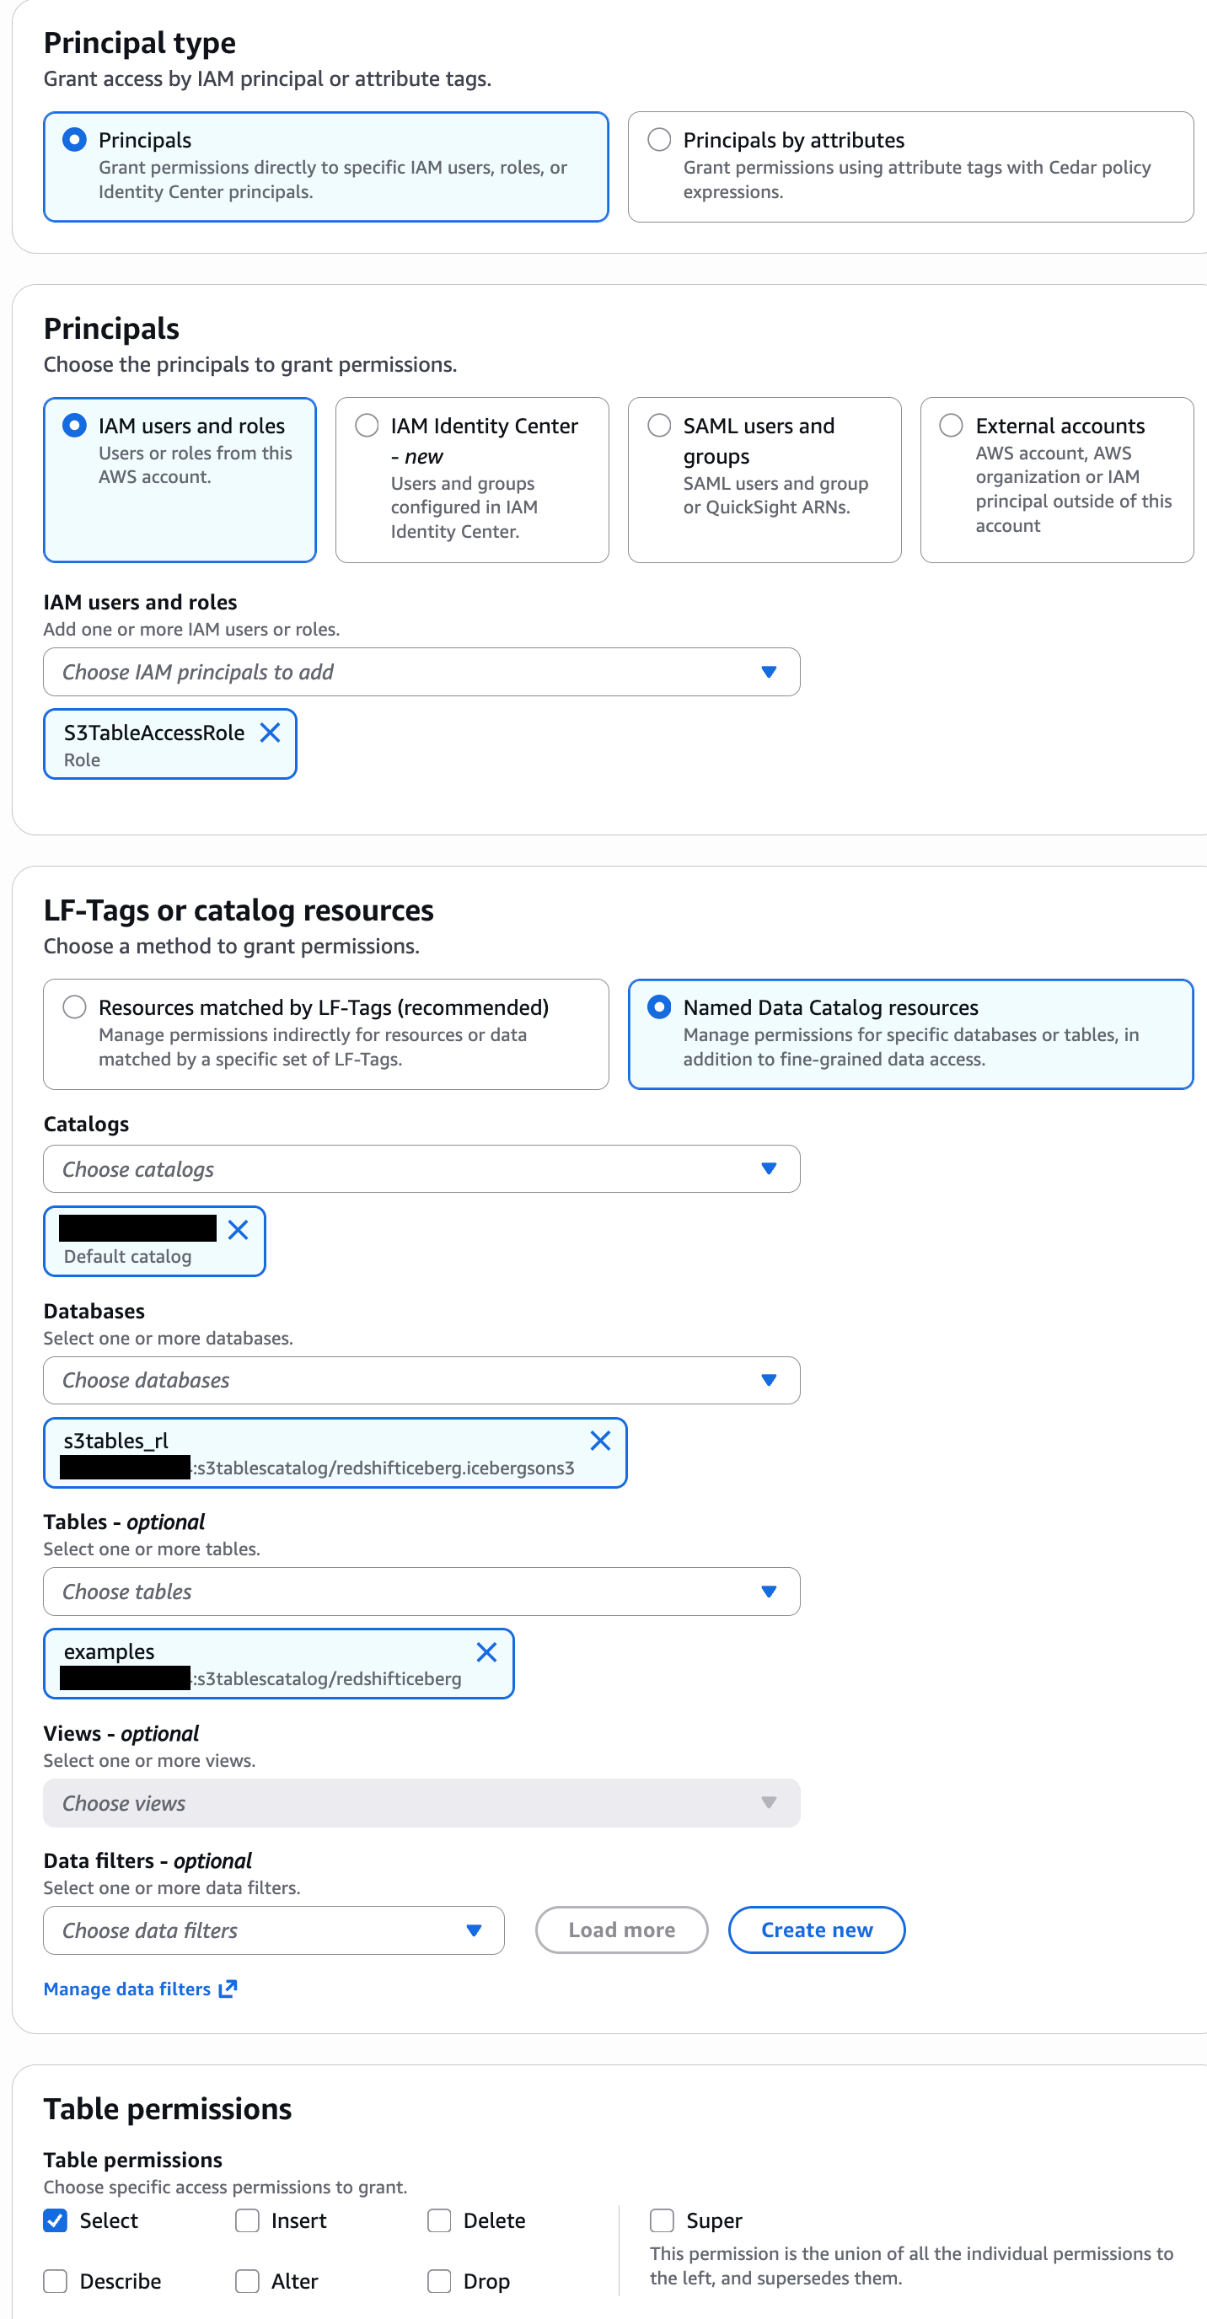
External applications like Tableau, PowerBI, and custom ETL tools often authenticate with database credentials instead of IAM federation. These users need an IAM role to access S3 Tables on their behalf.
Create an IAM service role to access S3 Tables:
You create a role (for example, S3TableAccessRole) with a trust policy that allows Amazon Redshift to assume it:
You then attach the following permission policies to the role:
A policy for Lake Formation data access (substitute your 12-digit AWS Account ID for YOUR_ACCOUNT_ID):
A policy for AWS Glue Data Catalog access (substitute the appropriate AWS Region for REGION_ID and your 12-digit AWS Account ID for YOUR_ACCOUNT_ID):
For production, scope these permissions to your specific resources and AWS Region.
Grant Lake Formation permissions to the role:
In the Lake Formation console, grant the S3TableAccessRole DESCRIBE access on the database and SELECT access on the tables for your resource link. For detailed steps, see Granting Lake Formation permissions.
Associate the role and create the schema:
First, associate the IAM role with your Amazon Redshift cluster or workgroup. For instructions, see Associating IAM roles with Amazon Redshift.
Create the external schema:
Then grant access to your database users:
Query with two-part notation
With either option, you can now query S3 Tables using the simpler two-part notation:
You can use this notation in BI tools, JDBC/ODBC connections, and application code and no longer need to know the underlying catalog structure.
Accelerate queries with materialized views
When you repeatedly query S3 Tables, each execution scans the external data from S3. Materialized views store pre-computed results in Amazon Redshift, so subsequent queries read from local storage instead of scanning S3 on every run.
Redshift supports incremental refresh for materialized views on Apache Iceberg tables, including INSERT, DELETE, UPDATE, and table compaction operations. After the initial creation, Amazon Redshift processes only the rows that changed since the last refresh when you run subsequent refreshes, rather than recomputing the full result set. This helps reduce both the time and compute cost of keeping your views current, especially for large tables with frequent changes.
Materialized views have general limitations and considerations when used with external data lake tables. For details, see Materialized views on external data lake tables.
Create a materialized view on S3 Tables
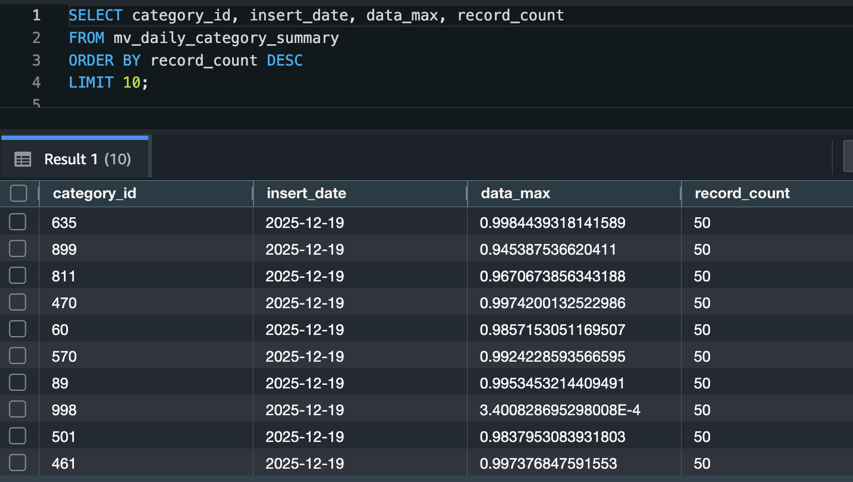
The following example creates a materialized view that joins the examples table in S3 Tables with a local categories table in Amazon Redshift. You can use a materialized view to pre-compute daily record counts and data samples per category:
Query the materialized view directly:
Your query can now read from local Amazon Redshift storage and typically returns results without scanning S3 Tables:
Refresh strategies
You have two options for keeping materialized views current:
Automatic refresh: Set AUTO REFRESH YES in the view definition to have Amazon Redshift automatically refresh the view in the background when it detects changes to the base tables. This is a good fit for dashboards and reports that can tolerate a short delay between data changes and query results. Note that automatic refresh requires Option B (database user) when creating the external schema, and the default is AUTO REFRESH NO.
Manual refresh: Run REFRESH MATERIALIZED VIEW when you need to control the timing:
Use manual refresh when you need to coordinate updates with data loading pipelines or when you want to refresh during off-peak hours.
Tune S3 Tables compaction for your query patterns
S3 Tables automatically compacts small Parquet files into larger ones in the background. This compaction reduces the number of read requests your query engine must make, which can improve query performance. By default, compaction targets a file size of 512 MB, configurable between 64 MB and 512 MB. Four compaction strategies are available, and choosing the right one for your query patterns can make a measurable difference.
Compaction strategies
| Strategy | When to use | How it works |
| Auto | You want S3 to decide for you | Selects sort compaction for sorted tables, binpack for unsorted tables |
| Binpack | General-purpose workloads, unsorted tables | Combines small files into larger files (100 MB+) and applies pending row-level deletes |
| Sort | Queries frequently filter on a single column (e.g., insert_date) |
Organizes data by the table’s sort-order columns during compaction |
| Z-order | Queries filter on two or more columns together (e.g., insert_date and category_id) |
Blends multiple column values into a single scalar for sorting |
Binpack improves performance by reducing the number of files a query engine reads. Sort compaction goes further. By ordering data within files, it enables query engines to skip entire files based on column min/max metadata during predicate pushdown. This is effective for queries that filter on the sort column, such as date-range filters. Z-order extends this benefit to queries that filter on multiple columns simultaneously, at the cost of slightly less efficient pruning on any single column compared to a pure sort.
To use sort or z-order compaction, you first need to verify that the table is sorted by one (sort) or multiple (z-order) columns:
Configure a compaction strategy
To change the compaction strategy for a table, use the PutTableMaintenanceConfiguration API through the AWS Command Line Interface (AWS CLI):
To adjust the target file size (for example, to 256 MB):
Similar to the “sort” example, you can specify {"strategy":"z-order"} for z-order compaction.
For more detail on sort and z-order, see Improve Apache Iceberg query performance in Amazon S3 with sort and z-order compaction.
Snapshot management
S3 Tables manage snapshots automatically. By default, it keeps a minimum of 1 snapshot and expires snapshots older than 120 hours (5 days). The snapshot retention is customized by setting minSnapshotsToKeep and maxSnapshotAgeHours. After a snapshot reaches the expiration time you configured in your retention settings, S3 Tables marks objects that only that snapshot references as noncurrent and removes them based on the unreferenced file removal policy.
You can adjust these settings if your workload needs more snapshots for time-travel queries or longer retention:
Keep in mind that retaining more snapshots increases storage costs. If a materialized view references an expired snapshot, Amazon Redshift falls back to a full recompute on the next refresh. Therefore, snapshot retention can directly affect your materialized view refresh behavior. Balance snapshot retention with your materialized view refresh frequency to avoid unnecessary full recomputes.
For more information, see Maintenance for tables in the Amazon S3 documentation.
Best practices
Choose the right access pattern for your users. Use IAM federation with SESSION credentials for new applications and interactive users. Reserve the IAM role approach for BI tools and extract, transform, and load (ETL) pipelines that can’t integrate with IAM federation directly. Plan to migrate database users to federated access over time.
Match compaction strategy to query patterns. Use sort compaction when your queries filter on a single column (such as date ranges). Use z-order when queries filter on two or more columns together. Stick with the auto default if your query patterns vary or you’re unsure.
Size materialized views for your refresh window. Materialized views that join large external tables with local tables take longer to refresh. If your data changes frequently, keep the materialized view focused on the specific aggregations your dashboards need rather than materializing entire tables.
Coordinate snapshot retention with materialized view refresh. If a materialized view references an expired Iceberg snapshot, Amazon Redshift performs a full recompute instead of an incremental refresh. Set your snapshot retention (maxSnapshotAgeHours) longer than your materialized view refresh interval.
Monitor compaction with AWS CloudTrail. S3 Tables logs compaction operations as CloudTrail management events. Track these to verify that compaction runs on schedule and to identify tables that might benefit from a different strategy.
Balance performance gains against storage costs. Materialized views store pre-computed results in Amazon Redshift, adding to your managed storage. Compaction reduces file counts, but z-order and sort compaction can increase overall storage because of data duplication across sort boundaries. Review your Amazon Redshift managed storage usage and S3 Tables storage metrics periodically to make sure the performance benefits justify the additional storage utilization.
Troubleshooting
| Issue | Resolution |
| “Permission denied” when creating the external schema | Verify the IAM role has lakeformation:GetDataAccess permission. Confirm you associated the role with your Amazon Redshift cluster or workgroup. Also check that you granted the role access to the resource link database and its tables in Lake Formation. |
| “Schema not found” or “Database not found” errors | Confirm the resource link name in Lake Formation matches the DATABASE value in your CREATE EXTERNAL SCHEMA statement. Verify the catalog ID format uses the pattern account_id:s3tablescatalog/bucket_name. |
| “Table not found” when querying through the external schema | Check that Lake Formation permissions include table-level access, not just database-level. Verify the table exists in the S3 Tables catalog by querying it through the auto-mounted catalog first. |
| Materialized view refresh falls back to full recompute | Check if the referenced Iceberg snapshot has expired. Increase maxSnapshotAgeHours in the snapshot management configuration. Verify that the base table hasn’t exceeded 4 million position deletes in a single data file. Compaction resolves this. |
| Queries on S3 Tables are slow after data loading | Compaction runs on an automated schedule and may not have processed recent writes yet. Check CloudTrail for the latest compaction event. Verify the compaction strategy matches your query patterns. Switch from binpack to sort if you filter on specific columns. |
Cleaning up
To avoid ongoing costs, remove the resources you created in this walkthrough:
Also remove:
- The IAM role (
S3TableAccessRole) and its attached policies, if you created one for database users. - The Lake Formation resource link and associated permissions.
- The S3 table bucket, if you no longer need the data.
Conclusion
In this post, we showed how to optimize S3 Tables queries from Amazon Redshift using three approaches: external schemas that simplify query syntax from three-part to two-part notation, making it easier for BI tools and end users to work with S3 Tables. We also covered materialized views for pre-computed analytical results that reduce repeated S3 scans, and S3 Tables compaction strategies tuned to your query patterns for more efficient file access.
For new applications, design your access layer with IAM federation and external schemas from the start. Use materialized views to accelerate repeated analytical queries that join S3 Tables with local Amazon Redshift data. Match your compaction strategy to how your team queries the data. Use sort compaction for date-range filters and z-order when queries filter on multiple columns at once. Furthermore, the same S3 tables you optimize here are also accessible from Amazon Athena, Amazon EMR, and third-party engines.
To learn more, see the Amazon S3 Tables documentation, Materialized views in Amazon Redshift, and S3 Tables maintenance. We welcome your feedback in the comments.