AWS Contact Center
Last Agent and Last Queue Routing on Amazon Connect for Returning Callers
Introduction
In our previous blog, we discussed how Amazon Connect customer profiles provides a simple, consistent way to manage customer’s experience for repeat callers with features like personalized prompts, last agent, and last queue routing.
For customers looking to personalize the experience of repeat callers, but are unable or not wanting to use customer profiles, this blog offers a different solution. This solution is implemented by using Amazon DynamoDB, AWS Lambda, and Amazon Connect. The caller’s information is retained for a configurable amount of time, such as 24 hours.
The aim of this blog is to provide sample code and instructions for customers who want to offer their returning callers a customized experience. The experience might vary from a simple welcome back greeting, offering to put them through to the same queue or agent, or pushing them to the front of the queue.
This blog walks you through the process of setting up the AWS infrastructure needed to support your Amazon Connect contact center environment using the following AWS services:
Solution Overview

In the above architecture, AWS Lambda, Amazon DynamoDB, and Amazon Lex will interact with your Amazon Connect instance to enable this solution. The architecture calls for the following:
- One (1) Amazon DynamoDB table named returnCalls
- Two (2) AWS Lambda functions named searchCustomerCalls and addCustomerCalls
- One (1) Amazon Lex bot named returnCallerConcierge.
These components will work together with your Amazon Connect instance through three (3) separate Amazon Connect contact flows, these are:
- One (1) contact flow named repeatCallerFlow
- Two (2) agent whisper flows named newCallerAgentWhisper and returningCallerAgentWhisper
High-Level Call Process
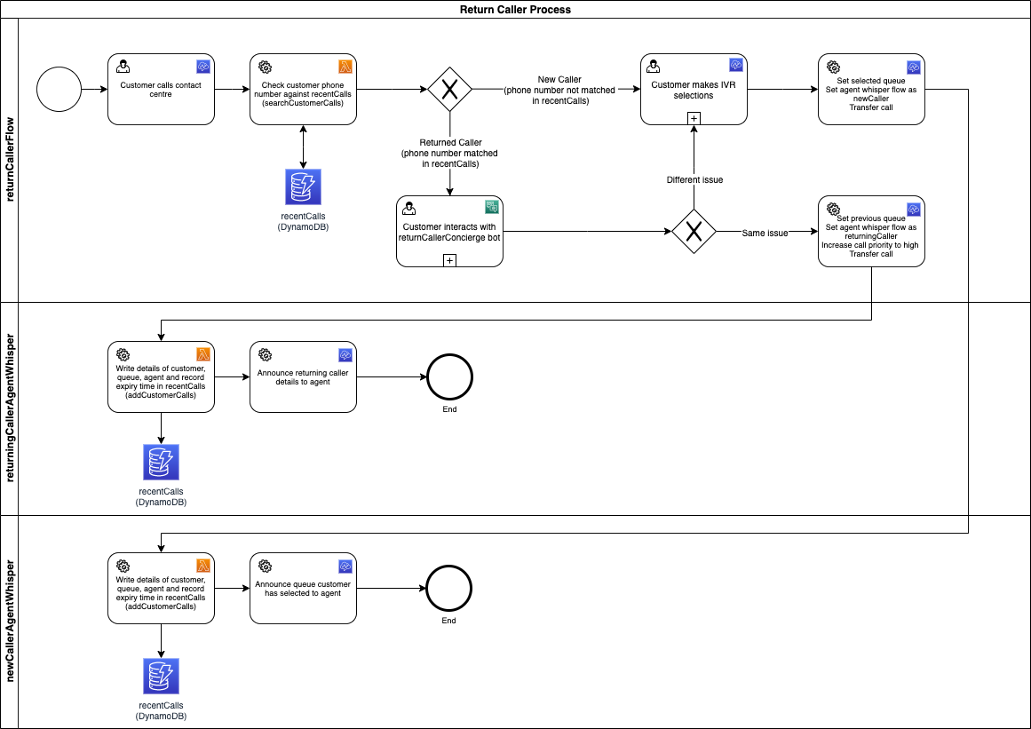
In the above process, when a customer calls into your Amazon Connect instance and are put into the repeatCallerflow, Amazon Connect invokes the AWS Lambda function searchCustomerCalls. This function checks if the customer’s phone number matches those currently stored in the recentCalls table. Depending on the outcome of this check, the customer will go down one of two different paths.
Path 1: New Caller Path
- If the customer’s phone number is not present in the recentCalls table, then the AWS Lambda function will return a negative result to Amazon Connect
- The customer will go through to the regular IVR options
- The customer chooses an option and is transferred to the relevant queue. Importantly, the agent whisper flow is set to newCallerAgentWhisper
- When the customer reaches the front of the queue and is transferred to an agent, the newCallerAgentWhisper runs and the following occurs
- The addCustomerDetails function is invoked storing the customers phone number, the queue name and queue ARN that has been selected and the name and ARN of the agent the call is being transferred to. In addition, the function sets an “expiry time” based on the setup (expiry time step will be discussed in a later section).
- A whisper indicates to the agent the queue that the customer has been assigned based on their IVR selection.
- The agent and customer are connected.
Path 2: Returned Caller Path
- If the customer’s phone number is present in the recentCalls table, then the AWS Lambda function will return a positive result to Amazon Connect along with the following attributes
- customerQueueName – The name of the queue which the customer had previously been assigned based on their IVR selection.
- customerQueueARN – The ARN of the queue which the customer had previously been assigned based on their IVR selection.
- agentName – The username of the agent the customer had previously been connected with.
- agentARN – The ARN of the agent the customer had previously been connected with.
- Amazon Connect will then ask the customer if they are calling about the same matter as their last call. It uses the returnCallerConcierge bot to interact with the customer and interpret natural language responses (this bot has two intents, that capture yes/no styled utterances)
- If the customer answers “no” or similar than they are put into the regular flow (step 2 in the Step 1: New Caller Path above).
- If they answer yes, they are asked if they would like to be put through to the same department they previously dealt with. On the other hand, if the answer is no, they are directed to step 2 of the Step 1: New Caller Path above
- If they answer yes to this question the following occurs:
- Their queue is set based on the previousQueueARN attribute.
- The priority of their contact is set to 1.
- The agent whisper flow is set to returningCallerAgentWhisper.
- The customer is transferred to the relevant queue.
- When the customer reaches the front of the queue and is transferred to an agent, the returningCallerAgentWhisper runs and the following occurs
- The addCustomerDetails function is invoked storing the customers phone number, the queue name and queue ARN that has been set and the name and ARN of the agent the call is being transferred to. It also re-sets the “expiry time” value based on the same calculation as mentioned in the New Caller Path.
- A whisper indicates to the agent that the customer is a return caller and the queue that the customer has been assigned.
- The agent and customer are connected.
Amazon DynamoDB TTL (Time To Live) Process

The above diagram outlines the two separate flows that occur to expire and then delete records in the recentCalls table using the Amazon DynamoDB TTL (Time To Live) feature. The idea is to remove customer call records based on a configured number of minutes, this number is set when you launch the AWS CloudFormation stack (covered in a later section).
It’s worth noting that this is a two-stage process, first Amazon DynamoDB checks the configured TTL attribute expiryTime of each record to see if it is expired or not. If it is expired, it is flagged as such but NOT immediately deleted. A second stage then checks all records flagged as expired and deletes them, this typically occurs within 48 hours. For this reason, the searchCustomerCalls function performs an additional check to see if the record is still within the “live” time, if not, it ignores it.
Pre-requisites
This blog assumes you have the basic understanding of the following services:
- Amazon Connect
- AWS CloudFormation
- Amazon DynamoDB
- AWS Lambda
- Amazon Lex
Steps to get started
1. Deploy and Configure AWS Services Using AWS CloudFormation
As discussed in the introduction and outlined in the high-level architecture and process, this solution relies on several AWS services to support your Amazon Connect instance. To deploy and configure these services, you will use AWS CloudFormation. CloudFormation will create the Amazon DynamoDB table, AWS Lambda functions and configure the necessary roles and permissions.
To begin, log into the AWS Management Console and ensure that the AWS Region you have selected is the same Region as your Amazon Connect instance. Then, walk through the following steps
- Choose the Launch Stack button below to create a stack called returnCaller

- For ConnectInstanceARN copy and paste the ARN of your Amazon Connect Instance
- For RecordTTL enter the time in minutes you want the calls to remain in the Amazon DynamoDB table. RecordTTL is how long you want to wait before treating customers as new callers. The default value is 180 minutes (3 hours)

- Choose the Next button on the Configure stack options page
- In the blue information box, tick the “I acknowledge that AWS CloudFormation might create IAM resources with custom names.”
(This gives permission to create the necessary role for AWS Lambda and Amazon DynamoDB to interact)
- Choose the Create stack button
At this point, you will need to wait until the stack has been created. This should take less than 5 minutes. Once it has completed continue with the following steps;
- Choose the Outputs tab
- Copy and paste the values for LambdaAddCustomerDetailsARN and LambdaSearchCustomerDetailsARN into a separate document. You will need these later

2. Import the Amazon Lex Bot
The next step you will need to import the returnCallerConcierge Amazon Lex bot. This is a simple bot that interacts with the customer to determine if they are answering yes or no.
- In your AWS Management Console search bar, type “Lex” and select Amazon Lex from the results
- If you have not created an Amazon Lex bot before, choose Get Started then choose Cancel at the bottom of the page (if you have previously created a bot, follow on from the next step). Note that this solution is using an Amazon Lex V1 bot.
- At the top of the page, choose the Actions button and select Import
- On the Import bot window, choose Browse and navigate to the returnCallerConcierge_Bot_LEX_V1.zip file (available for download here)

- Choose Import
Once the bot is imported, you will notice the status is “NOT_BUILT” you will need to build and publish this bot before we continue. To do this, complete the following steps
- Choose the returnCallerConcierge bot
- Choose Build, then on the confirmation window choose Build
- Once the bot has been built successfully, you will receive a green confirmation box. Close this box

- Click on the Publish button
- Enter “prod” as the alias for this build of the bot.

- Add any tags as needed
- Click on the Publish button
After the bot is published, you can choose the Close button on the confirmation window and move on to the next section.
3. Import and configure the Amazon Connect contact flows
The final step is to import and configure the Amazon Connect call flows, and add the Amazon Lex bot to the instance. As mentioned in earlier sections there are three (3) call flows in total you can download these via the links below.
- One (1) contact flow named repeatCallerFlow
- Two (2) agent whisper flows named newCallerAgentWhisper and returningCallerAgentWhisper
The first step will be to import these into your Amazon Connect instance:
- Log into your Amazon Connect instance as an Administrator or as a user with the necessary permissions to add and configure call flows and queues.
- Choose the Create contact flow button
- Choose the drop-down next to the Save button in the top right of the screen and select Import flow (beta)

- On the Import flow window choose select and navigate to where you have saved the repeatCallerFlow file is saved, select it and choose open

- Choose the Import button
- Once the flow is imported choose the Invoke AWS Lambda function node

- Under Select a function option paste in the value for LambdaSearchCustomerDetailsARN that you saved earlier from the AWS CloudFormation outputs.
- Choose the Save button
- Choose the Save button at the top right of the screen (you will not be publishing the flow at this time).
Next, navigate back to the call flow screen, it is now time to import the Agent Whisper flows. The import and update process for these two flows is identical so run through the below steps for each of the two flows.
- From the Contact flows screen, choose the drop-down arrow next to the Create contact flow button and select Create agent whisper flow

- Choose the drop-down next to the Save button in the top right of the screen and select Import flow (beta)

- On the Import flow window, choose select and navigate to where you have saved the newCallerAgentWhisper/returningCallerAgentWhisper flows (attached in the resources section of this document) is saved, select it and choose open

- Choose the Import button
- When the flow is imported, select the Invoke AWS Lambda function node

- Under Select a function option paste in the value for LambdaAddCustomerDetailsARN that you saved earlier from the AWS CloudFormation outputs.
- Choose the Save button
- Choose the Save button at the top right of the screen to save the call flow then choose Publish.
Next you will need to create the queues for the sample “Appliances for All” flow and map them to a routing profile that you will use for testing.
- Inside of Amazon Connect, navigate to the Queues management section.
- Choose the Add new queue and complete the details. You can select a phone number and business hours you have available for this exercise. Complete this for the following queues (Use the names exactly. If you do would like to change them, update them in the repeatCallerFlow)
- Sales
- Service
- Repairs
- Installations
- Spare_Parts
- Once complete, navigate to the Routing Profiles management section
- From here either edit the Basic Routing Profile or modify one of the routing profiles you currently have attached to your test users. Add the newly created queues making sure to select the Voice channel

- Update the Priority of each queue to 2
- Choose the Save button for the routing profile
Last step is to connect the Amazon Lex bot to your instance and complete the configuration of the repeatCallerFlow. This will require you to log into both the AWS Management Console and your Amazon Connect instance.
- In your AWS Management Console search bar, type “Connect” and select Amazon Connect from the results
- Select your instance being sure to choose on the link to it under the Instance Alias column
- Select Contact flows from the options in the left-hand side menu bar
- Under the Amazon Lex section, select your Region and then select the returnCallerConcierge bot and choose + Add Lex Bot

- From here, log in to your Amazon Connect instance
- Navigate to the Contact flows management section.
- Select repeatCallerFlow
- Select the Get customer input node (you will see the ***SelectBotHere*** notation)

- Under the Lex bot section choose the “x” to remove the content of the Name field and then select returnCallerConcierge from the list
- Ensure that the Alias name is prod

- Choose the Save button
- Save the contact flow and then press Publish
Testing the solution
Now that we have our setup ready, let’s test the solution:
Ensure that you have connected a phone number to the repeatCallerFlow and that you have configured either yourself or your test agents to the routing profile configured in the earlier
Call the phone number using a phone that does not have caller ID suppressed (that is, “show my phone number” is active)
On the first call, you should receive the standard IVR flow. Make a selection from the IVR and wait to go through to an agent
Either answer the call or have one of your test agents answer. This will invoke the addCustomerDetails function in the Agent Whisper
Hang-up from the test call
If you go to Amazon DynamoDB, then select the recentCalls table and then items, you should be able to see the entry for the phone call you just made. This should include your phone number, selected queue, and answering agent details.
Next, repeat the process.
- Call the number per above
- This time you should receive the “Welcome back” message and be serviced initially by the Amazon Lex bot.
- Answer “yes” to the questions. This should put you through to the same queue as you selected previously and provide the relevant agent whisper.
From here, you can try the different variations such as
- Trying different utterances with the Amazon Lex bot (“sure”, “yeah”, “nope”, etc.)
- Trying with caller ID suppressed on your phone
- Wait until the expiry time has passed and call again.
Cleaning Up
To avoid incurring future charges, delete the resources that you created as follows:
Amazon Connect
- From within the instance, navigate to the phone numbers management section and remove the link between the test phone number and the repeatCallerFlow
- From within the AWS Management Console
- Navigate to Amazon Connect
- Select your instance link from the Instance Alias column
- Select Contact flows from the left-hand menu
- Click Remove next the returnCallerConcierge bot
AWS CloudFormation
In the same way that AWS CloudFormation creates and configures services required for the solution, it can remove them when they are no longer needed.
- In the AWS Management Console navigate to CloudFormation,
- Select the returnCaller stack and click the Delete button
- Confirm by clicking the Delete stack button (this will remove the IAM role, AWS Lambda functions, Amazon DynamoDB table and all records in it)
Amazon Lex
Follow the below steps to remove the Amazon Lex Bot.
- In the AWS Management Console, navigate to Amazon Lex
- Select the returnCallerConcierge bot by clicking in the circle next to the link to it
- Click on the Actions button
- Select Delete
- Confirm the delete by clicking the Continue button
Conclusion
In this blog post, we implemented a simple solution that customizes returning callers experience to your Amazon Connect contact center. This solution provided the following features:
- The ability to recognize and greet returning callers
- The ability to identify the queue and agent that the caller interacted with last time, and offer them a quick path back.
- The ability to push the returning caller to the front of the queue.
The above solution provides basic functionality using standard AWS services. As indicated early in the blog, Amazon Connect customer profiles can be configured to achieve the same result. Please see our blog post on Amazon Connect Customer Profiles for ways to enhance agent and caller experience.