AWS Database Blog
Avoid shared database accounts with federated IAM authentication
When a security event requires you to trace who accessed customer data in your database, audit trails often lead to shared database accounts used by multiple developers. That makes individual user tracking difficult. The gap between your federated identity system and your database access creates real operational risk: failed compliance audits, delayed event response, and ongoing overhead from managing separate database credentials outside your identity provider (IdP).
In this post, you will learn how to integrate Okta with AWS IAM Identity Center and implement Amazon Relational Database Service (Amazon RDS) AWS Identity and Access Management (AWS IAM) authentication to create a unified authentication flow. You configure attribute-based access control (ABAC) that automatically maps user identities from your IdP to database permissions, supporting interactive user sessions and helping you avoid shared accounts. By the end, you have a working system where database authentication works exactly like your application authentication.
While this post uses Amazon RDS and Okta as an example, this architecture works with Amazon Aurora databases and various Security Assertion Markup Language (SAML) 2.0-compliant identity providers.
Solution overview
The authentication flow relies on your external identity provider (IdP), AWS IAM Identity Center, and Amazon RDS IAM authentication. Okta handles user authentication, while AWS IAM Identity Center manages authorization and access to AWS resources.
The following diagram illustrates the end-to-end authentication flow.
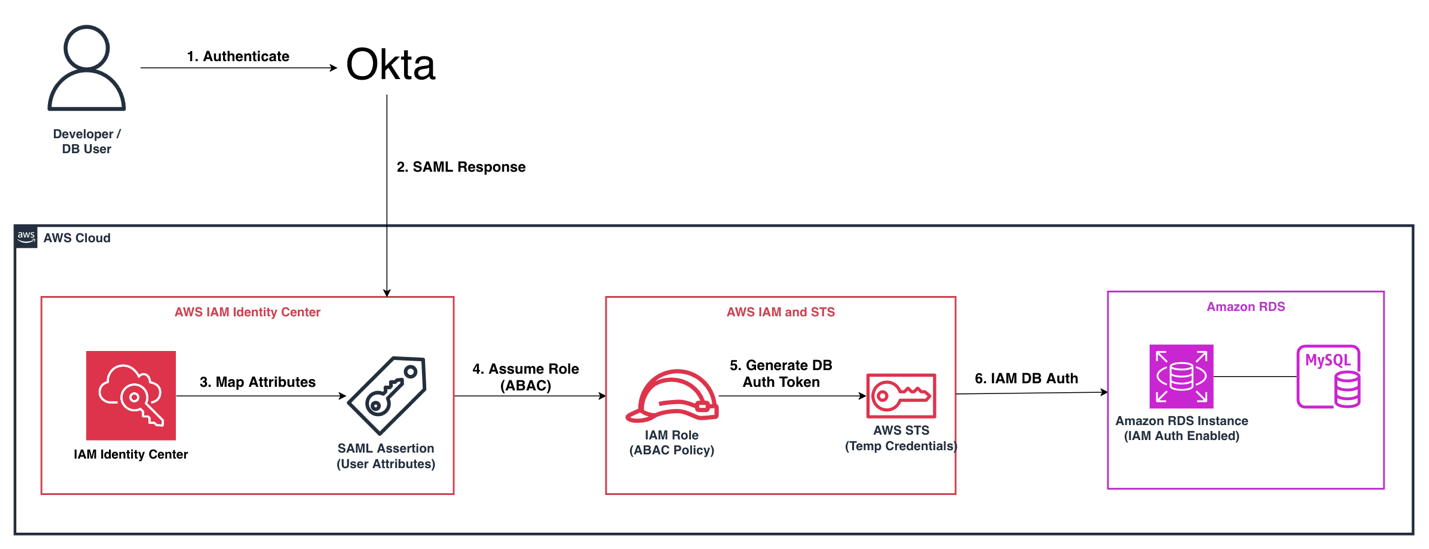
Figure 1: Okta with IAM Identity Center and Amazon RDS IAM authentication
Here’s the flow of user authentication into the database:
- A user authenticates with Okta using their credentials and multi-factor authentication (MFA).
- The user accesses AWS through the IAM Identity Center portal. Okta passes their identity and attributes (department, project, environment) as part of the SAML 2.0 assertion.
- Those attributes become session tags in your AWS account, providing fine-grained, attribute-based access control (ABAC).
- The user generates a short-lived, 15-minute authentication token tied to their specific identity.
- The user uses the token to connect to Amazon RDS for MySQL, or other databases such as Aurora or Amazon RDS for PostgreSQL, without a password.
The user attributes are passed from Okta to IAM policies. A user tagged Department=engineering in Okta can only generate tokens for databases tagged the same way. You can change the attribute in Okta and access changes everywhere automatically.
The combination of Okta’s identity management, IAM Identity Center’s multi-account access control, and RDS IAM authentication provides several key benefits:
- Individual accountability: Every database query is logged with the person’s actual identity.
- Passwordless authentication: No credentials to manage or rotate.
- Dynamic access control: ABAC policies automatically enforce least privilege based on user attributes.
- Centralized management: Changes in Okta flow through to database access automatically.
Why IAM Identity Center?
IAM Identity Center is built for organizations, not only single accounts. IAM Identity Center provides centralized access management across your entire AWS Organizations deployment, making it the foundation for enterprise-scale identity integration.
IAM Identity Center manages access across your entire AWS organization from one place. Permission sets act as templates that deploy consistently across accounts. The AWS Command Line Interface (AWS CLI) handles credential refresh automatically. IAM Identity Center also integrates natively with AWS CloudTrail, giving you centralized audit logs.
For enterprise environments with multiple accounts and a need for centralized identity governance, IAM Identity Center provides the right foundation.
Implementation steps
The following implementation consists of three main phases: connecting your Okta identity provider to AWS, configuring attribute-based access control for fine-grained permissions, and enabling IAM authentication on your database.
Connect Okta to IAM Identity Center
The foundation is a SAML 2.0 trust between Okta and IAM Identity Center. First, activate AWS IAM Identity Center. This is a one-time setup in your chosen home AWS Region. You can pick between the built-in identity store or use an external provider. Because we’re using Okta in this post, we use the external provider option.
After completing the SAML 2.0 trust configuration, verify the trust is working by checking the IAM Identity Center console for a successful IdP connection status.
Configure custom attributes in Okta and connect to IAM Identity Center
For ABAC to work, you need these custom attributes populated in your Okta user profiles. In the Okta Profile Editor, add custom attributes to match your session tags: department, project, environment.
Then, configure the Okta AWS IAM Identity Center app. Refer to Configure SAML and SCIM with Okta and IAM Identity Center for instructions. You’ll need to upload the metadata file from Okta and configure the attribute mappings. These mappings tell IAM Identity Center how to interpret SAML 2.0 attributes from Okta:
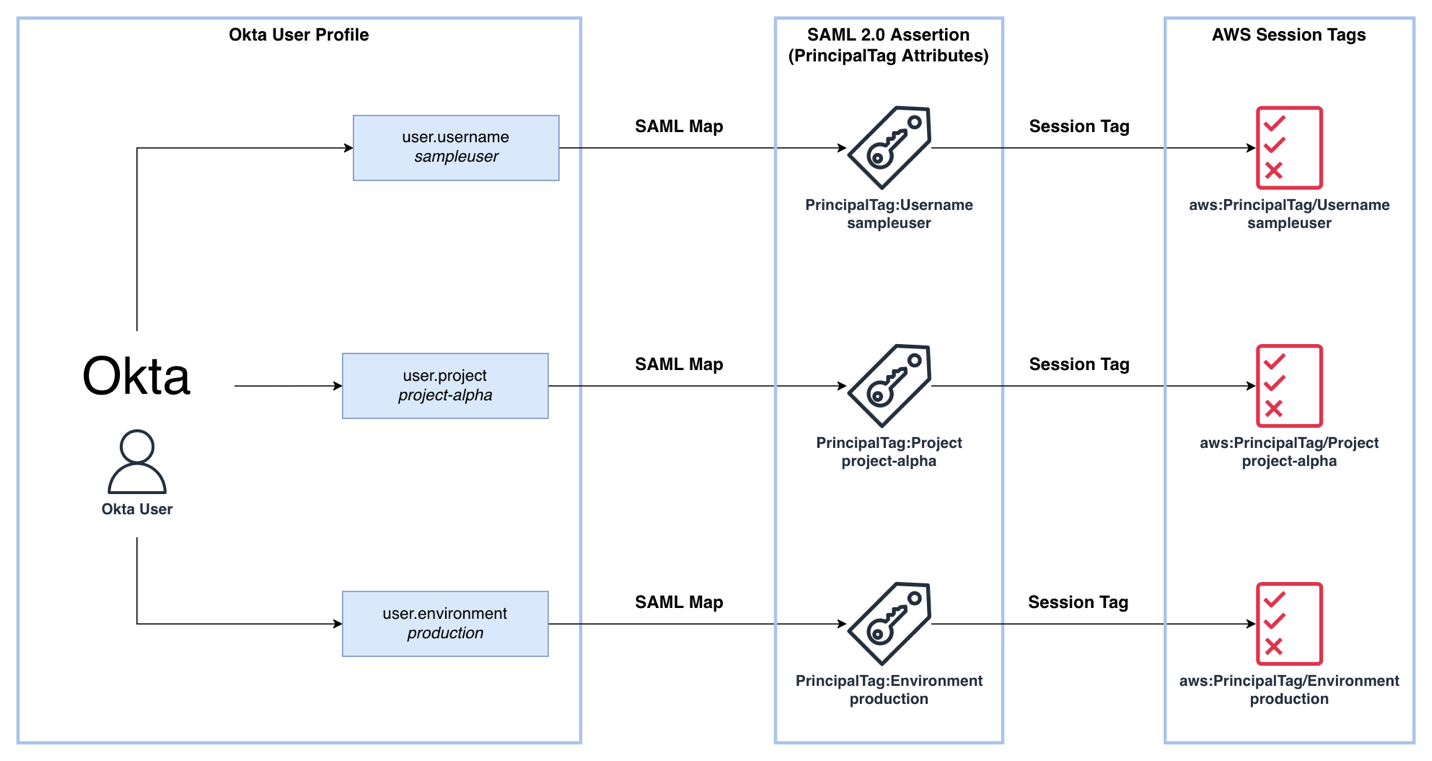
Figure 2: Okta to AWS attribute mapping flow
The following snippet of SAML Assertion shows how you can set up custom attribute statements that pass user attributes as session tags in the SAML 2.0 assertion. Run this configuration in your Okta admin console under the SAML settings for the AWS IAM Identity Center application:
These PrincipalTag attributes are what make ABAC possible. They travel with the user’s session and become available in IAM policy conditions.
Note: Establish a naming convention for attribute values. Use lowercase, hyphenated values (project-alpha, not Project Alpha) that can be applied consistently as AWS resource tags.
Confirm attribute mappings are passing through by signing in via Okta and checking the AWS CloudTrail AssumeRoleWithSAML event for the expected PrincipalTag values.
Create a permission set with ABAC
In IAM Identity Center, create a permission set called DatabaseAccess-ABAC with a custom inline policy. The critical piece is the rds-db:connect action scoped to a resource that includes the username from the session tag. Apply this policy through the AWS Management Console or AWS CLI. Here’s a sample IAM policy:
Note: This means each user can only generate tokens for a database user that matches their own username. No one can impersonate another user’s database identity. You can pass other attributes to identify the user instead of Username given in this example.
Enable IAM authentication on Amazon RDS for MySQL and create users
Enable IAM authentication on your Amazon RDS for MySQL instance (it coexists with password auth, so migration is gradual). Then create database users that map to Okta identities.
Run the following SQL commands in your MySQL client (for example, MySQL Workbench or the mysql CLI):
The AWSAuthenticationPlugin tells MySQL to expect an IAM token instead of a password. The username matches the user’s Okta username, and that’s what ties the whole system together.
For teams with many users, this is worth automating. Query Okta for users with specific attributes, create corresponding database users, and assign grants. Some organizations go further with System for Cross-domain Identity Management (SCIM) provisioning to automatically create and deprovision database users as people join or leave teams.
Confirm that the database user was created successfully by running the following command and verifying your new user appears in the results.
Connect to the database
Prerequisites
View Using SSL/TLS to encrypt a connection to a DB instance or cluster to configure SSL. You’ll need to:
- Choose a certificate authority (CA) that signs the DB server certificate.
- Download the appropriate certificate bundle by Region.
- Connect to the database using the database engine’s process for SSL (in this case, MySQL).
The connection workflow is straightforward. Authenticate to AWS via IAM Identity Center (which opens a browser to Okta), then generate a token and connect:
Note: The example in the preceding code shows the syntax for MySQL community client 8.0. You may need to adjust the command for your specific client.
Note: The --enable-cleartext-plugin flag is required because IAM authentication uses a cleartext authentication mechanism on the client side, though the connection is encrypted via SSL. IAM authentication only works over SSL. Use the --ssl-mode=VERIFY_IDENTITY flag to make sure encryption with authentication is active.
Note: The --profile value corresponds to the named profile you configured in ~/.aws/config for your IAM Identity Center SSO session.
Troubleshooting
If you encounter issues during setup, here are common failure points and how to resolve them:
- SAML 2.0 attribute mapping errors: If session tags aren’t appearing in your AWS account, verify the attribute statement names in Okta exactly match the expected
PrincipalTagformat. Check the CloudTrailAssumeRoleWithSAMLevent for missing or malformed tags. - Token generation failures: If
generate-db-auth-tokenfails, confirm the IAM policy grants therds-db:connectaction and that the resource ARN pattern matches your database. Verify your AWS CLI SSO session is active withaws sts get-caller-identity. - SSL/TLS certificate issues with Amazon RDS connections: If the MySQL client rejects the connection, download the latest Amazon RDS CA bundle and specify it with
--ssl-ca. Confirm--ssl-mode=VERIFY_IDENTITYis set. - Session tag propagation problems: If ABAC policies aren’t working as expected, use
aws sts get-caller-identityto inspect the assumed role and verify tags are present. Cross-check tag key casing between Okta attributes and IAM policy conditions.
Best practices
Database permissions should follow least privilege: IAM permissions to generate tokens don’t automatically grant database access. You still need to grant appropriate SQL permissions. Read-only analysts should have SELECT-only grants, application accounts should access only necessary schemas, and privileged operations should be restricted to dedicated admin accounts.
Treat tokens as short-lived credentials and do not cache or log the token. Token expiry is a feature to restrict the validity of tokens to 15 minutes.

FigureFigure 3: Token lifecycle
Tag governance matters for ABAC. Use AWS Organizations tag policies to enforce required tags on Amazon RDS resources and validate values against a controlled vocabulary. Typos in tags can silently break access.
IAM database authentication requires 300 to 1,000 MiB of extra memory on the database cluster, and custom Amazon Route 53 DNS records can’t be used to generate auth tokens. As a best practice, use IAM database authentication when your app needs fewer than 200 new connections per second. Use connection pooling or Amazon RDS Proxy to reduce overhead. Review IAM database authentication for limitations and recommendations.
Enforce MFA in Okta for the AWS application. This makes sure that even an unintentionally disclosed Okta password doesn’t grant database access without the second factor.
Session duration in IAM Identity Center should be set appropriately for your use case. Eight hours is common for interactive work, providing a full workday before re-authentication. For automated applications, shorter sessions force more frequent re-authentication, limiting the impact of unintended access.
Clean up
To avoid ongoing charges, clean up the resources you created during this walkthrough:
- Remove IAM Identity Center configurations: In the AWS IAM Identity Center console, delete the permission sets you created for database access. This removes the associated IAM roles and policies.
- Clean up RDS resources: If you created a test RDS instance specifically for this walkthrough, delete it from the Amazon RDS console. Deleting an RDS instance is permanent and cannot be undone, so make sure you have backups if needed.
- Review CloudTrail logging: If you enabled additional CloudTrail logging for this setup, review your CloudTrail configuration to make sure you’re not incurring unexpected logging costs.
- Okta application cleanup: In your Okta admin console, you can disable or remove the AWS application integration if it was created solely for testing purposes.
Conclusion
In this post, we showed how integrating Okta with AWS IAM Identity Center and Amazon RDS IAM authentication brings database access into your federated identity model. It turns the question “Who accessed this data?” from a mystery into a straightforward query.
For enterprise security teams, this architecture represents a significant step forward. The implementation requires coordination between identity management, cloud infrastructure, and database administration teams, and the result is a robust, scalable system that grows with your organization.
To extend this solution further, consider using this pattern with other database engines such as PostgreSQL, and other SAML 2.0-compliant identity providers such as Ping Identity. To get started, open the AWS IAM Identity Center console and follow the activation steps in the IAM Identity Center documentation.