AWS Database Blog
Build and explore Knowledge Graphs faster with Amazon Neptune using Graph.Build and G.V() – Part 1
This is a guest blog post by Richard Loveday, Head of Product at Graph.Build, in partnership with Charles Ivie, Graph Architect at AWS.
The Graph.Build platform is a dedicated, no-code graph model design studio and build factory, available on AWS Marketplace.
Knowledge graphs have been widely adopted by organizations, powering use cases such as social media networks, fraud detection, digital twin, and drug discovery. The rise of large language models (LLMs) has accelerated interest, as knowledge graphs provide an ideal structured foundation for LLM interactions. This has led to their adoption as primary data repositories for organizations of all sizes.
However, widespread adoption is hindered by a lack of accessible tooling and the expertise required to implement these systems. Consequently, many organizations have struggled to take advantage of what is otherwise an intuitive and powerful approach to data modeling.
In this series of posts we demonstrate how to build and manage a complete knowledge graph solution from start to finish without writing a single line of code, integrating Amazon Neptune with the following AWS Marketplace tooling:
The lifecycle of a knowledge graph solution is a continuous loop of four distinct phases:
- Schema Design: Establish the foundational blueprint (the schema or ontology) that defines the types of entities and relationships.
- Data Ingestion and Modeling: Ingest and map disparate data sources to the ontology, building the graph model.
- Persistence: Load the resulting graph model into a native graph database for efficient storage and retrieval.
- Exploration and Discovery: Utilize the graph by querying and analyzing its connections to discover valuable facts and insights.
This series is split into two parts, each focusing on a specific tool to guide you through this lifecycle:
Part 1 (this post): Design, ingestion, modelling and persistence
We use Graph.Build to visually design our ontology, connect to existing data sources like SQL and JSON to build our graph model, and persist the model directly into Amazon Neptune.
Part 2: Exploration and discovery
We will then use G.V() to connect to our graph in Neptune, enabling no-code exploration, querying, and analysis to discover valuable insights.
Solution overview
Both Neptune and Graph.Build support Labeled Property Graph (LPG) and Resource Description Framework (RDF) models. In this post, we demonstrate a common LPG use case to identify financial crimes.
Graph.Build allows you to design and build graph schemas and models visually.
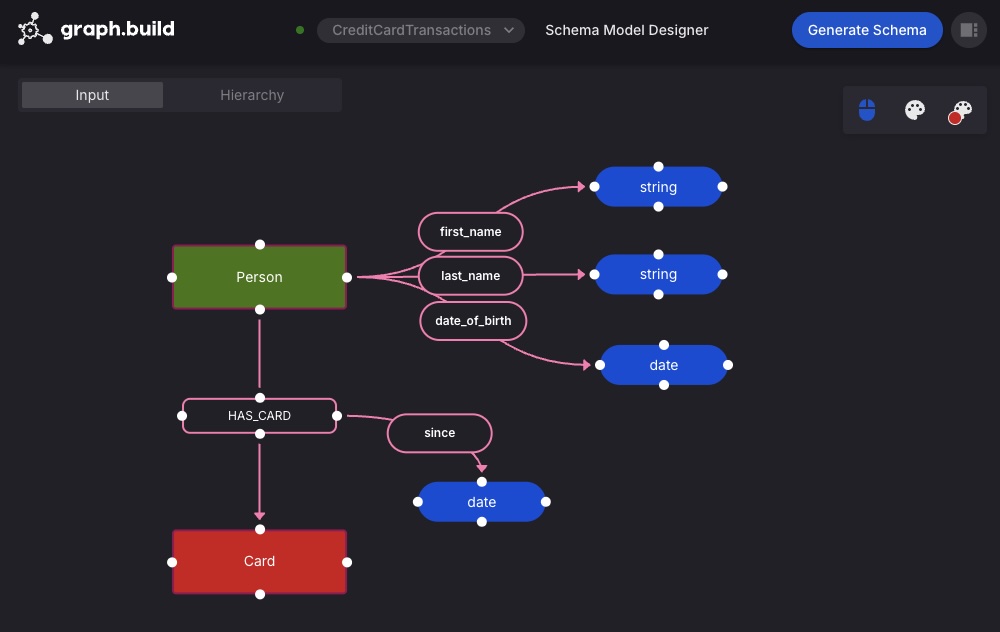
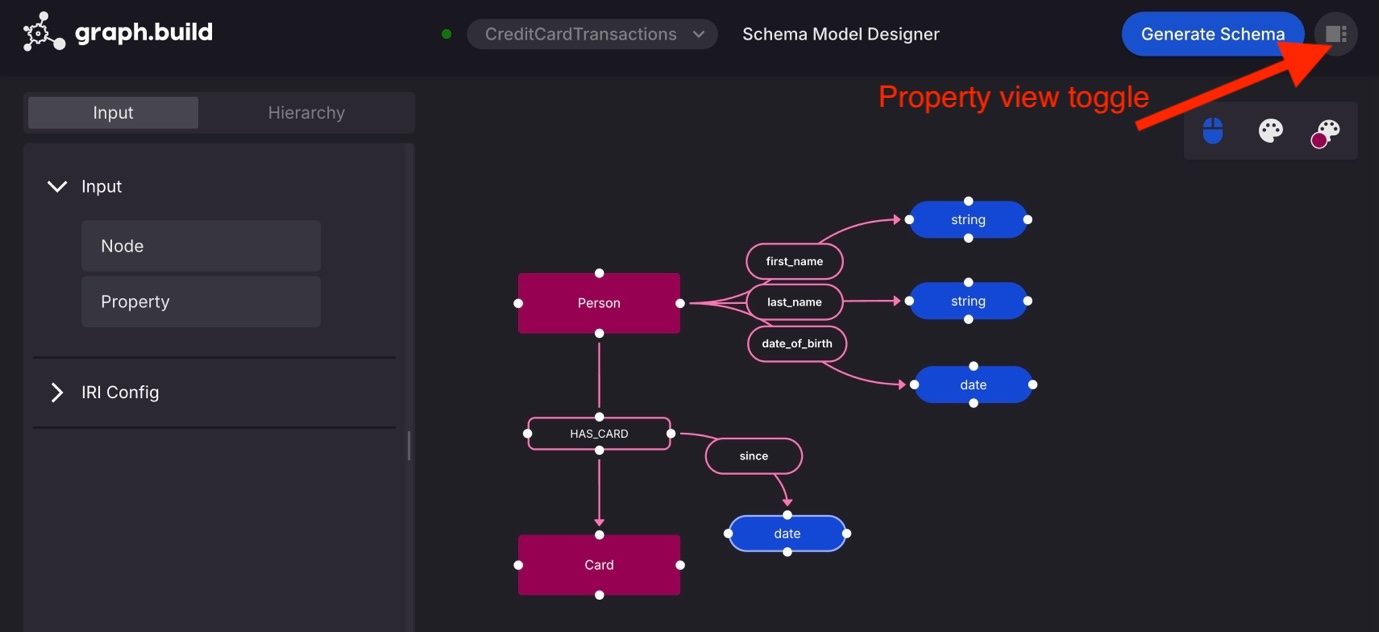
We design and build the following small example schema and model that represents the start of such a use case. The model describes people, ownership of credit cards, and a few related properties.
Graph databases like Amazon Neptune enable powerful, relationship-based queries once data is structured in a well-defined ontological model. Designing these models and transforming structured or semi-structured data into the required Labeled Property Graph (LPG) format is a critical step in this process. In this first part of the post, we explore how to streamline this workflow using Graph.Build, making the process faster and more accessible—without writing any code.
With Graph.Build, you can visually define a graph schema (ontology) and generate an extract, transform, and load (ETL) model that automatically transforms diverse data sources, including SQL databases, CSV files, and JSON feeds, into graph models staged and ready for ingestion into Neptune. This no-code approach alleviates the need for manual data mapping and transformation logic, making it straightforward to structure and ingest data efficiently.
Graph.Build can process large CSV files by configurable batch processing, and large numbers of small files by consuming a Kafka queue detailing the files.
After it’s created the Graph.Build Writer automates loading the new graph models into Neptune, completing the end-to-end ETL workflow. For brevity, this post provides an overview of the steps used in the Graph.Build Studio. For detailed, step-by-step instructions, refer to the graph.build documentation.
We perform the following steps.
- Deploy and configure Graph.Build on Amazon Elastic Container Service (Amazon ECS) using AWS CloudFormation.
- Design a new property graph schema.
- Design Graph.Build linked mappings conforming to the new schema:
- Source and build a graph model from JSON files in Amazon Simple Storage Service (Amazon S3).
- Source and build a graph model from Amazon RDS.
- Write the linked graph models to Amazon Neptune.
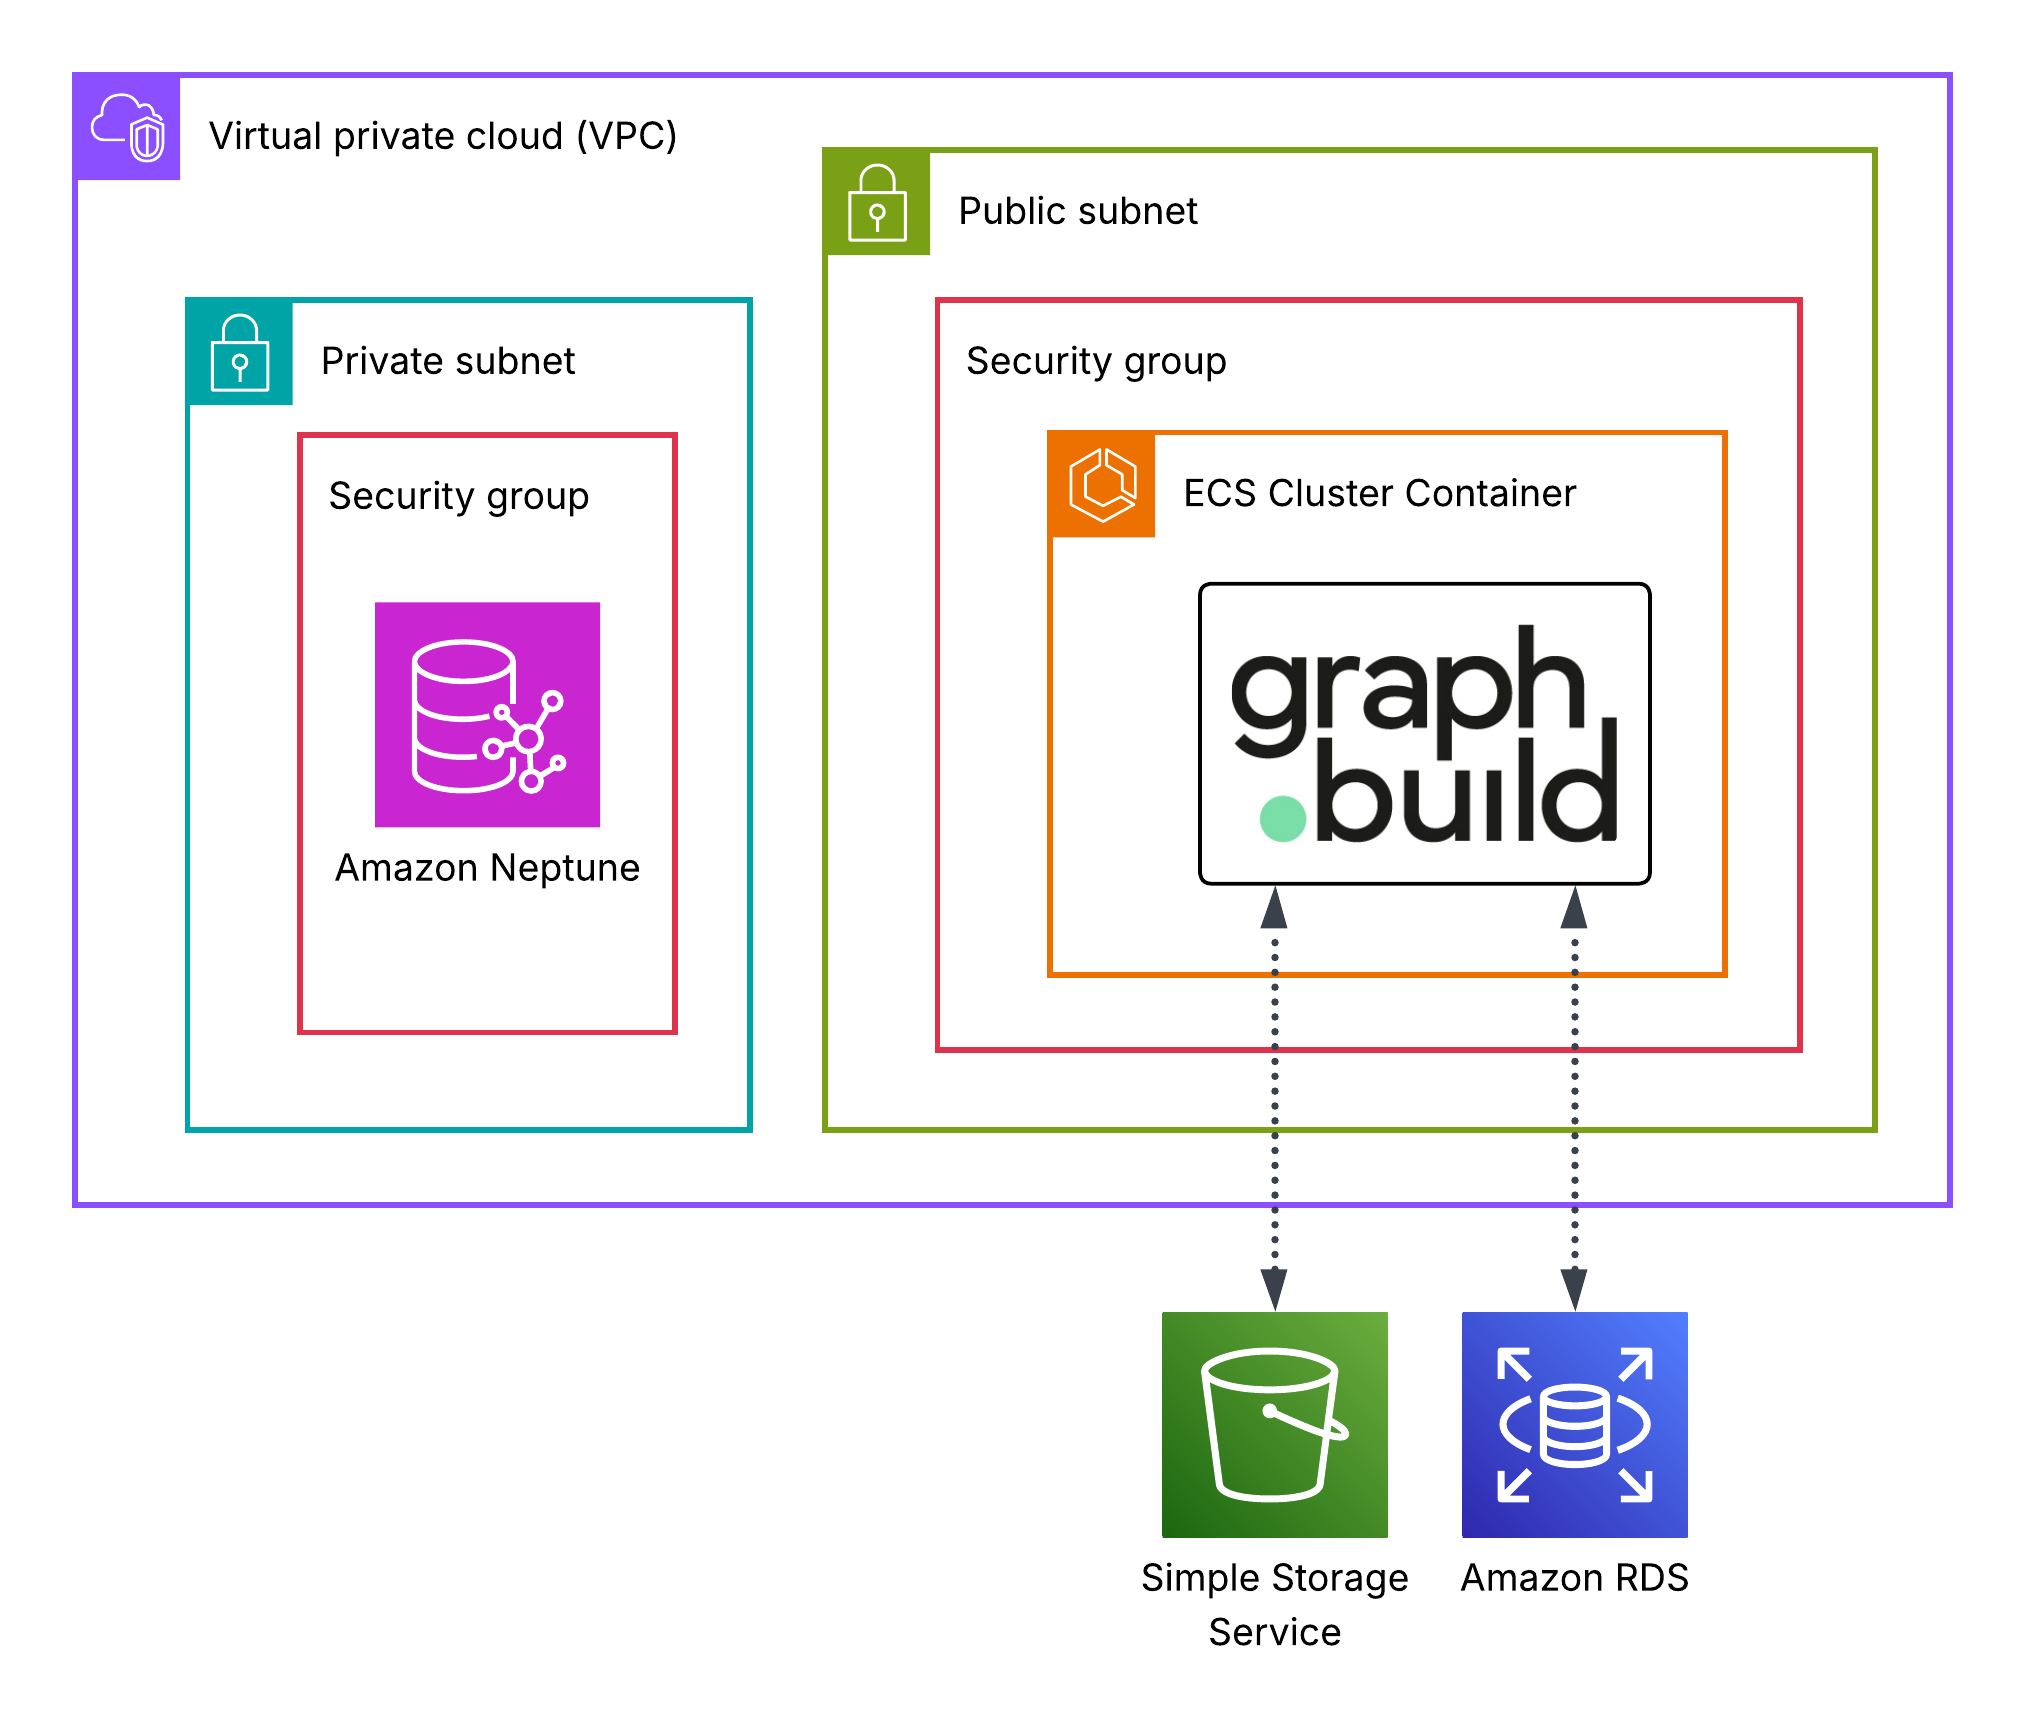
The solution is deployed as follows
Prerequisites
In this post we show you how to map data from existing data sources to a newly designed graph schema and then build a new Graph model for Amazon Neptune. Although Graph.Build removes the need for code in this process, a basic understanding of Graph databases, SQL, JSON and AWS is required, as well as the following
A running Amazon Neptune database cluster.
Follow the guide on the Amazon Neptune documentation for creating an Amazon Neptune cluster.
Visit the Amazon Neptune documentation for more information about graph databases.
AWS Marketplace subscription to the required Graph.Build services.
The Graph.Build platform is available on AWS Marketplace, with a free 14-day trial. Each service only costs when it is running. Once the free 14-day trial is completed, services will incur their individual per-hour cost:
Examples are from the N. Virginia region.
|
Graph Build Studio Small |
14-day free trial, then $0.41 per hour |
|
Semi-Structured Transformer |
14-day free trial, then $2.14 per hour |
|
SQL Transformer |
14-day free trial, then $2.56 per hour |
|
Graph Writer |
14-day free trial, then $1.70 per hour |
To follow along, subscribe to the following Graph.Build services:
All pricing is in addition to the costs of the AWS infrastructure which it is running on.
Deploy and configure Graph.Build on ECS using AWS CloudFormation
Follow the guide on the Graph.Build documentation to deploy a Graph.Build cluster on Amazon Elastic Container Service (ECS) using AWS CloudFormation, taking care to follow the path for the AWS marketplace template.
Once the AWS CloudFormation template completes successfully, in the outputs tab, take note of the ApplicationURL and StudioAdminPasswordSecret value’s, as you will need them in the next step.
Design a new property graph schema
Amazon Neptune does not require, and cannot enforce a predefined schema, but schema’s are a powerful way to ensure data consistency. Graph.Build enables you to design a schema that guides the data modeling process, so that the graph written to Neptune conforms to your intended structure.In your browser, navigate to the ApplicationURL noted down from the previous step.
Login to Graph.Build studio with the following credentials.
Username = SuperAdmin
Password = { StudioAdminPassword }
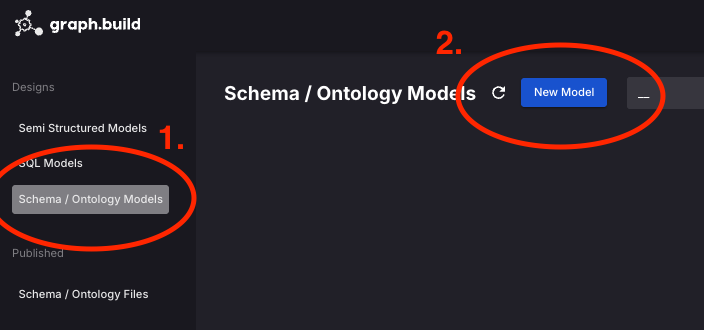
Choose Schema / Ontology Models, New Model
- In step 1, Choose Property Graph, skip step 2 and for step 3, name your property graph schema
Credit Card Transactions - Drag in a new Node to the canvas, add choose the label
Person - Select the
Personnode, and add a property calledfirst_nameof typeString
Repeat the process to add the properties last_name (String) and date_of_birth (Date) - Create another Node called
Cardand draw a new connection starting fromPersonand terminating atCard. Name the edgeHAS_CARD - Add a property called
sincewith data type date to the newHAS_CARDedge, using the same process as adding a property to a node. - Choose Generate Schema, Publish Schema
(OPTIONAL) Toggle the properties view mode button to edit properties in an expanded view.
Source and build a graph model from JSON files in S3
Now that we have our schema, we can build graph models that map our schema to each source’s schema.
For the first data source we choose JSON, in S3.
- Choose the
graph.buildlogo, then navigate to Designs, Semi Structured Models, New Model.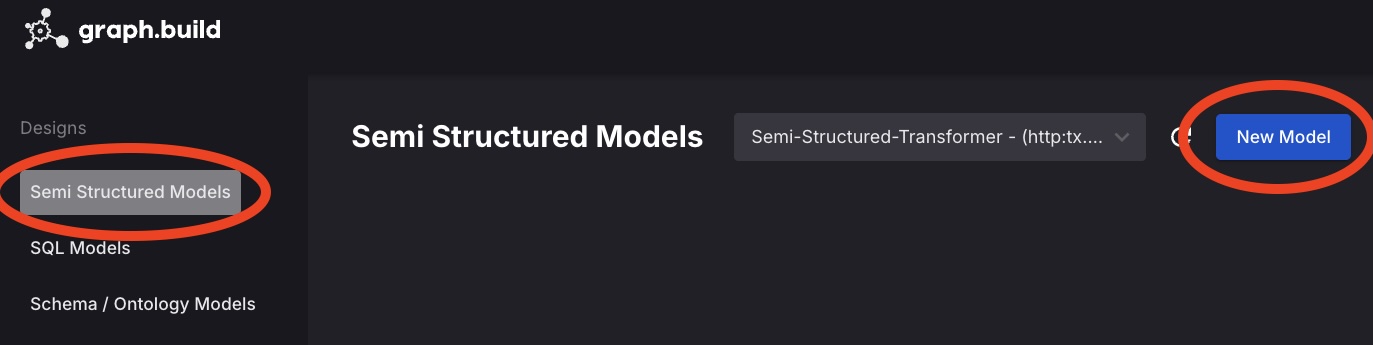
- Copy the following synthetic JSON data and store it in a file called
sample.json.The JSON sample is intended to be a sample of a larger JSON data model that you wish to transform to Graph. Once the following design has been completed, a transformation can be executed against as many JSON files as you wish, provided they have the same structure, they will behave in the same way.
- Choose Property Graph, then
Credit Card Transactionsschema, Next Step. - Name your new model
PersonCard - Choose Upload Sample File, and choose the
sample.jsondata file, then Finish Setting Up
The next screen shows all the JSON keys that are available to build the Graph model. These JSON keys are known as ‘input blocks’.
Create your first Node / Vertex.
- Drag the
CardNoinput block onto the canvas, choose Node and under Node Settings, Label, choose Card and Apply. - Repeat the process to create the
Personnode, usingPassportNoas the input block, then draw a new edge between the nodes. Note that theHAS_CARDedge is automatically populated, as it is the only valid edge between thePersonandCardnodes. - Add the properties to the model by selecting a node or edge, choosing the property key, data type and template mapping to the source JSON.
- Choose Generate Model, Test Model to review the graph model.
- Download the test result and inspect the nodes and edges files. These files are compatible with Amazon Neptune and can be loaded into Amazon Neptune using the bulk loader.
- Close the test result window, choose Generate Model, Publish Model to prepare the transformation job to process any file of the same format.
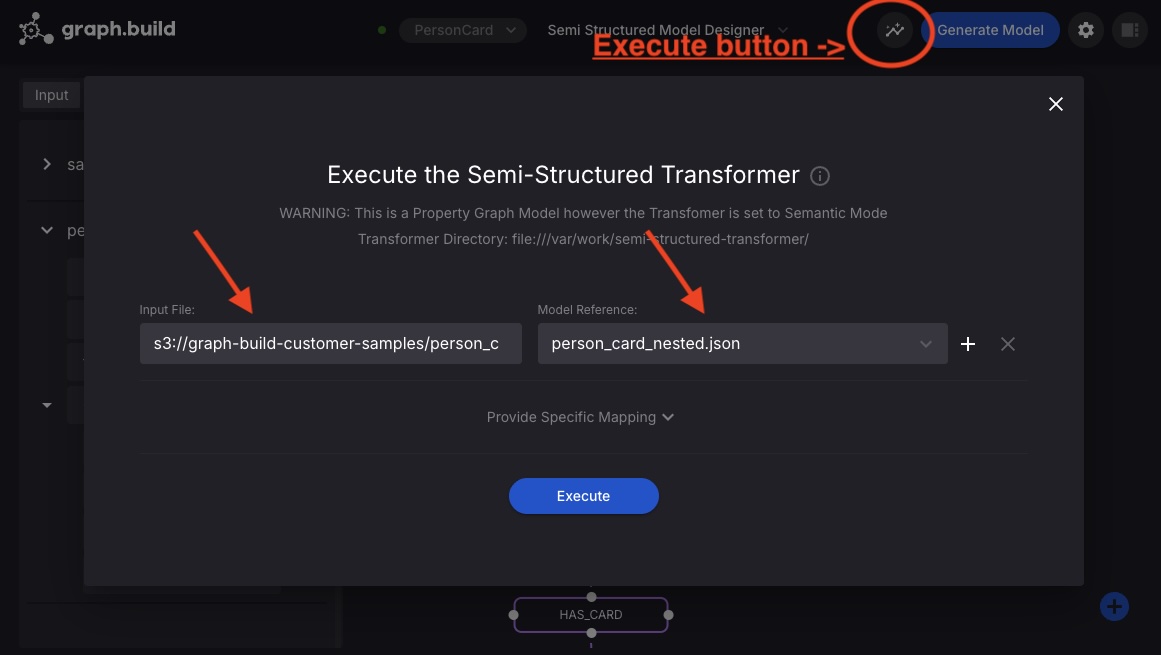
Execute the new transformation job on a file located in S3
Now you have published your transformation model, you can execute the job on any file with the same structure that resides in S3. Choose the execute button, set the Input File to:
Select person_card_nested.json for the model reference.
Refer to the graph.build documentation for how to trigger transformations using REST.
Once the execution is complete, the new graph model persisted back to the outputs folder for the Semi Structured transformer in the S3 bucket created during AWS CloudFormation.
Refer to the graph.build documentation to processing large or numerous files of JSON, XML or CSV that reside in S3, and automate update and insert graph model operations to Amazon Neptune using the Graph.Build Writer.
Source and build a graph model from a SQL database
As well as building Graph models from files in JSON, CSV, and XML format, Graph.Build can also pull data from a SQL endpoint via a JDBC connection.
Connection types include Amazon Athena, Amazon RDS, Amazon Aurora, and any other JDBC connection.
Synthetic data has been created and stored in an RDS database.
This database is publicly available and free to use for experimentation with Graph.Build.
Choose the graph.build logo, then navigate to Designs, SQL Models, New Model, step thorough the setup as before, inputting the following connection details for the SQL endpoint.
|
Driver |
com.mysql.cj.jdbc.Driver |
|
Endpoint |
card-data.crlz1hrnweup.us-east-1.rds.amazonaws.com:3306/carddata |
|
Username |
readonly_user |
|
Password |
readonly_graphbuild123 |
Once connected, insert the following query, and execute:
Query results are automatically limited by configuration to avoid problems with large scale result sets.
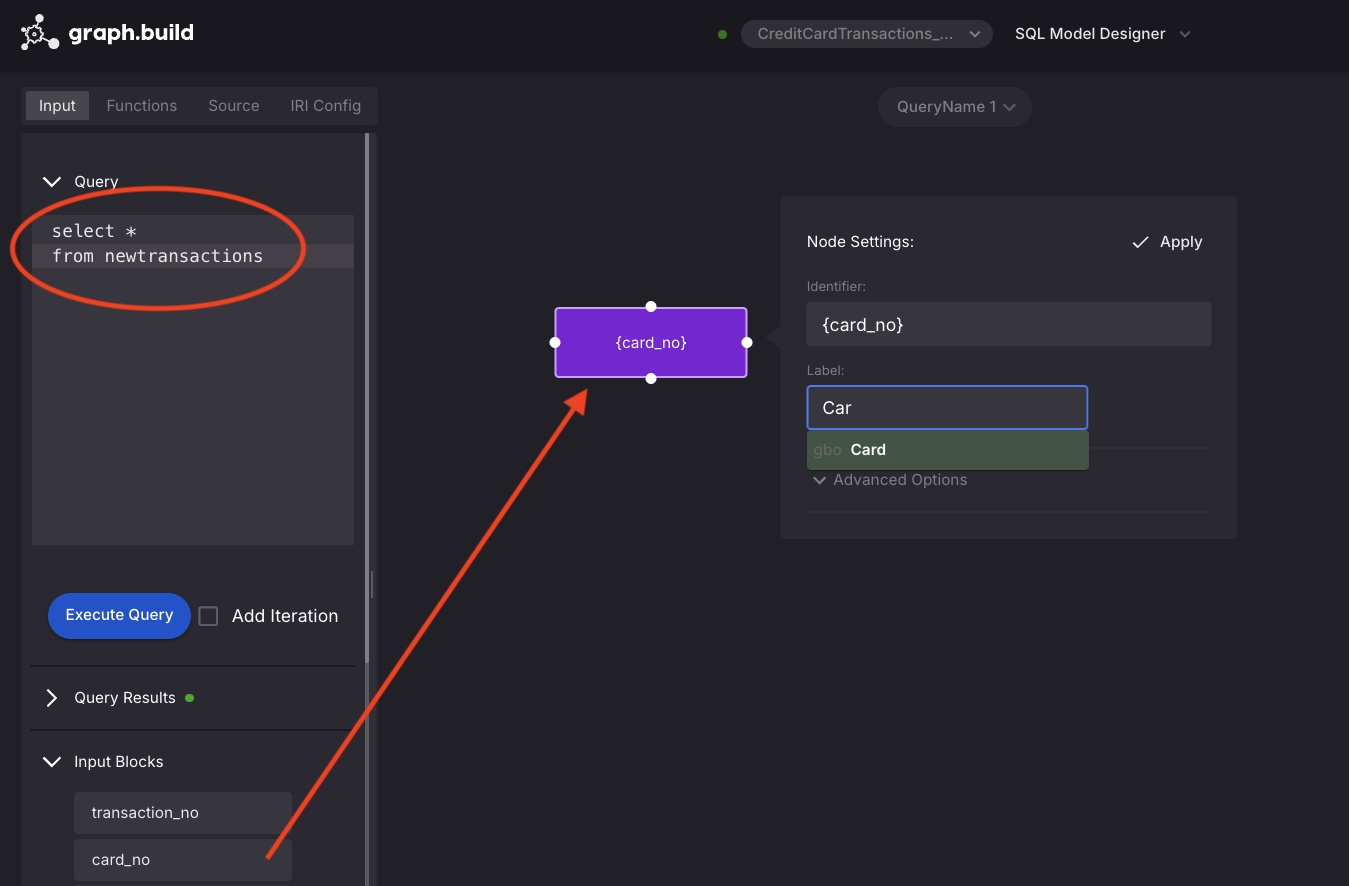
Complete a model as previously described for the JSON data source.
Once complete, select the execute button (as shown in the JSON example previously) and choose execute.
Once the transformation is complete, you will find the graph model files in the output directory for the SQL transformer in the S3 bucket created during AWS CloudFormation.
Once in S3, models can be loaded into Amazon Neptune using the bulk loader, or Kafka can be configured to automatically insert or update graph models to Amazon Neptune using the graph.build writer.
Cleanup
Navigate to the AWS CloudFormation console.
Choose Stacks, turn off view nested, select your graph.build stack and Delete.
Conclusion
In this post, we demonstrated how to design, test, and build graph models, then load them into Amazon Neptune, with no code.
Using Graph.Build on AWS greatly reduces the time and effort it takes to iterate on graph solutions, meaning more time can be spent on perfecting the solution and less on code and infrastructure.
Now that you have your data loaded, you are ready to start exploring. In the next post in this series, we will show you how to connect to your Neptune cluster with G.V() to query, analyze, and discover new insights. To begin building your own knowledge graph, find Graph.Build on the AWS Marketplace.