AWS Database Blog
Build fraud detection systems using AWS Entity Resolution and Amazon Neptune Analytics
Financial institutions such as banks, payment processors, and online merchants face significant challenges in detecting and preventing fraud and financial crimes. Entity resolution and graph algorithms can be combined to support fraud detection use cases such as Card Not Present (CNP) fraud detection. A CNP transaction occurs when a credit or debit card payment is processed without the physical card being presented to the merchant, typically during online, telephone, or mail-order purchases. These transactions carry higher fraud risks because merchants can’t physically verify the card or the cardholder’s identity, making them particularly vulnerable to fraudulent usage.
Entity resolution services such as AWS Entity Resolution identify links between entities using shared attributes. Amazon Neptune Analytics, a memory-optimized graph database engine for analytics, enhances CNP fraud detection by enabling graph analysis of complex relationships between customers, transactions, and fraud patterns. When entities are resolved and matched, they create connections that can be stored and queried using graph database structures. Furthermore, graph databases’ built-in support for graph algorithms including community detection enables efficient exploration of entity networks, making it straightforward to discover hidden patterns and indirect connections between resolved entities. This combined approach facilitates fraud detection by quickly traversing relationships and identifying unusual patterns.
In this post, we show how you can use graph algorithms to analyze the results of AWS Entity Resolution and related transactions for the CNP use case. We use several AWS services, including Neptune Analytics, AWS Entity Resolution, Amazon SageMaker notebooks, and Amazon Simple Storage Service (Amazon S3).
Solution overview
AWS Entity Resolution ingests customer data from various sources, standardizing and matching records to create a single view of the customer with a persistent identifier. The persistent customer identifier, customer attributes, and transactions are then loaded into Neptune Analytics as vertices, and relationships between each entity form the edges of the graph. Amazon Neptune Workbench hosted Amazon SageMaker AI notebooks provide the environment for investigators to assess the data. For more details, see Accessing the graph.
The following diagram illustrates the solution architecture.
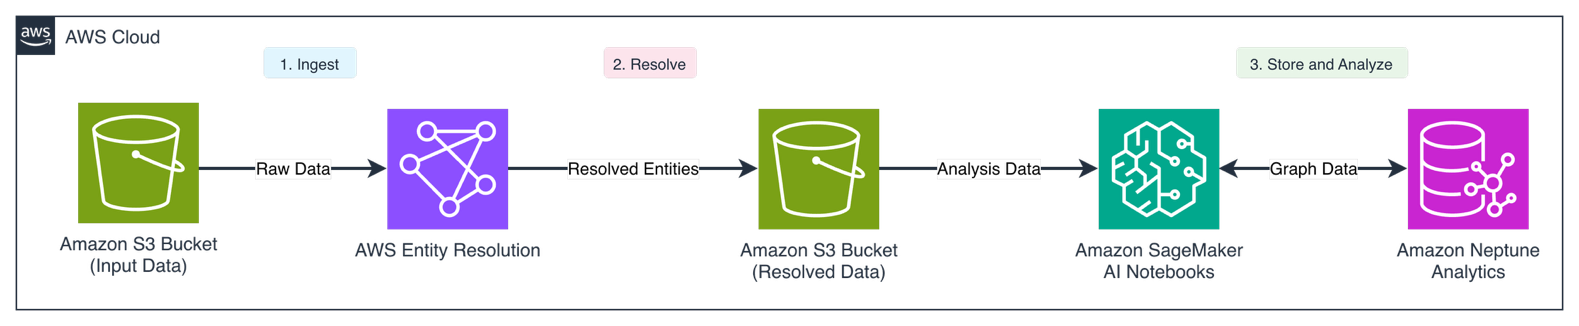
The workflow consists of the following steps:
- Source customer data flows into AWS Entity Resolution for matching and standardization.
- Resolved entities are placed into the output S3 bucket.
- Entities and transactions are transformed in Neptune Workbench and loaded into Neptune Analytics as graph elements. Users then run queries in Neptune Workbench to modify the graph in memory and perform graph analytics.
Data model
The graph data model consists of several node types and edge relationships designed to represent customer and transaction data. The nodes include Group (containing persistent identifiers from AWS Entity Resolution), Email, Customer (with source system customer information like name and date of birth), Credit Card Account, Address, and Phone. These nodes are connected through relationships such as HAS_CUSTOMER (linking Group to Customer nodes with confidence scores), HAS_ACCOUNT (linking Customer to Credit Card Account nodes), HAS_PHONE, HAS_ADDRESS, and HAS_EMAIL. The model is further enhanced with transaction-related nodes like CnpCreditCardTxInit, CreditCardTx, and CnpInitFail, which are connected through relationships that track the flow of CNP transactions and their outcomes.The following diagram illustrates the graph data model.
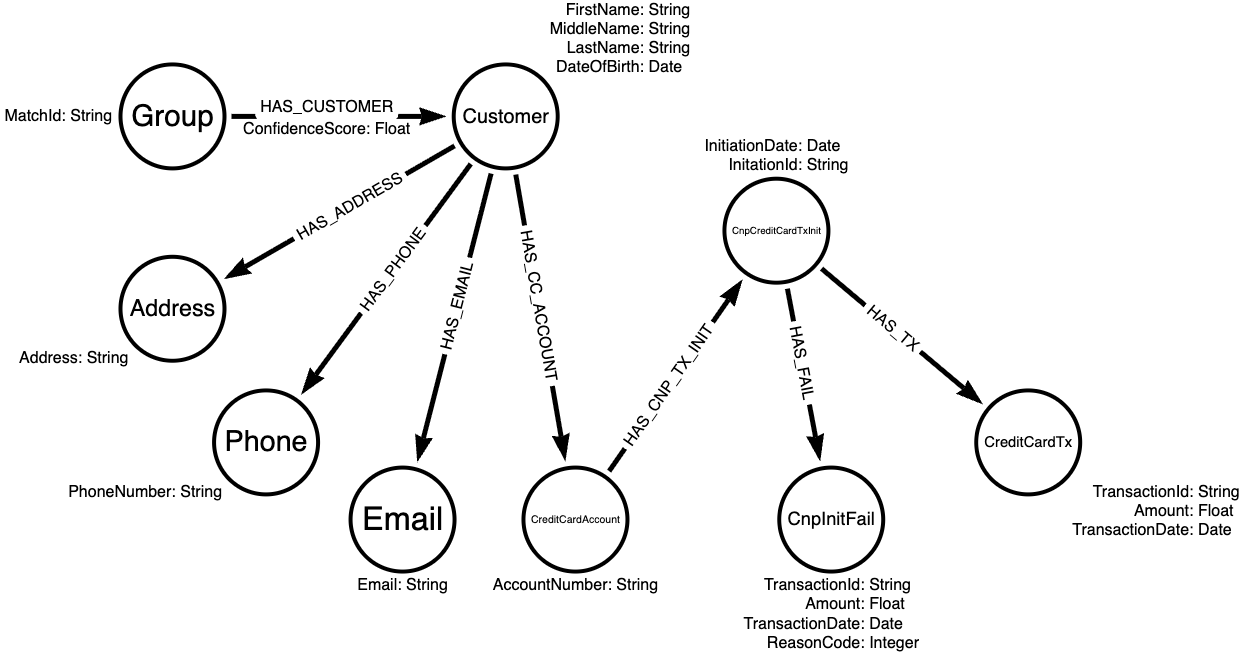
The following table lists the nodes and edges in more detail.
| Type | Label | Description | Properties |
| Node | Group |
The persistent identifier generated by AWS Entity Resolution for resolved entities | MatchId |
| Node | Email |
Contains the email address identifiers for the entities ingested into AWS Entity Resolution | Email |
| Node | Customer |
Contains the financial institution’s customer identifier and relevant customer information such as name fields and date of birth |
|
| Node | CreditCardAccount |
Contains details regarding the customer’s linked account identifiers | AccountNumber |
| Node | Address |
Contains the input address fields that were ingested by AWS Entity Resolution | Address |
| Node | Phone |
Contains the customer’s known phone numbers that were provided during onboarding | PhoneNumber |
| Node | CnpCreditCardTxInit |
Captures when a transaction was initiated without a physical card, such as online shopping |
|
| Node | CreditCardTx |
Represents a successful transaction without a physical card |
|
| Node | CnpInitFail |
Captures a failure reason for why a transaction was rejected if a card was not present |
|
| Edge | HAS_CNP_TX_INIT |
An edge from the CreditCard node to the CnPCreditCardTxInit node | |
| Edge | HAS_CNP_TX_INIT |
An edge from the CnPCreditCardTxInit node to the CreditCardTx node | |
| Edge | HAS_FAIL |
An edge from the CnPCreditCardTxInit node to the CnpInitFail node | |
| Edge | HAS_CUSTOMER |
A relationship from the Group nodes to the associated Customer nodes; contains the confidence scores generated by the AWS Entity Resolution machine learning workflow | ConfidenceScore |
| Edge | HAS_ACCOUNT |
A relationship from the Customer nodes to the customer’s linked accounts | |
| Edge | HAS_PHONE |
A relationship from the Customer nodes to the customer’s known identifiers | |
| Edge | HAS_ADDRESS |
A relationship from the Customer nodes to the customer’s known addresses | |
| Edge | HAS_EMAIL |
A relationship from the Customer nodes to the customer’s known email addresses |
Prerequisites
You will incur costs on your account for the AWS services used in the example. Although AWS offers the AWS Free Tier for some services such as SageMaker AI, review the pricing pages for AWS Entity Resolution and Amazon Neptune Analytics before proceeding. For help with estimating costs, refer to the AWS Pricing Calculator.
To follow along with this post, you must have the following resources.
- An AWS account
- AWS Command Line Interface (AWS CLI) installed
- An S3 bucket for intermediate data
- An AWS Glue Crawler and Glue Table to retrieve schemas for AWS Entity Resolution
- One or more AWS Identity and Access Management (IAM) roles to run the examples, with permissions to do the following:
- A SageMaker execution role with permissions to read and write to your S3 bucket
- A Neptune notebook configured for Neptune Analytics
Prepare AWS Entity Resolution ML workflow
AWS Entity Resolution provides multiple workflow options to identify potential duplicate entities. Machine learning (ML) workflows use an AWS provided ML model that can handle variations in matching fields such as Name, Address, Email Address, Phone, and Date of Birth. The output of the workflow will provide a confidence score, which indicates how likely the entities within the same match group are duplicates based on the trained model. You can use rule-based workflows to configure matching logic based on business rules.
Select a dataset such as the Freely extensible biomedical record linkage (FEBRL) dataset or create an example dataset with at least three of the five matching fields that can be used by the ML workflow. For this post, we used the Faker Python library to create mock matching fields (address, date_of_birth, email, firstname, lastname, full_name, and middle) to perform entity resolution matching.
After you have created the dataset, loaded it into an S3 bucket where AWS Entity Resolution workflows have read permissions, and crawled the data using AWS Glue, you must define a schema mapping. The schema mapping informs AWS Entity Resolution workflows how to interpret the source fields for matching workflows.
The following screenshot illustrates an example schema mapping.

After you create the schema, use the AWS CLI to create and run an ML workflow. Refer to Creating a machine learning-based matching workflow for steps to create and execute an ML workflow using AWS Management Console.
First, create a JSON file named ml-workflow.json in the current directory and add the following contents (replace placeholders).
After you create the JSON file, run the following command to create the workflow:
Run the following command to execute the workflow:aws entityresolution start-matching-job --region <region> --workflow-name <your ml workflow name>
Transform data output
When the ML workflow is complete, the output can be transformed into a valid Neptune data format and ingested into Neptune Analytics. The following code snippets show examples of how to transform the AWS Entity Resolution data output into the OpenCypher Bulk Load format.
Use the following code in your Neptune Notebook to create nodes from the output of AWS Entity Resolution. Replace the placeholders with your own values:
Use the following code to create edges from the output of AWS Entity Resolution:
Load additional datasets
We also want to supplement the mock customer data with some generated transactions that simulate a customer transaction workflow. Use the following code to load the data into an S3 bucket where the Neptune Loader has permissions to read from (replace the placeholders with your own values):
Neptune Analytics supports multiple mechanisms to load data into the in-memory graph, including loading from an existing Neptune cluster and from Amazon S3. For this example, we read data from Amazon S3 using a batch load, where the caller’s IAM role has the appropriate permissions:
Analyze output with Neptune Analytics
Using Neptune Analytics through Neptune Workbench, you can run powerful graph algorithms like Louvain and weakly connected components to identify clusters of potentially fraudulent activities and analyze relationships between resolved entities. For example, you can quickly identify clusters of CNP transaction failures, analyze the number of shared personally identifiable information (PII) elements between different entities, and assess risk based on the number of known bad actors in the graph, making it an effective tool for detecting sophisticated fraud patterns.
The Louvain algorithm is a community detection algorithm that helps identify clusters or communities within a graph by optimizing modularity, which measures the density of connections within communities compared to connections between communities. In Neptune Analytics, the Louvain algorithm can support the discovery of natural groupings in data, such as finding customer segments or detecting fraudulent clusters of accounts that are working together.
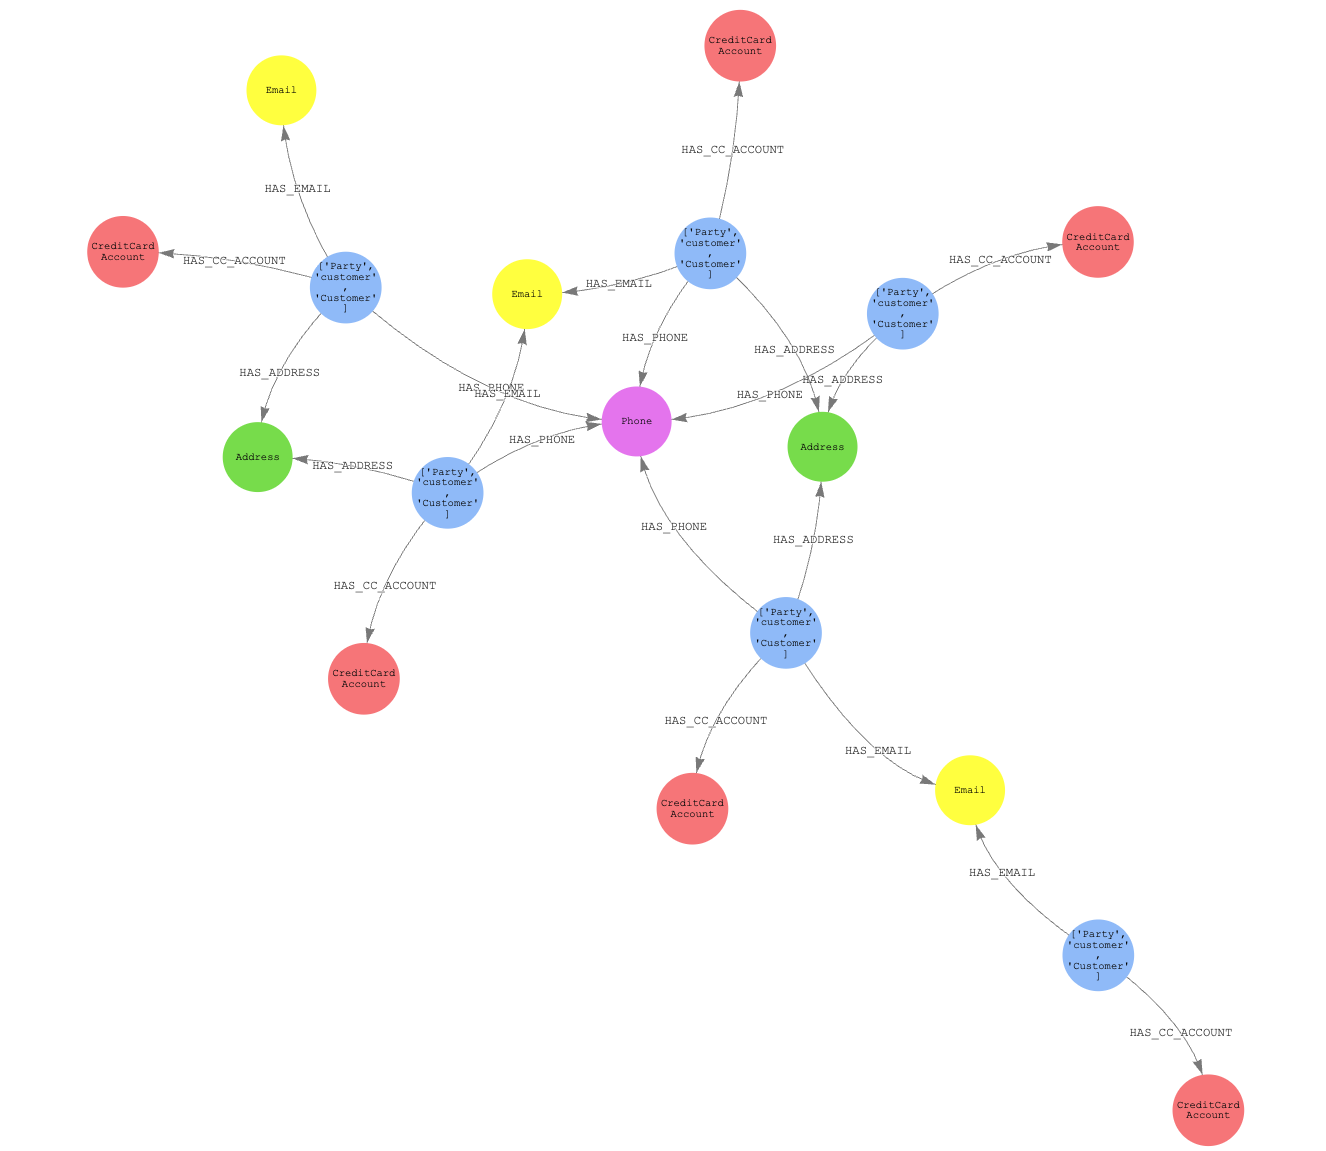
The queries in this post illustrate the use of Louvain and weakly connected components, though results will vary based on your specific dataset characteristics. In Neptune Analytics, the CALL keyword invokes the algorithms, while mutate keyword writes computed results back to the graph as new properties on nodes or edges. We will use Neptune Notebook’s visualization tools to showcase query results. There are also advanced visualization tools available such as Graph-explorer, an open-source tool that you can use to browse graph-data without writing queries.
First, let’s find clusters within the graph for transactions where they are associated with CNPInitFail. We want to persist these clusters with an edge property, CNPFailCommunity:
In addition to discovering clusters associated with CNPInitFail, we want to analyze the AWS Entity Resolution results. Although clusters have already been created by AWS Entity Resolution, we can create additional clusters using the graph algorithm and weakly connected components to generate clusters where resolved customers might share at least one matching attribute:
Now that our clusters have been generated, let’s find the largest cluster of transactions generated by Louvain:
We can take this largest cluster of transactions and retrieve the associated AWS Entity Resolution attributes that are associated with the same weakly connected components cluster:
Let’s drill down further into to CNPInitFail, where we select a failure code to assess risk. Assume that there are only three failure codes (1, 2, and 3) generated in the preceding transaction code, where failure code 3 is the riskiest. We want to see if multiple AWS Entity Resolution resolved entities are associated with the failures:
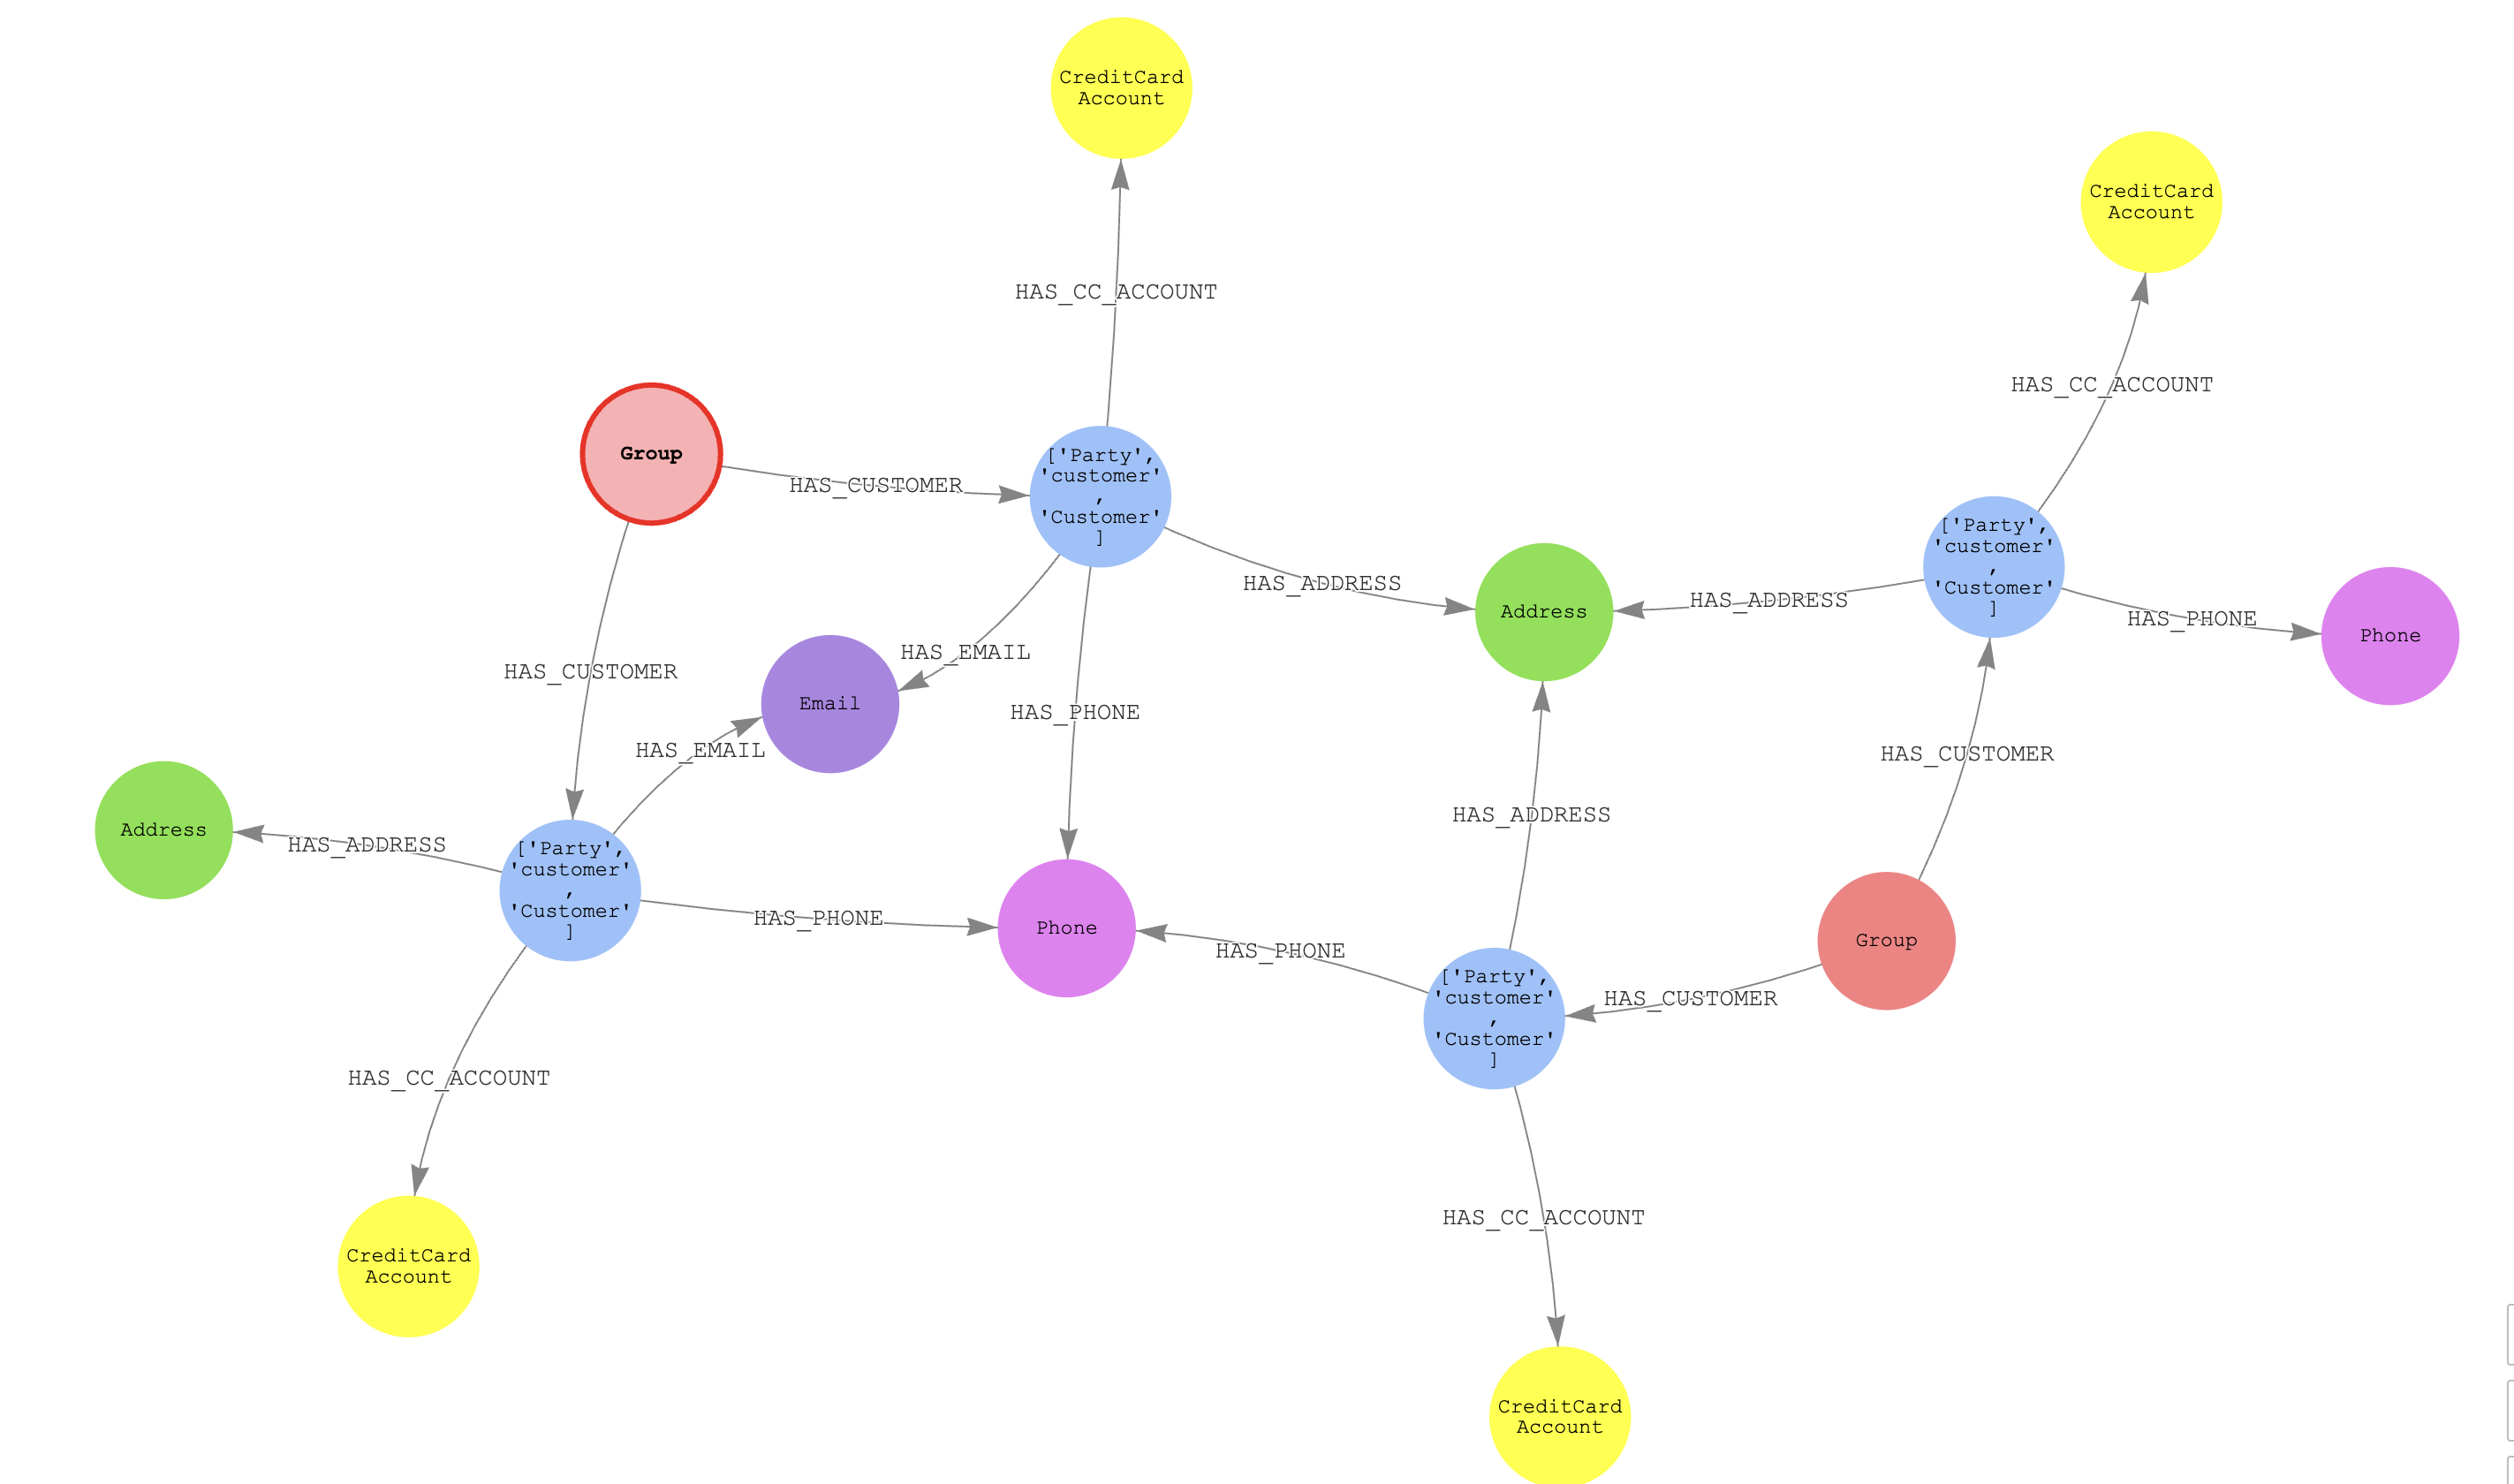
Given the group with the largest number of resolved entities (distinct AWS Entity Resolution match IDs), we want to assess the number of shared PII elements to assess if these entities’ distinct groups are two distinct bad actors or a single bad actor:
For visualization purposes (comment out the where not statement), we can see two distinct Group nodes and four parties. The two groups have a differing email address, phone, and address that are not shared. This suggests that the two resolved entities might be related, because they have shared the same number and at least one address.
We can also perform risk analytics based on the number of known bad actors in the graph. The following query analyzes groups of resolved entities by calculating the ratio of bad actors to total customers within each match group, ordered by the percentage of bad actors per cluster. This analysis helps identify which groups have the highest concentration of customers associated with high-risk CNP transaction failures (for example, reason code 3), providing investigators with a risk-based metric to prioritize their investigations.
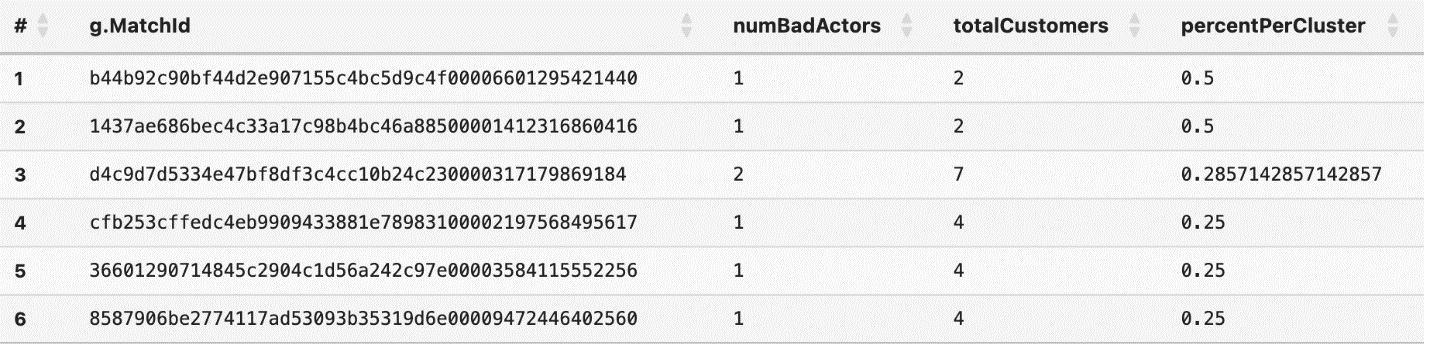
For example, based on the above output, the first two results have a higher percentage of bad actors in the cluster at 50% as opposed to the third cluster with 30% of bad actors in the cluster. However, there are only 2 total customers within groups 1 and 2, which may be an important consideration for investigations.
Clean up
When you’re done, clean up your resources to stop incurring costs. You can do so using the AWS CLI or the respective service consoles. For instructions, refer to AWS Entity Resolution, AWS Glue Tables, AWS Glue Crawlers, Neptune Notebooks, or Neptune Analytics documentation. You can also delete S3 buckets or objects created as part of this exercise.
Conclusion
The combination of AWS Entity Resolution and Neptune provides a powerful solution for financial institutions to detect and prevent CNP fraud. By using AWS Entity Resolution to match and standardize customer records with the Neptune graph database, organizations can quickly identify suspicious patterns and relationships between entities. The solution in this post demonstrated how you can transform resolved entities into a graph structure, perform advanced analytics using Neptune Analytics, and visualize complex relationships between customers, accounts, and transactions. The integration with Neptune Workbench helps investigators efficiently analyze clusters of potentially fraudulent activities and assess the relationships between resolved entities.
To learn more about using AWS Entity Resolution or Neptune Analytics, contact your AWS account team or visit the AWS Entity Resolution and Amazon Neptune User Guides.