AWS Database Blog
Perform delta data loads to data lakes using AWS DMS
A data lake is a centralized repository that allows you to store structured and unstructured data at any scale. You can store your data as-is, without having to first structure the data, and run different types of analytics—from dashboards and visualizations to big data processing, real-time analytics, and machine learning to guide better decisions.
Delta data load is a technique for loading incremental changes after an initial full load to a data. It is an alternative to running a change data capture (CDC) process which replicates data changes as they happen. A delta load implies that the entire data of a relational database table is not repeatedly extracted, but only the new data that has been added to a table since the last load. With delta load, you can process only data that needs to be processed, either new data or changed data. This makes the process efficient, reducing costs and saving time.
In this post, we share a framework for performing delta data load from your operational data stores using AWS Database Migration Service (AWS DMS), AWS Step Functions, Amazon DynamoDB, and AWS Lambda functions. For demonstration, we use Amazon Relational Database Service (Amazon RDS) for Oracle as the source database. You may choose a different supported source endpoint.
Solution overview
The following diagram illustrates our solution architecture.

The initial set of data is extracted with a full load task using DMS as part of a Step Functions workflow. The solution uses a DynamoDB table containing configuration information to dynamically create AWS DMS tasks. We use these tasks to load delta changes based on a specified filter column (for example, update timestamp). Values in this filter column are used to limit the number of records transferred from your source to your target.
We use Step Functions for orchestration. A Step Functions workflow is scheduled to run at a preconfigured frequency. The workflow triggers a series of Lambda functions for creating AWS DMS resources, managing AWS DMS tasks, and loading the data to Amazon Simple Storage Service (Amazon S3). When the load is complete, a Lambda function updates the DynamoDB table with load statistics, including latest value for filter column. At the end of the workflow, AWS DMS resources are deleted.
The following diagram illustrates this workflow.

Delta load benefits
Using a delta load approach provides the following benefits:
- Efficiency – With delta load, you only need to process data that you need. This makes the load process efficient, reducing costs and processing time.
- Stateful changes – You can run AWS DMS data replication tasks on a predefined schedule. For example, your business may require you to load data only during non-business hours. This framework is useful for performing data migration at scale for a group of tables with granular rules for tracking what data to migrate during each execution window.
- Historic datasets and reproducibility – You can gracefully recover from a failure when migrating a large table. If an AWS DMS full load task is restarted upon failure, AWS DMS reloads the entire source table. This framework enables you to load data incrementally from the point of failure.
- Flexible scaling – You can choose flexible scaling for your data replication workload instances. If you prefer to complete migration for large tables during a predetermined time window (for example, a 4-hour off-peak window), you could spread the migration workload across multiple AWS DMS replication instances.
Prerequisites
To use this solution, you must complete the following prerequisites:
- Create and configure the source database for AWS DMS. For instructions, visit Using an Oracle database as a source for AWS DMS.
- For identifying delta changes, you must specify a column in the source table as the filter column in the DynamoDB table. This column is used as part of the AWS DMS task filter.
- Create an Amazon Virtual Private Cloud (Amazon VPC) with at least two subnets and security groups. We use this VPC for creating the AWS DMS replication instance and it must have access to the database.
- Your VPC must be configured with endpoints for Amazon S3, AWS DMS, DynamoDB, and AWS Secrets Manager. VPC endpoints enable you to connect your AWS resources to your VPC without requiring an internet gateway, NAT device, VPN connection, or AWS Direct Connect connection. When you create VPC endpoints, all traffic between your AWS resources in your VPC will be kept within the Amazon network. Additionally, you can attach endpoint policies to define resource actions that can be performed, the Identity and Access Management (IAM) user or role that can perform the actions, and the resources these actions can be performed on.
- Create S3 buckets to store raw data that AWS DMS extracts into an Amazon S3 data lake. Ensure that the IAM role for DMS has permissions to access the S3 buckets.
- Set up the AWS Command Line Interface (AWS CLI) to run commands for interacting with your AWS resources.
- Set up the AWS SAM CLI to deploy your resources.
- Have the appropriate AWS credentials for interacting with resources in your AWS account.
Limitations
This solution has the following limitations:
- The solution doesn’t capture deletes from the underlying source table.
- If you want to capture updates, you must use an update timestamp column for filtering. If your table doesn’t have a column that you can use for tracking updates, only new records are captured.
- While processing updates, if the source table receives multiple update events for the same column within the same window, only the last change is captured.
- AWS DMS endpoints created by the stack use default settings. You can customize the settings after deployment.
- Staging data is not removed by the Step Functions workflow in case of AWS DMS task failure.
Deploy your solution resources
We use the AWS Serverless Application Model (AWS SAM) to deploy the required resources. AWS SAM is an open-source framework for building serverless applications. It provides shorthand syntax to express functions, APIs, databases, and event source mappings. With just a few lines per resource, you can define the application you want and model it using YAML. During deployment, AWS SAM transforms and expands the AWS SAM syntax into AWS CloudFormation syntax, enabling you to build serverless applications faster.
Download the necessary software from the public GitHub repository.
The AWS SAM template creates the following resources:
- The Step Functions workflow for loading data from the source database to the data lake
- A DynamoDB table that persists the metadata and state of data load for each data lake table
- AWS DMS endpoints for the source and target data locations
- Lambda functions for creation and deletion of AWS DMS resources
- Lambda functions for starting and monitoring AWS DMS replication tasks
- IAM roles for granting access to AWS resources
Use the following commands to clone the repository and deploy the necessary resources:
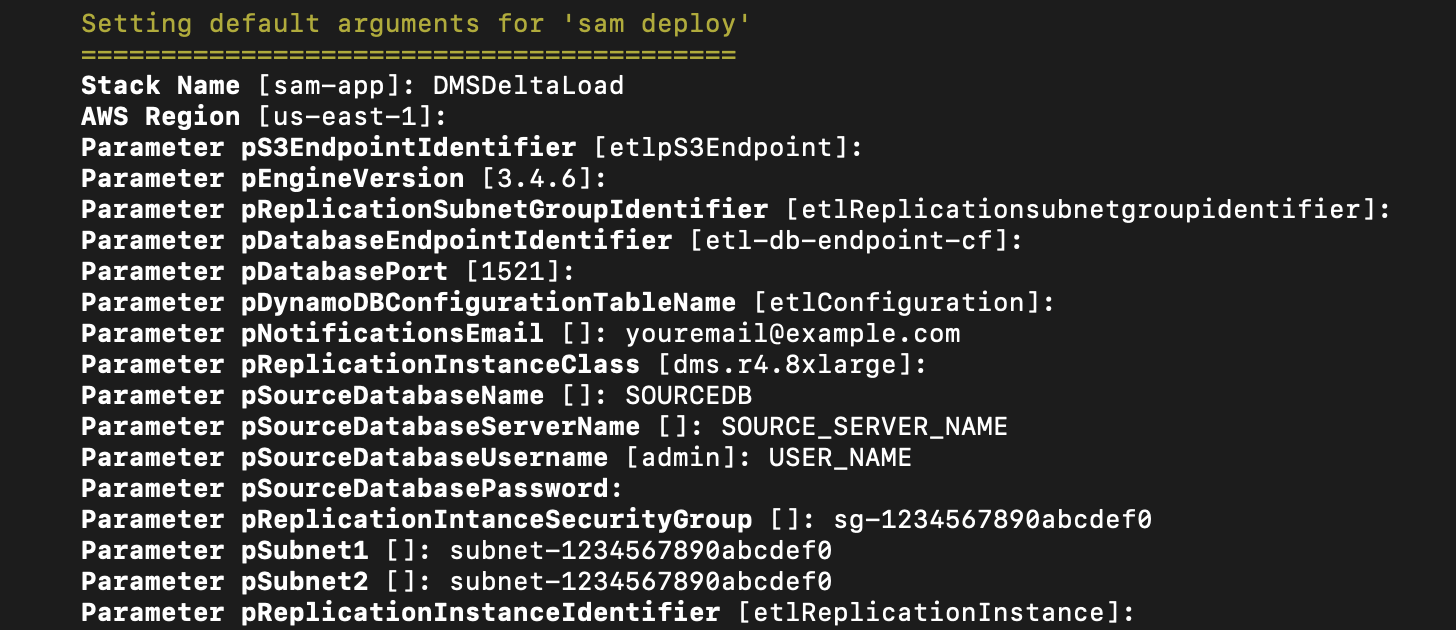
AWS SAM requires that you input parameters to configure the ingestion and transformation pipeline. You need to provide the following input values. You may choose to use defaults for the other parameters.
| Parameter | Default Value | Description |
| pNotificationsEmail | – | Notification ID to get notified for the workflow status |
| pRefInstanceSubnet1 | – | Subnet for deploying the AWS DMS replication instance |
| pRefInstanceSubnet2 | – | Subnet for deploying the AWS DMS replication instance |
| pReplicationIntanceSecurityGroup | – | Security group for the replication instance to communicate with the database |
| pSourceDatabaseName | – | Source database name to extract data from |
| pSourceDatabasePassword | – | Password for connecting to source database |
| pSourceDatabaseServerName | – | Source database host name |
| pSourceDatabaseUsername | – | User name for connecting to source database |
Post-deployment
Data doesn’t propagate to your data lake until you review and update the DynamoDB controller table and run the workflow.
The following table summarizes the DynamoDB controller table layout.
| Attribute | Description |
| activeflag | When set to true, enables the data load for this source |
| sourceTable | Source table name |
| filtercolumn | The column name in the sourceTable that is used to filter delta records |
| filteroperator | The column name in the sourceTable that is used to filter delta records. A parameter has one of the following values:
|
| ouputs3Prefix | S3 bucket location where AWS DMS stores data |
| sourceSchema | Database name of the source table |
| startvalue |
Filter value that is used by AWS DMS to get the delta records. This is updated at the end of the ETL process. If If If |
| endvalue |
If If |
| targetTableName | Target table name |
| replication_task_settings | Use this parameter to customize replication task settings. The value is in JSON format. |
Run the following AWS CLI command to load data to the DynamoDB table. Provide your own values as indicated.
Schedule a job using Amazon EventBridge
To run the Step Functions workflow on a pre-defined frequency, you could set up an Amazon EventBridge event.
- On the EventBridge console, choose Rules.
- Choose Create rule.
- For Name, enter a name for your rule.
- For Description, enter an optional description.
- Under Define pattern, select Schedule.
- Select Fixed rate every and choose your preferred time (for this post, 1 hour).
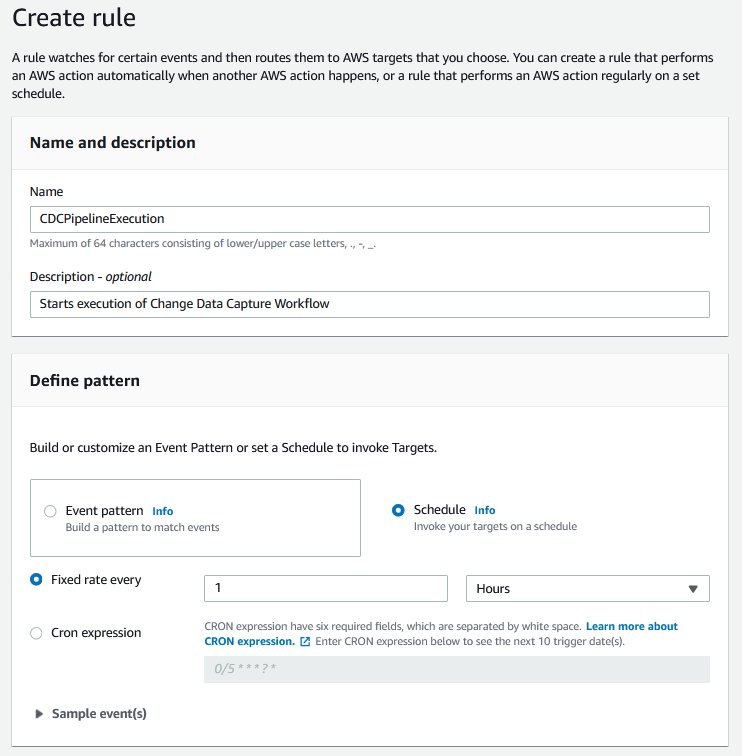
- Select AWS default event bus.
- For Target, choose Lambda function.
- For Function, choose the
StartCDCWorkflowfunction you created earlier. - Choose Create.
This sets up an EventBridge rule that triggers every hour to run the change data capture pipeline. You could also run the Lambda function StartCDCWorkflow manually for testing. The Lambda function reads the DynamoDB table and starts parallel runs of the Step Functions workflow for each active table.
Solution Demonstration
We show you how to test this solution once you deploy it. Amazon EventBridge allows you to schedule jobs based on your needs, but you can also do a one-time invocation of this solution through a Step Functions or AWS Lambda invocation. We demonstrate this using a Lambda invocation.
Our objective is to load data from a source table orders_rds to a target table orders_s3. We use a filter column row_id to restrict data being loaded to delta inserts.
- On the DynamoDB console, create a Table with
targetTableNameas the Partition Key (we chose the defaultetlConfigurationas our table name). - Insert an item with the following attributes:
- Proceed to the AWS Lambda console and choose the function
etlLambdaStartCDCWorkflow. - Choose Test from the menu. Select the defaults for input JSON as this function does not require specific values as input. Choose Save and choose Test again.

- Navigate to the Step Functions console, and choose the
etlStepFunctionDataPipelineState machine - Under Executions, choose the most recent Execution.
- Observe the execution go through each stage and complete successfully.

- Navigate to the S3 console and select the bucket you created as a target endpoint, and choose folder
etl/raw/dwh. This has theLOAD00000001.parquetfile, that consists of the data that you loaded using the workflow.

- Choose the radio button next to the file name, and choose Query with S3 Select under Actions.

- Under Input settings, choose Apache Parquet.
- Under Output settings, choose JSON.
- Choose Run SQL query.

- Observe the query results and the data that you intended to load.

Clean up
To avoid incurring ongoing charges, clean up your infrastructure by deleting the stack from the AWS CloudFormation console. Delete the DynamoDB table and any other resources you created as a prerequisite for this exercise.
Conclusion
In this post, we demonstrated how you can utilize a metadata-driven framework that enables flexible ingestion of inserts and updates to a data lake.
This pattern provides the ability to scale AWS DMS tasks based on the characteristics of the underlying data. Test this solution and let us know what you think in the comments section.
Additionally, you can automatically scale an AWS DMS replication instance to handle a higher load (scale up) when required and save money (scale down) when the load is low. For more information, visit How to Scale AWS Database Migration Service (DMS) replication instances.
About the Authors
 Mohit Mehta is a leader in the AWS Professional Services Organization with expertise in AI/ML and big data technologies. Prior to joining AWS, Mohit worked as a digital transformation executive at a Fortune 100 financial services organization. Mohit holds an MS in Computer Science, all AWS certifications, an MBA from College of William and Mary, and a GMP from Michigan Ross School of Business.
 Meenakshi Ponn Shankaran is Senior Big Data Consultant in the AWS Professional Services Organization with expertise in big data. MS is an SME on working with big data use cases at scale and has experience in architecting and optimizing workload processing on petabyte-scale data lakes. When he’s not solving big data problems, he likes to coach the game of cricket.
 Kishore Dhamodaran is a Senior Cloud Consultant with Amazon Web Services Professional Services. Kishore helps customers with their cloud enterprise strategy and migration journey, leveraging his years of industry and cloud experience.