AWS HPC Blog
Deploying generative AI applications with NVIDIA NIMs on Amazon EKS
 This post was contributed by Abhishek Sawarkar (NVIDIA), Alex Iankoulski (AWS), Aman Shanbhag (AWS), Deepika Padmanabhan (NVIDIA), Jiahong Liu (NVIDIA), Joey Chou (AWS)
Today, we’ll take you through a step-by-step -guide to help you to create a cluster of g5.48xlarge instances, accelerated by 8 x NVIDIA A10G Tensor Core GPUs, using Amazon Elastic Kubernetes Service (Amazon EKS) to host your inference solution via NVIDIA NIM, NVIDIA’s optimized microservices for deploying AI models at scale. This blog is part 1 of a 2-part series.
Amazon EKS is a managed service for running Kubernetes workloads on AWS. We can use EKS to orchestrate NVIDIA NIM (plural: NIMs) pods across multiple nodes, because it automatically manages the availability and scalability of the Kubernetes control plane nodes responsible for scheduling containers, managing application availability, storing cluster data, and other key tasks. EKS also integrates with AWS networking, security, and infrastructure – leveraging all the performance, scale, reliability, and availability of AWS infrastructure. You can find all the details in the EKS documentation.
To follow along, you can find the code in our awsome-inference GitHub repository. This repo contains reference architectures and test cases for inference on AWS. The examples cover a variety of models, use-cases, and frameworks for inference optimization.
Introducing NVIDIA NIM
NVIDIA NIM (or just NIM for the rest of this post) is part of the NVIDIA AI Enterprise, available on the AWS Marketplace. NIM is a set of easy-to-use microservices designed for secure, reliable deployment of high-performance AI model inference supporting the next generation of world-class generative AI applications. NIM offers developers a number of benefits including ease of use, performance at scale, and security. For more information on NIM, check out the NIM Documentation or Getting Started pages.
Ease of use
NIM speeds up time-to-market with pre-built, cloud-native containerized microservices that are continuously maintained to deliver optimized inference on NVIDIA GPU accelerated instances.
Performance and scale
NIM can improve the Total Cost of Ownership (TCO) by providing low latency, high throughput inference for AI applications, that scales on EKS depending upon the number of incoming requests. We’ll cover NIM performance and benchmarking in-depth in a future blog post. If you’re interested in learning more about the performance advantage of NIM now, you can check out NVIDIA’s blog with Hugging Face.
Security
By hosting NIM on EKS, you can leverage enterprise-grade software with dedicated feature branches, security patching, rigorous validation processes, and enterprise support, including access to NVIDIA AI experts. This way, you can maintain security, and control, of your generative AI applications.
To learn more about hosting on AWS, check out Amazon EC2 Accelerated Computing Instances, Amazon SageMaker, and Amazon EKS. You can also explore the latest community-built AI models optimized and accelerated by NVIDIA NIM on NVIDIA AI.
This post focuses on Amazon EKS, and walks you through deploying the Llama3-8B NIM on a single node of Amazon EC2 G5 instances. The g5.48xlarge instance is powered by 8 x NVIDIA A10G Tensor Core GPUs. To learn more about g5 EC2 instances, check out Amazon EC2 G5 Instances.
You can also use a smaller g5 instance (for example, the g5.12xlarge). The default profile of the Llama3-8B NIM is fp16, which means it takes up 16GB of GPU memory just for the model. If you want to follow along, we recommend having at least 24 GB of GPU memory so you can fully leverage the optimization benefits provided by NVIDIA NIM. To learn more about NIM profiles, check out the Deploying the NIM section in this post.
Steps to deploy the Llama3-8B NIM onto a single g5.48xlarge instance
Architecture: What you will be deploying
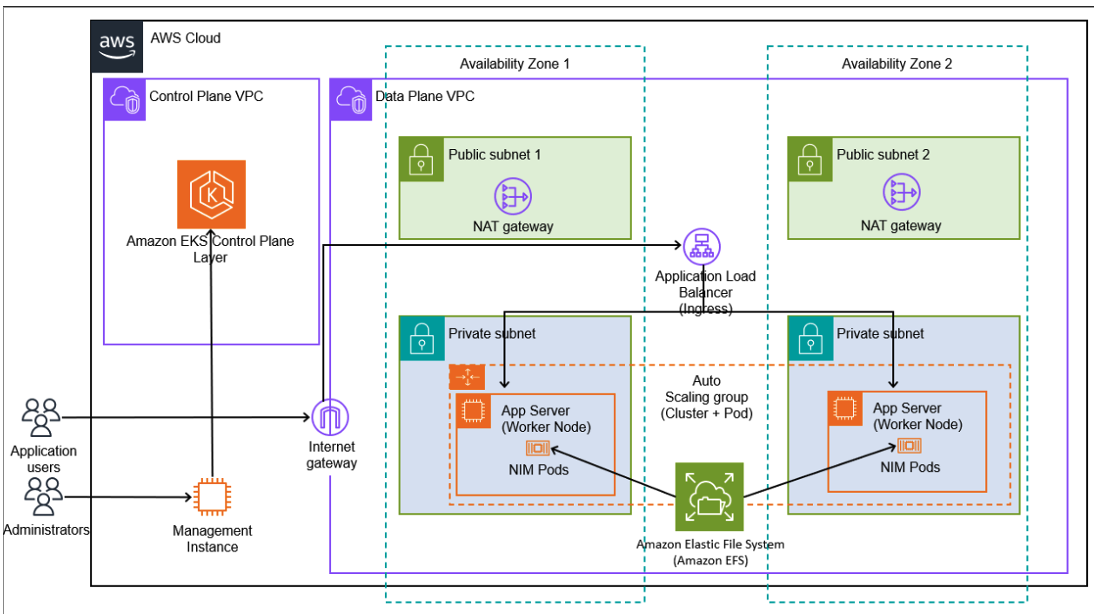
Figure 1 – This is the architecture diagram of what you will be provisioning during this 2-part-blog series. During this blog, we will provision EKS Resources (the Control Plane VPC is automatically provisioned in AWS’ account, and is fully managed), including the pods and worker node groups (g5.48xlarge in this blog). Additionally, we will also provision the Data Plane VPC and associated resources – Subnets (Public & Private), NAT Gateways, and the Internet Gateway. In part 2, we will cover Autoscaling (for both the cluster and pods) and Load Balancing (Ingress of type Application Load Balancer).
Since this post focuses on the Llama3-8B model in fp16, we won’t need multiple instances provisioned to accommodate it (since the model fits on one GPU). We’ll talk about the shared file system (Amazon EFS) in a future post – when we talk about larger model NIMs.
Deploying into your AWS account
Prerequisites
Before you proceed, please ensure you have the NVIDIA AI Enterprise License (NVAIE) to access the NIMs. To learn more about how you can get access, go to build.nvidia.com and provide your corporate email address.
To get started, clone the awsome-inference GitHub Repository:
git clone https://GitHub.com/aws-samples/awsome-inference.gitMake sure that the following packages are installed:
aws clieksctlkubectldockerhelm
You can find shell scripts to install each one of these packages in the aws-do-eks repository in the directory aws-do-eks/Container-Root/eks/ops/setup/:
./install-aws-cli.sh./install-eksctl.sh./install-kubectl.sh./install-docker.sh./install-helm.sh
Alternatively, you may choose to install the packages manually. You can find instructions for this in the README file on the GitHub repo.
Set up your NGC Personal API Key, so that you are ready to download the NIM Docker Images. Once you have that set up, export it as a command-line variable:
The NGC Personal API Key is required for using the NGC Service through the Docker client – or via the NGC CLI. To learn more about the NGC Service, please check out the NGC catalog.
Lastly, run aws configure to authenticate with AWS. The examples on GitHub – and in this post – use the region us-east-2 to provision resources. Feel free to change this, as required. Make sure you consistently use the same region throughout the deployment process.
Setting up your VPC and EKS cluster
You can find all the resources for this sub-section in the sub-directory:
cd 1.infrastructure/In this directory, you’ll find the files needed to get a Virtual Private Cloud (VPC), and an EKS cluster, set up in your own environment.
To set up your VPC, go to the directory:
cd 0_setup_vpc/In this directory, you’ll find vpc-cf-example.yaml, which is an AWS CloudFormation template for deploying a VPC with a pair of public and private subnets, spread across two Availability Zones (AZ). It also includes an Internet gateway, a default route on the public subnets, a pair of NAT gateways (one in each AZ), and default routes for them in the private subnets. For more information on this CloudFormation template, check out AWS CloudFormation VPC Template.
To deploy the VPC Stack, please download the VPC Template (called vpc-cf-example.yaml), and navigate to the CloudFormation console. Once there, hit Create Stack. Under step 1, hit Choose an existing template, and Upload a template file. You can leave the rest of the steps as defaults.
Note: The instructions described below walk you through setting up an EKS Cluster only if you do not use Capacity Blocks for ML. If you wish to use Capacity Blocks for ML, please follow the instructions in the Capacity Blocks section of the awsome-inference/1.infrastructure README to set up the EKS Cluster and self-managed node groups.
Next, to set up your EKS Cluster, navigate back to the 1.infrastructure/ and then go to the 1_setup_cluster/ directory:
cd 1_setup_cluster/This sub-directory contains YAML cluster configurations, templates, and examples to aid you setting up clusters for inference. Within this directory, you should find nims-cluster-config-example.yaml.
This cluster configuration is an example configuration that you can use to spin up a managed EKS cluster of p5.48xlarge instances that you have reserved via the On-Demand Capacity Reservation (ODCR). You can use this example configuration as-is, or with modifications to set up your EKS cluster.
We’ve commented out the capacityReservation field in this example configuration. If you want to use an ODCR, please uncomment lines 63-65 on the configuration file and fill in your own details that map to your ODCR.
# Uncomment the lines below (capacityReservation) if you use an ODCR
# capacityReservation:
#   capacityReservationTarget:
#     capacityReservationID: "cr-0ce6be6d411d2f43f"
Next are some of the parameters that you may need to change in the nims-cluster-config-example.yaml file:
$PLACEHOLDER_VPC_ID$PLACEHOLDER_SUBNET_PRIVATE_1$PLACEHOLDER_SUBNET_PRIVATE_2$PLACEHOLDER_SUBNET_PUBLIC_1$PLACEHOLDER_SUBNET_PUBLIC_2$INSTANCE_TYPE$PUBLIC_KEYPAIR_NAME$SECURITY_GROUP_IDS
Parameters 1-5 can be found using your CLI:
aws cloudformation describe-stacks --stack-name <YOUR_VPC_STACK_NAME>Parameters 7 and 8 have to be changed if you’d like ssh access to your worker nodes. For the rest of this post, we’ll set parameter 5 ($INSTANCE_TYPE) to g5.48xlarge. If you’d like to make any other changes, just consult README for 1.infrastructure.
Deploying the NIM
Before deploying the NIM, it is important to understand the different profiles available for this. With each NIM, NVIDIA releases different profiles that you can choose based on what infrastructure you wish to run on, or what you wish to test.
This profile is chosen by default based on your infrastructure. You can customize the infrastructure you run your NIM on with EKS – for example, you can specify how many GPUs are available per pod with the following lines in your manifest, and a NIM profile that is optimized for 1 GPU is automatically chosen.
resources:
  limits:
    nvidia.com/gpu: 1
Alternatively, you may choose to specify a profile, if multiple profiles are available. For example, you can choose an fp8 profile that lets you use an fp8-quantized version of the base model.
To learn more about the NIM profiles available for you to use, follow these steps:
- Ensure you have your EKS cluster up and running (following the steps described in the section above), and that you have your NIM pod(s) deployed.
- Once your EKS cluster and pods are up and running, to execute into the pod, run:
kubectl exec -it <pod name> -- cat /etc/nim/config/model_manifest.yaml- If you want to use a specific profile, you can specify the profile’s SHA value in the yaml file like this:
...
# @param env [array] Adds arbitrary environment variables to the main container
 env:
 - name: NIM_MODEL_PROFILE
   value: 30b562864b5b1e3b236f7b6d6a0998efbed491e4917323d04590f715aa9897dc"
...
Now that you have your infrastructure set up, you can start provisioning pods to host your NIM(s).
Navigate to the nims-inference directory:
cd 2.projects/nims-inferenceOnce there, you should see a helm example in the nim-deploy directory. This directory is cloned from NVIDIA’s nim-deploy repository.
Before running the helm command below, please ensure that you’ve set the NGC CLI API key as described in the “Prerequisites” section.
To get your NIM up and running without any configuration changes, you may run:
cd nim-deploy/helm
helm install my-nim nim-llm/ --set model.ngcAPIKey=$NGC_CLI_API_KEY --set persistence.enabled=true
This helm install command uses the default values.yaml file. You also have the option to use custom values helm files. More on this in the README on NVIDIA’S nim-deploy repository.
If you run into any issues here, refer to the Troubleshooting section later in this post.
Once you deploy the pod, running kubectl get pods should show something like:
my-nim-0 1/1 Running 0 10s
To test whether you can query the NIM pod, try port forwarding like this:
kubectl port-forward service/my-nim-nim-llm 8000:8000Then, in another terminal, run:
curl -X 'POST' \
'http://localhost:8000/v1/chat/completions' \
  -H 'accept: application/json' \
  -H 'Content-Type: application/json' \
  -d '{
  "messages": [
    {
      "content": "You are a polite and respectful chatbot helping people plan a vacation.",
      "role": "system"
    },
    {
      "content": "What should I do for a 4 day vacation in Spain?",
      "role": "user"
    }
  ],
  "model": "meta/llama3-8b-instruct",
  "max_tokens": 16,
  "top_p": 1,
  "n": 1,
  "stream": false,
  "stop": "\n",
  "frequency_penalty": 0.0
}'
This should return something like:
{"id":"cmpl-228f8ceabea1479caff6142c33478f3b","object":"chat.completion","created":1720470045,"model":"meta/llama3-8b-instruct","choices":[{"index":0,"message":{"role":"assistant","content":"Spain is a wonderful destination! With four days, you can definitely get a taste"},"logprobs":null,"finish_reason":"length","stop_reason":null}],"usage":{"prompt_tokens":42,"total_tokens":58,"completion_tokens":16}}
And: Congrats! You now have a NIM pod up and running on a single g5.48xlarge instance. You can also now stop the port forward service.
Troubleshooting
The most common issues we’ve seen relate to Kubernetes Persistent Volume Claims (PVC). This is because, by default, the helm charts provided don’t install the ebs-csi controllers for you. If you find yourself blocked by PVC errors, try this:
- Check all pods with
kubectl get pods -A - Get the logs of the
aws-node-xxxxpod and check the three containers (with the-cflag):aws-nodeaws-eks-nodeagentaws-vpc-cni-init
- Check the status of your PVCs with the
kubectl get pvc -AIf the PVC controller isn’t installed – or if you see an error here – run the steps below. - Install the PVC controller using:
kubectl apply -k "GitHub.com/kubernetes-sigs/aws-ebs-csi-driver/deploy/kubernetes/overlays/stable/?ref=release-1.27"- Once you’ve run this, you should have the EBS CSI controller installed on your cluster, and you should be able to deploy your pod without any errors. Redeploy (using
helm install) your configuration after making these changes.
Benchmarking
The GitHub repository also contains some example code to get you started with collecting performance metrics against your deployed NIM. To do this, we use the NVIDIA genai-perf tool. genai-perf is a command-line benchmarking tool for measuring inference metrics of models served through an inference server.
Some of the metrics provided by this tool are: output token throughput, time to first token, inter token latency, and request throughput. For more on the tool, check out the GenAI-Perf Documentation.
Once you’ve tested your NIM, you can set up a service of type ClusterIP to expose a port on your container.
kubectl apply -f nim-deploy/helm/nim-llm/nodeport.yamlWe have a sample benchmarking script under benchmark/benchmark_concurrency.sh, that will run benchmarking with multiple concurrencies:
cd benchmark/
./benchmark_concurrency.sh
You can then copy the benchmarking data from the genai-perf pod to your local:
kubectl cp <POD_NAME>:/workspace/benchmarks <YOUR_LOCAL_PATH>Once done, you should terminate the benchmark deployment:
./terminate_benchmark.shYou can directly change any of the flags used by genai-perf tool in the genai-perf.yaml manifest found in the same benchmark/ directory, too.
This process saves a .csv and .json file onto your local system. These files contain the benchmarking metrics we mentioned. Alternatively, you can check which pod has prefix genai-perf, and run:
kubectl logs <pod-name>This is what an example output will look like:
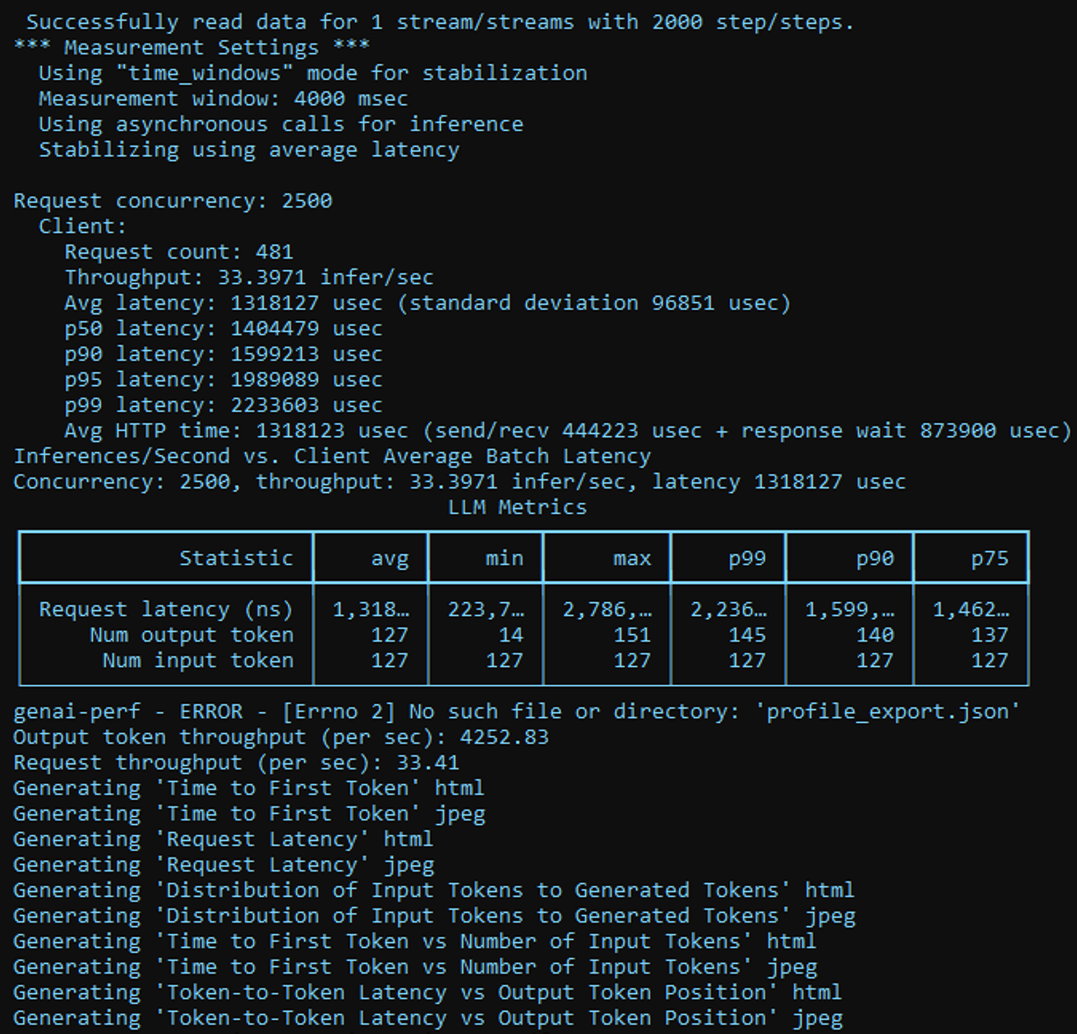
Figure 2 – Screenshot of an example log of running the genai-perf tool. You may safely ignore any ERROR messages that you see in these logs, and the cut off values too – the benchmarking scripts on the awsome-inference GitHub Repository get you the relevant CSV and JSON files that contain the complete benchmarking numbers.
We’ll focus on benchmarking metrics in depth in a future blog post. For now, we hope this post provided you with enough to get started benchmarking your NIM deployments.
What’s next?
Now you’re able to have the Llama3-8B NIM deployed on a single g5.48xlarge instance using EKS as an orchestrator. In a future blog post, we will focus on:
- Scaling your NIM with EKS
- Load Balancing across NIM pods with EKS
- Benchmarking: Which instance should you run on? How many NIM pods can you fit per GPU? What scale can you take this to?
- Using other NIMs.
Conclusion
In this post, we’ve shown you how to leverage Amazon EKS to orchestrate the deployment of pods containing NVIDIA NIMs, to enable quick-to-setup and optimized large-scale Large Language Model (LLM) inference on AWS G5 instances.
NVIDIA NIM can empower researchers and developers to run optimized inference in their applications, and Amazon EKS can help with the orchestration. Together, these scale NIM easily and efficiently to thousands of GPUs, resulting in accelerated time-to-market for cutting edge AI applications.
To learn more about deploying NVIDIA NIM and the associated infrastructure, refer to AWS Samples. To learn more about Amazon EKS and NIMs, check out the EKS User Guide, and NVIDIA NIM.
Lastly, as mentioned in the “What’s Next?” section, keep on the lookout for part 2, where we dive deep into scaling, load balancing, and benchmarking.