IBM & Red Hat on AWS
Deploy Red Hat OpenShift AI on AWS for Scalable AI/ML Solutions
As businesses continue to adopt artificial intelligence and machine learning (AI/ML) to innovate and strengthen their competitive advantage, they look for efficient ways to build, deploy, and manage the necessary infrastructure and workloads. However, managing the infrastructure for these technologies can be complex and time-consuming. Companies need a solution that simplifies deployment and scales with their needs. Red Hat OpenShift AI (OpenShift AI), provides a comprehensive platform that makes it easier to containerize, orchestrate, and scale AI/ML workloads on Kubernetes.
Red Hat OpenShift AI on AWS delivers enhanced AI/ML and Generative AI capabilities by integrating seamlessly with AWS. This integration provides key benefits such as scalability and service connections, including Amazon Simple Storage Service (Amazon S3) for storage and data access. By leveraging these features, data scientists and developers can rapidly build, train, and deploy AI/ML models, streamlining their workflow and improving efficiency.
In this blog post, we will cover how to deploy Red Hat OpenShift AI using Amazon’s managed Red Hat OpenShift Service on AWS (ROSA). You’ll learn about the deployment options, key benefits of OpenShift AI on AWS, and walk through the operator installation process.
Red Hat OpenShift AI overview
Red Hat OpenShift AI is a platform for data scientists and developers of artificial intelligence applications. It builds on the robust foundation of OpenShift and OpenShift Data Science, providing a scalable environment for various AI activities, from model training to deployment and monitoring.
The platform supports a wide range of tools and frameworks. This includes Jupyter notebooks, TensorFlow, and PyTorch for building and testing models. Data science pipelines and accelerators like NVIDIA GPUs and Intel Gaudi AI enhance performance. This enables data scientists and developers to work efficiently within a consistent and integrated ecosystem.
Deployment options
Red Hat OpenShift AI on AWS provides flexible deployment options to meet customer needs. You can choose between ROSA, a fully managed service operated by Red Hat with support from Red Hat and AWS, or the self-managed Red Hat OpenShift Container Platform (OCP) deployed on AWS.
ROSA handles provisioning, updates, monitoring, and scaling, freeing you from managing infrastructure. It has integrated AWS APIs and consistent tools, simplifying cloud migration and operations while offering pay-as-you-go billing. This allows you to focus on your applications and innovation.
For customers who need more control or specific customization, OCP can be deployed on AWS. This option allows for greater tailoring of the deployment but requires additional resources for managing and maintaining the clusters.
Both ROSA and OCP on AWS support features like autoscaling that help optimize costs and performance across various AI workloads.
Subscription options
Red Hat OpenShift AI is available as an add-on to your existing OpenShift deployment, whether you’re using ROSA or OCP on AWS. This subscription gives you access to AI/ML tools and integrates with popular AI frameworks. If you’re using ROSA, you can subscribe to OpenShift AI through the AWS Marketplace. For self-managed deployments, you can purchase it directly from Red Hat.
How OpenShift AI fits into AWS
OpenShift AI on AWS enhances your AI/ML and Generative AI capabilities by seamlessly integrating with AWS services. It offers flexible scalability, allowing you to adjust AI/ML workloads as demand changes. With native integration, you can use AWS services like Amazon S3 for storage and Amazon Elastic Compute Cloud (Amazon EC2) instances with GPU acceleration for intensive computations.
Security and compliance are built-in, with AWS providing robust protections and certifications to safeguard your data. Cost efficiency is another key benefit, as AWS’s pay-as-you-go pricing model means you only pay for what you use, avoiding the costs of maintaining on-premises systems.
Deploying and Serving Models in OpenShift AI
Models deployed in OpenShift AI are accessible as API’s, allowing users to submit input and receive predictions programmatically.
There are two main options for serving models. For small and medium-sized models, the Multi-Model Serving Platform uses ModelMesh to deploy multiple models on a single server, sharing resources efficiently.
For larger models, like large language models, the Single-Model Serving Platform utilizes KServe, deploying each model on its own server. This approach supports robust deployment, monitoring, scaling, and maintenance. KServe is a Kubernetes tool that manages ML models, including those from Hugging Face, and handles autoscaling, networking, and server setup. KServe also supports advanced features like GPU autoscaling and canary rollouts. KServe requires the deployment of the Red Hat OpenShift Serverless and Red Hat OpenShift Service Mesh Operators.
For tasks requiring heavy computation, EC2 instances with NVIDIA GPUs can be enabled in OpenShift AI, providing powerful resources for your models. To set this up, install the NVIDIA GPU Operator on your OpenShift cluster and create an accelerator profile.
Additional OpenShift AI capabilities
In OpenShift AI, distributed workloads and multiple cluster nodes can be used to speed up data processing and model training. CodeFlare simplifies this by managing orchestration, scaling resources, and GPU integration, allowing parallel job execution. This reduces task completion times and handles larger datasets and complex models efficiently.
You can streamline your data science workflows with data science pipelines, automating data processing and model training. Use KubeFlow Pipelines with YAML files for efficient management, or the Elyra JupyterLab extension for in-JupyterLab management. Store pipeline artifacts in Amazon S3 to save local storage.
Accelerators like NVIDIA GPUs and Intel Gaudi AI boost performance for deep learning and data processing for large datasets. Configure accelerator profiles in your OpenShift dashboard to optimize your computational resources.
Cost
You are responsible for the cost of the AWS services used when deploying OpenShift AI in your AWS account. For cost estimates, see the pricing pages for each AWS service or refer to the AWS cost calculator.
Prerequisites
Before getting started, review the following prerequisites for this solution:
- You need an active ROSA cluster with a minimum of 2 worker nodes with 8 CPUs and 32 GB RAM available to install the OpenShift AI add-on. If this requirement is not met, the installation process fails to start and an error is displayed.
- This blog assumes familiarity with: ROSA, Amazon EC2, Amazon Elastic Block Store (Amazon EBS), Amazon Virtual Private Cloud (Amazon VPC), and AWS Identity and Access Management (IAM).
- Access to an AWS account, with permissions to create the resources described in the installation steps section.
- Verification of the required AWS service quotas to deploy ROSA. You can request service-quota increases from the AWS console.
- Access to a Red Hat ROSA token; you can register on the Red Hat website to obtain one.
- A bastion host with the required software packages:
Security Considerations
The steps described in this blog are not intended for production environments. Before deploying ROSA with OpenShift AI in your AWS account, review the AWS Best Practices for Security, Identity, & Compliance website, the AWS Well-Architected Framework Security Pillar, and the Red Hat Security Reference Architecture for ROSA documentation.
Examples of security best practices include using private clusters with AWS PrivateLink, deploying ROSA with AWS Security Token Service (STS) for temporary, least-privilege credentials, and protecting your workloads with AWS Web Application Firewall (WAF). Additionally, you can encrypt persistent volumes with AWS Key Management Service (KMS), manage secrets securely with AWS Secrets Manager, defend against DDoS attacks with AWS Shield, and establish secure connections using AWS VPN.
Installation Steps
Install the Red Hat OpenShift Service Mesh and Red Hat OpenShift Serverless Operators
- Log in to your OpenShift cluster web console as a user with the cluster-admin role.
- From the side menu, expand Operators and click OperatorHub.
- Use the filter box to search for Red Hat OpenShift Service Mesh.
- Select the operator from the list and then click Install.
- On the Install Operator page, keep all default settings, click Install and wait for the installation to complete.
- Repeat steps 1 through 5 to install the Red Hat OpenShift Serverless Operator.
- Expand Operators in the left-side menu and click Installed Operators.
- Select openshift-operators from the Project
- Verify that both Red Hat OpenShift Service Mesh and Red Hat OpenShift Serverless Operators have been successfully installed (figure 1).
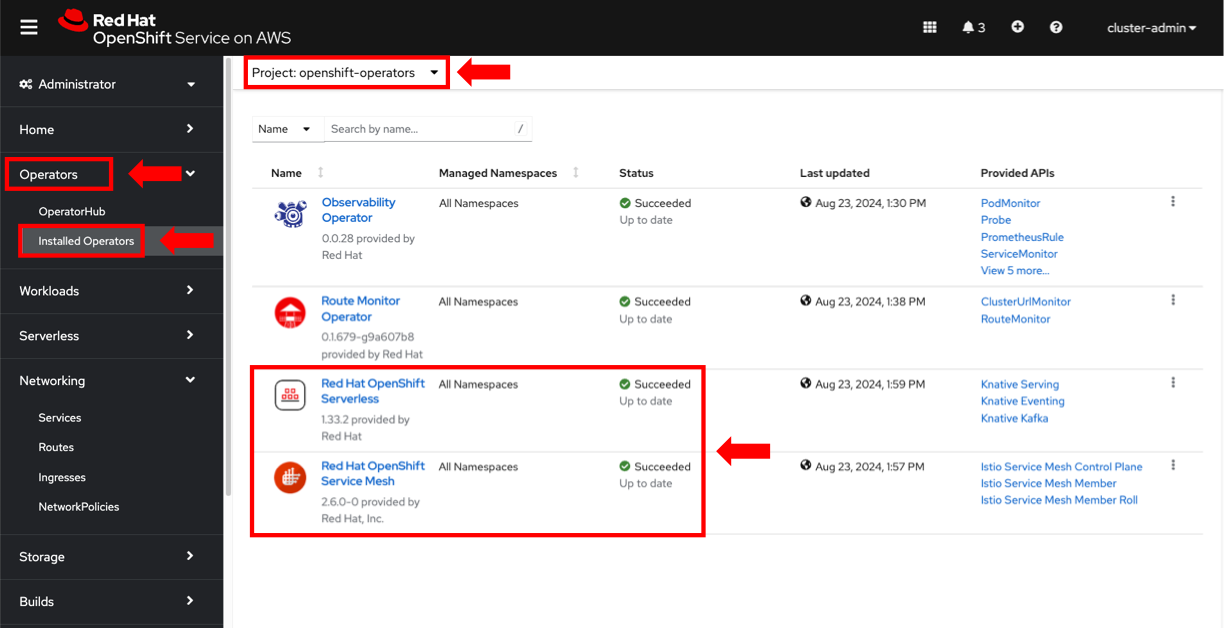
Figure 1. Pre-required OpenShift Operators installed in the ROSA cluster.
Install the Red Hat OpenShift AI Operator
- From the OpenShift console, expand Operators in the left-side menu and click OperatorHub.
- Search for Red Hat OpenShift AI using the filter
- Select the operator from the list and then click Install.
- On the Install Operator page, keep all default settings, click Install and wait for the installation to complete.
- Expand Operators in the left-side menu and click Installed Operators.
- Select redhat-ods-applications from the Project
- Verify that the Red Hat OpenShift AI Operator is successfully installed with Status showing as Succeeded.
Create a Data Science Cluster
In this section, we’ll set up a DataScienceCluster with the KServe, Dashboard and Workbenches components enabled. This setup will help you manage and access your OpenShift AI projects.
OpenShift AI Dashboard provides a clear view of your applications and available resources. It allows you to manage users, notebook images, accelerator profiles, and model-serving runtimes. Data scientists use it for creating and organizing their projects.
In OpenShift AI, projects act as structured workspaces. Within each project, multiple Workbenches can be created, each with their own Jupyter notebook environment. This setup helps organize tasks, manage data and models, and efficiently share resources across Workbenches.
- On the Installed Operators page, make sure you set the Project dropdown to redhat-ods-applications and click Red Hat OpenShift AI.
- On the Red Hat OpenShift AI Operator details page, click the Create DataScienceCluster button in the Details
- On the Create DataScienceCluster page, select YAML view, paste the content below and click Create (figure 2).
apiVersion: datasciencecluster.opendatahub.io/v1
kind: DataScienceCluster
metadata:
  name: default-dsc
  labels:
    app.kubernetes.io/name: datasciencecluster
    app.kubernetes.io/instance: default-dsc
    app.kubernetes.io/part-of: rhods-operator
    app.kubernetes.io/managed-by: kustomize
    app.kubernetes.io/created-by: rhods-operator
spec:
  components:
    codeflare:
      managementState: Removed
    kserve:
      serving:
        ingressGateway:
          certificate:
            type: SelfSigned
        managementState: Managed
        name: knative-serving
      managementState: Managed
      defaultDeploymentMode: RawDeployment
    trustyai:
      managementState: Removed
    ray:
      managementState: Removed
    kueue:
      managementState: Removed
    workbenches:
      managementState: Managed
    dashboard:
      managementState: Managed
    modelmeshserving:
      managementState: Removed
    datasciencepipelines:
      managementState: Removed
    trainingoperator:
      managementState: Removed
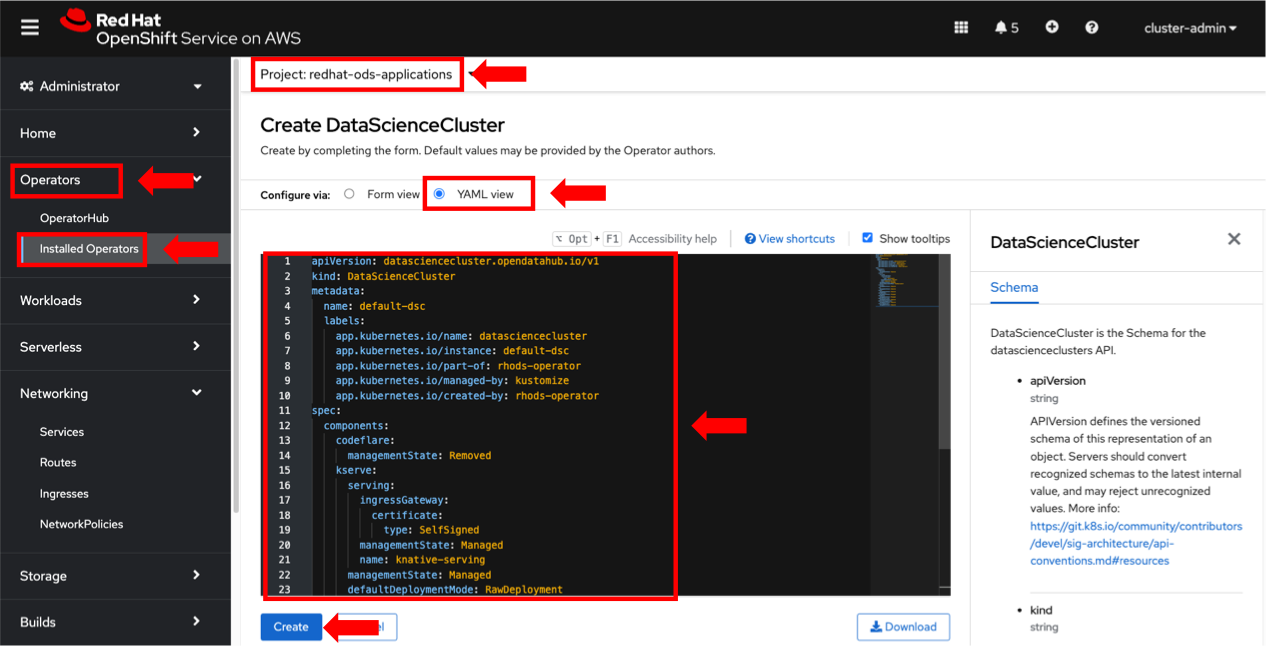
Figure 2. Create your DataScienceCluster instance.
- From the OpenShift console, expand Workloads in the left-side menu and click Pods.
- Set the Project dropdown to redhat-ods-applications and make sure the Pods are Running (figure 3).

Figure 3. Verify that the OpenShift AI Data Science Cluster pods are running.
- From the OpenShift console, expand Networking in the left-side menu and click Routes.
- Set the Project dropdown to redhat-ods-applications and click the link to the OpenShift AI dashboard (figure 4).
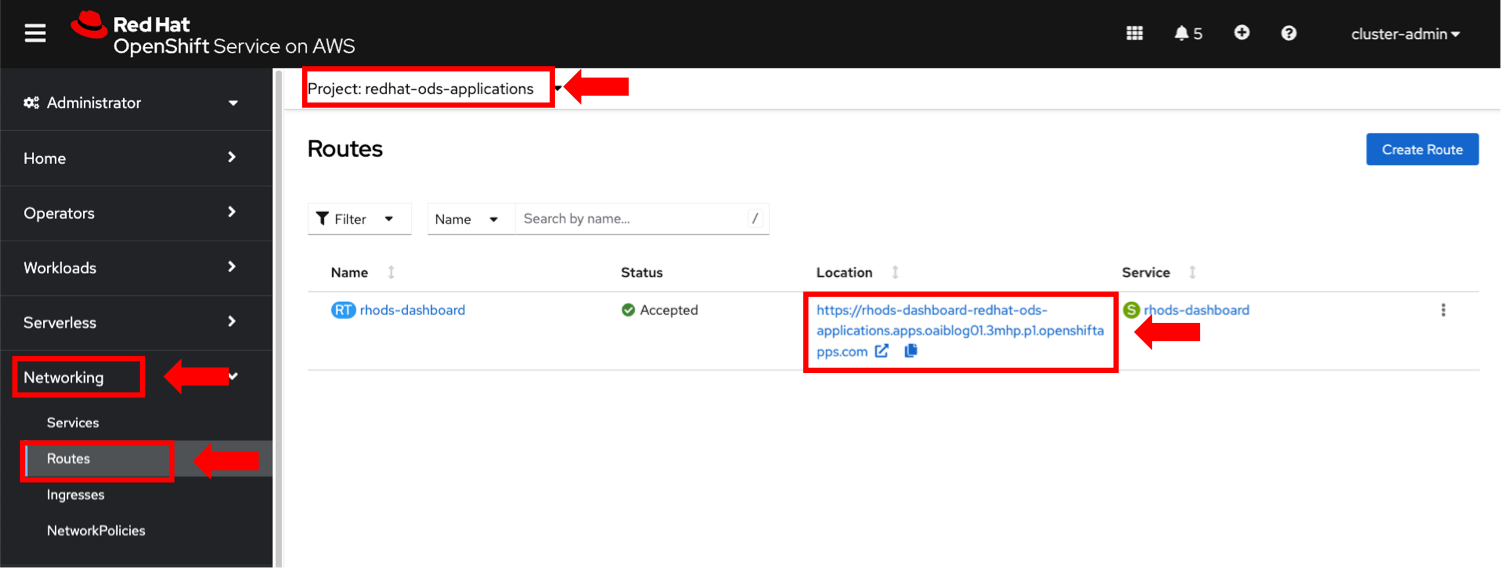
Figure 4. OpenShift Route with the link to access the OpenShift AI dashboard.
- Login to the OpenShift AI console using your OpenShift credentials.
- In the left navigation menu, click Data Science Projects.
- In the Data Science Projects page, click Create data science project.
- Enter a project Name in the Create data science project panel and click Create.
- Once your new data science project loads, click Create a workbench.
- In the Create workbench dashboard, enter the details for your workbench. Including the Name, Notebook image and Deployment size (figure 5). You also have the option to set Persistent storage and Amazon S3 data connection. Click Create workbench.

Figure 5. Create a new data science workbench in OpenShift AI.
- From your project page, click the Workbenches tab and verify that the status of your new workbench is showing as Running.
- Click Open to access your new workbench. You will be required to provide on OpenShift credentials to log in.
- After authenticating, you will gain access to your JupyterLab IDE (figure 6).
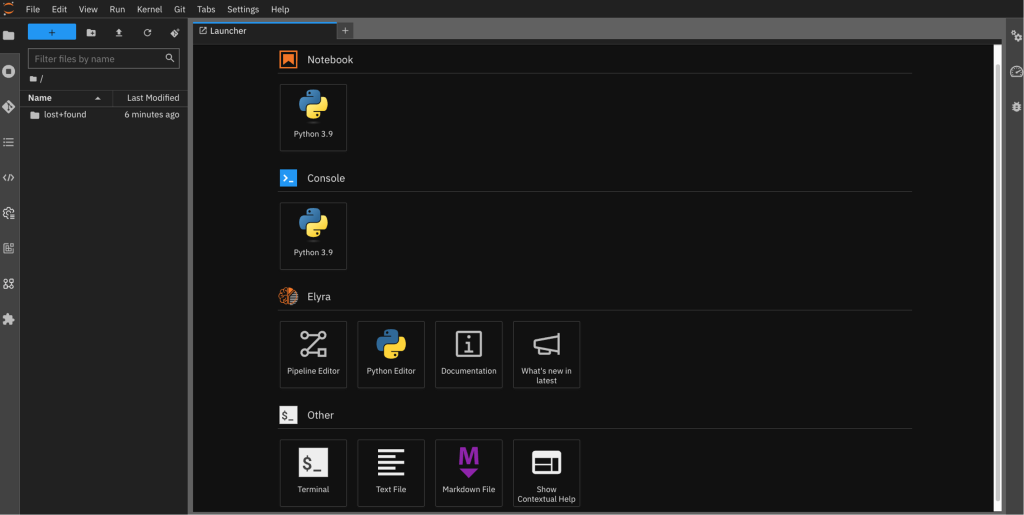
Figure 6. OpenShift AI workbench JupyterLab IDE.
With the OpenShift AI operator installed and your Data science cluster and Workbench ready you can now move on to the exciting part building and training your AI models.
Cleanup
For the final step, it’s important to clean up any resources you’ve deployed to avoid unnecessary costs and keep your environment clean.
If you have completed the implementation, including the prerequisites to deploy a ROSA cluster, follow these steps to delete the ROSA cluster.
Connect to your bastion host, and run the following steps to delete the OpenShift AI installation, including ROSA. This avoids incurring future charges on your AWS account:
$ rosa delete cluster -c $CLUSTER_NAME --yes --region $AWS_REGION
$ rosa logs uninstall -c $CLUSTER_NAME --watch
Once the cluster is uninstalled, remove the operator-roles and oidc-provider, as informed in the output of the rosa delete command. For example:
$ rosa delete operator-roles -c <OPERATOR_ROLES_NAME> -m auto -y
$ rosa delete oidc-provider -c <OIDC_PROVIDER_NAME> -m auto -y
Summary
Red Hat OpenShift AI on AWS offers a robust platform for deploying and managing AI/ML workloads. By integrating OpenShift’s container orchestration with AWS’s scalable infrastructure, it helps enterprises enhance their AI capabilities and drive innovation. You can choose between the managed ROSA service or a self-managed deployment based on your needs.
In this blog, you learned how to deploy OpenShift AI on AWS, covering the integration with AWS services and how to set up Data Science Clusters and Workbenches. Visit the AWS Marketplace to find the best fit for your organization and start leveraging OpenShift AI to advance your AI/ML projects.
Visit the Red Hat OpenShift offers on the AWS Marketplace:
Further Content
- Red Hat OpenShift AI official documentation
- Watch this video to understand more about Basics of OpenShift AI
- Watch this video to understand more about Red Hat OpenShift AI overview
- Watch this Red Hat OpenShift AI Demo
- Red Hat Solutions on AWS
- Red Hat OpenShift Service on AWS (ROSA) YouTube playlist
- OpenShift Virtualization on Red Hat OpenShift Service on AWS (ROSA)
- Fine-grained IAM roles for Red Hat OpenShift Service on AWS (ROSA) workloads with STS
- Benefits of OpenShift with STS
- Red Hat OpenShift Service on AWS: private clusters with AWS PrivateLink
- How to create a ROSA cluster with STS
- For customers exploring Red Hat OpenShift Platform Plus which includes components like Red Hat OpenShift Container Platform, Red Hat Advanced Cluster Management for Kubernetes, Red Hat Advanced Cluster Security, Red Hat OpenShift Data Foundation and Red Hat Quay.