AWS for M&E Blog
Monetize audio-only content with AWS Elemental MediaTailor
Introduction
This how-to blog post discusses how to monetize audio-only content such as podcasts and radio/talk shows on AWS by preparing the source for streaming with AWS Elemental MediaConvert and using Amazon CloudFront as a content delivery network (CDN) to deliver the content securely and with low latency. AWS Elemental MediaTailor is then used for server-side ad insertion on the resulting audio-only content.
During content creation, most podcasters record their shows using an external recorder and a high quality, uncompressed format such as a .WAV file and then export the audio to a stereo .MP3 file for distribution. MediaConvert accepts both formats. For this how-to, we will use an .MP3 file that has already been converted from its uncompressed format.
MediaConvert will then convert this source file into HTTP Live Streaming (HLS) format. HLS creates adaptive bitrate files (the client device and server dynamically detect the internet speed of the user and adjust audio quality accordingly). HLS does this by chopping up audio into 10 second segments. For this use case, we only use one bitrate (128 kbps), but a common use case is three bitrates: 64 kbps, 128kbps, and 256kbps where the first and latter bitrates are outlier cases around audio quality. Note: MediaConvert also supports these input/output formats for audio-only conversions.
CloudFront distributes these HLS files so that end users get the best experience in terms of latency and also for security so that the Amazon Simple Storage Service (Amazon S3) bucket can continue to block public access to its contents.
MediaTailor will be used for ad insertion and supports Video Ad Serving Template (VAST) and Video Multiple Ad Playlist (VMAP) responses from ad decision servers. In this example, we will use a VAST response. For configuring a VAST response or for additional ad insertion information, view the documentation here.
How to prepare audio source content using AWS MediaConvert
Upload the audio source content to an Amazon S3 bucket and create a folder for MediaConvert HLS output. In this example, the source file is a 256 kbps .MP3 titled “PartyPromo” and the created folder is titled partypromo_hls (this contains the outputted HLS files from MediaConvert).

Figure 1: Objects within an Amazon S3 Bucket
Once the source file is uploaded to an Amazon S3 Bucket, convert that file to an HLS format for streaming. The settings selected are based off minimum Apple Podcast Audio Requirements: 128 kbps, 44.1 KHz stereo audio file. To do so, navigate to MediaConvert and then create a job.

Figure 2: AWS Elemental MediaConvert service page
When the Create a job screen displays, enter the appropriate input/output information. Within the inputs section, for Input file URL, browse Amazon S3 and select your source file. You will also Remove video selector from Input section. Keep the rest of the default settings in the Inputs section.

Figure 3: AWS Elemental MediaConvert job input tab
In the Output groups section, you add a new Apple HLS output group.

After creating a new output group, set Custom group name and Destination (where your HLS files will be delivered).
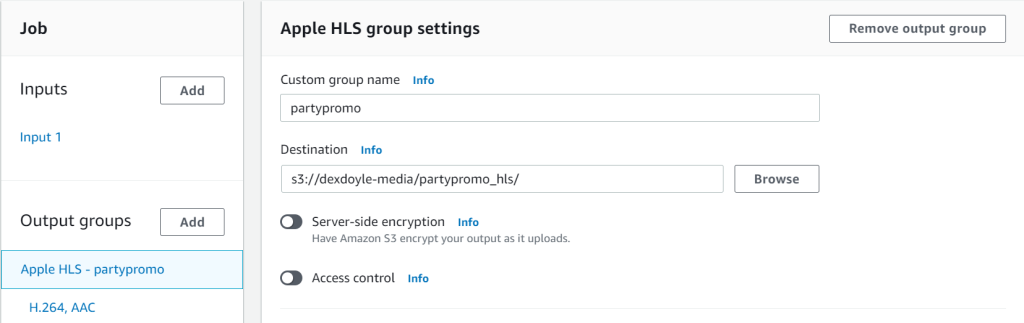
Figure 4: AWS Elemental MediaConvert job – Apple HLS group settings
Scroll down and expand the Advanced section. For Manifest duration format, select floating point.

Figure 5: AWS Elemental MediaConvert job output – advanced settings
Manifest duration format: By default, the manifest duration format is set to Integer, which allows viewers to play the asset with HLS players version 2 (EXT-X-VERSION) and later. Setting the manifest duration format to Floating point forces viewers to play the asset with HLS players version 3 and later (which is the minimum requirement for AWS MediaTailor).
Next, click on the output underneath the Apple HLS output group to modify its settings. For Name modifier, put the name of your source file and Segment modifier. It can be the bitrate, which is _128 in this example.

Figure 6: AWS Elemental MediaConvert job output settings
Under Encoding settings, click Remove video since this is an audio-only file.
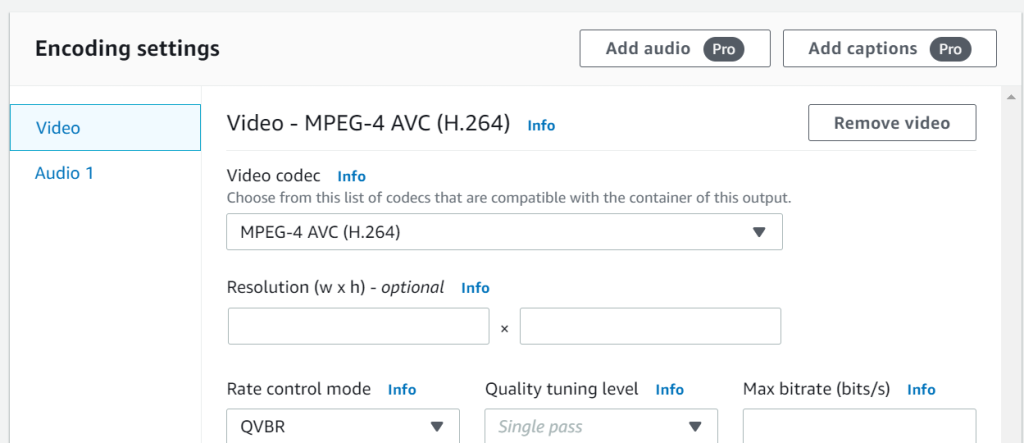
Figure 7: AWS Elemental MediaConvert encoding settings (video tab)
This changes the Output settings view. Under the Audio section, for Audio track type, select Audio-Only variant stream.

Figure 8: AWS Elemental MediaConvert job output (audio tab)
Under Encoding settings, for the Audio 1 output, select the appropriate Sample rate (Khz) and Bitrate (kbit/s), For this example, the requirements are to change the Sample rate to 44.1 (how the .mp3 was recorded) and the Bitrate to 128 (what is needed for the podcast output). Keep the default values for the rest of the settings.

Figure 9: AWS Elemental MediaConvert Encoding Settings (Audio Tab)
Before creating the job, click underneath Job Settings and select AWS integration. If you have already used MediaConvert for Service role control, you may see “Use an existing service role”. You can use this role if it has the appropriate Amazon S3 permissions for your input/output locations. If this role does not have the correct permissions, you will see a job failure and error message.

Figure 10: AWS Elemental MediaConvert job settings (AWS integration tab)
If this is your first time using MediaConvert, you can create a new service role with either full permissions or limited permissions where you define the input/output locations for the source file and the output files. If you keep the default role name, MediaConvert will use the same role for future MediaConvert jobs. In this example, a new service role with limited permissions is created and renamed so it does not become the default role.

Figure 11: AWS Elemental MediaConvert job service role creation
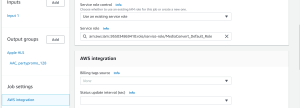
Figure 12: AWS Elemental MediaConvert job service role creation
Once you have a role created/selected, click the Create button on the bottom right of screen.
Figure 13: AWS Elemental MediaConvert create job
This will submit the job and takes a few minutes to complete. In this example, the source file was 40 minutes long and took approximately 4 minutes to complete. If you refresh, you will see the status move from SUBMITTED to PROGRESSING to COMPLETE.

Figure 14: AWS Elemental MediaConvert job summary
Upon completion of the MediaConvert job, the output files will be in the folder you selected during the job settings. It should contain many small files and one manifest file that ends with .m3u8.
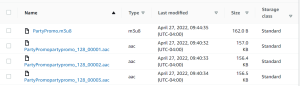
Figure 15: HLS files created From AWS Elemental MediaConvert job
Please note your manifest file name since this is how you will test that the source file was converted properly.
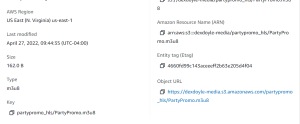
Figure 16: HLS Manifest File Additional Information
How to configure a CloudFront distribution for access to the manifest and streaming files
First, select CloudFront in the AWS Console and then click on Create distribution.
For the Origin domain, select the Amazon S3 bucket that contains the MediaConvert output files. Next, set the Origin path to the folder that contains the manifest files. Provide a Name for the origin.
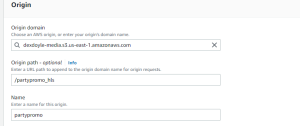
Figure 17: Amazon CloudFront origin settings
For S3 bucket access, select Yes use OAI (bucket can restrict access to only CloudFront) and then create a new OAI (if you do not have an existing one for this location). Under Bucket policy, select Yes, update the bucket policy to have CloudFront do this automatically and allow read access to the OAI.
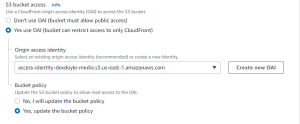
Figure 18: Configuring Amazon CloudFront S3 bucket access
The other settings can be kept as default or modified based on user preferences. Once you review the other settings, you can then click on Create distribution.

Figure 19: Amazon CloudFront create distribution
The CloudFront distribution process takes a couple of minutes to complete.

Figure 20: Amazon CloudFront Distribution Information
Once completed, you can test the manifest file that ends in .m3u8 by appending the name to the CloudFront distribution into a service like JWPlayer Steam Tester.
Your web URL to your audio-only content will be your CloudFront distribution with your file name appended. After ensuring the file is accessible through CloudFront, insert an ad using MediaTailor.
How to configure ad insertion using AWS Elemental MediaTailor
Within the AWS Console, go to AWS Elemental MediaTailor and then click on Create configuration.

Figure 21: AWS Elemental MediaTailor service page
For Name, provide an identifier of your choice. For Content source, include the CloudFront distribution that hosts the manifest files. For Ad decision server, use your own or this example from Google (It will insert a piano ad at the beginning of your source).
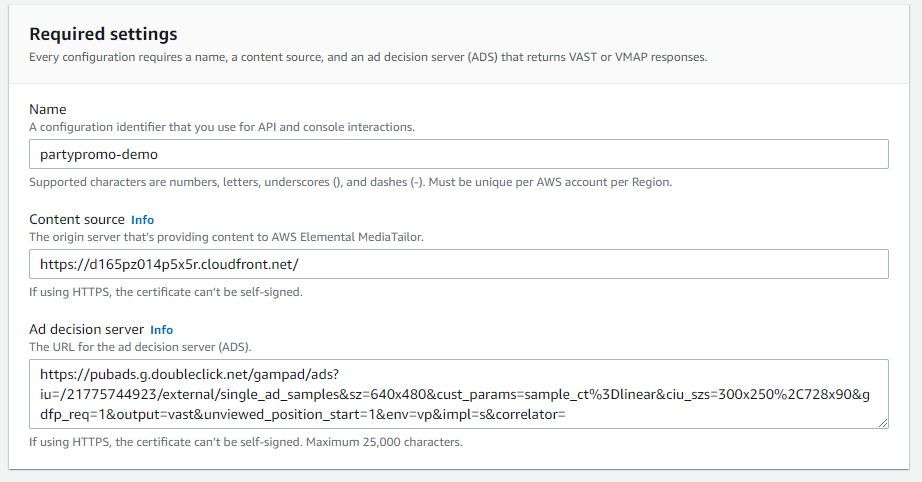
Figure 22: AWS Elemental MediaTailor configuration required settings
Next, click on Create configuration.

Figure 23: AWS Elemental MediaTailor Content & origin details
To test that the ad configuration is successful, copy the HLS playback prefix and append the .m3u8 file name previously created from MediaConvert. You can this test in a service like JWPlayer Stream Tester
You will know you were successful in inserting an ad when you test your link and are able to hear the piano ad playing at the beginning for the first 10 seconds of your audio. If you use a different ad server, then success can be measured based off the ad server settings (for example, an ad insertion every 5 minutes).
Conclusion
In this blog post, you learned how to monetize audio-only content with AWS Elemental MediaTailor using ad insertion. We walked through the process of using AWS MediaConvert to prepare an audio-only file, Amazon CloudFront to create a streaming distribution, and AWS Elemental MediaTailor for ad insertion.
Further Reading
Using AWS Elemental MediaConvert to create outputs with only audio