Microsoft Workloads on AWS
How to create an Amazon EC2 AMI usage and billing information report
Have you been tasked with identifying which Amazon Machine Images (AMI) are in use in your organization and how they are being billed? Have you researched several solutions but find that you can’t get the exact data you need or that you don’t have access to the payer-level billing data? Then this solution is for you!
There are many reasons an organization might need to know which AMI an Amazon Elastic Compute Cloud (Amazon EC2) instance is using or which AWS billing information field is in use. An organization might be working on a cost optimization and compliance initiative, or considering Bring Your Own License (BYOL) scenarios for Windows Server and SQL Server workloads, or gathering a multi-region, multi-account layout of their running instances.
In this blog post, we will show you how to use the Amazon EC2 APIs and AWS Systems Manager Automation to create a central reporting tool for your organization. This pattern can then be used to create customized reports. Unlike alternative methods you may have seen, this solution does not require data customization or privileged access to billing data, and you can output the billing field.
Workflow
For this solution, you will be using Automation to execute Python code that extracts metadata from the Amazon EC2 API about running Amazon EC2 instances across all regions and accounts in your organization and then stores the output in a CSV file in an Amazon Simple Storage Service (Amazon S3) bucket.
This solution uses the following AWS services:
- Amazon S3
- Automation, a capability of AWS Systems Manager
- AWS Identity and Access Management (IAM)
- AWS Lambda
- Amazon EventBridge
- AWS CloudFormation
Prerequisites
Designate a central account and region to run your Automation documents from. This could be a shared services account. To learn why this is needed, please refer to Running automations in multiple AWS Regions and accounts.
Solution overview
We are going to share two deployment methods, depending on your use case. The first method is focused on gathering information for a single account and all of its enabled regions. The second method is for customers looking for organizational visibility.
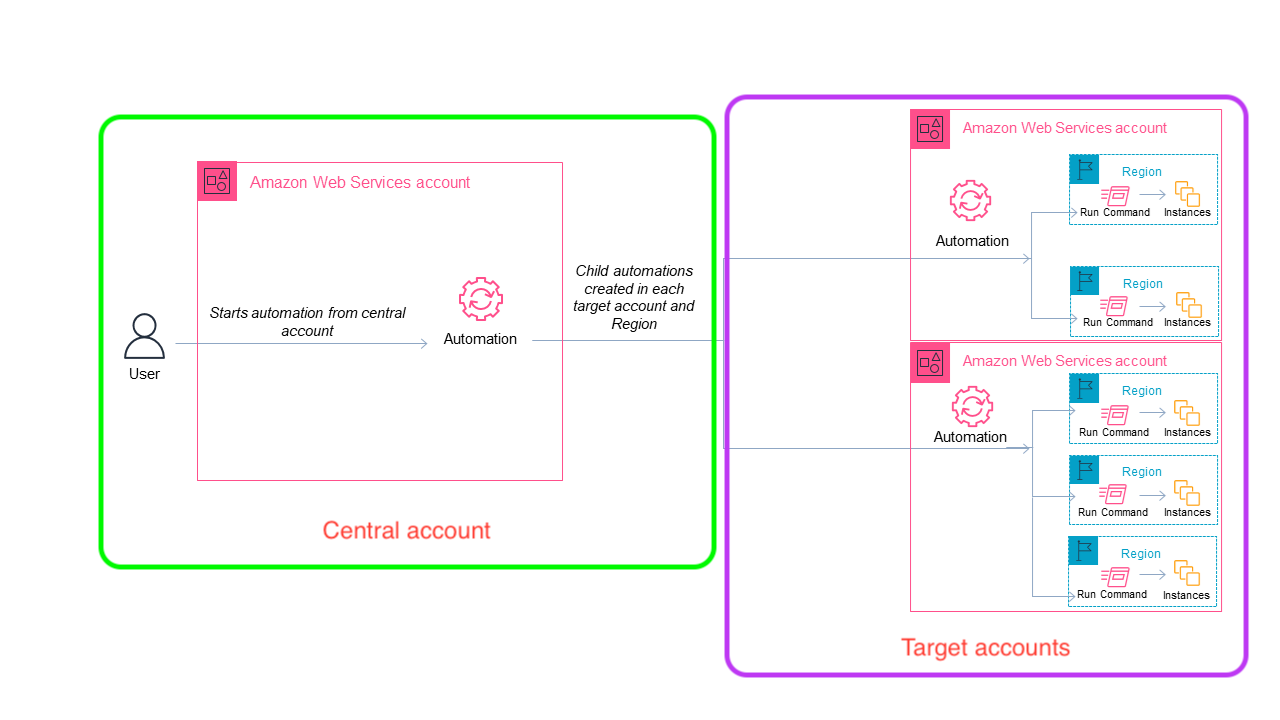
Figure 1:multi-account multi-region automation
Method 1: Single account deployment
If you are looking to gather this information within a single AWS account, follow these steps to deploy the solution.
1. Deploy the solution
- Download the CloudFormation template.
- Navigate to the CloudFormation console in the AWS account you would like to generate the report in.
- For Create Stack, choose With new resources (standard).
- For Template source, choose Upload a template file. Choose Choose file and select the template you downloaded in step 1. Choose Next.
- For Stack name, enter a stack name (such as ec2-report-single-account ).
- For Local Account, choose true. Leave all other parameters at their default values. Choose Next.
- In the Configure stack options page, choose Next.
- Select I acknowledge that AWS CloudFormation might create IAM resources with custom names, then choose Submit.
The CloudFormation template creates an Amazon S3 bucket, Automation document, and IAM role for Automation. After the template has deployed, choose Outputs and note the values of the AWSSystemsManagerAutomationExecutionRole, S3Bucket, and SystemsManagerAutomationDocument outputs, as shown in Figure 2.
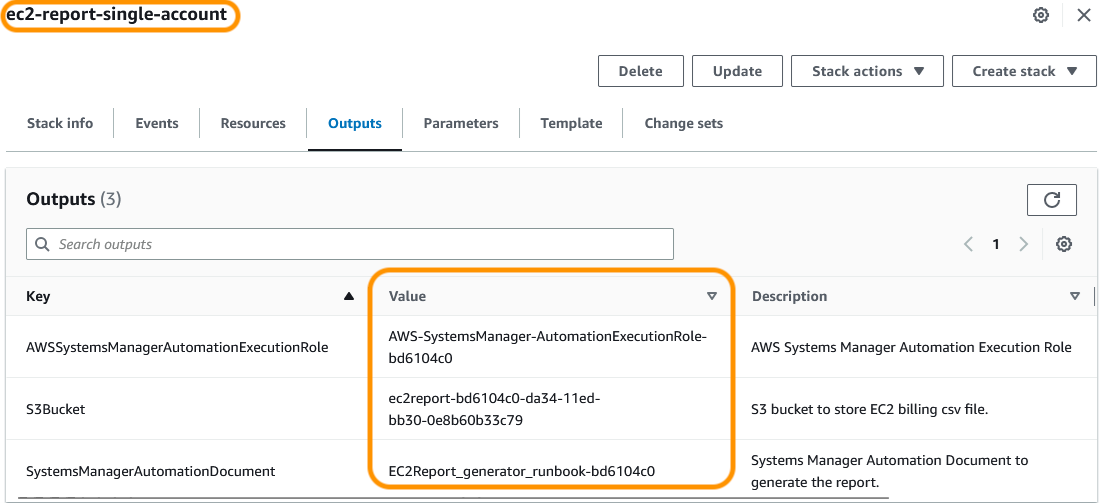
Figure 2: Single Account CloudFormation outputs
2. Run the report
- Navigate to Systems Manager Automation.
- Select Execute Automation.
- Choose Owned by me, then select EC2Report_generator_runbook. Choose Next.
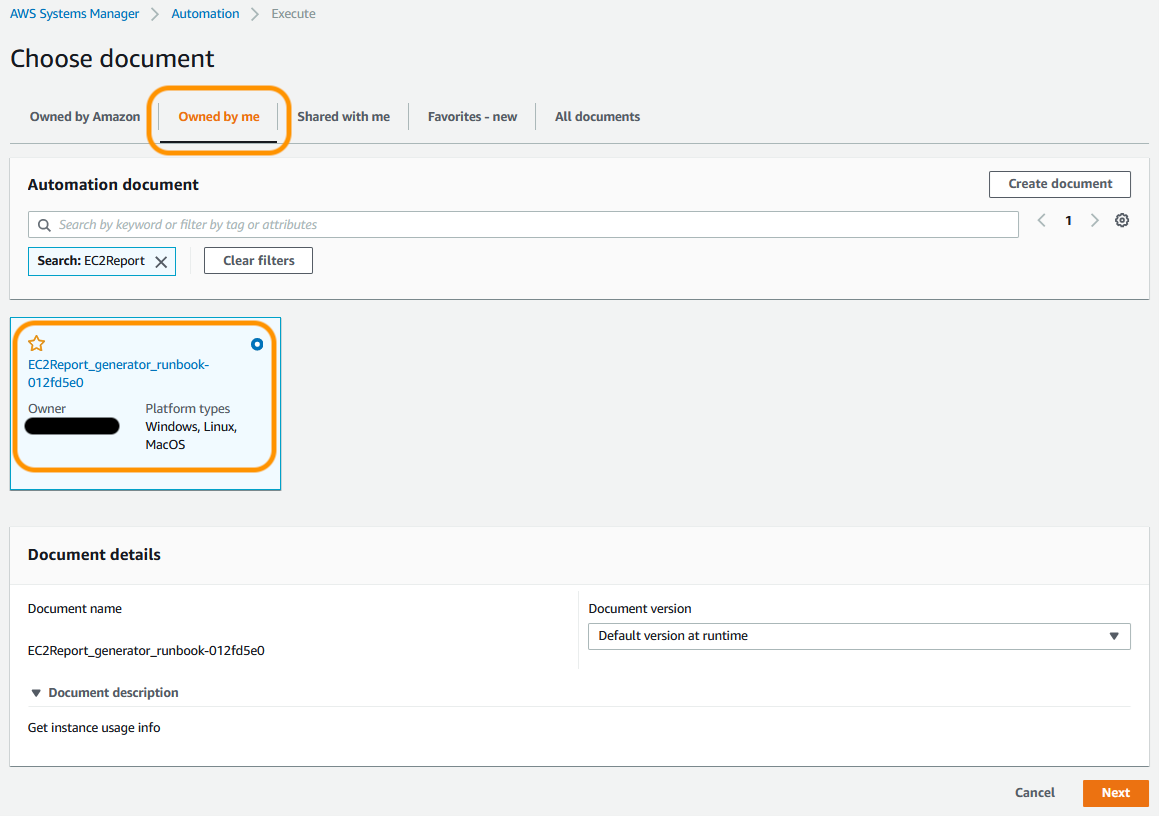
Figure 3: Select the Automation Document for Single Account execution
- Select Simple execution.
- In the Input Parameters area, for AutomationAssumeRole, enter the value of the AWSSystemsManagerAutomationExecutionRole output from the CloudFormation stack (see Figure 4). For Amazon S3 bucket, enter the value of the S3Bucket output from the CloudFormation stack (this will be the default value).
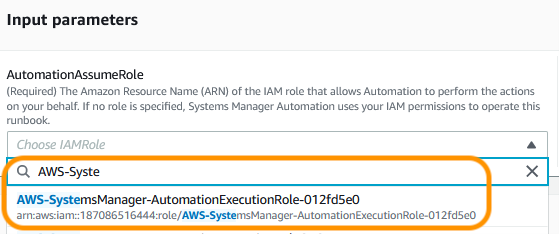
Figure 4: Select the Automation Assume Role
- Choose Execute.
The Automation document will now loop through all regions within the current account. Select the Step ID under Executed Steps and note the Amazon S3 bucket and CSV file name in the OutputPayload data.
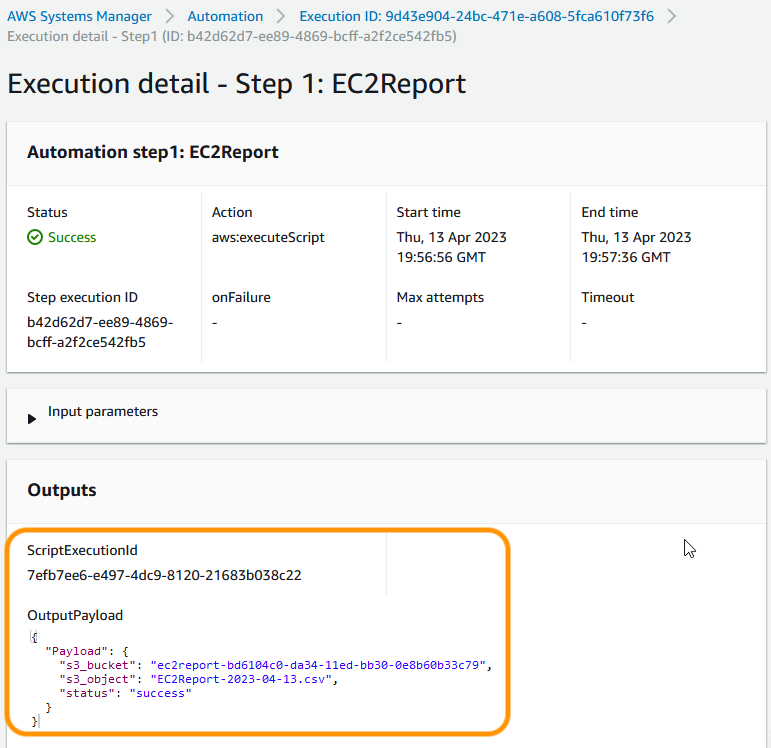
Figure 5: Systems Manager Automation execution output
Navigate to the S3 console, find the bucket, and download the EC2 Report CSV. The name includes the date the report was generated.
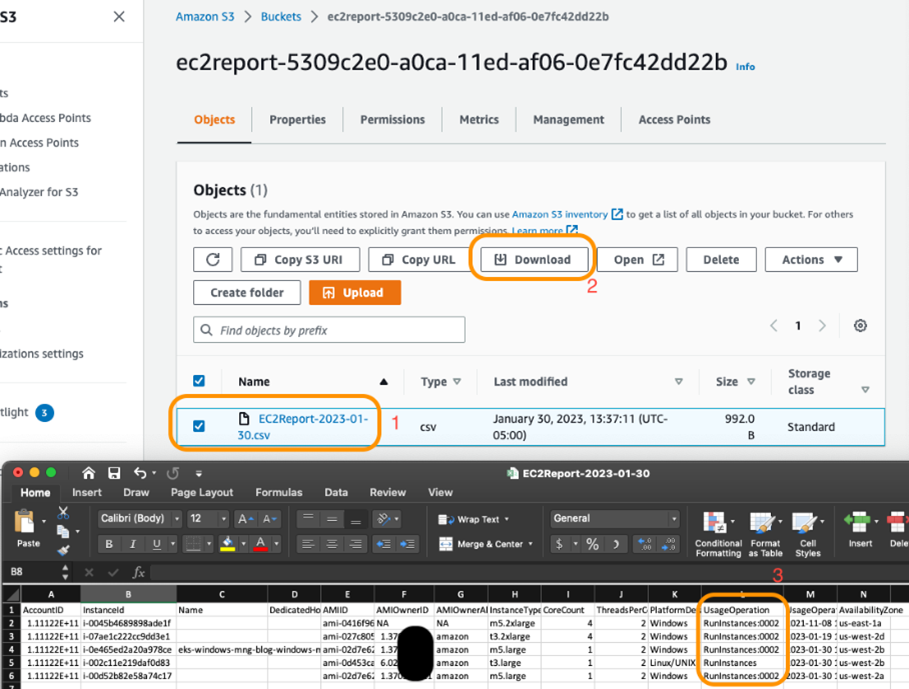
Figure 6: EC2 Report generation output
Method 2: AWS Organizations multi-account, multi-region deployment
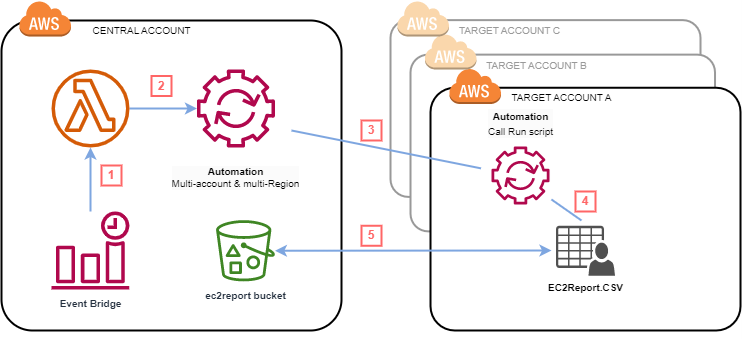
Figure7: Multi-account, multi-region Automation
Follow these steps to deploy this solution in an AWS Organization to gain visibility across multiple accounts and regions. In this post, we use the following concepts and terminology to describe the implementation of the solution:
- Management account: This is your AWS Organizations management account. You will use this account to run the CloudFormation StackSets that will target all accounts in the organization. This approach simplifies the process of creating the IAM roles in the target account. If you are using Delegated Admin for CloudFormation StackSets, your management account would be your Delegated Admin account.
- Central account: This is an AWS member account that you designate as your AWS Systems Manager Automation execution account. This account will use a Lambda function to trigger Automation documents. This account will have the Amazon S3 bucket where the report results are stored and will be used to invoke the target account IAM roles. Optionally, you can schedule the execution using Amazon EventBridge.
- Target account: The Automation will execute inside these accounts. The output will be written to the Amazon S3 bucket in the central account.
The first step is to create an Amazon S3 bucket, Automation document, Lambda function, Amazon EventBridge rule (optional), and an IAM role that will administer the Automation document in the central account using the CloudFormation template.
The second step is to configure the AWS Organizations management account to use CloudFormation StackSets. The process will deploy the IAM execution role in each target account in the organization. Alternatively, you could use the CloudFormation template to manually deploy the IAM execution role in each target account. However, we won’t be outlining these manual steps in this solution.
1. Configure CloudFormation in the central account
- Download the CloudFormation template.
- Navigate to the CloudFormation console in the central account.
- For Create Stack, choose With new resources (standard).
- For Template source, choose Upload a template file. Choose Choose file and select the template you downloaded in step 1. Choose Next.
- For Stack name, enter a stack name (such as ec2-report-multi-account ).
- In the Parameters area, do the following:
- For Single Account, leave it at the default value of false.
- For Central AWS Account under Central Account area, choose true.
- For Central AWS Account ID, enter the account ID of the central account.
- For Organization ID, enter the AWS Organization ID.
- For Target Accounts and OUs for Systems Manager multi-account multi-region automation, enter the IDs of the target accounts and organizational units (OUs), separated by commas. If you enter an OU, the Automation will run in every account in that OU. If you need to look up OU IDs, follow these steps:
- In a new tab, navigate to the Organizations console and select AWS Accounts.
- Copy the ID of the organizational unit that contains the target accounts. Note: You will not be able to target OUs that have nested OUs.
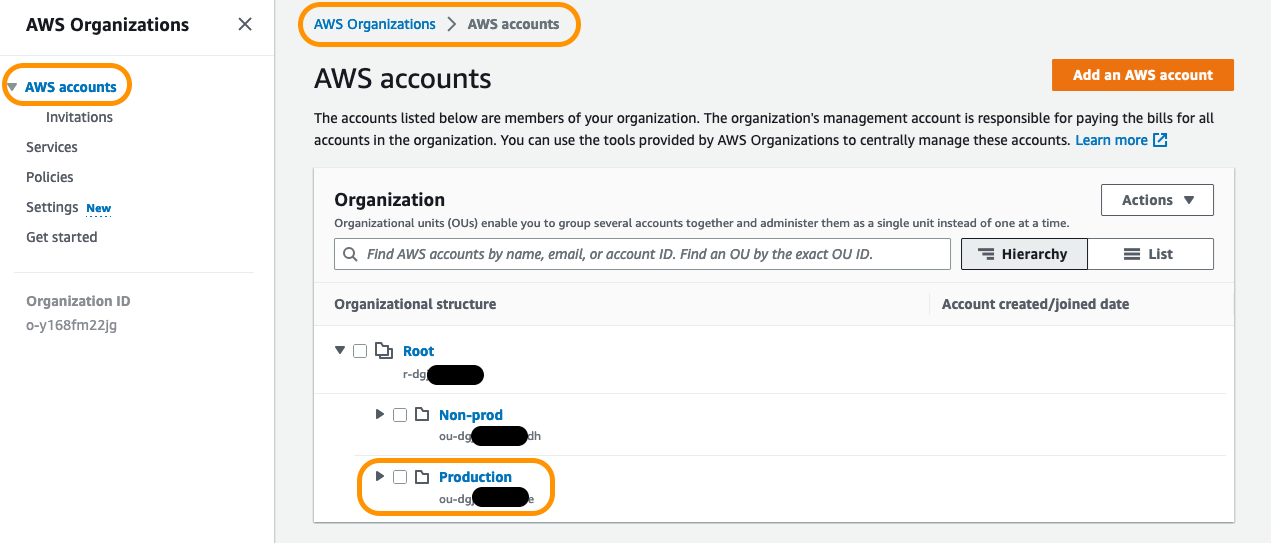
Figure 8: AWS Organizations view to gather Organization ID and OU information
-
- (Optional) If you want to run the report on a repeating schedule:
- For RunOnSchedule, choose true.
- For EventBridgeRuleSchedule, enter a cron or rate expression. Please refer to the CloudFormation parameter description for examples.
- In the Target Account(s) area, leave all parameters at their default values. Choose Next.
- (Optional) If you want to run the report on a repeating schedule:
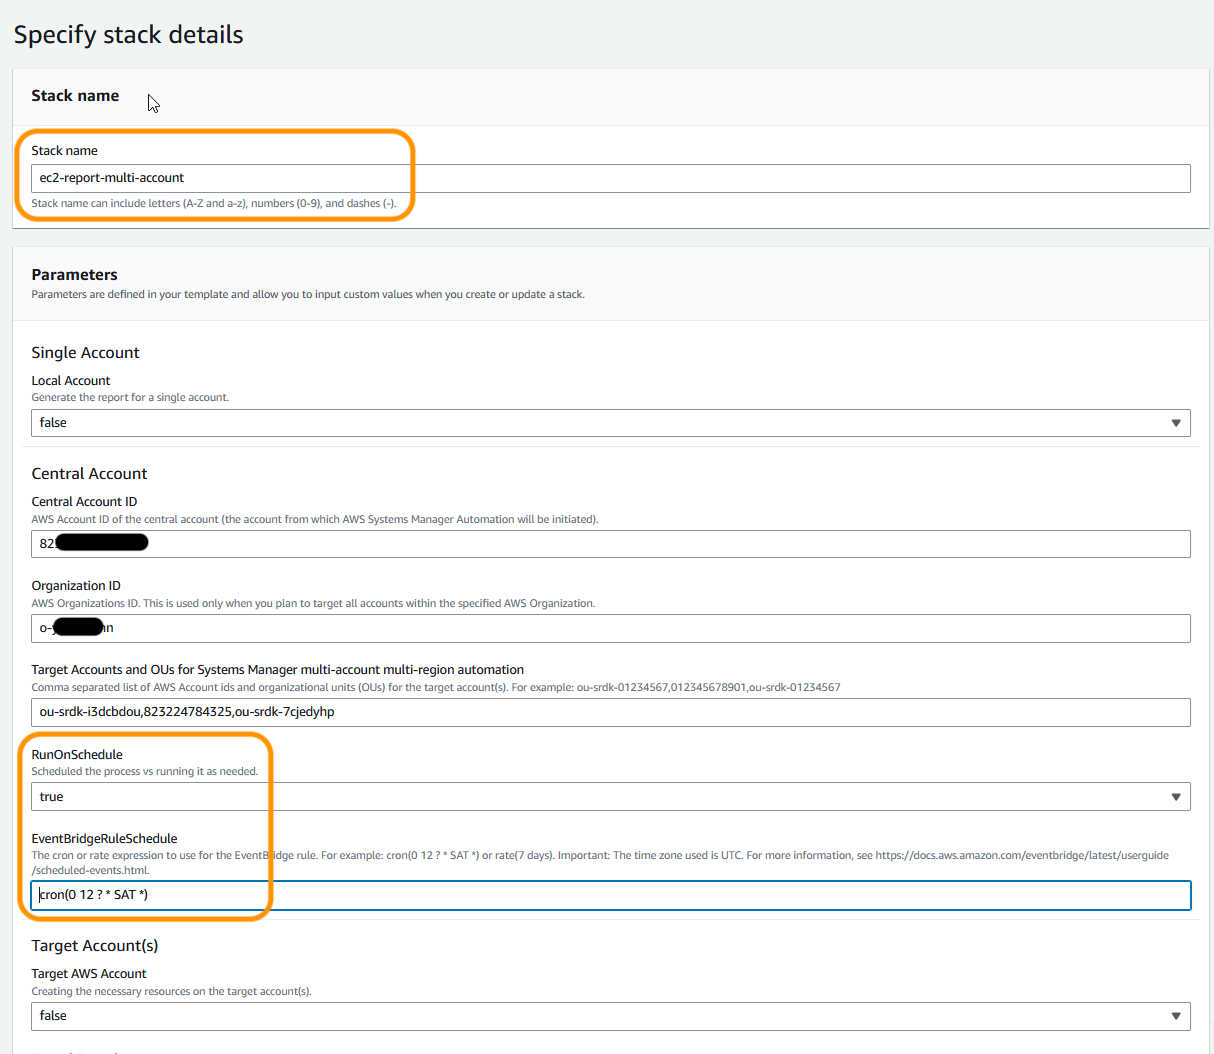
Figure 9: Specify stack details
- In the Configure stack options page, choose Next.
- Select I acknowledge that AWS CloudFormation might create IAM resources with custom names, then choose Submit.
- Navigate back to the CloudFormation console, select your new Stack, and choose Outputs.
- You will use these values on the target account(s).
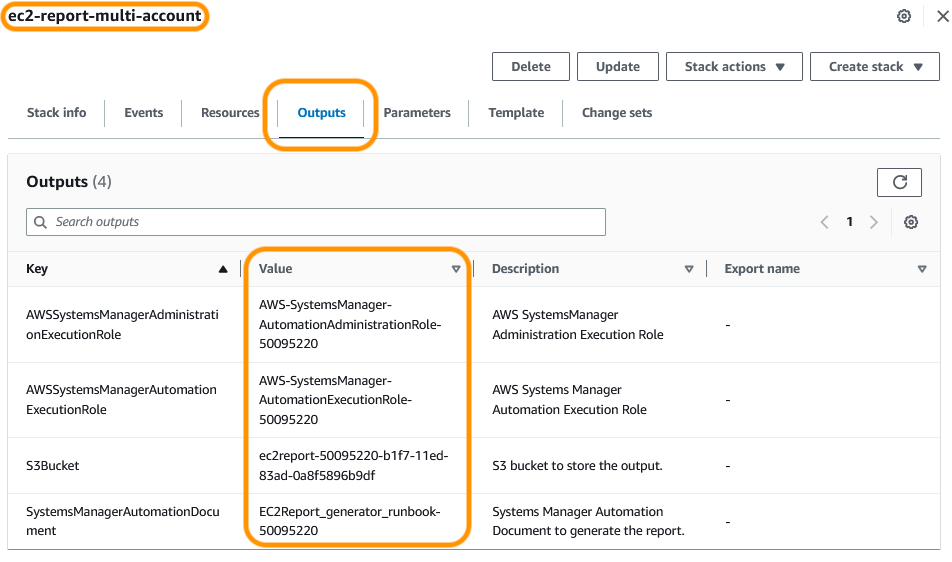
Figure 10: EC2 report multi-account CloudFormation outputs
2. Configure CloudFormation StackSets in the management account
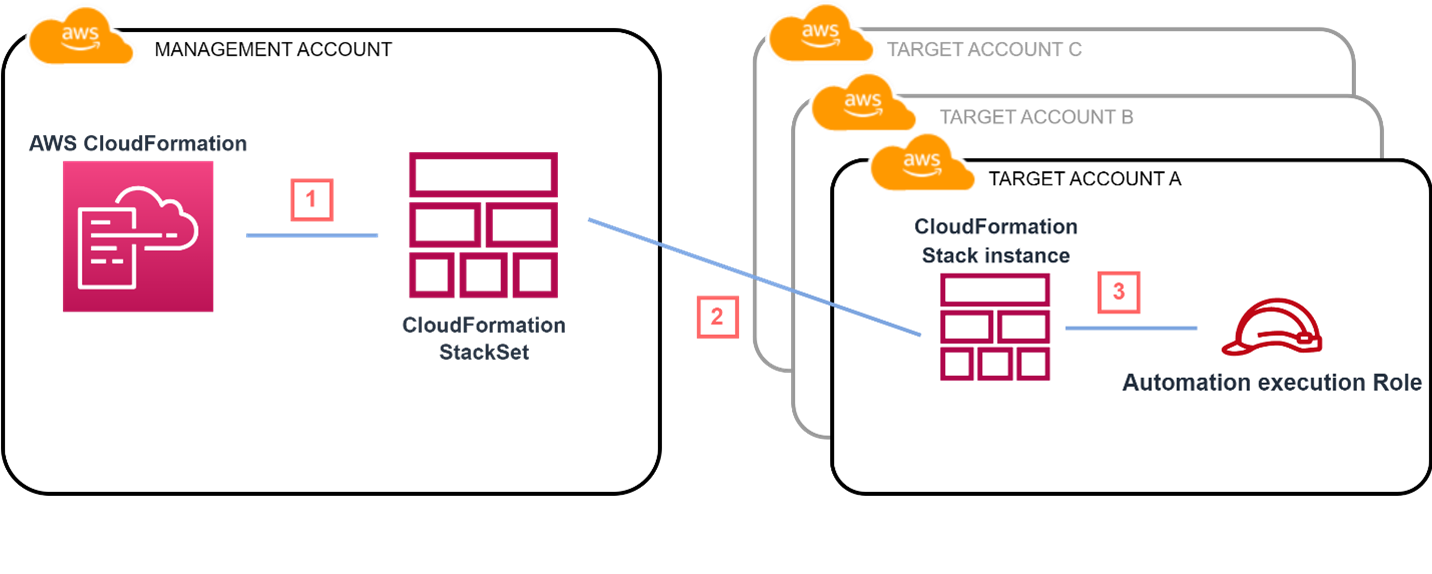
Figure 11: CloudFormation StackSet visualization
You will use the same CloudFormation template you downloaded.
- Navigate to the CloudFormation console in the management account.
- Select StackSets.
- If you haven’t used StackSets before, complete the CloudFormation StackSets prerequisites.
- Choose Create StackSet.
- In the Specify template area, choose Upload a template file. Choose Choose file and select the template you downloaded. Leave all other parameters at their default values. Choose Next.
- In the Specify StackSet details page, do the following:
- For Stack name, enter a stack name (such as ec2-report-multi-account-stackset ).
- For Single Account, leave it at the default value of false.
- In the Central Account area, leave all parameters at their default values.
- For Target AWS Account, choose true.
- For Central AWS Account ID and Organization ID, enter the values used in the central account stack.
- For Central S3 bucket, Automation Administration Role Name, and Automation Execution Role Name, enter the corresponding output values from the central account stack.
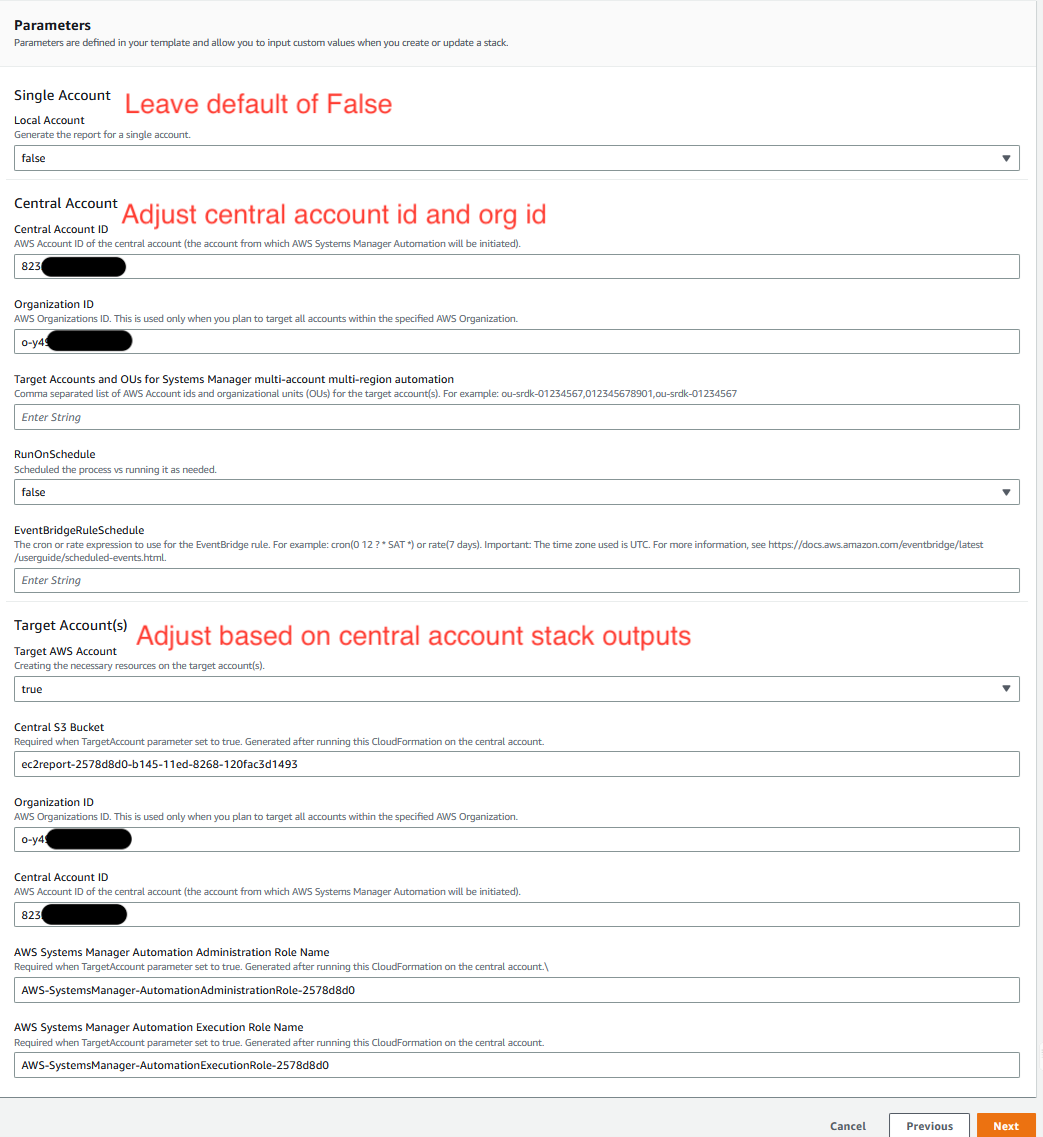
Figure 12: CloudFormation StackSet parameter overview
- Choose Next.
- In the Configure StackSet options page, choose Next.
- In the Set deployment options page:
- Select Deploy new stack.
- For Deployment locations, select Deploy stacks in organizational units.
- For AWS OU ID, enter the same value as Target Accounts and OUs for Systems Manager multi-account multi-region automation.
- For Account filter type, select Difference.
- For Account numbers, enter the central account ID and the management account ID, separated by a comma. This excludes the central and management accounts. (The central account already has the necessary IAM role, and the management account should not run production compute workloads.)
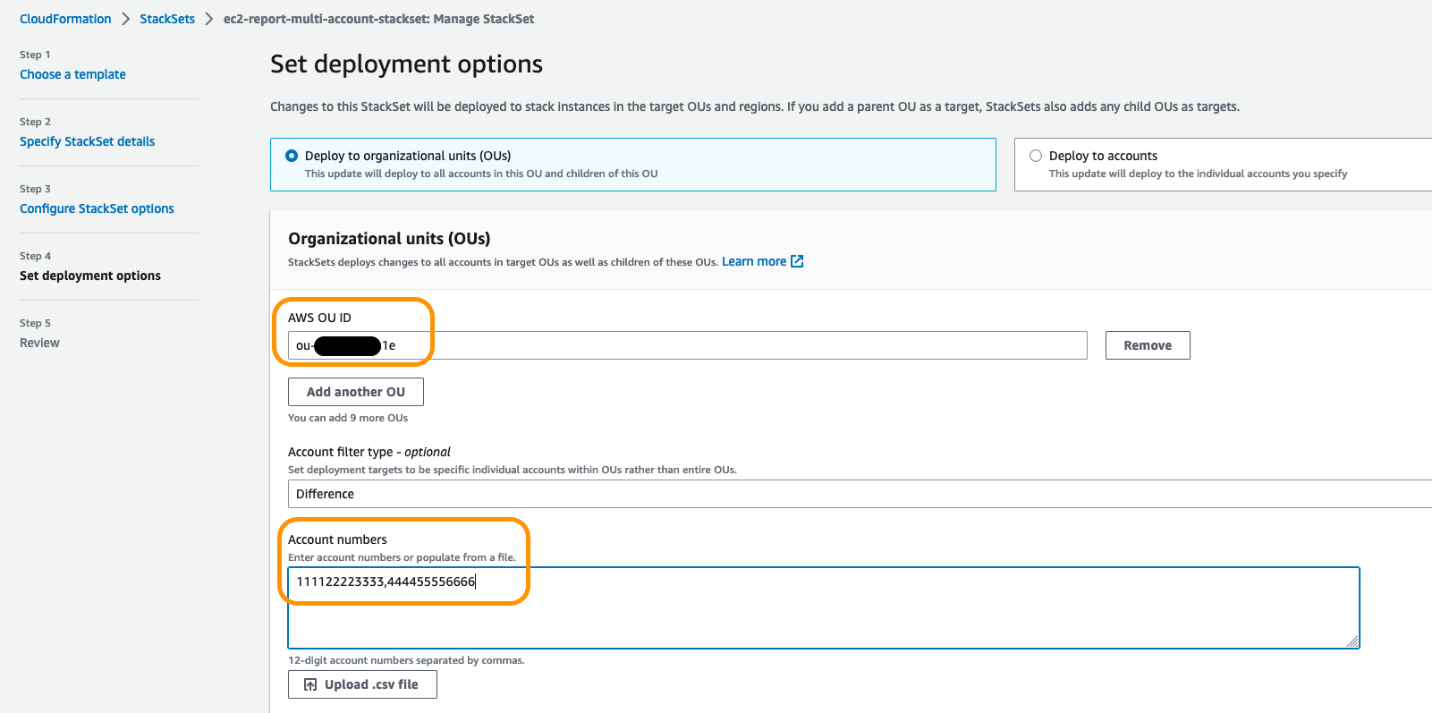
Figure 13: StackSet Deployment options – AWS OUs
-
- For Specify regions, select the region that you used to create the stack in the central account.
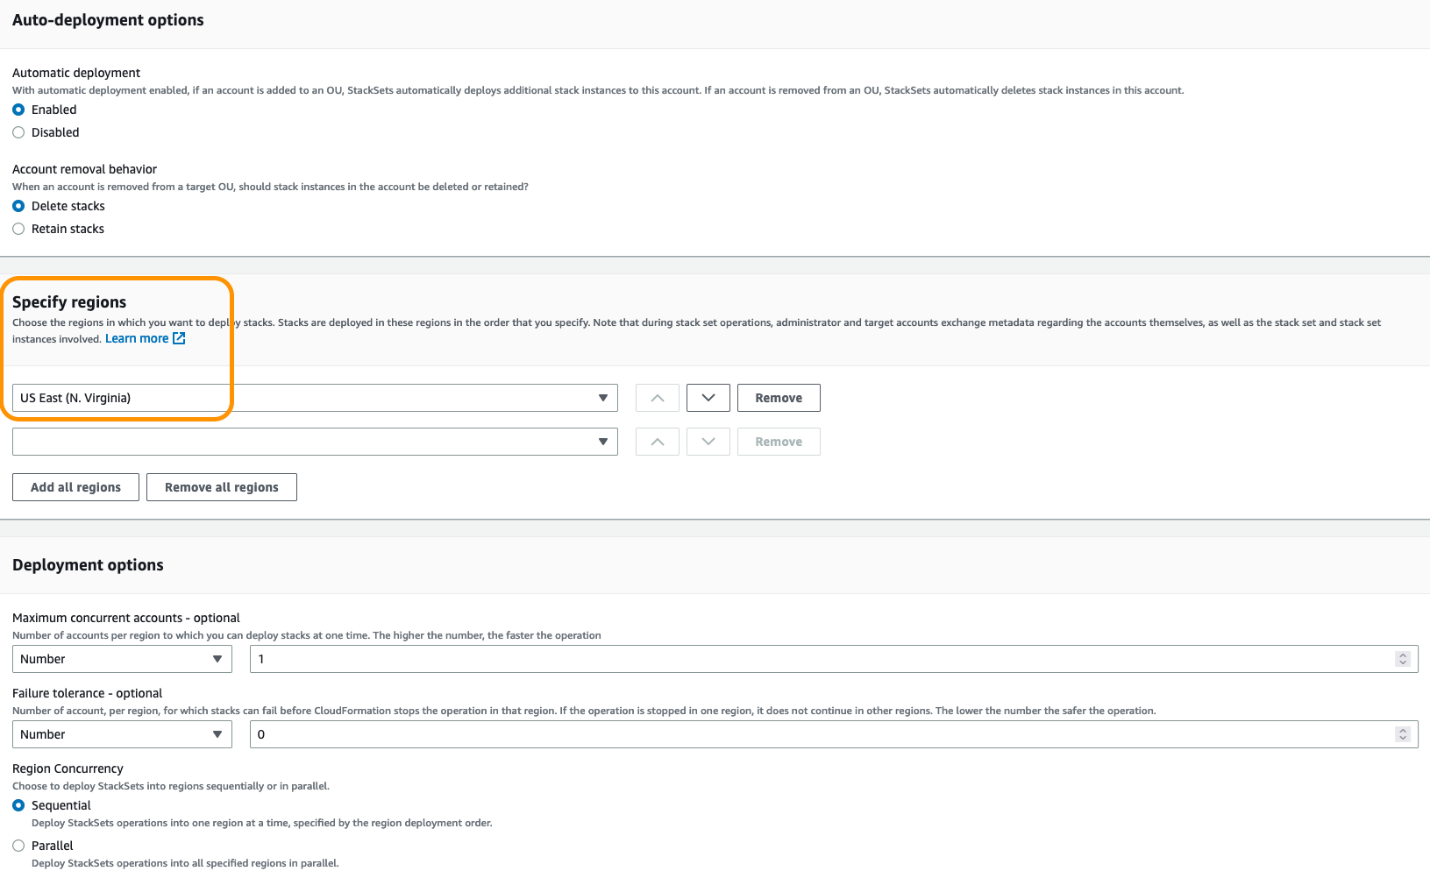
Figure 14: StackSet Deployment options
- Choose Next.
- Select I acknowledge that AWS CloudFormation might create IAM resources with custom names, then choose Submit.
After these steps, the StackSet will now create the necessary IAM role in each target account. To check the deployment status, navigate back to the CloudFormation StackSet console, select the ec2-report-multi-account-stackset, and select Stack instances. Each target account should be listed with a Detailed Status value of SUCCEEDED.
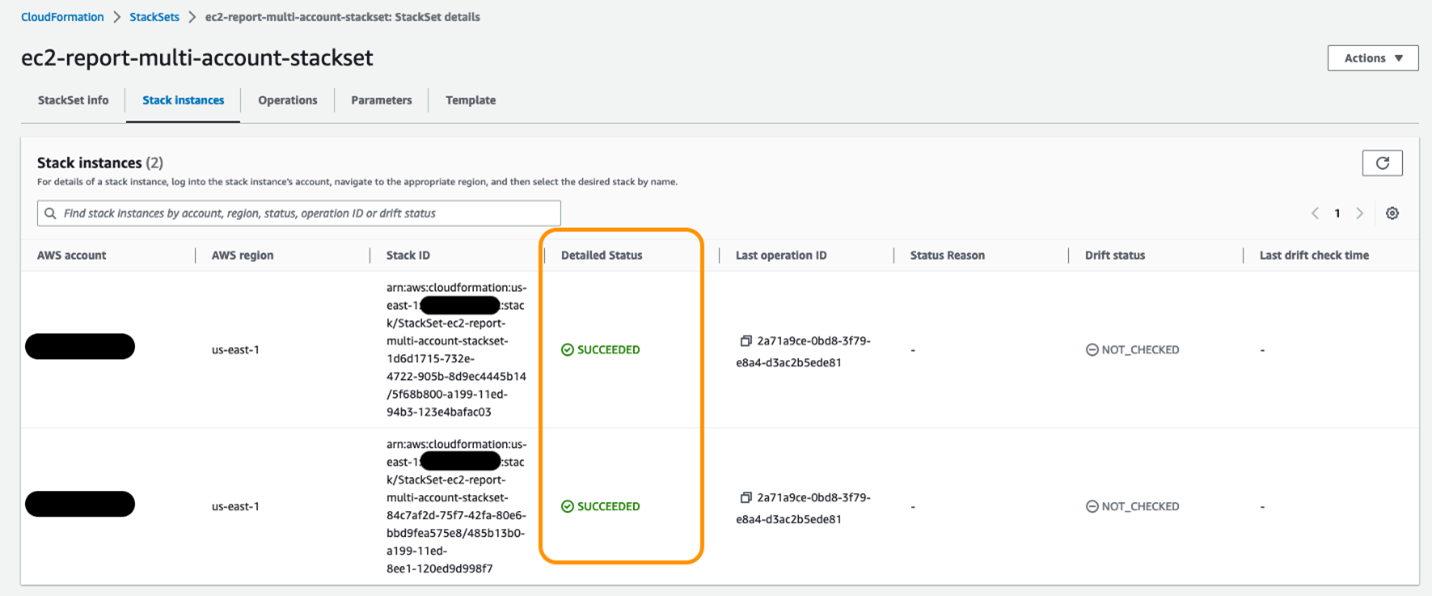
Figure 15: StackSet Deployment options
You are now ready to run the report from the central account. If you selected to configure an Amazon EventBridge schedule, the Lambda will be executed on the schedule you define.
3. Run the multi-account, multi-region Automation runbook in the central account
- Navigate to AWS Lambda Functions in the central account.
- Select the MultiAccountEC2ReportBlog-<randomid> function.

Figure 16: Lambda function that executes the Systems Manager Automation document
- In the Code source area, select Test.
- Choose Create a new event. For Event name, enter testing, then choose Save.
- Choose Test to run the Lambda function. The function runs the Automation document on the central accounts and each target account. In each target account, the Automation document gathers data from all regions.

Figure 17: Lambda successful execution
Working with the output file
After the report is generated, the results from each account and region will be appended to the CSV output file located in the Amazon S3 bucket in the central account (refer to the CloudFormation stack outputs). Within a single spreadsheet, you can filter and sort by account ID, region, billing information field, and guest operating system across your organization.
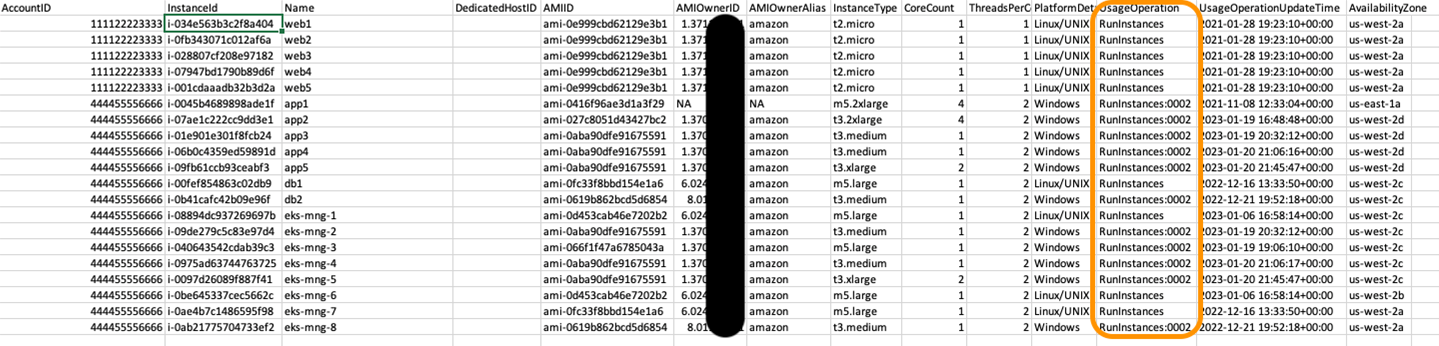
Figure 18: Reviewing the document output
Now when you are asked how AMIs are being billed within your organization, you can easily look at the UsageOperation field that aligns with the appropriate billing information field.
Conclusion
In this blog post, we described a solution that uses Amazon EC2 APIs and AWS Systems Manager Automation to create a centralized report of Amazon EC2 usage.
This solution simplifies retrieving critical operations and billing information from Amazon EC2 instances across many accounts and regions. The report can be customized to include any metadata about Amazon EC2 instances that is important to your organization’s reporting and auditing needs. This multi-account, multi-region reporting design pattern can be applied to virtually any AWS service that you require configuration reports on.
AWS can help you assess how your company can get the most out of cloud. Join the millions of AWS customers that trust us to migrate and modernize their most important applications in the cloud. To learn more on modernizing Windows Server or SQL Server, visit Windows on AWS. Contact us to start your modernization journey today.