Networking & Content Delivery
AWS Site-to-Site VPN now supports IPv6 on the outside IPs
Amazon Web Services (AWS) Site-to-Site VPN is a fully managed service that allows you to create a secure connection between your data center or branch office and your AWS resources using IP Security (IPSec) tunnels. It provides critical connectivity for a variety of workloads: connecting on-premises workloads to the cloud, connecting devices to the cloud, and providing encrypted communication. Site-to-Site VPN is a versatile choice for teams to get quick connectivity. When a VPN tunnel is configured, you must select outside and inside IP addresses. IPv4 was the only choice for both outside and inside IP addresses until 2018. We then released support for IPv6 for inside IP addresses. In July 2025 we expanded this and announced the ability to specify IPv6 for outside IP addresses as well. Users can now connect their IPv6 networks using Site-to-Site VPN connectivity with pure IPv6 addressing, removing the need to do IPv6>IPv4>IPv6 translation.
Benefits of IPv6 support
- Migration to IPv6: With this new announcement, migrating to IPv6 is more direct, allowing users to connect two IPv6 networks using IPv6 only.
- IP exhaustion: Leveraging IPv6 for outer tunnels allows you to save valuable IPv4 IP addresses in an environment where IPv4 is becoming a scarce resource.
- Reduced cost: With IPv6 on outside IPs, you can also reduce cost of connecting two networks without the need to pay for public IPv4 addresses on either side of your tunnels (AWS side and your on-premises side).
- Regulatory and compliance: If you are working in regulated industries such as federal, healthcare, finance, and telecommunications, IPv6 outside addresses allows you to meet requirements for IPv6-only networks.
Configurations supported
IPv6 is only supported when the Site-to-Site VPN terminates on an AWS Transit Gateway or on an AWS Cloud WAN core network edge (CNE). Figure 1 shows an example of an IPv6 Site-to-Site VPN terminating on a Transit Gateway.
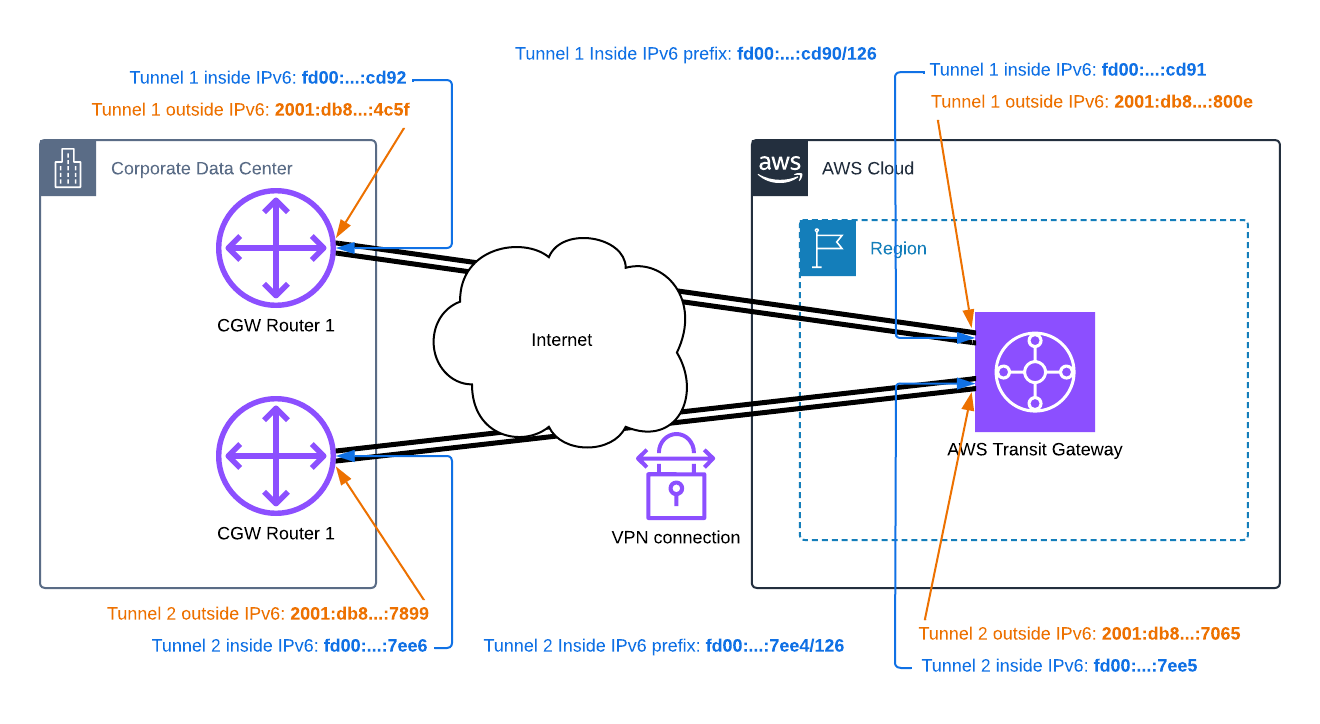
Figure 1: IPv6-only VPN connection to Transit Gateway
Terminating an IPv6 Site-to-Site VPN on a CNE follows the same pattern as the preceding image.
Overview of IPv6 Site-to-Site VPN
To start experimenting with an IPv6 Site-to-Site VPN, download the AWS CloudFormation template and deploy in your chosen AWS Region. The template only needs one parameter: an email address to notify you of any potential outages. The template provisions the following infrastructure (shown in Figure 2) in your account.
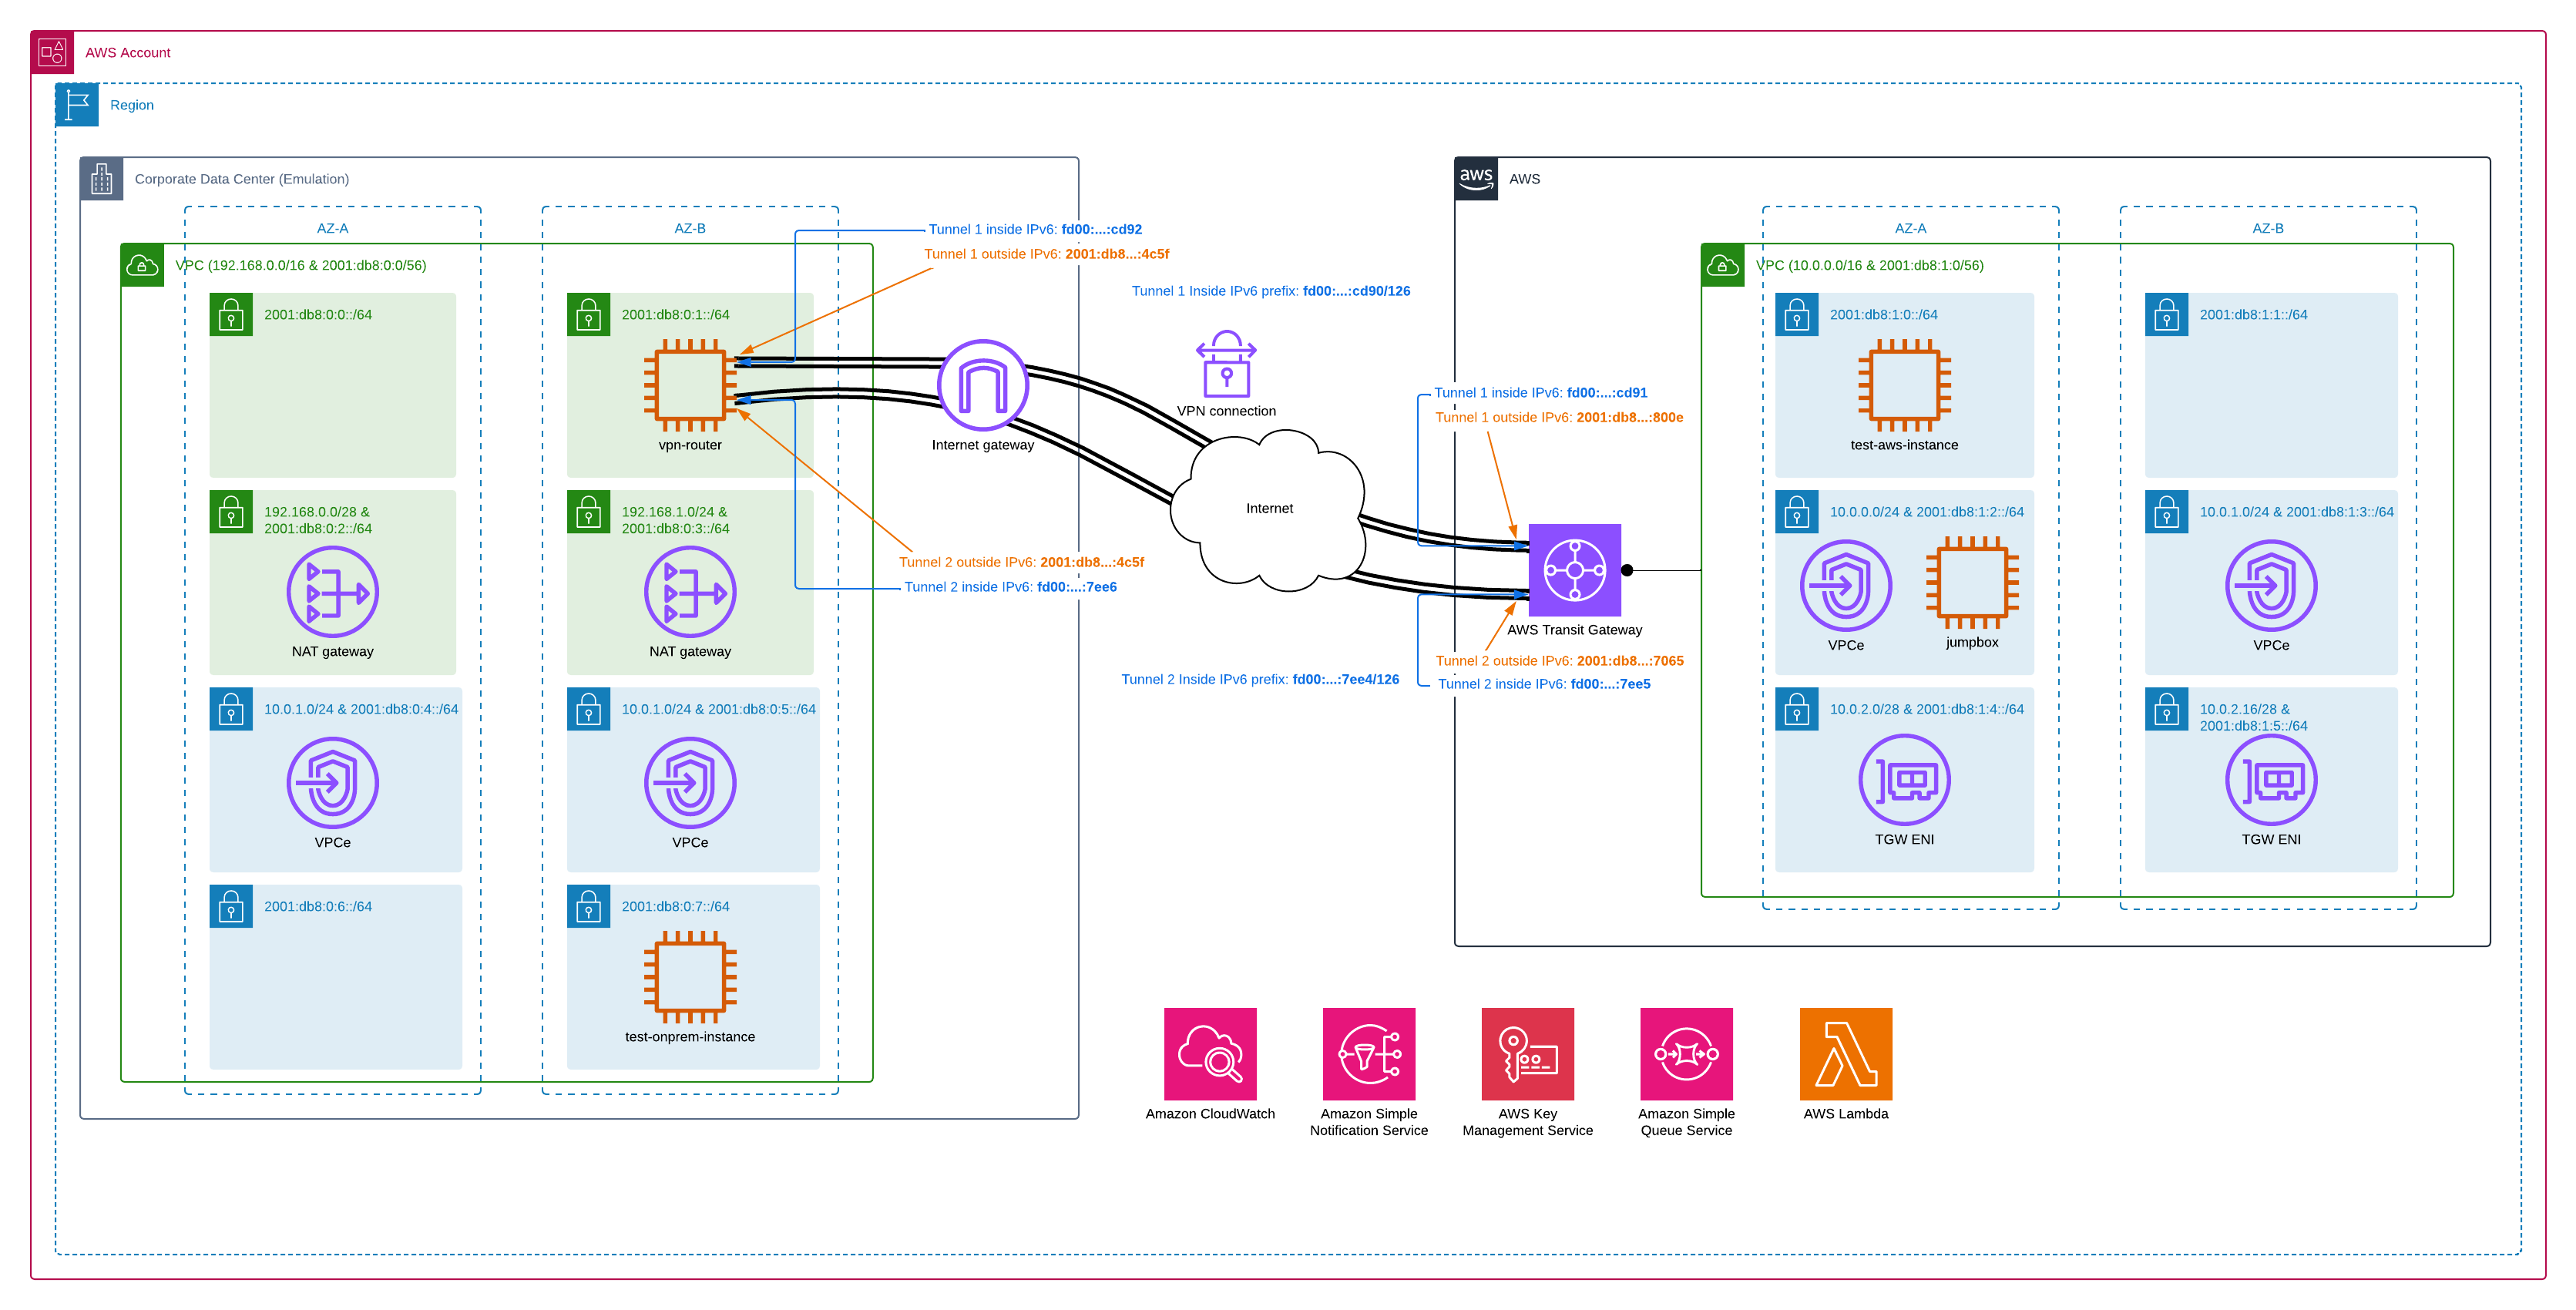
Figure 2: IPv6 Site-to-Site VPN CloudFormation deployed environment
Deploying this template incurs costs, which are outlined in the Cost section of this post. Refer to the Cleaning up section for tear down instructions. In the following section, we walk through the infrastructure that is deployed.
Corporate data center emulation
To emulate a corporate data center, the template has deployed a VPC with the following infrastructure:
- A dual stack Amazon VPC with two prefixes: an IPv4 prefix and an IPv6 prefix.
- The IPv6 address of the VPC could be different for you depending on whether you use AWS provided IPv6 or Bring Your Own IP (BYOIP) addresses.
- An internet gateway attached to the VPC. This is the underlay for our VPN and allows us to install and configure the Amazon Elastic Compute Cloud (Amazon EC2) VPN router, which is emulating your on-premises router.
- Two IPv6 only public subnets (hosting the Amazon EC2 VPN router).
- An EC2 instance deployed in the preceding IPv6 only public subnet to emulate a VPN router
- Two public dual stack subnets.
- Two NAT gateways deployed in the preceding subnets to perform NAT64, which allows us to directly connect to the Amazon EC2 VPN router using AWS Systems Manager Session Manager. The NAT gateways are also critical to notify CloudFormation when scripts have completed execution through cfn-* hooks.
- Two private dual stack subnets to host VPC endpoints to access other AWS services through AWS PrivateLink.
- Two IPv6 only private subnets to host an instance that we can ping for testing.
- An EC2 instance deployed in the preceding IPv6 only private subnet to emulate a test instance.
AWS infrastructure
The template terminates the IPv6 Site-to-Site VPN on a Transit Gateway and we have deployed the following infrastructure.
- A dual stack Amazon VPC with two prefixes: an IPv4 prefix and an IPv6 prefix.
- The IPv6 address of the VPC could be different for you depending on whether you use AWS provided IPv6 or BYOIP.
- Two private dual stack subnets to host the Transit Gateway attachments.
- A Transit Gateway with IPv6 support.
- VPC attached to the Transit Gateway, associated with the default route table and propagating the routes to the default route table.
- Two IPv6 only private subnets to host an instance that we can ping for testing.
- An EC2 instance deployed in the preceding IPv6 only private subnet to emulate a test instance.
- Two private dual stack subnets to host VPC endpoints to access other AWS services through AWS PrivateLink.
- An EC2 instance deployed in the preceding dual stack private subnet to act as a jump box. This is needed because we do not have an NAT gateway in this VPC to perform NAT64.
Common infrastructure
- AWS Secrets Manager to manage VPN pre-shared keys.
- Amazon CloudWatch to store logs, metrics, and alarms.
- An Amazon Simple Notification Service (Amazon SNS) topic to notify you of any outages, for example tunnel down.
- An AWS Key Management Service (AWS KMS) customer managed key (CMK) to encrypt CloudWatch logs, secrets in Secrets Manager, and SNS topics.
VPN infrastructure
The template also deploys the following VPN connectivity resources to build an IPv6 Site-to-Site VPN between the emulated on-premises data center and AWS:
- A customer gateway in the VPC that logically represents your on-premises router.
- An IPv6 Site-to-Site VPN connection terminating at the Transit Gateway.
- Configuration of the EC2 instance emulating the router.
IPv6 Site-to-Site VPN walkthrough
The following steps walk through the IPv6 Site-to-Site VPN.
Prerequisites
You need the following prerequisites to follow this walkthrough:
- The CloudFormation template has been deployed successfully without any errors.
Step 1. Customer gateway
- Open the Amazon VPC console and navigate to Virtual private network (VPN) > Customer gateways.
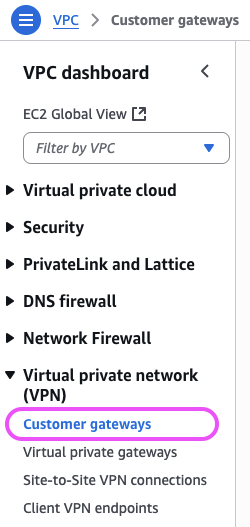 Figure 3: Navigate to customer gateways
 - We have deployed a customer gateway for you. Creating a customer gateway for an IPv6 Site-to-Site VPN follows the same steps as an IPv4 Site-to-Site VPN. The only difference is that it is pointing to the IPv6 IP address of your router. In our case, it’s pointing to the IPv6 address of the EC2 instance, which is emulating the VPN router.
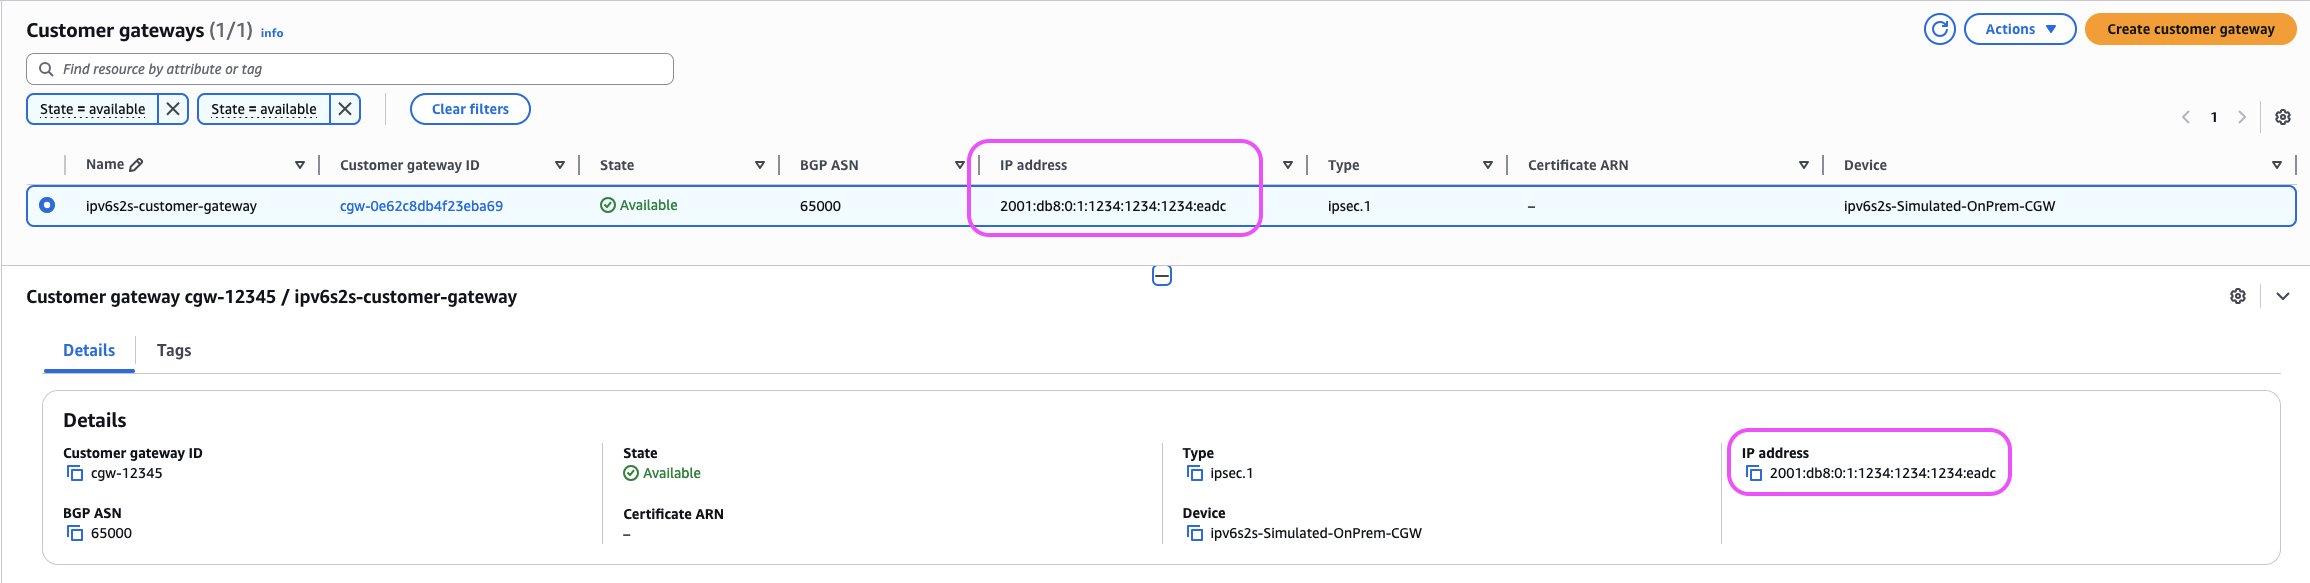 Figure 4: AWS VPC Console, Customer Gateway selected view
 - If you navigate to the Amazon EC2 console, then go to Instances, there should be an instance named (
…-onprem-vpn/vpn-router-instance) with the matching IPv6 address.
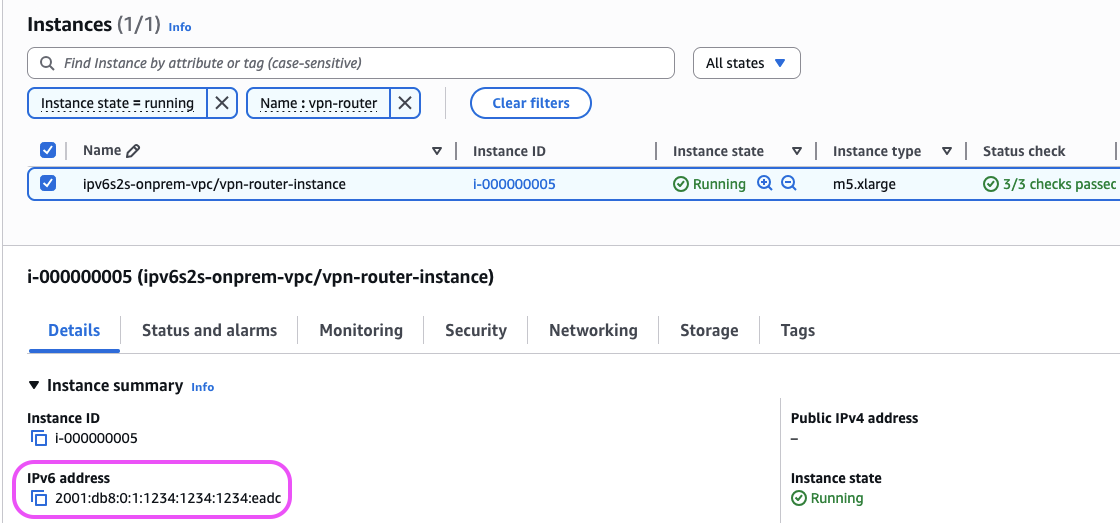
Figure 5: EC2 VPN router with IP showing
Step 2. IPv6 Site-to-Site VPN
The template has also deployed an IPv6 Site-to-Site VPN connection. 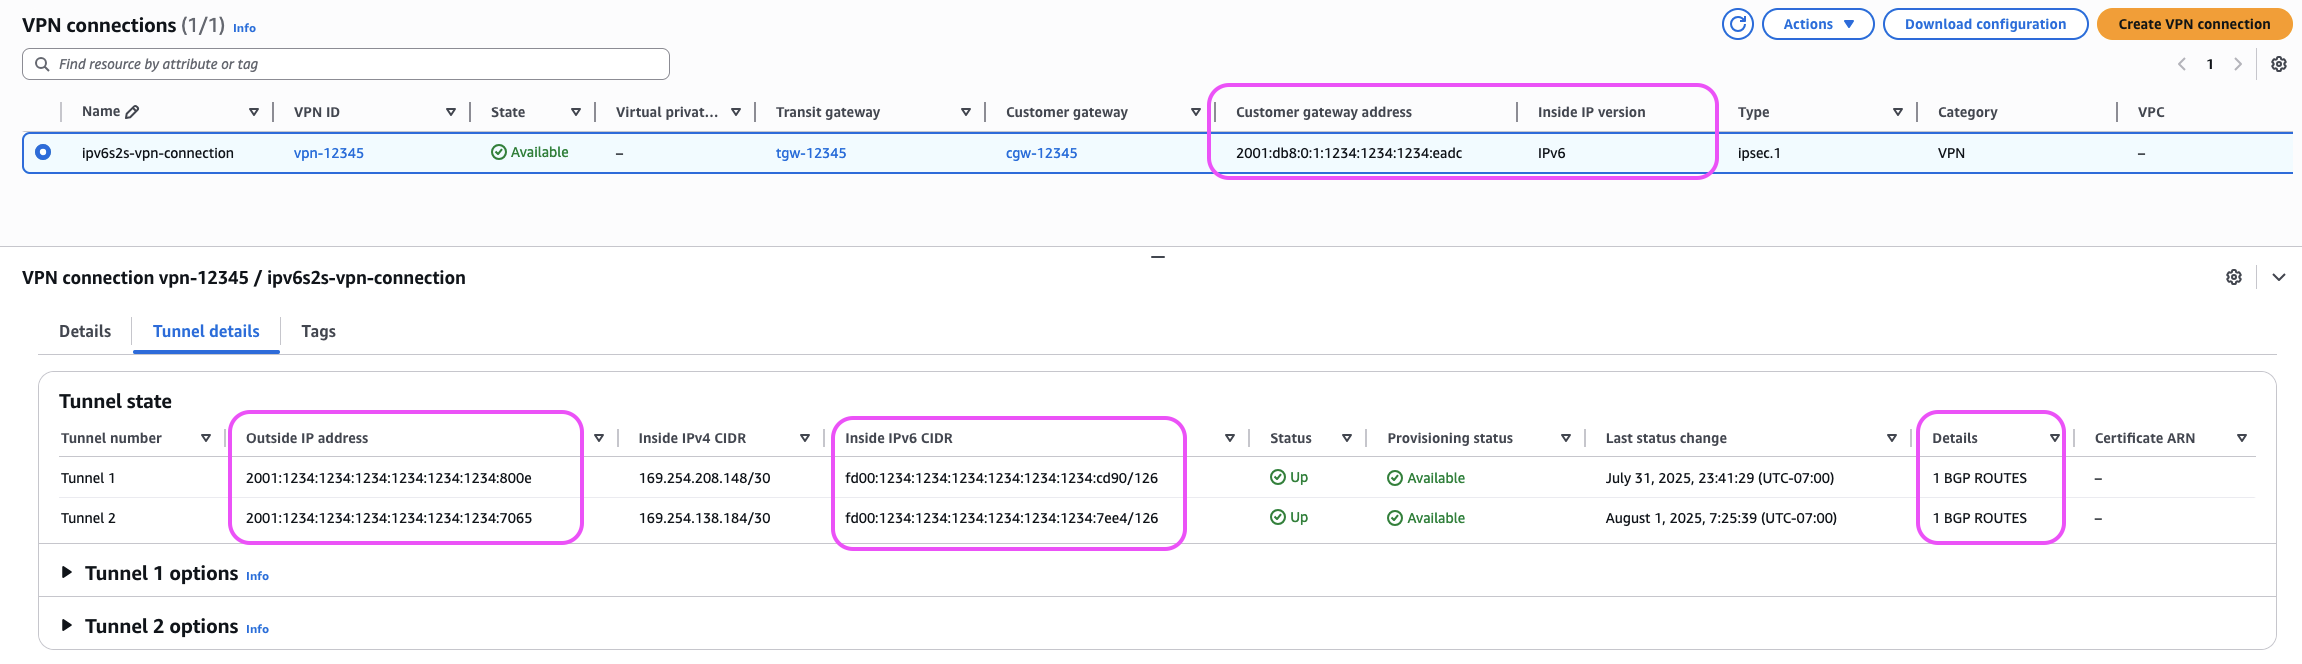 Figure 6: IPv6 S2S VPN detailed view
-
- Open the Amazon VPC console.
- In the navigation pane, under Virtual private network (VPN), choose Site-to-Site VPN connections.
- Choose the VPN connection created by the template named
…-vpn-connection. - It has an IPv6 Customer gateway address associated to it.
- Navigate to the Tunnel details tab.
- It has two IPv6 Outside IP addresses, one for each tunnel.
- It has two
/126IPv6 Inside IP address prefixes. These addresses are allocated by AWS from thefd00::/8range. From this prefix, the AWS side of the connection is the first usable IPv6 address, and your side of the connection is the second usable IPv6 address. For an example, if your Inside IPv6 prefix isfd00:…:cd90/126, then the AWS side IPv6 address isfd00:…:cd91and your side IPv6 address isfd00:…:cd92. For more details, refer to the documentation. - The IPv6 Site-to-Site VPN is using dynamic routing, advertising the on-premises prefix to AWS.
You can observe the propagation of the on-premises route (2001:db8:0:0::/56) into the Transit Gateway route table through the Site-to-Site VPN attachment.
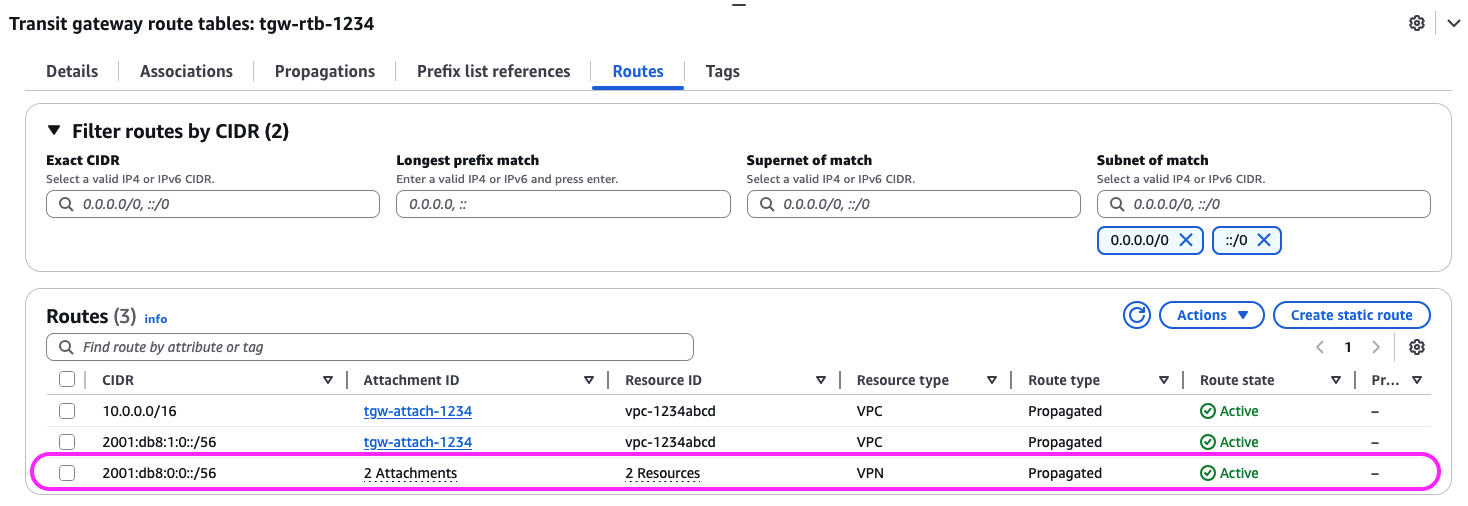 Figure 7: On-premises route propagating into the Transit Gateway route table
-
- Navigate to the Amazon VPC console.
- In the navigation pane, under Transit gateways, choose Transit gateway route tables.
- Choose the route table associated with the Transit Gateway created as part of this stack. You can refer to the CloudFormation output variable named
AwsTransitGatewayIdto make sure that you are looking at the right Transit Gateway route table.
- You can also validate that the AWS route has been propagated to your on-premises side.
- Navigate to the Amazon EC2 console.
- Choose the instance named
…-onprem-vpc/vpn-router-instance. - On the top right-hand side, choose Connect.
- Use the Session Manager tab and choose Connect, this uses Systems Manager to connect to the Amazon EC2 VPN router.
- Run the command
sudo vtysh -c "show ipv6 route bgp"in the shell window and you should observe that the IPv6 prefix from the VPC (2001:db8:1:0::/56) is propagated.$ sudo vtysh -c "show ipv6 route bgp" Codes: K - kernel route, C - connected, S - static, R - RIPng, O - OSPFv3, I - IS-IS, B - BGP, N - NHRP, T - Table, v - VNC, V - VNC-Direct, A - Babel, F - PBR, f - OpenFabric, > - selected route, * - FIB route, q - queued, r - rejected, b - backup t - trapped, o - offload failure B>* 2001:db8:1:0::/56 [20/100] via fd00:…:7ee5, vti2, weight 1, 00:54:18 * via fd00:…:cd91, vti1, weight 1, 00:54:18
How it was setup
For the purpose of this post we have used open source software, Strongswan, to emulate the IPsec VPN and Free Range Routing (FRR) for BGP. Detailed configuration of Strongswan and FRR are beyond the scope of this post. However, you can dive deeper into the setup through the CloudFormation template.
Testing IPv6 connectivity
You can test connectivity by doing a ping test across from the AWS side and/or the on-premises side. We have deployed two EC2 instances on either side in IPv6 only subnets to demonstrate the connectivity.
Step 1. AWS to on-premises ping
- Navigate to the Amazon EC2 console and use Systems Manager to connect to the Amazon EC2 jump box on the AWS side (
…-aws-vpc/jump-instance).- This is necessary because we do not have a NAT Gateway on the AWS side to enable NAT64.
- Choose the AWS jump instance, choose Connect on the top right, choose Session Manager, and choose Connect.
- From the jump box, you can now SSH into the EC2 test instance on the AWS side.
- Run
~/connect-to-aws-test-instance.shto connect to the test instance using the helper script.
- Run
- When it is connected, get the IPv6 address of the on-premises test instance (
…-onprem-vpc/test-instance) by following this Amazon Managed Services guide. - Run the ping test using
ping6 -c 3 2001:db8:0:7:…:3447, making sure that you replace the IP address specific to your environment. - With a successful ping, you should observe the following output:
[ec2-user@i-000000002 ~]$ ping6 -c 3 2001:db8:0:7:…:3447
PING 2001:db8:0:7:…:3447(2001:db8:0:7:…:3447) 56 data bytes
64 bytes from 2001:db8:0:7:…:3447: icmp_seq=1 ttl=253 time=2.69 ms
64 bytes from 2001:db8:0:7:…:3447: icmp_seq=2 ttl=253 time=1.90 ms
64 bytes from 2001:db8:0:7:…:3447: icmp_seq=3 ttl=253 time=1.88 ms

--- 2001:db8:0:7:…:3447 ping statistics ---
3 packets transmitted, 3 received, 0% packet loss, time 2003ms
rtt min/avg/max/mdev = 1.887/2.162/2.694/0.377 ms
Step 2. On-premises to AWS ping
- Navigate to the Amazon EC2 console and use Systems Manager to connect to the on-premises test instance (
…-onprem-vpc/test-instance).- Choose the on-premises test instance, choose Connect on the top right, choose Session Manager, and choose Connect.
- When it is connected, get the IPv6 address of the AWS test instance (
…-aws-vpc/test-instance) by following this Amazon Managed Services guide. - Run the ping test using
ping6 -c 3 2001:db8:1:0:…:9816, making sure that you replace the IP address specific to your environment. - With a successful ping, you should observe the following output:
sh-4.2$ ping6 -c 3 2001:db8:1:0:…:9816
PING 2001:db8:1:0:…:9816(2001:db8:1:0:…:9816) 56 data bytes
64 bytes from 2001:db8:1:0:…:9816: icmp_seq=1 ttl=252 time=2.20 ms
64 bytes from 2001:db8:1:0:…:9816: icmp_seq=2 ttl=252 time=1.91 ms
64 bytes from 2001:db8:1:0:…:9816: icmp_seq=3 ttl=252 time=1.82 ms

--- 2001:db8:1:0:…:9816 ping statistics ---
3 packets transmitted, 3 received, 0% packet loss, time 2003ms
rtt min/avg/max/mdev = 1.829/1.983/2.205/0.160 ms
Observability
Monitoring an IPv6 Site-to-Site VPN follows the same process as monitoring an IPv4 Site-to-Site VPN. The template provided as part of this post includes basic monitoring through a CloudWatch alarm. The alarm is triggered when the state of the VPN tunnel changes, resulting in a notification sent to your email through an SNS topic. The notification sent to your email should be like the following one (as shown in Figure 3):
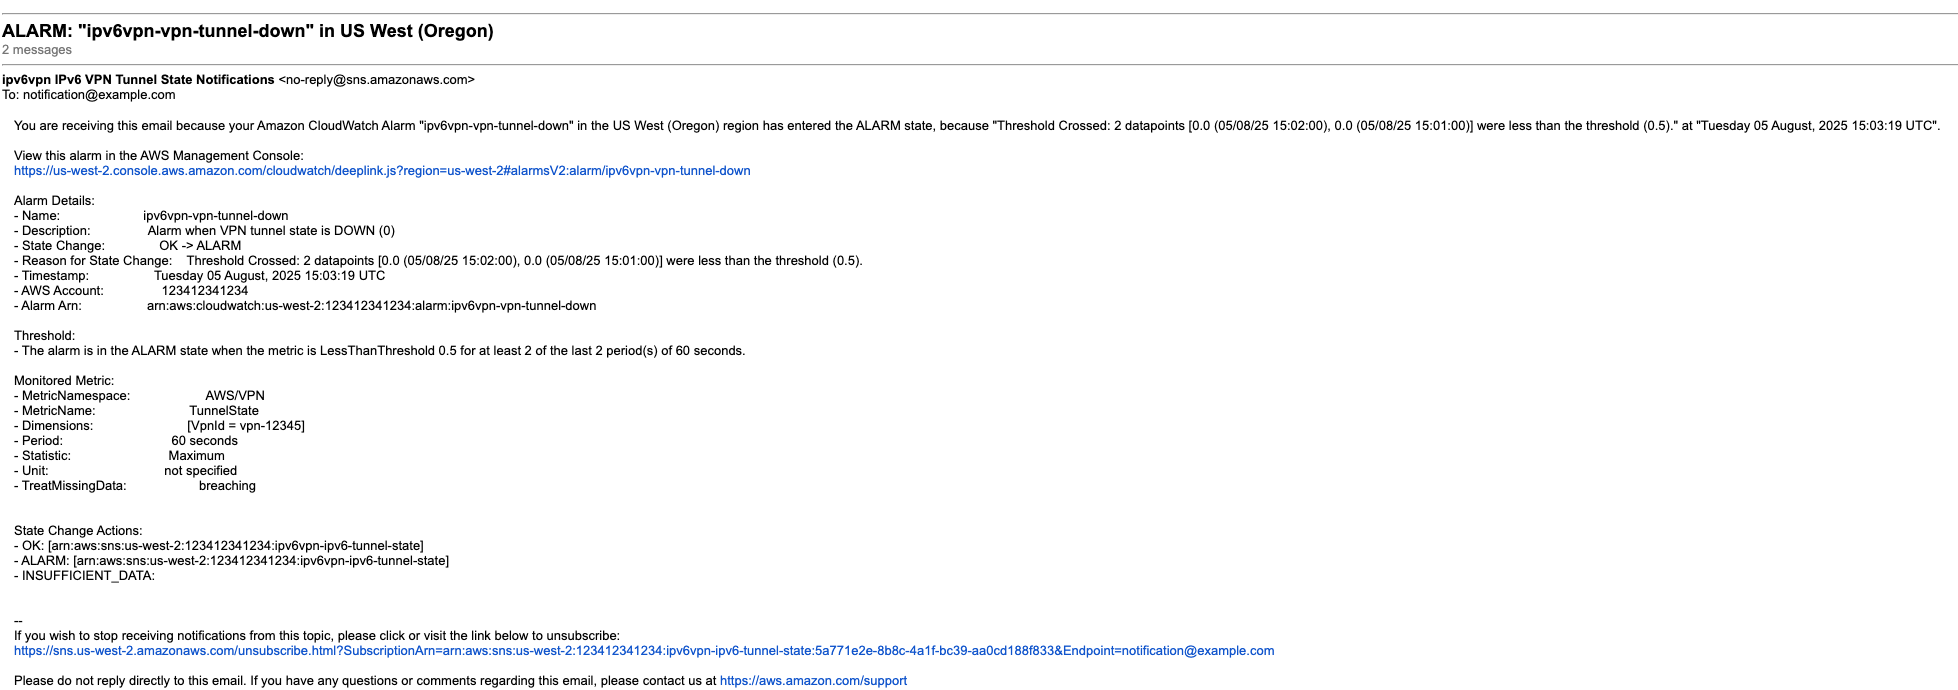
Figure 8: CloudWatch alarm notification for tunnel state changes
To emulate the preceding behavior, you can manually bring the VPN tunnels down. This can be achieved by stopping the EC2 VPN router instance (…-onprem-vpc/vpn-router-instance).
- Navigate to the Amazon EC2 console.
- Choose the instance named
…-onprem-vpc/vpn-router-instance. - From the top right-hand menu, choose Instance State, and choose Stop.
After testing is completed, follow the same process described in the preceding section and choose Start.
For advanced monitoring capabilities, we use an existing solution detailed in the post Setting up of AWS Site-to-Site VPN automated monitoring solution. We adapt it to use the CloudWatch log group and SNS topic created during our IPv6 Site-to-Site VPN setup. Deploy the template, entering the necessary parameters using the helper hints as needed. You need two output values from the IPv6 Site-to-Site VPN CloudFormation stack; VpnTunnelStateNotificationTopicArn and VpnConnectionLogGroupName. Refer to the following image (as shown in Figure 9) for further details.
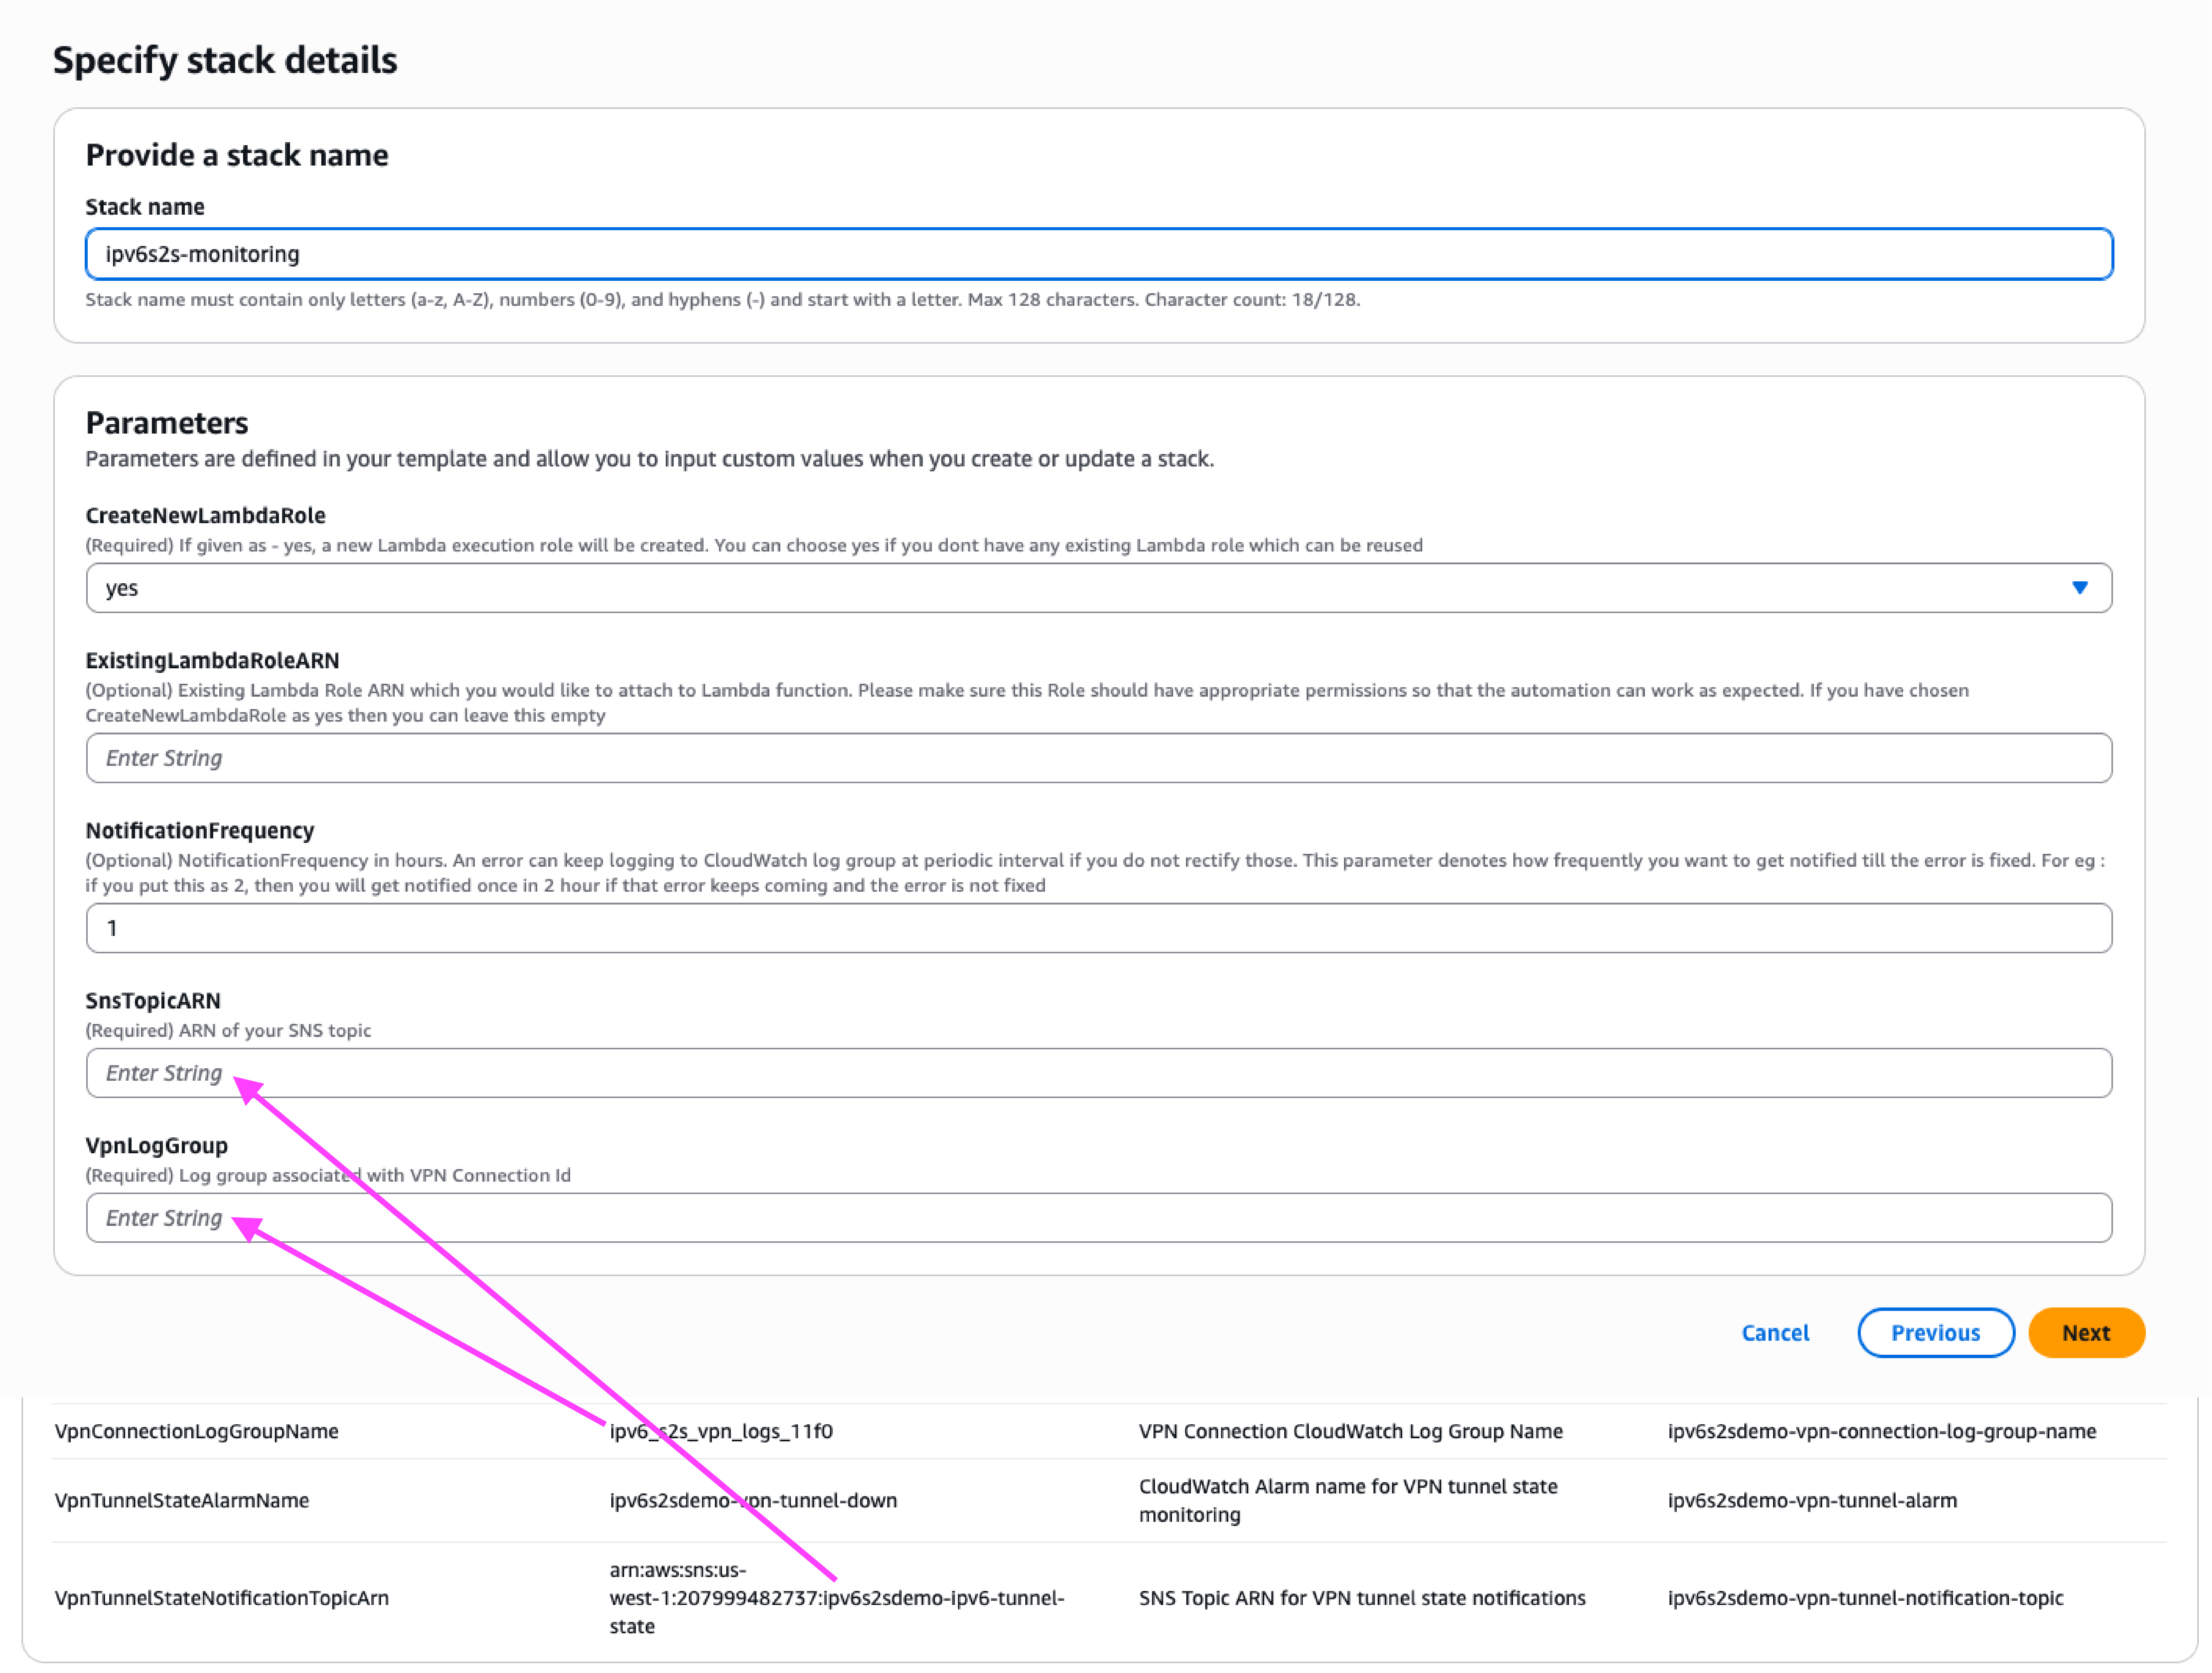
Figure 9: Observability stack deployment
The preceding monitoring solution adapts to your specific VPN setup by using the existing log group, making sure of seamless integration without more configuration. Follow the post instructions to deploy the monitoring solution for your IPv6 Site-to-Site VPN, which provides real-time issue detection, actionable alerts with error-specific remediation steps, and faster problem resolution.
Cleaning up
To clean up the resources provisioned for this post, delete the CloudFormation stack(s).
Cost
Pricing for Site-to-Site VPN with IPv6 for outside IPs follows the same principles of pricing for IPv4 with the added benefit that there is no extra cost for the IPv6 addresses. For detailed pricing information, visit the VPN pricing page.
Deploying the CloudFormation template incurs the following costs:
- Site-to-Site VPN connection per hour and data transfer out (DTO).
- Cost for EC2 instances:
- To emulate the VPN router and associated Amazon Elastic Block Store (Amazon EBS)
- Jump box and associated EBS volume.
- Testing connectivity and associated EBS volumes.
- Cost for the two NAT gateways to enable Systems Manager and CloudFormation message flow to configure the VPN router.
- Cost for the Transit Gateway and two attachments.
- Cost for the VPC endpoints to enable private connectivity to AWS services such as Systems Manager, Secrets Manager, AWS KMS, Amazon Simple Queue Service (Amazon SQS), and Amazon S3 across both VPCs.
- Other resources
- Cost for SNS topic for outage notifications.
- Cost of AWS Lambda invocations during stack creation/update as part of custom resources.
- Cost for Amazon SQS Dead Letter Queue (DLQ).
A handy AWS Pricing Calculator link has been created to help visualize this cost for your reference.
Considerations
- You cannot enable IPv6 on an existing IPv4 Site-to-Site VPN connections.
- Make sure that your Site-to-Site VPNs follow resilience best practices when deploying for real-world scenarios.
- Consider more monitoring options for your Site-to-Site VPN tunnels.
Conclusion
AWS Site-to-Site VPN now fully supports IPv6 on both inside and outside IP addresses. Therefore, you are one step closer in your adoption of IPv6. Furthermore, adopting IPv6 helps remediate the impacts of IP exhaustion, reducing cost and meeting regulatory and compliance requirements. Start experimenting with a fully IPv6-enabled VPN solution today. To deploy this solution in your AWS account, just use the template provided.
Further reading
About the authors

Ruskin Dantra
Ruskin Dantra is a Solutions Architect based out of California. He is originally from the Land of the Long White Cloud, New Zealand and is an 18-year veteran in application development with a love for networking. His passion in life is to make complex things simple using AWS.

Saijeevan Devireddy
SaiJeevan Devireddy is a Sr. Solutions Architect at AWS working with Strategic accounts. He is passionate about helping users with architecting and building highly available systems on AWS.

Scott Morrison
Scott Morrison is a Senior Specialist Solutions Architect for Networking at AWS, where he helps users design resilient and cost-effective networks. Scott loves to code in his spare working hours to solve unique problems. When not working, Scott is often found either in the desert outside of Las Vegas off-roading or occasionally playing in poker tournaments.