AWS Storage Blog
Efficiently verify Amazon S3 data at scale with compute checksum operation
Organizations across industries must regularly verify the integrity of their stored datasets to protect valuable information, satisfy compliance requirements, and preserve trust. Media and entertainment customers validate assets to make sure that content remains intact, financial institutions run integrity checks to meet regulatory obligations, and research institutions confirm the reproducibility of scientific results. These verifications are critical for maintaining audit trails and chain of custody, but they are often resource-intensive. Traditionally, customers needed to download entire datasets or restore archived content, consuming significant compute resources, time, and bandwidth. The challenge only grows with large assets such as 4K and 8K footage, medical imaging files, or billions of archived objects. This creates operational complexity and high costs at scale.
Amazon S3 now enables users to perform these integrity checks directly in the storage layer. With the compute checksum option in Amazon S3 Batch Operations, users can generate checksums for up to billions of objects without downloading or restoring data, regardless of object size or storage class. This capability makes it easier to confirm data integrity, maintain compliance, and streamline content validation workflows. Users can reduce the operational burden and costs of traditional verification approaches while gaining stronger confidence in the long-term durability of their data.
In this post, we explain how compute checksums work, the algorithms and options available, and how users can integrate this feature into their fixity and data verification workflows. We also explore the benefits of full-object and composite checksums, discuss trade-offs between cryptographic and CRC algorithms, and walk through how to initiate a job and generate reports that support compliance, audit, and preservation needs.
Compute checksum using S3 Batch Operations
A checksum is a short, fixed-length value generated from the content of a file or object. In the context of data integrity, users use checksums to verify that media assets remain unchanged during storage, transfer, or processing. Even a single-bit error in the file produces a different checksum, making it clear when corruption or tampering has occurred. When users create a new compute checksum operation job, they can choose from several supported algorithms, such as SHA-1, SHA-256, MD5, CRC32, CRC32C, and CRC64NVME. These algorithms support both full-object and composite checksum calculation methods. In this post, we implement the full object checksum approach, which delivers comprehensive end-to-end integrity verification through a single hash value, such as traditional on-premises methods, making the validation process clearer. Different algorithms offer different trade-offs. Cryptographic hash functions such as MD5, SHA-1, and SHA-256 are widely used in the media and entertainment industry, as well as digital preservation, because they provide strong guarantees against accidental corruption and deliberate modification. Users benefit from the ability to continue using these algorithms already integrated into existing applications. However, these functions operate sequentially, which means that they must process data one block at a time. As files grow into 4K, 8K, or high-frame-rate content, the sequential nature of cryptographic hashes makes them more computationally expensive and time-consuming.
For workflows that need faster performance, users can select CRC algorithms. These algorithms offer significant speed advantages because they support parallelization, which enables multiple data segments to be processed simultaneously. This reduces verification times when compared to cryptographic hashes, especially for large objects.
After users submit the compute checksum operation job, S3 calculates the checksum of each object listed in the manifest and generates a report containing the checksum value of each object. Users can use this report to track verification results, confirm data integrity across their media library, and maintain audit records as part of an ongoing fixity process.
Prerequisites
There are a few prerequisites you need before getting started:
- Make sure that you have the necessary permissions to create a job in S3 Batch Operations. For more information visit Granting permissions for Batch Operations.
- Have or create an AWS Identity and Access Management (IAM) role to use with S3 Batch Operations. For more information, visit IAM roles.
- Have or create three general purpose S3 buckets: one bucket for the assets, one for the S3 Batch Operations manifest, and one for the S3 Batch Operations reports. In this post, we refer to these S3 buckets as
assets-bucket,manifest-bucket, andreport-bucket. - Make sure that you have access to Amazon Athena from your account.
Walkthrough
This section walks you through how to verify the content of stored datasets:
- Create and upload a manifest to the manifest-bucket
- Configure correct permissions on the IAM role assumed by S3 Batch Operations
- Create the S3 Batch Operations job
- Locate the S3 Batch Operations completion reports
- Analyze the S3 Batch Operations completion reports
1. Creating and managing the manifest
This section walks through creating the manifest, and uploading the manifest.
1.1. Creating the manifest
A manifest is an S3 object that contains the object keys for which you want to calculate the checksum, and it must be in the form of an Amazon S3 Inventory report or a CSV file. In this post, you use a CSV file. The manifest must contain the bucket name, object key, and optionally, the object version for each object. Each line of the manifest should look like the following:
bucket-name,object-name,<version-id>
1.2. Uploading the manifest
When you have created your manifest, upload it to the manifest-bucket.
2. Setting up IAM permissions
S3 must have permissions to perform S3 Batch Operations on your behalf. You grant these permissions through an IAM role. For more information, visit Granting permissions for Batch Operations. This section walks through creating the correct IAM policy, and creating the IAM role that S3 Batch Operations assumes.
2.1. Create the IAM policy
Depending on the type of operations, you need to grant a different set of permissions to the IAM role that S3 Batch Operations assumes for executing the job. Regardless of the operation, S3 needs permissions to read your manifest object from your S3 bucket and write a report to your bucket. For the compute checksums operation, you need to include the permission to get the objects for which you want to compute checksum.
The entire policy looks like the following:
{
    "Version": "2012-10-17",
    "Statement": [
        {
            "Sid": "ChecksumPolicy",
            "Effect": "Allow",
            "Action": [
                "s3:GetObject",
                "s3:GetObjectVersion"
            ],
            "Resource": [
                "arn:aws:s3:::<assets-bucket>/*"
            ]
        },
        {
            "Sid": "ManifestPolicy",
            "Effect": "Allow",
            "Action": [
                "s3:GetObject"
            ],
            "Resource": [
                "arn:aws:s3:::<manifest-bucket>/*"
            ]
        },
        {
            "Sid": "ReportPolicy",
            "Effect": "Allow",
            "Action": [
                "s3:PutObject"
            ],
            "Resource": [
                "arn:aws:s3:::<report-bucket>/*"
            ]
        }
    ]
}
If the objects you want to compute checksum for are encrypted with AWS Key Management Service (AWS KMS), then your IAM policy must also include the permissions kms:Decrypt and kms:GenerateDataKey.
To create the IAM policy, navigate to IAM in the AWS Management Console. On the left menu, choose Policies, and then Create policy.

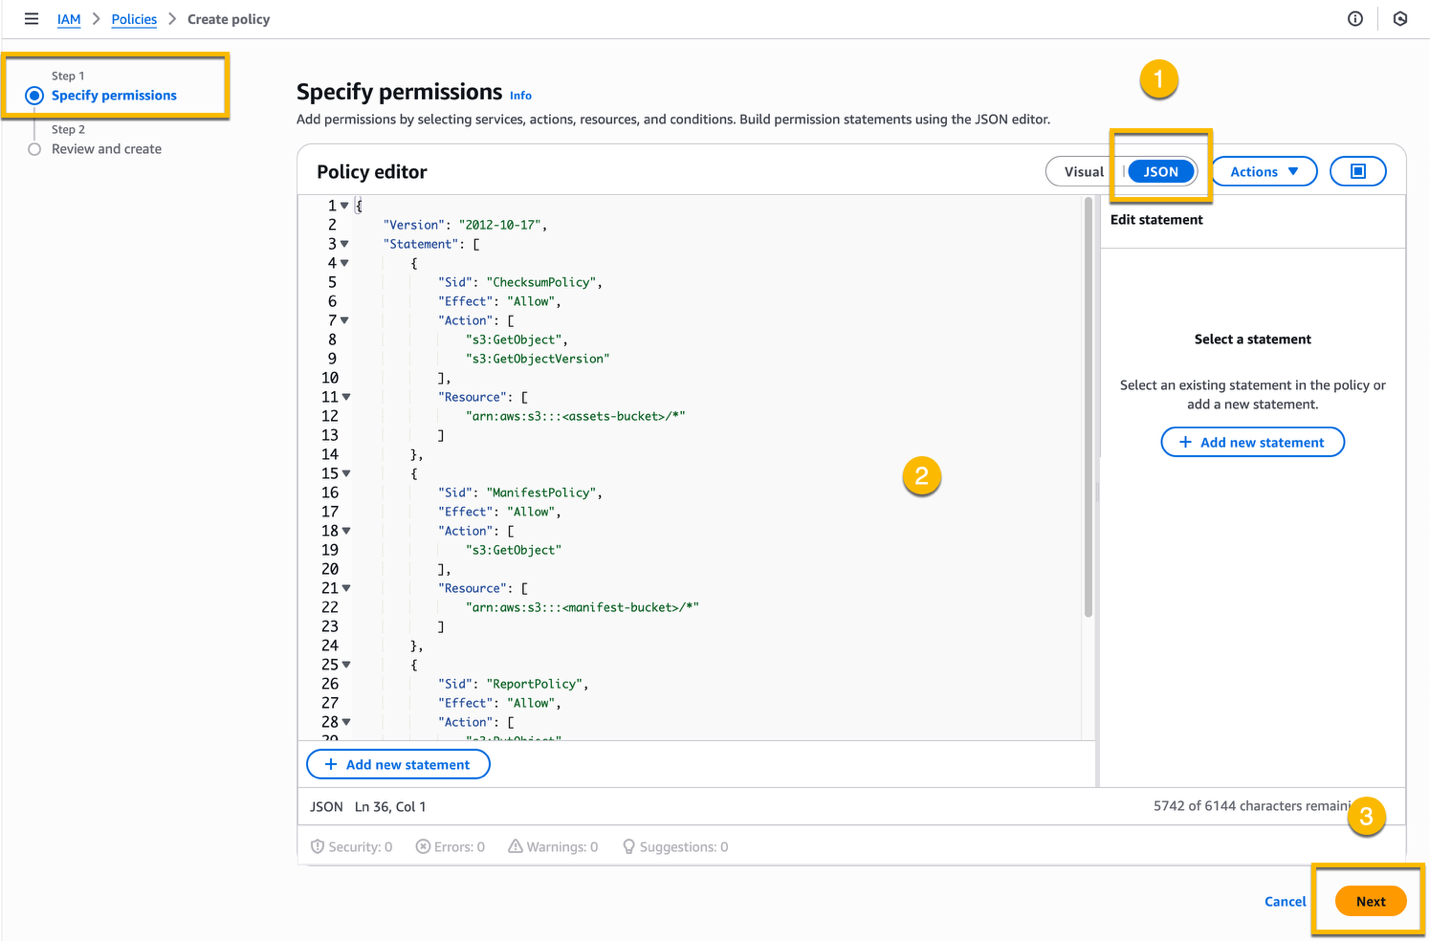
At Step 1 – Specify permissions, choose JSON, replace the existing policy with the new policy, and choose Next. Remember to replace the placeholder values for the bucket names with the correct names.
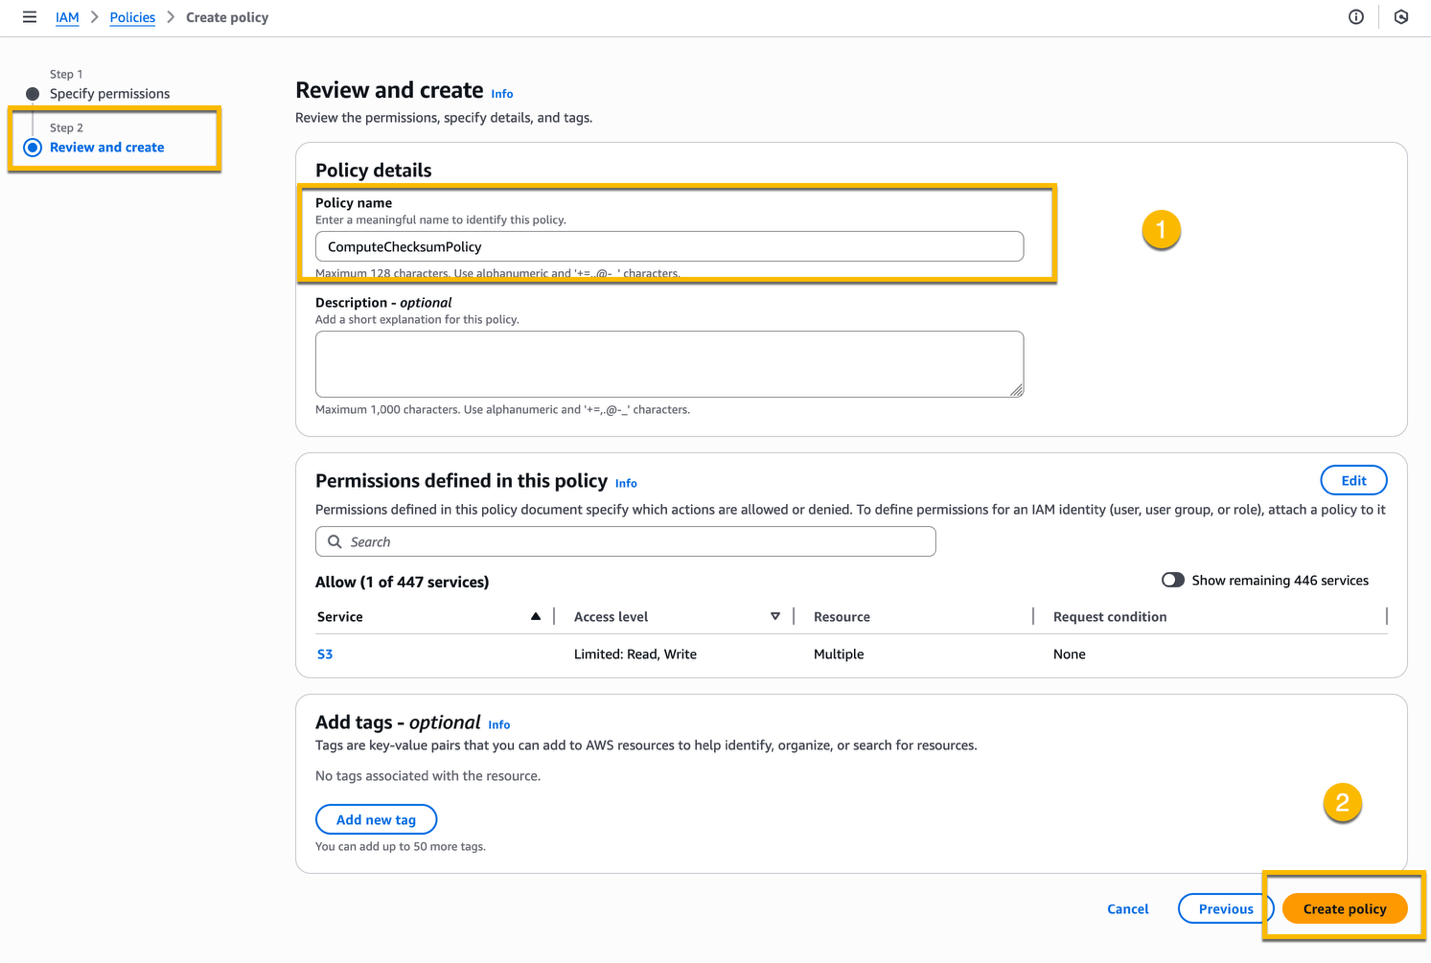
In Step 2 – Review and create, enter a name for the IAM policy, for example ComputeChecksumPolicy, and choose Create policy.
In the next step, you attach this IAM policy to the IAM role you create.
2.2. Creating the IAM role
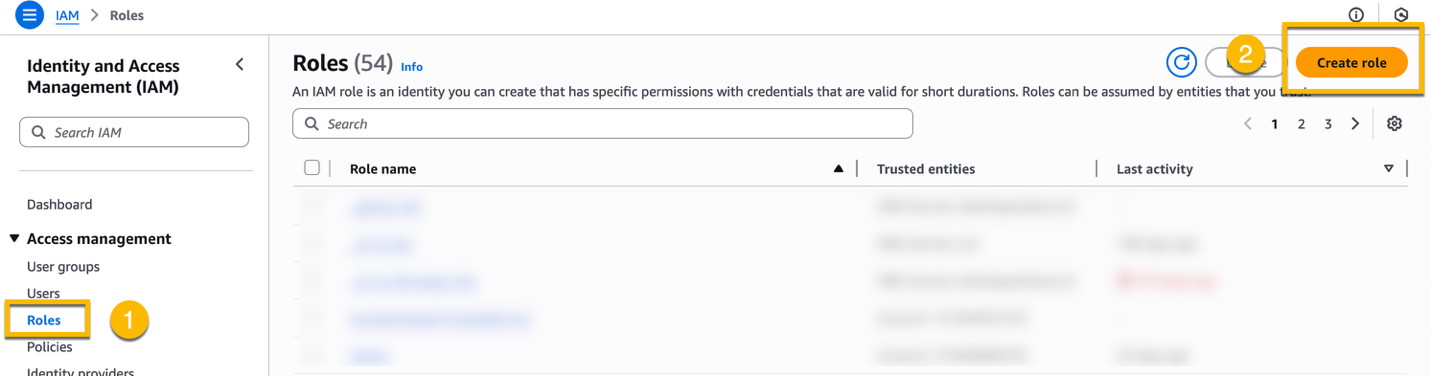
To create the IAM role, navigate to IAM in the console. On the left menu, choose Roles, and then Create role.
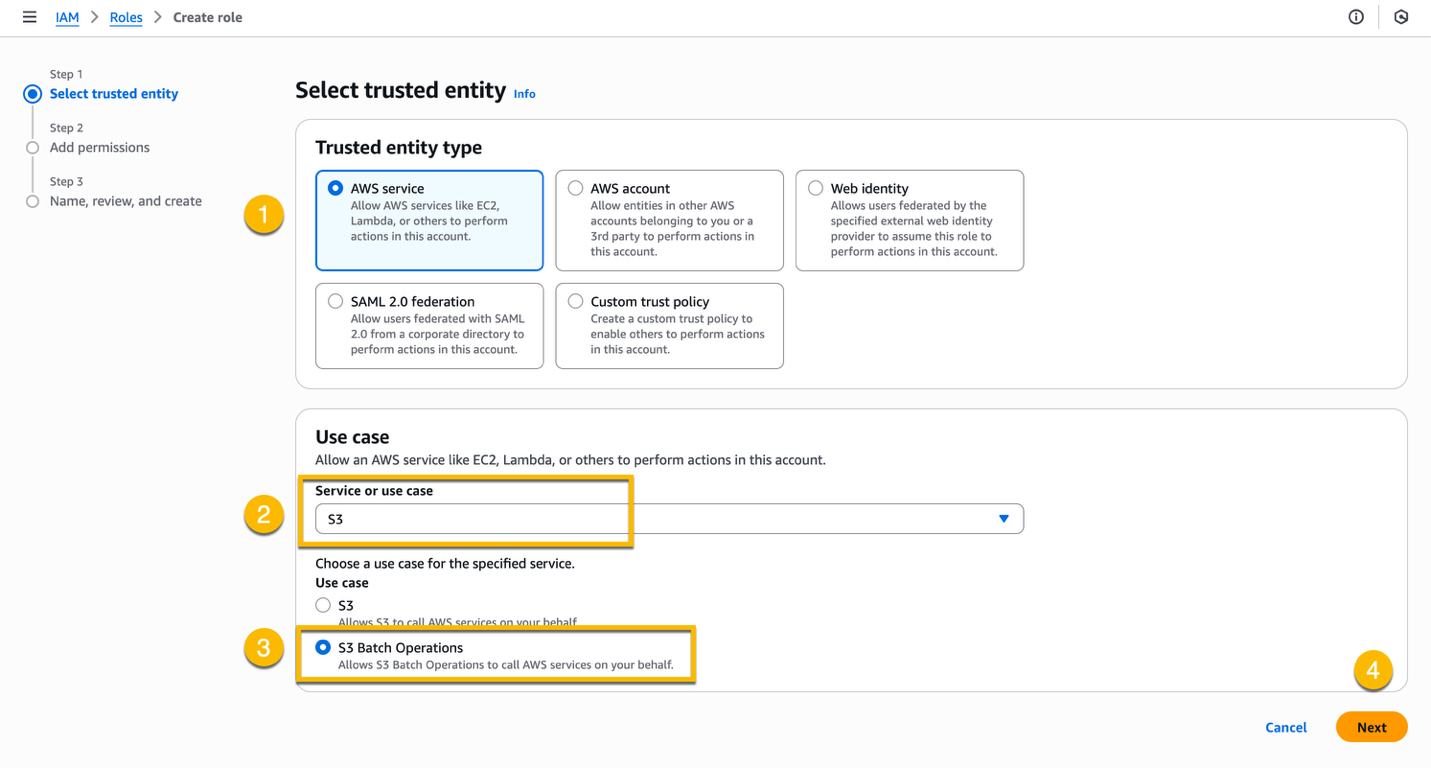
At Step 1 – Select trusted entity, choose AWS service, choose Amazon S3 from the Service or use case dropdown list, choose S3 Batch Operations as Use case, and choose Next.
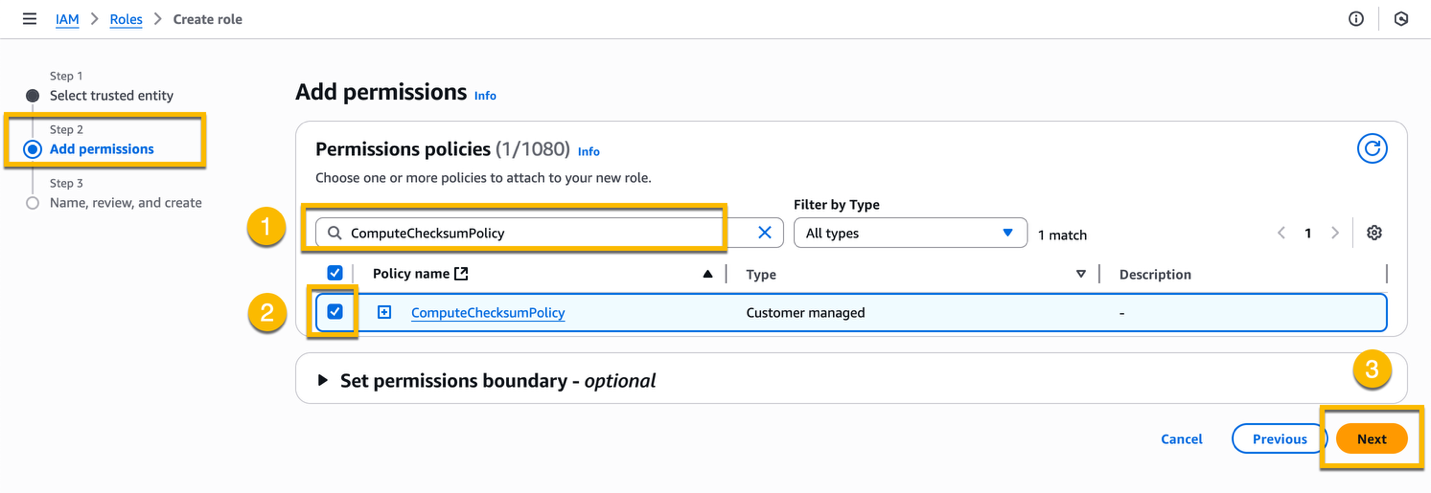
At Step 2 – Add permissions, search for the policy that you created in the previous step, choose the checkbox next to the policy, and choose Next.
At Step 3 – Name, review, and create, enter a name for the IAM role, for example ComputeChecksumRole, and choose Create role.
S3 Batch Operations assumes this IAM role when calculating the checksum.
3. Creating and running the S3 Batch Operations job
In this section, we walk through the steps to create the S3 Batch Operations job.
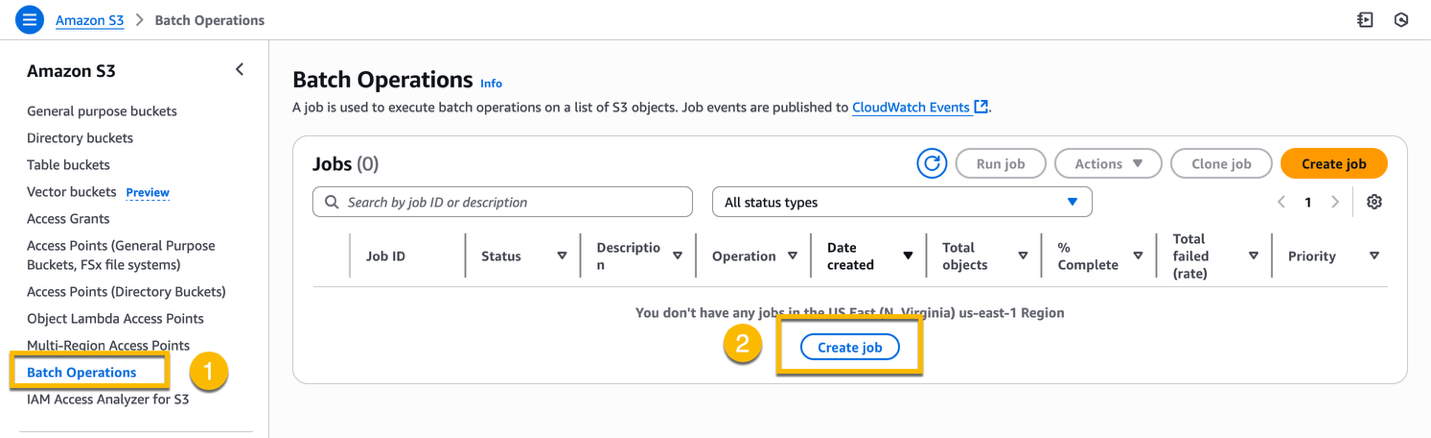
Navigate to S3 in the console. On the left menu, choose Batch Operations, and then Create job.
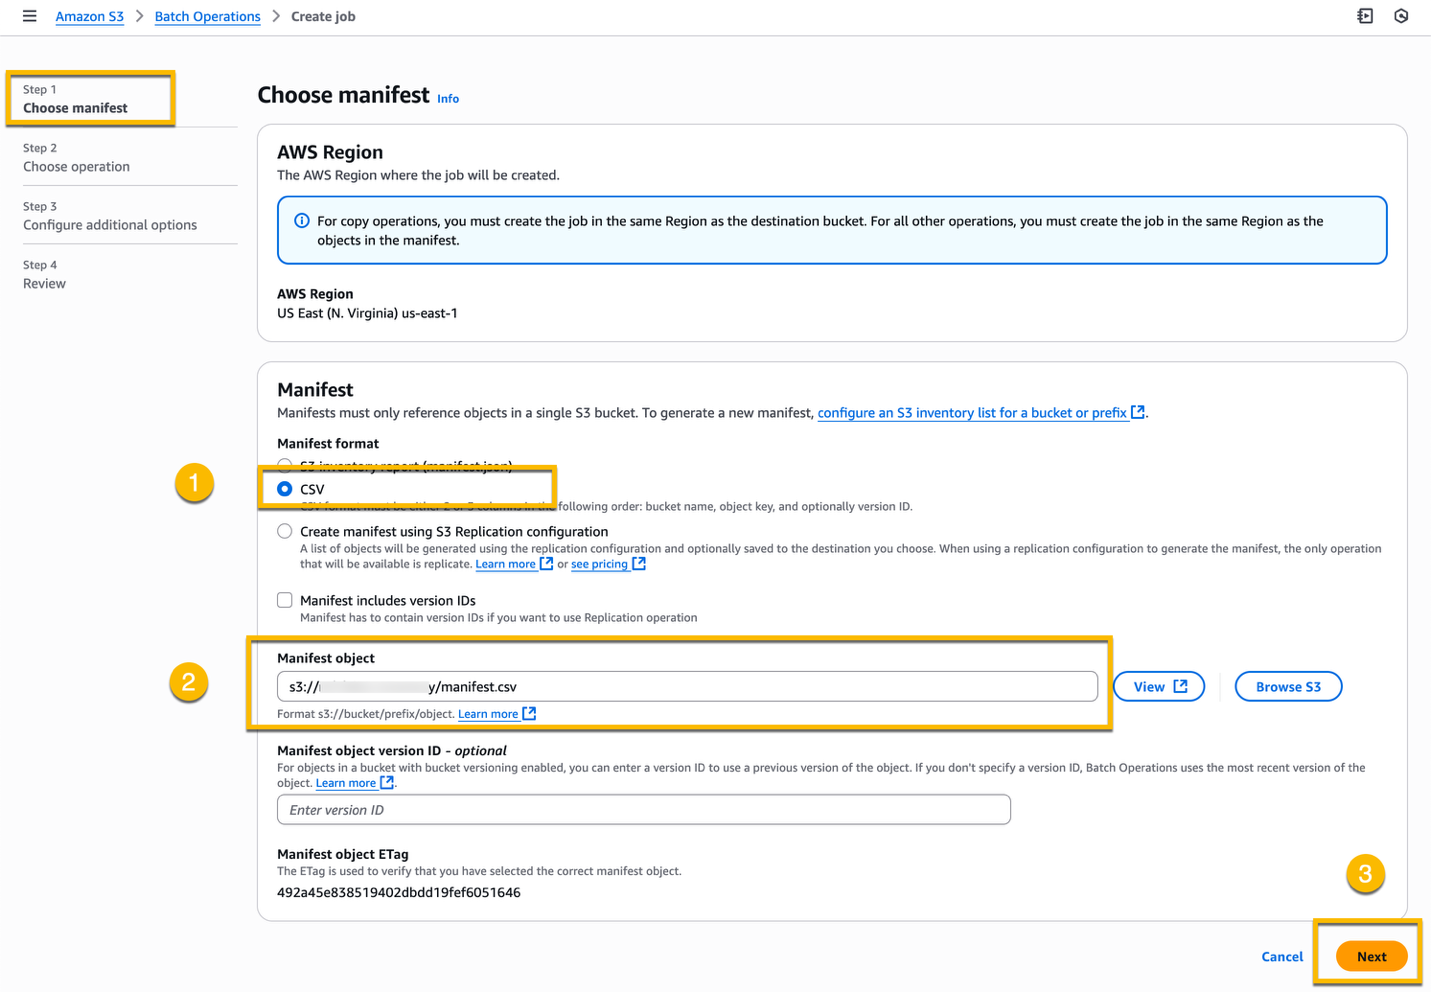
At Step 1 – Choose manifest, choose CSV as the Manifest format, enter the S3 path of the manifest that you uploaded in Step 1 (or browse to the manifest location), and choose Next.
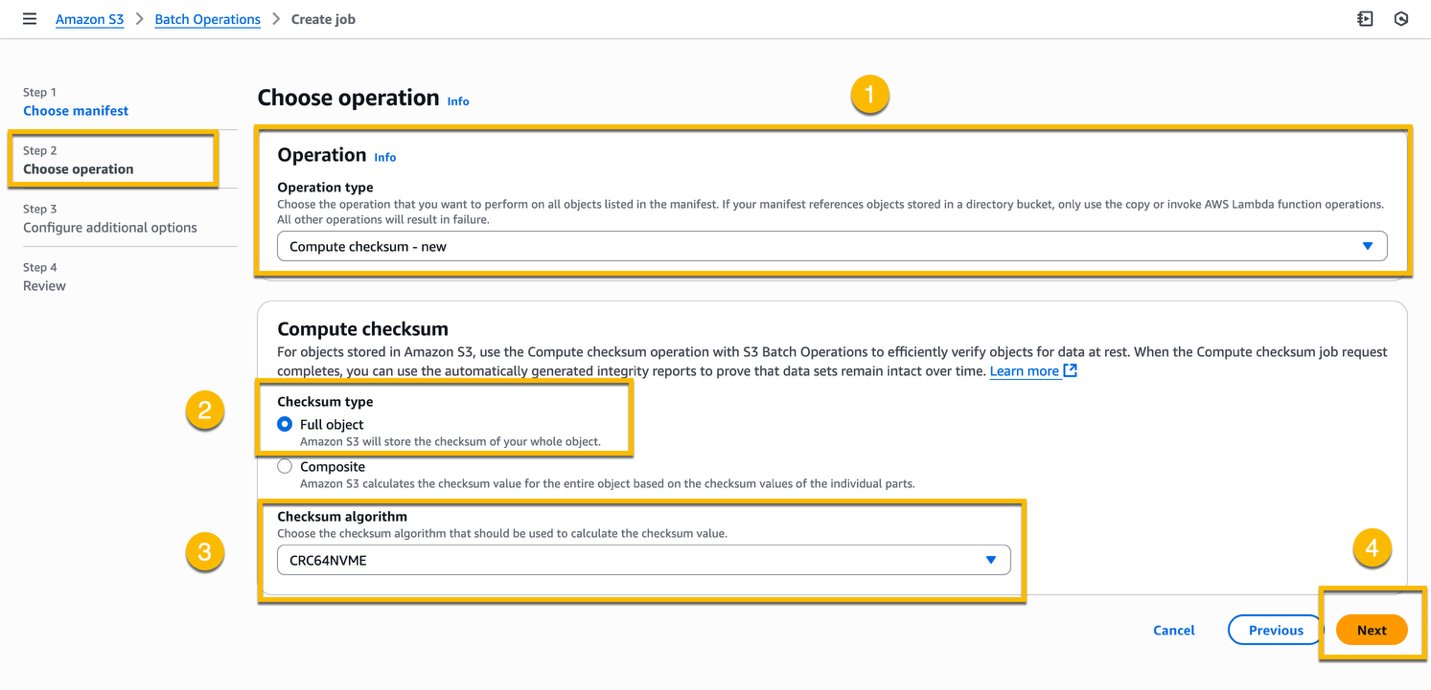
At Step 2 – Choose operation, choose Compute checksum – new from the Operation type dropdown list, choose Full object as the Checksum type, choose CRC64NVME from the Checksum algorithm dropdown list, and choose Next.
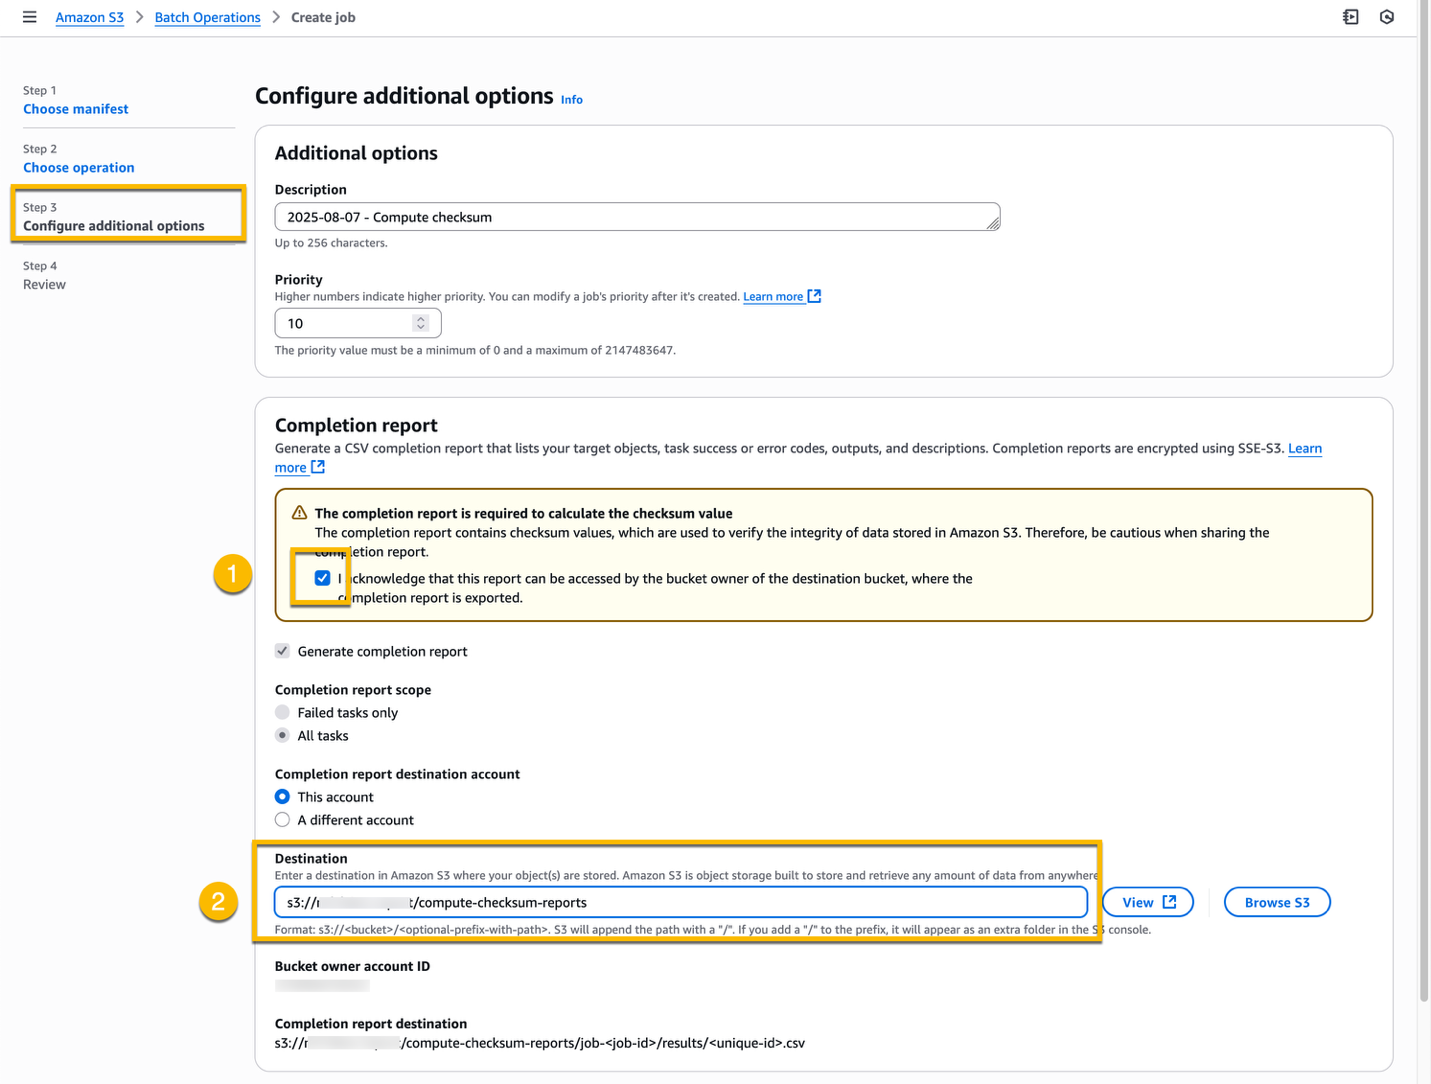
At Step 3 – Configure additional options, leave the default values in the Additional options section. In the Completion report section, acknowledge the warning that the completion report is necessary, choose This account as Completion report destination account, and enter the S3 path where you want to store the completion report (or browse to the S3 location).
In the Permissions section, select Choose from existing IAM role, choose the IAM role that you have created at Step 2, and choose Next.
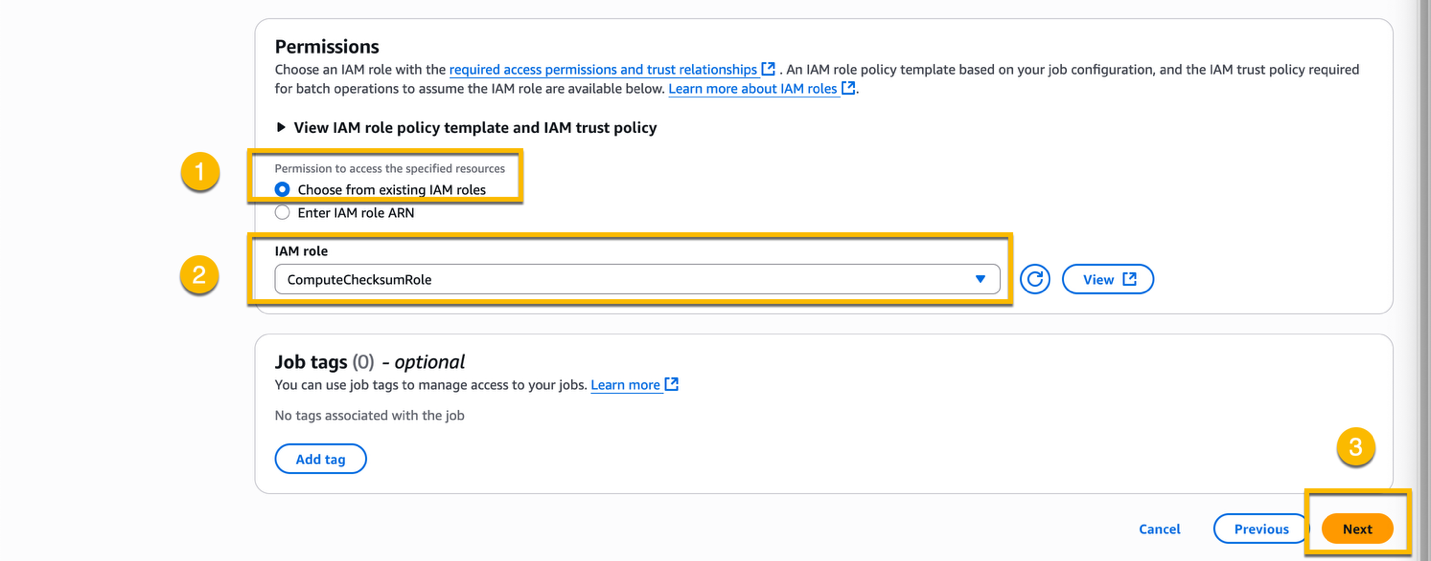
Review all settings at Step 4 – Review and choose Create job to create the compute checksum job.
4. Locating the checksum report
In this section, we walk through monitoring and reporting the S3 Batch Operations job status and locating the S3 Batch Operations completion reports.
4.1. Monitoring the S3 Batch Operations job status
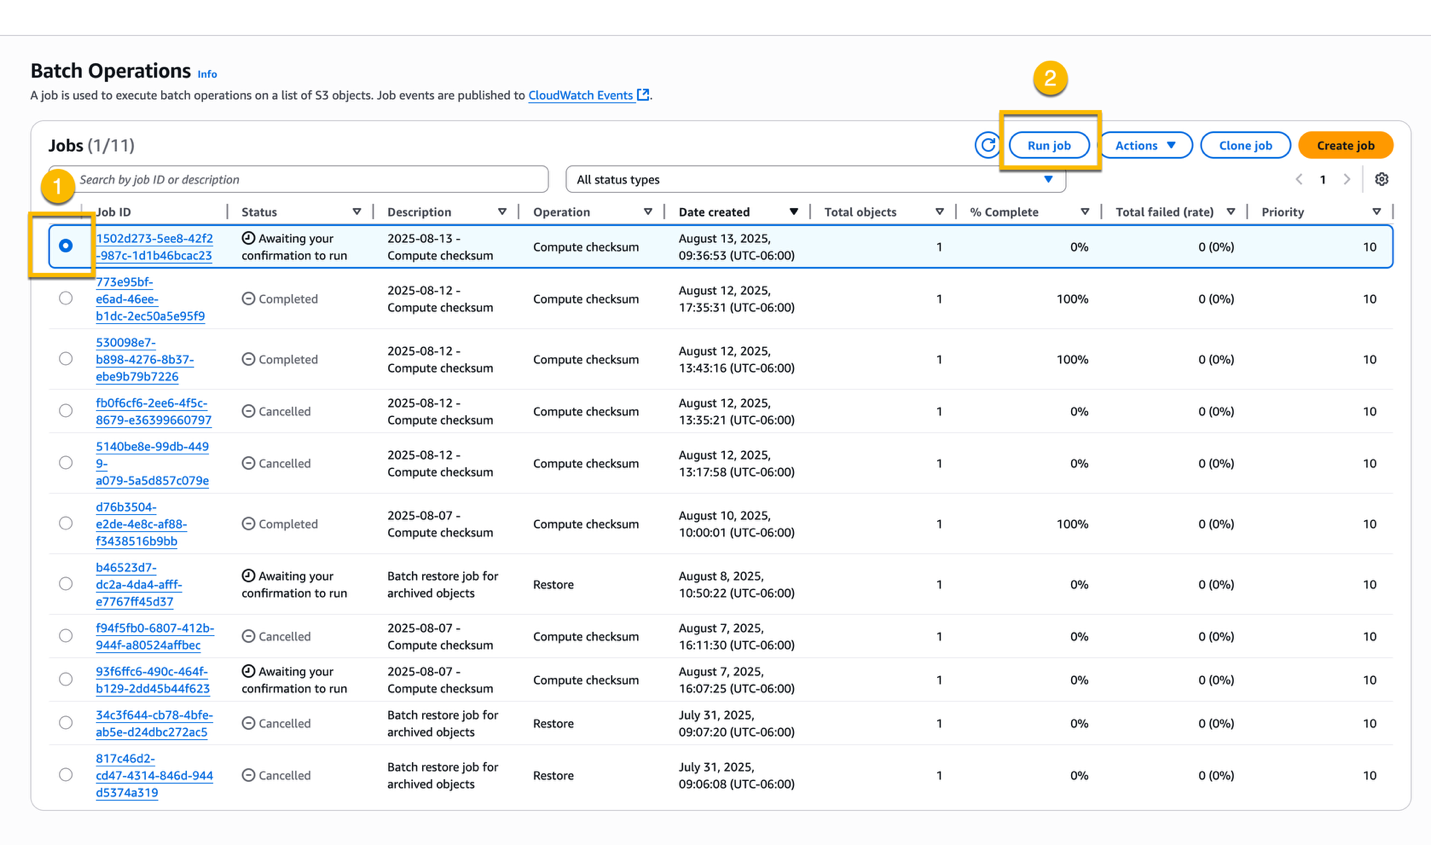
After you create a job, it progresses through a series of statuses. First, S3 processes the manifest object and other job parameters to set up and run the job. Then, the job transitions to the Awaiting your confirmation to run status, which is waiting for you to run the job.
To run the job, choose the job that you just created, and choose Run job.
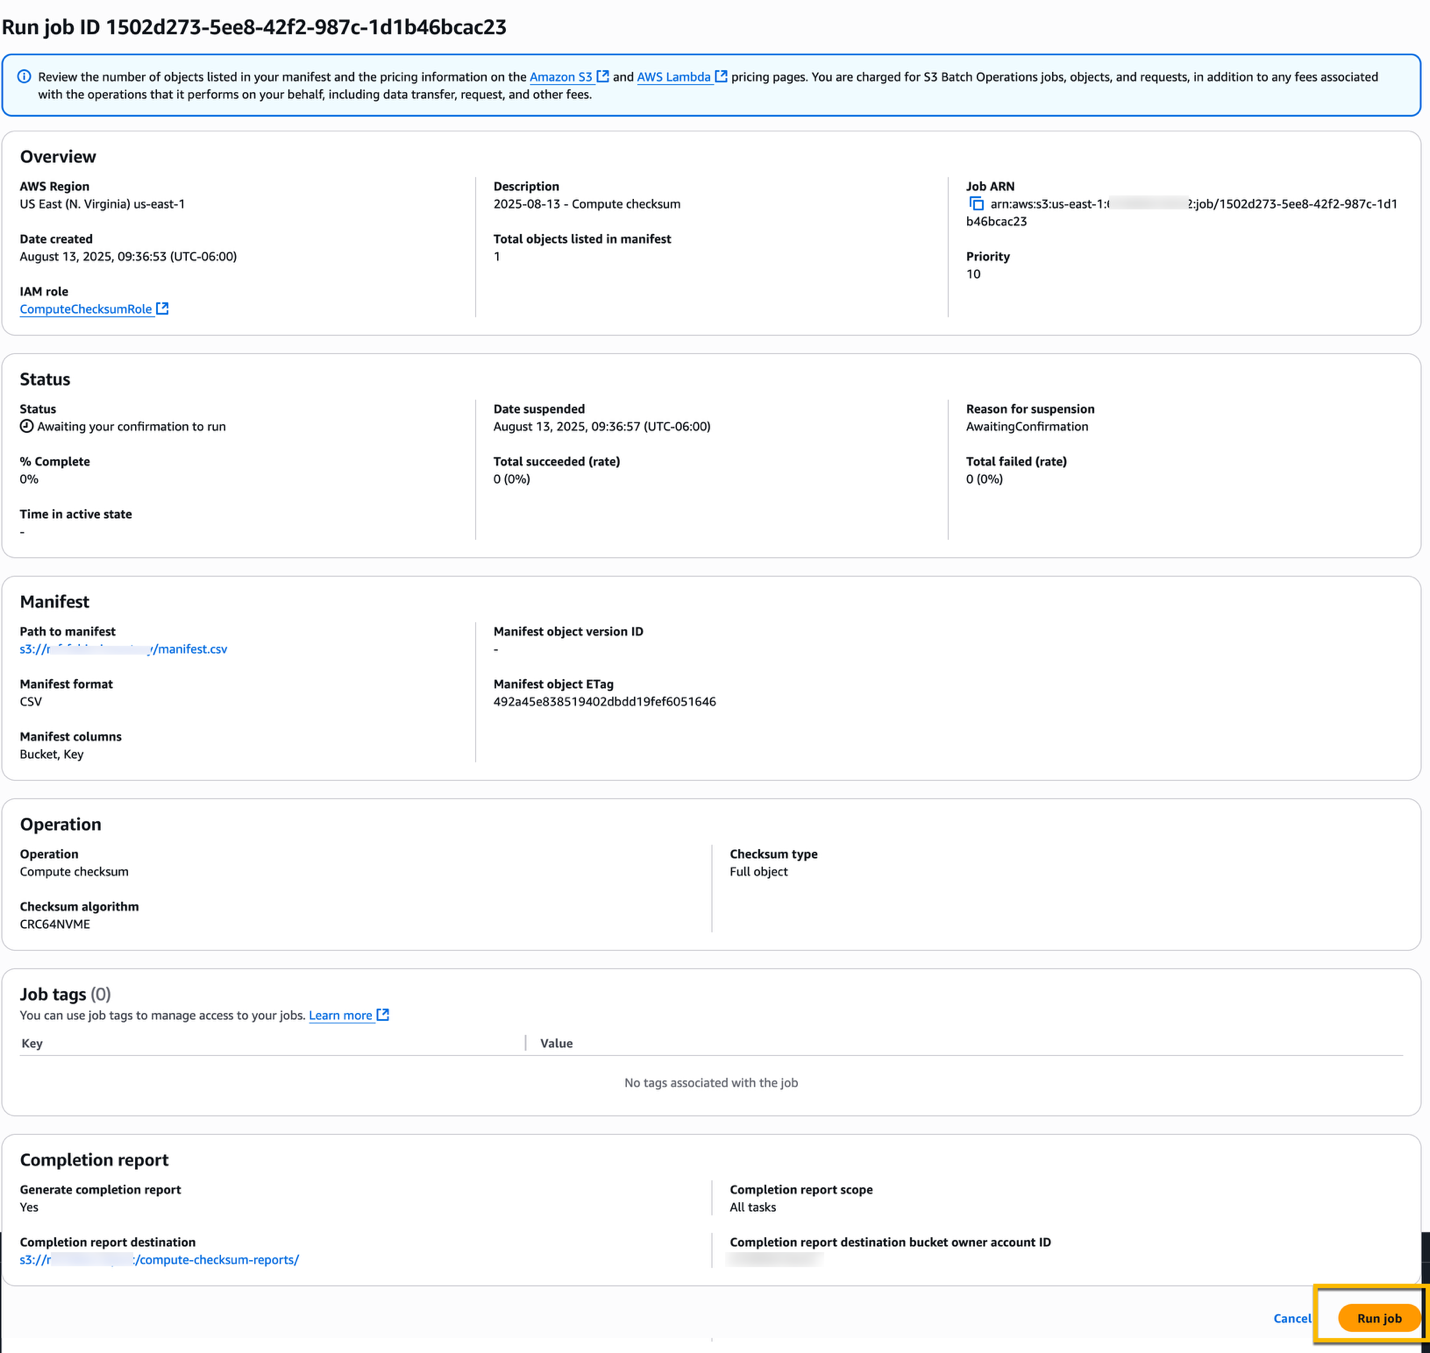
In the following page, review the job configuration, and choose the Run job button at the bottom of the page.
At this point the job changes to Ready and automatically moves to Active when S3 begins to run it. The amount of time that a job remains in the Ready state depends on whether you have higher-priority jobs running already and how long those jobs take to complete. Now S3 is calculating the checksum of the objects listed in the manifest. While a job is Active, you can monitor its progress using the S3 console.
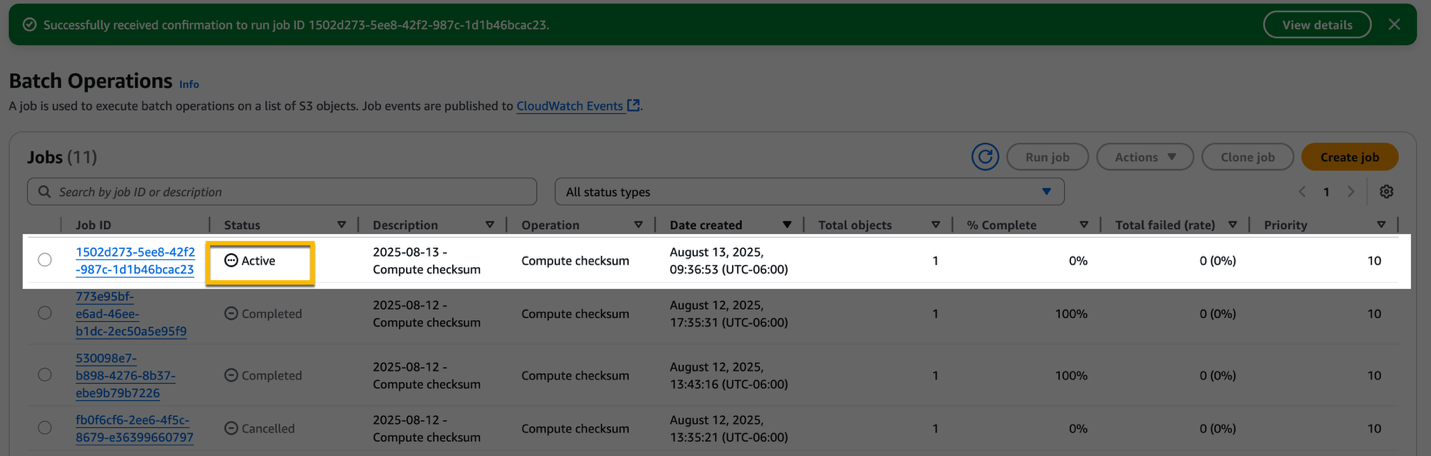
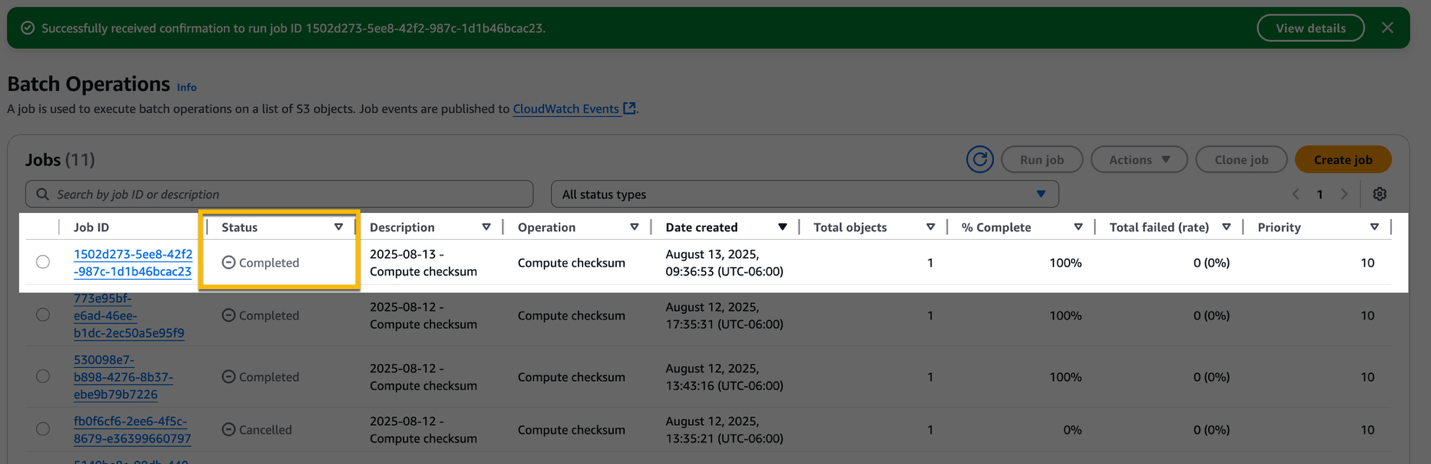
A job moves out of the Active state when the job is completed successfully or fails. When the job has finished calculating the checksum on all objects in the manifest, the report becomes available.
4.2. Locating the S3 Batch Operations completion reports
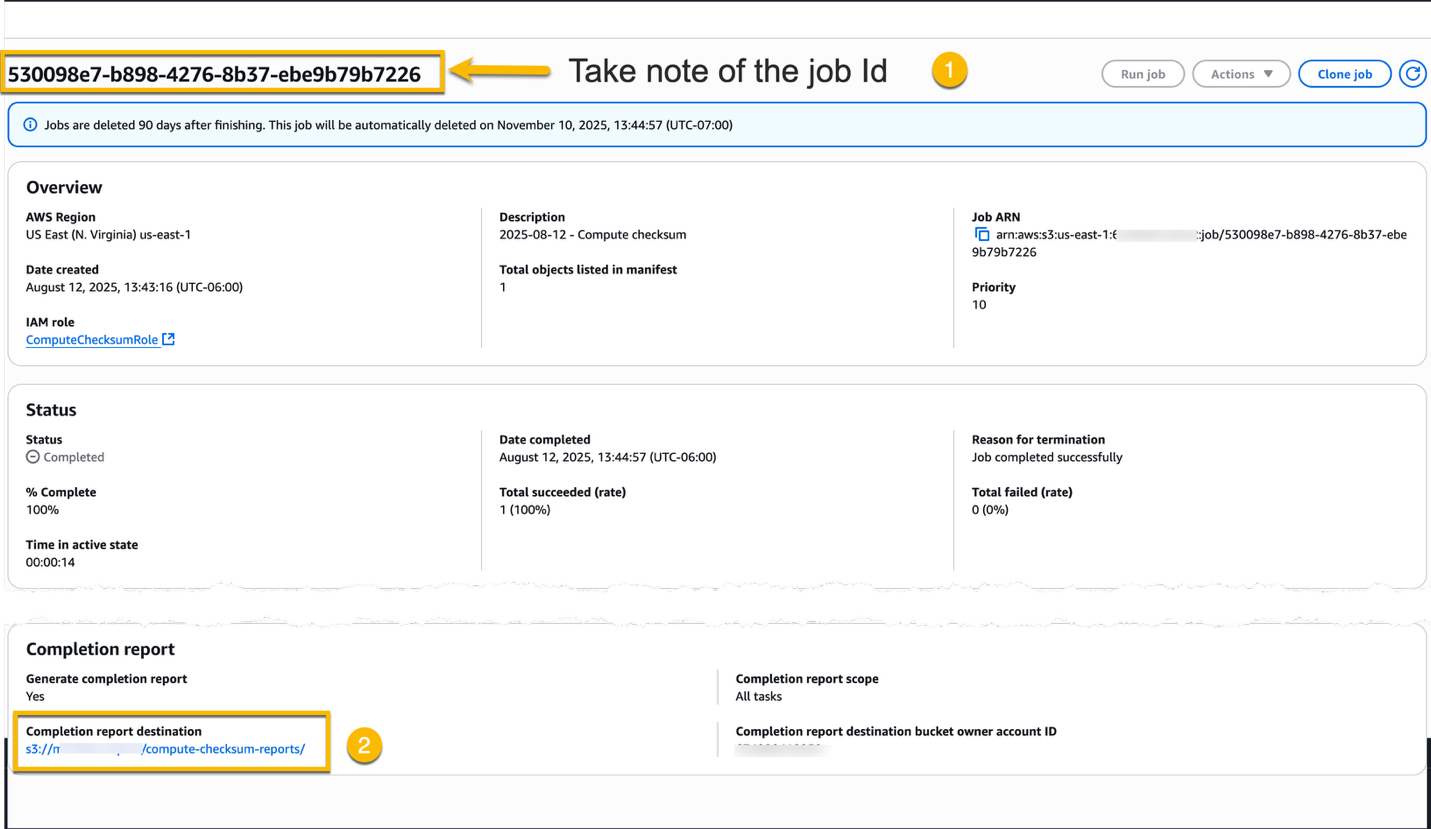
To locate the completion reports, choose the Job ID and note the job ID. Scroll down to the Completion report section, and choose the Completion report destination link.
Now find the folder named job-<jobId> and choose it to open the folder.
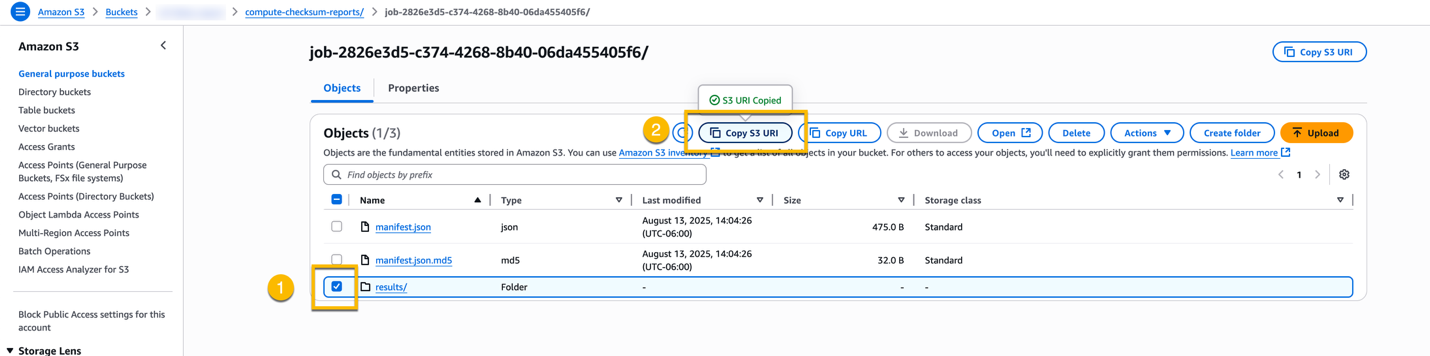
Choose the checkbox for the folder named results/ and choose the Copy S3 URI button. Note the S3 URI in your text editor because you need it in the next step.
5. Analyzing the S3 Batch Operations completion reports
In this section, we walk through understanding the completion reports schema, creating a table in Athena, analyzing the completion reports, and generating a flat CSV file with the checksum report.
5.1. Understanding the completion reports schema
S3 Batch Operations completion reports contain the following columns:
- Bucket
- Key
- VersionId
- TaskStatus
- ErrorCode
- HTTPStatusCode
- ResultMessage
The ResultMessage column contains the checksum data as the JSON object with the following structure:
{
    "checksum_base64": "HuAT0qdvFVs=",
    "etag": "b0f0be06b455717c169c93fdcce8a10e-2",
    "checksumAlgorithm": "CRC64NVME",
    "checksumType": "FULL_OBJECT",
    "checksum_hex": "1EE013D2A76F155B"
}
For analyzing the completion reports, use Athena, an interactive query service that streamlines data analysis in S3 using standard SQL.
5.2. Creating a table in Athena
To analyze the completion reports, first create a table named checksum in Athena. To create the table, navigate to the Athena Query editor in the console, and run the following query. Remember to replace <S3 URI> with the URI you noted in your text editor previously.
CREATE EXTERNAL TABLE checksum(
         bucket string,
         key string,
         version_id string,
         task_status string,
         error_code string,
         https_status_code string,
         result_message string)

ROW FORMAT SERDE 'org.apache.hadoop.hive.serde2.OpenCSVSerde'
  WITH SERDEPROPERTIES (
    'separatorChar' = ',',
    'quoteChar' = '"',
    'escapeChar' = '\\'
  )
  STORED AS TEXTFILE
  LOCATION '<S3 URI>';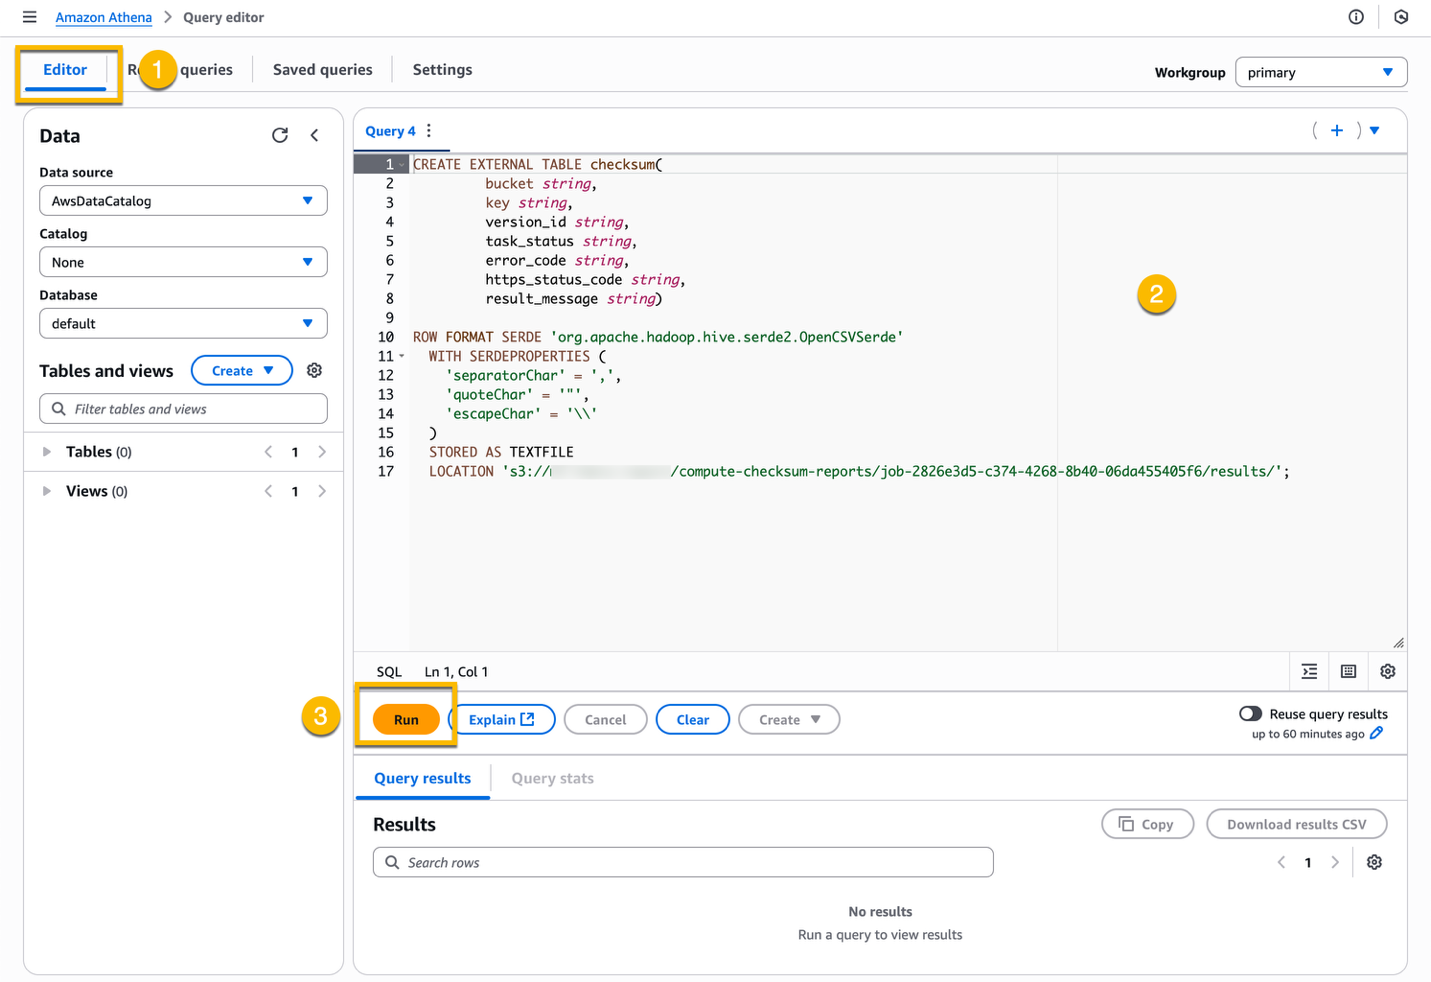
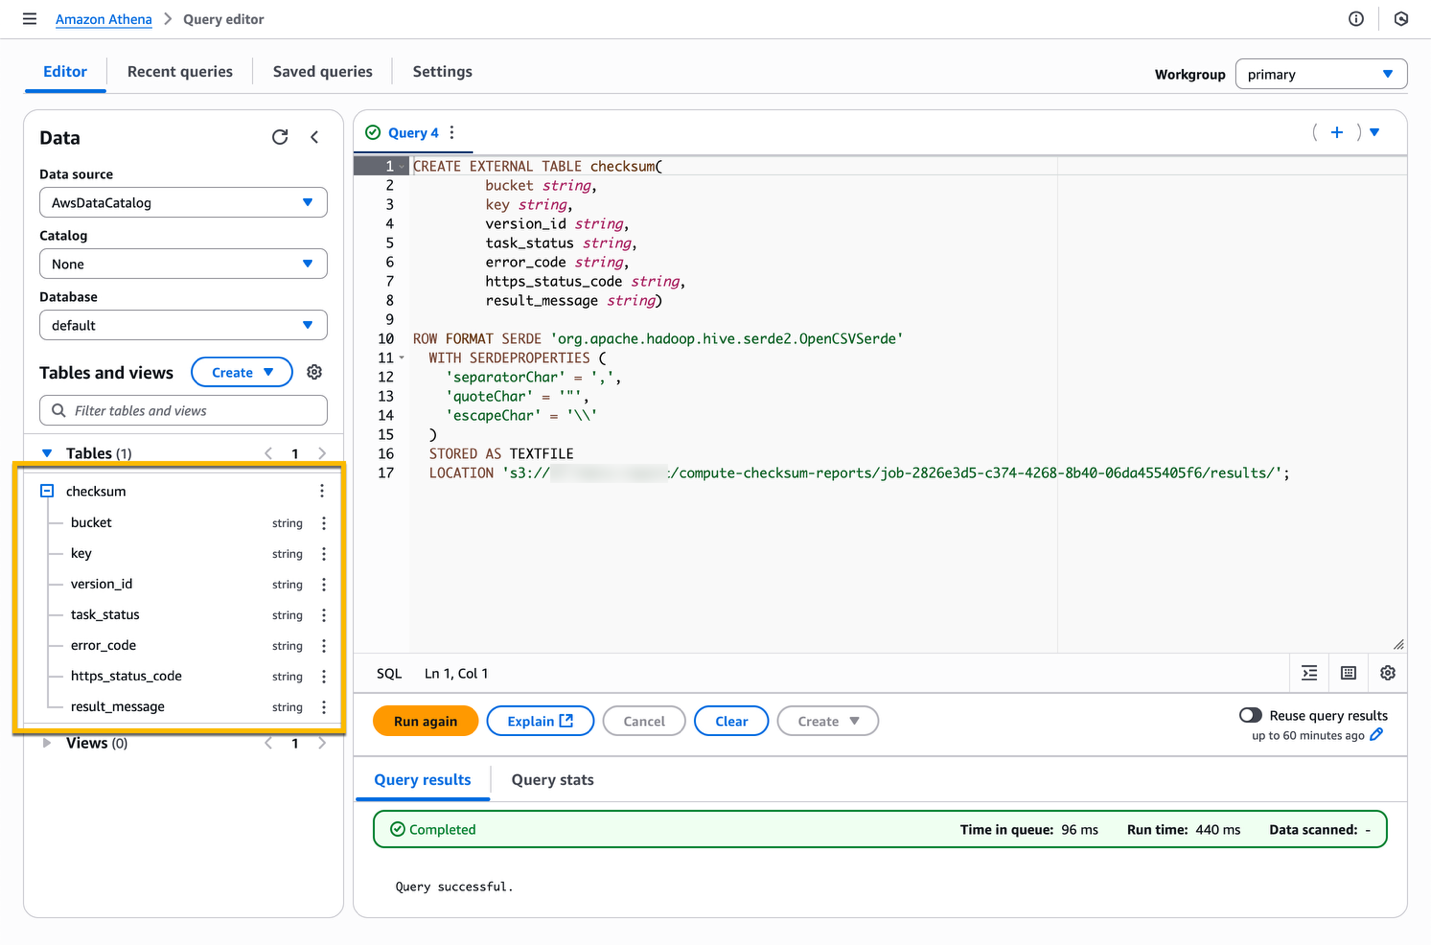
When the query completed, you should see a table named checksum. You can expand the table to observe the schema.
5.3. Analyzing the completion reports
To verify access to the completion reports, you can run the following query:
SELECT * FROM checksum LIMIT 10;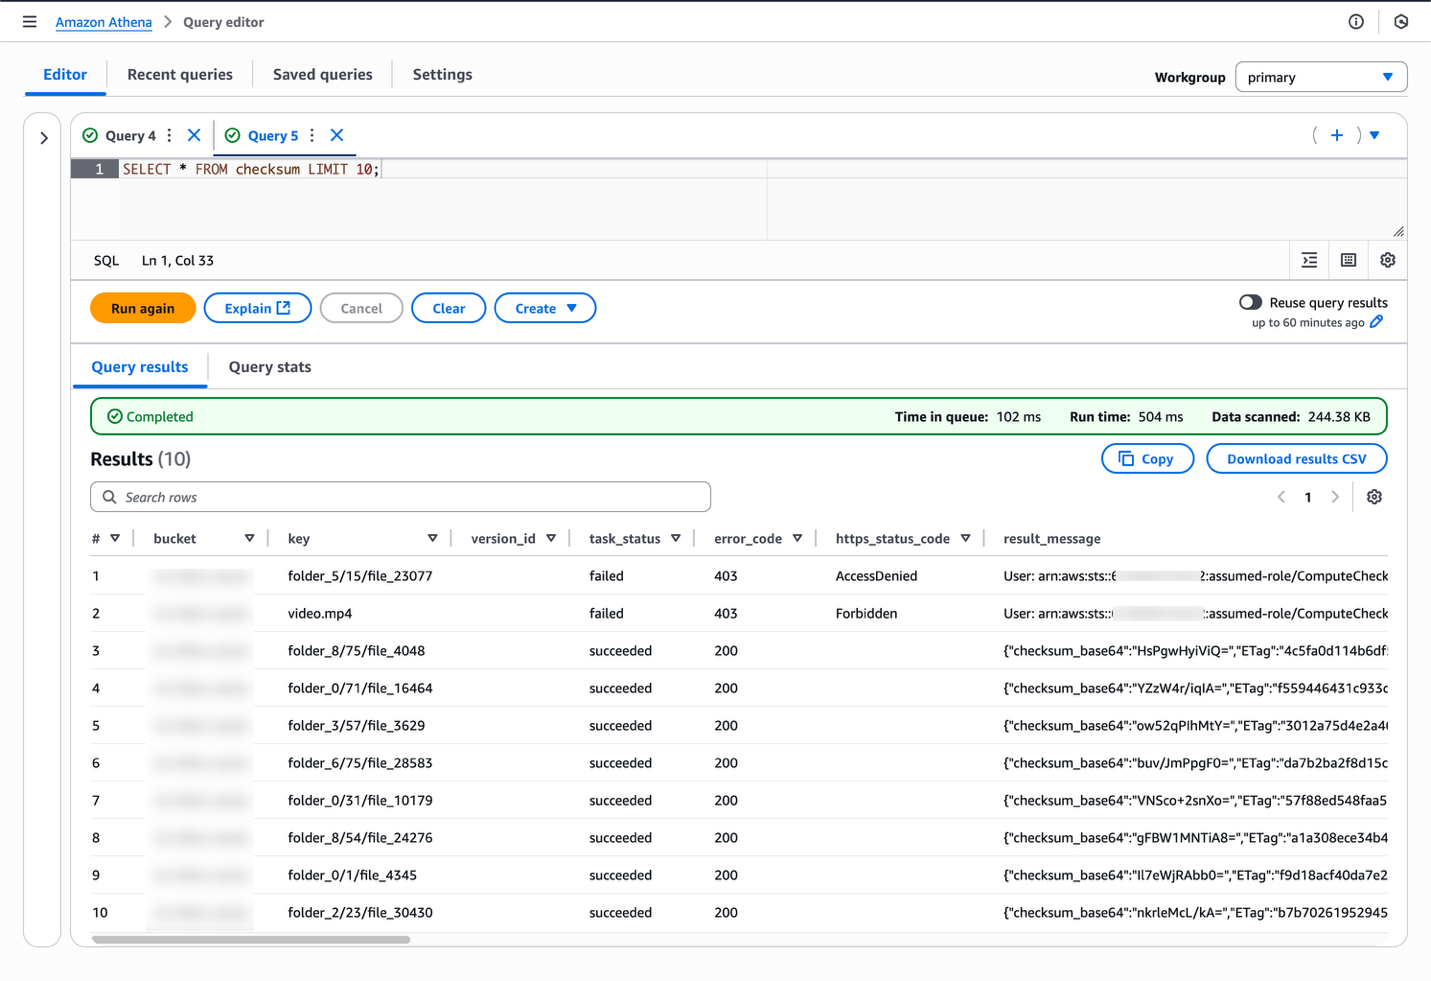
You can count the number of failed compute checksum tasks by running the following query:
SELECT COUNT (error_code) AS "Count of errors" FROM checksum WHERE error_code != '200';To troubleshoot the failed compute checksum tasks, you can run the following query:
SELECT key, result_message FROM checksum WHERE error_code != '200';The result_message column contains details regarding the failure.
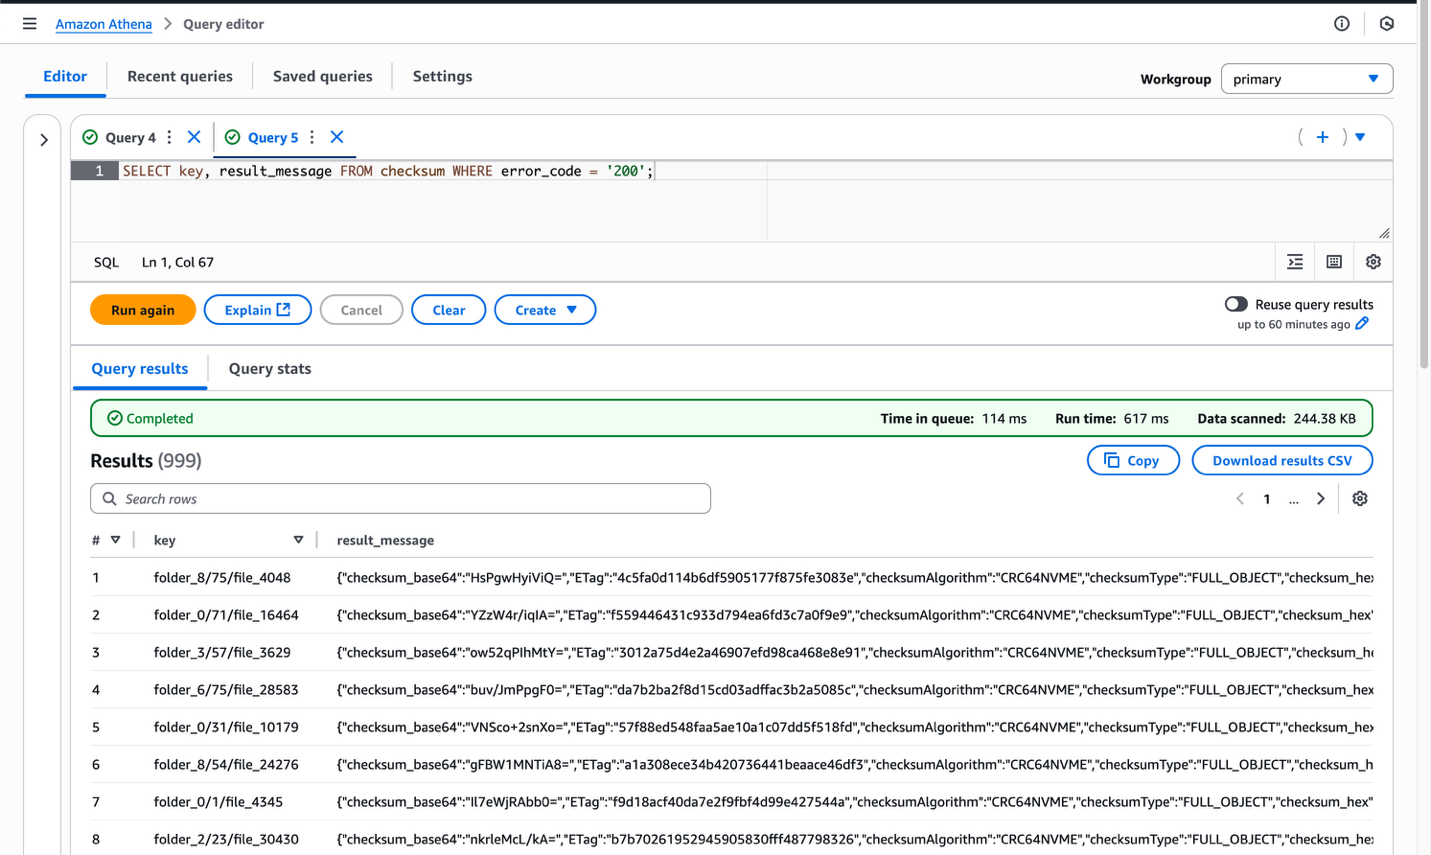
To choose only successful compute checksum tasks, you can run the following query:
SELECT key, result_message FROM checksum WHERE error_code = '200';The ResultMessage column contains the compute checksum information stored as a JSON object with the following structure:
{
    "checksum_base64": "HuAT0qdvFVs=",
    "etag": "b0f0be06b455717c169c93fdcce8a10e-2",
    "checksumAlgorithm": "CRC64NVME",
    "checksumType": "FULL_OBJECT",
    "checksum_hex": "1EE013D2A76F155B"
}
5.4. Generating a flat CSV file with the checksum report
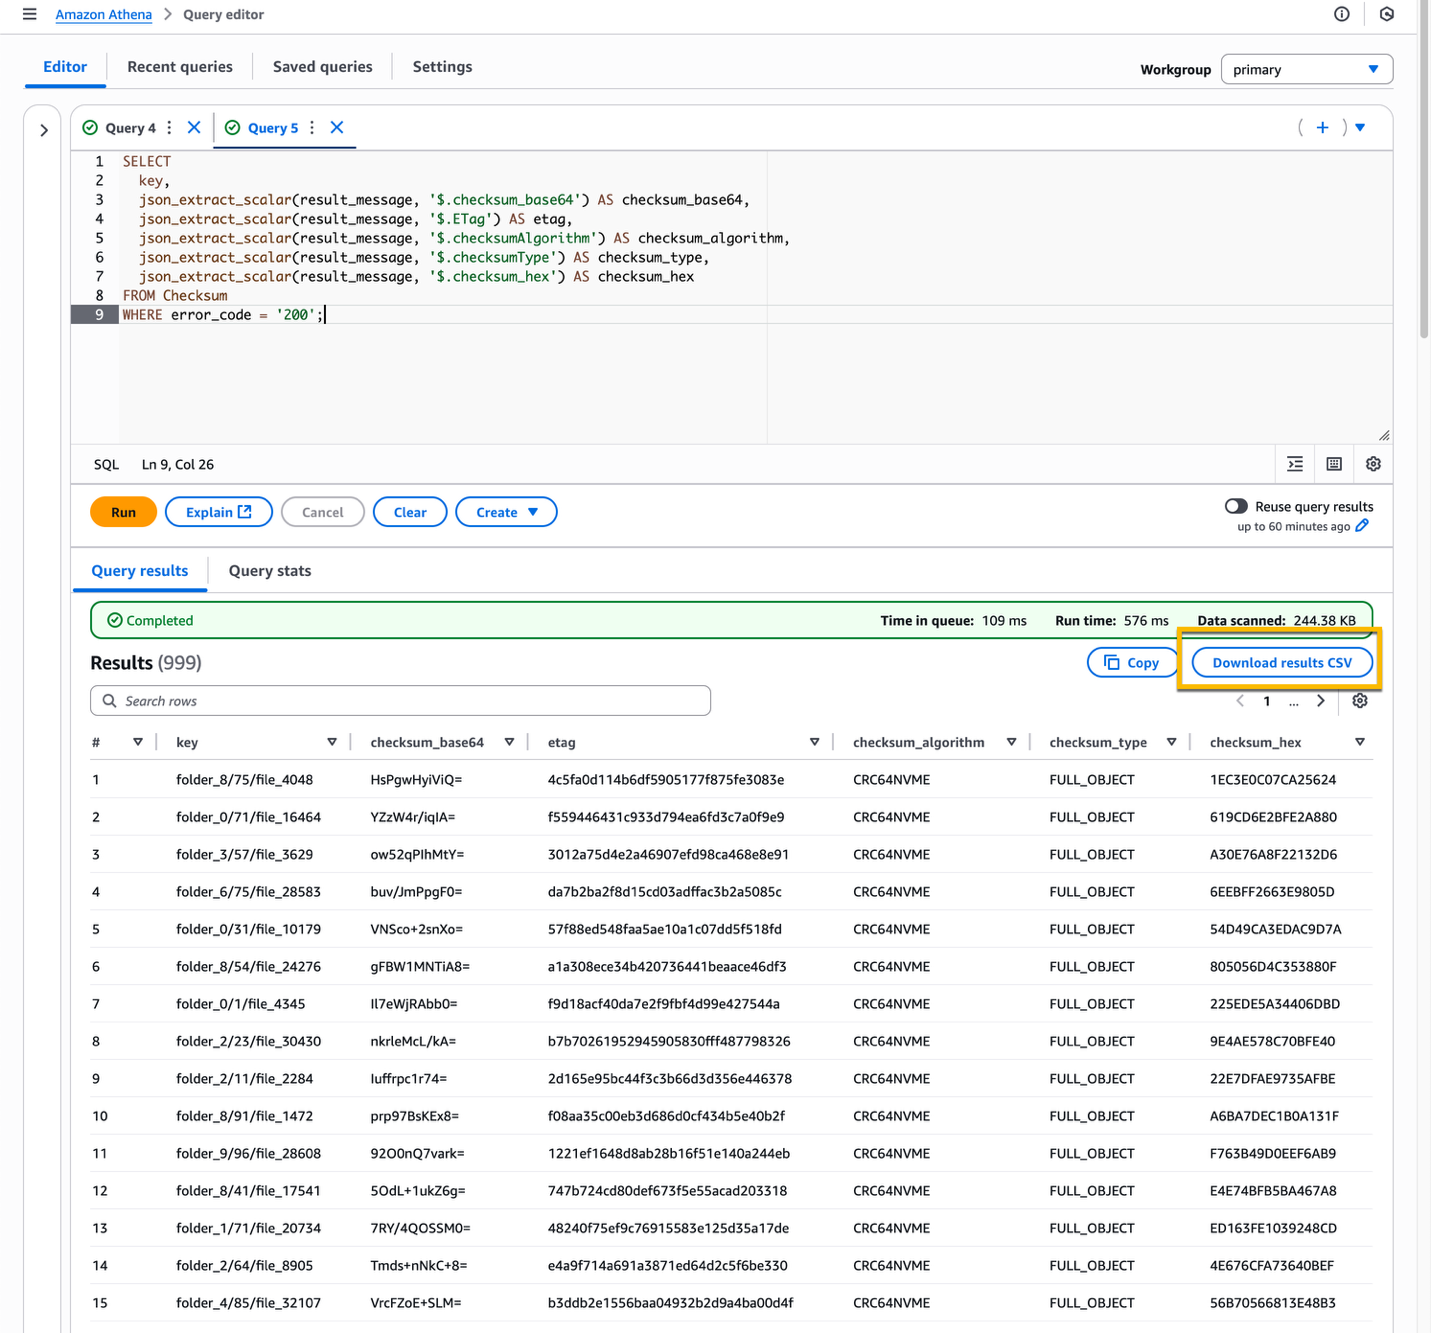
In some cases, you might need to parse the JSON string within the ResultMessage column and expand its key-value pairs into new columns in the table. To do so, you can run the following query:
SELECT
  key,
  json_extract_scalar(result_message, '$.checksum_base64') AS checksum_base64,
  json_extract_scalar(result_message, '$.ETag') AS etag,
  json_extract_scalar(result_message, '$.checksumAlgorithm') AS checksum_algorithm,
  json_extract_scalar(result_message, '$.checksumType') AS checksum_type,
  json_extract_scalar(result_message, '$.checksum_hex') AS checksum_hex
FROM Checksum
WHERE error_code = '200';
As a result, the compute checksum information is no longer stored as a JSON object, but each key-value pair has been expanded in dedicated columns. If you need to further analyze the data in your local computer, then you can download the query results as CSV file by choosing the Download results CSV button.
Conclusion
The compute checksum operation in Amazon S3 Batch Operations helps users verify the content of datasets at scale. This capability works with any object stored in Amazon S3, regardless of size or storage tier, with predictable costs through standard S3 Batch Operations job execution and data processing fees.
Creating checksum verification jobs is clear. Provide a manifest of objects to verify, and S3 Batch Operations automatically generates detailed integrity reports, thus eliminating manual verification processes. This means that you can verify billions of objects without storage retrieval fees or operational overhead from third party services. If you are managing large scale datasets across multiple storage classes, then compute checksum operation makes content verification direct and cost effective.