AWS Storage Blog
How to use Amazon S3 Multi-Region Access Points to streamline and reduce the cost of writing across AWS Regions
Large global organizations often struggle to efficiently manage data copies across different geographic regions when using distributed object storage services. Although several approaches exist for cross-region data writing, common solutions such as data replication or streaming can be costly and introduce latency issues.
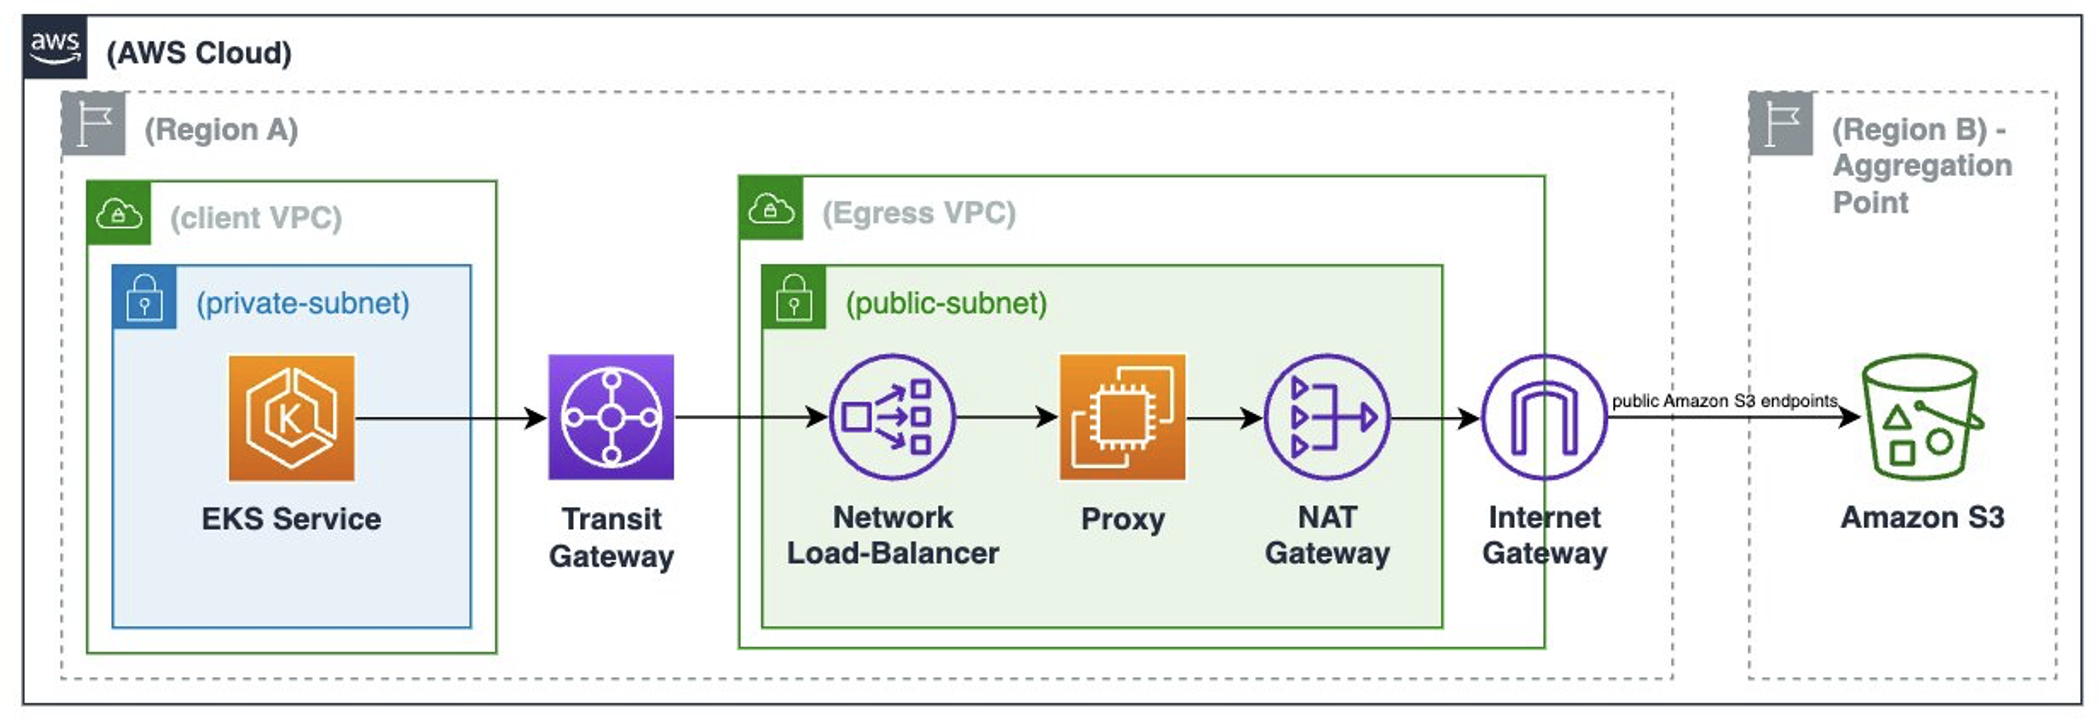
Many customers have core services deployed globally across multiple Amazon Web Services (AWS) Regions and other shared services consolidated to a few key Regions. For example, monitoring and observability services could run in key AWS Regions and aggregate data from workloads deployed across AWS Regions into a central Amazon S3 bucket to provide visibility into the overall health of the distributed services. Using NAT Gateway for centralized egress is a common pattern for writing data cross-Region from private subnets using public Amazon S3 endpoints. Gateway VPC endpoints are the preferred method to access Amazon S3 from a private subnet in a VPC, but gateway endpoints only support same-Region requests. Services running in dedicated VPCs with private subnets could connect to the centralized egress VPC through AWS Transit Gateway, and the egress VPC uses NAT Gateway (or NAT instances) and an internet gateway to communicate with the public Amazon S3 endpoints. Customers often adopt the centralized egress pattern for moving data between AWS Regions, but as data volumes grow this not only puts a heavy load on the central egress service, it also increases costs. This solution delivers the same functionality and performance while decreasing the load on the egress service and decreasing the cost to serve.
In this post, we discuss how a customer can use Amazon S3 Multi-Region Access Points based on AWS Global Accelerator to streamline cross-Region data movement between core application services and a centralized S3 bucket used by their monitoring and observability services. The architecture change reduces complexity, moves the cross-Region traffic to private Amazon S3 endpoints, reduces data movement related charges significantly, and removes a significant network load from an egress service. We outline the before and after architectures and the steps you can take to implement this solution. At the end of this post, we highlight one enterprise customer, Salesforce, that experienced a reduction in data movement charges of around 70%.
Key requirements for the customer:
- Write data from compute running in private subnets cross-Region
- A single S3 bucket aggregates the data from multiple AWS Regions
- Reduce/remove load on the central egress service
- Improve cost efficiency
Solution overview
The following figure shows the before: NAT Gateway Egress using Transit Gateway for cross VPC connectivity—Public Amazon S3 Endpoints.
The following figure shows the after: S3 Multi-Region Access Point using VPC Interface Endpoint—Private Amazon S3 Endpoints.
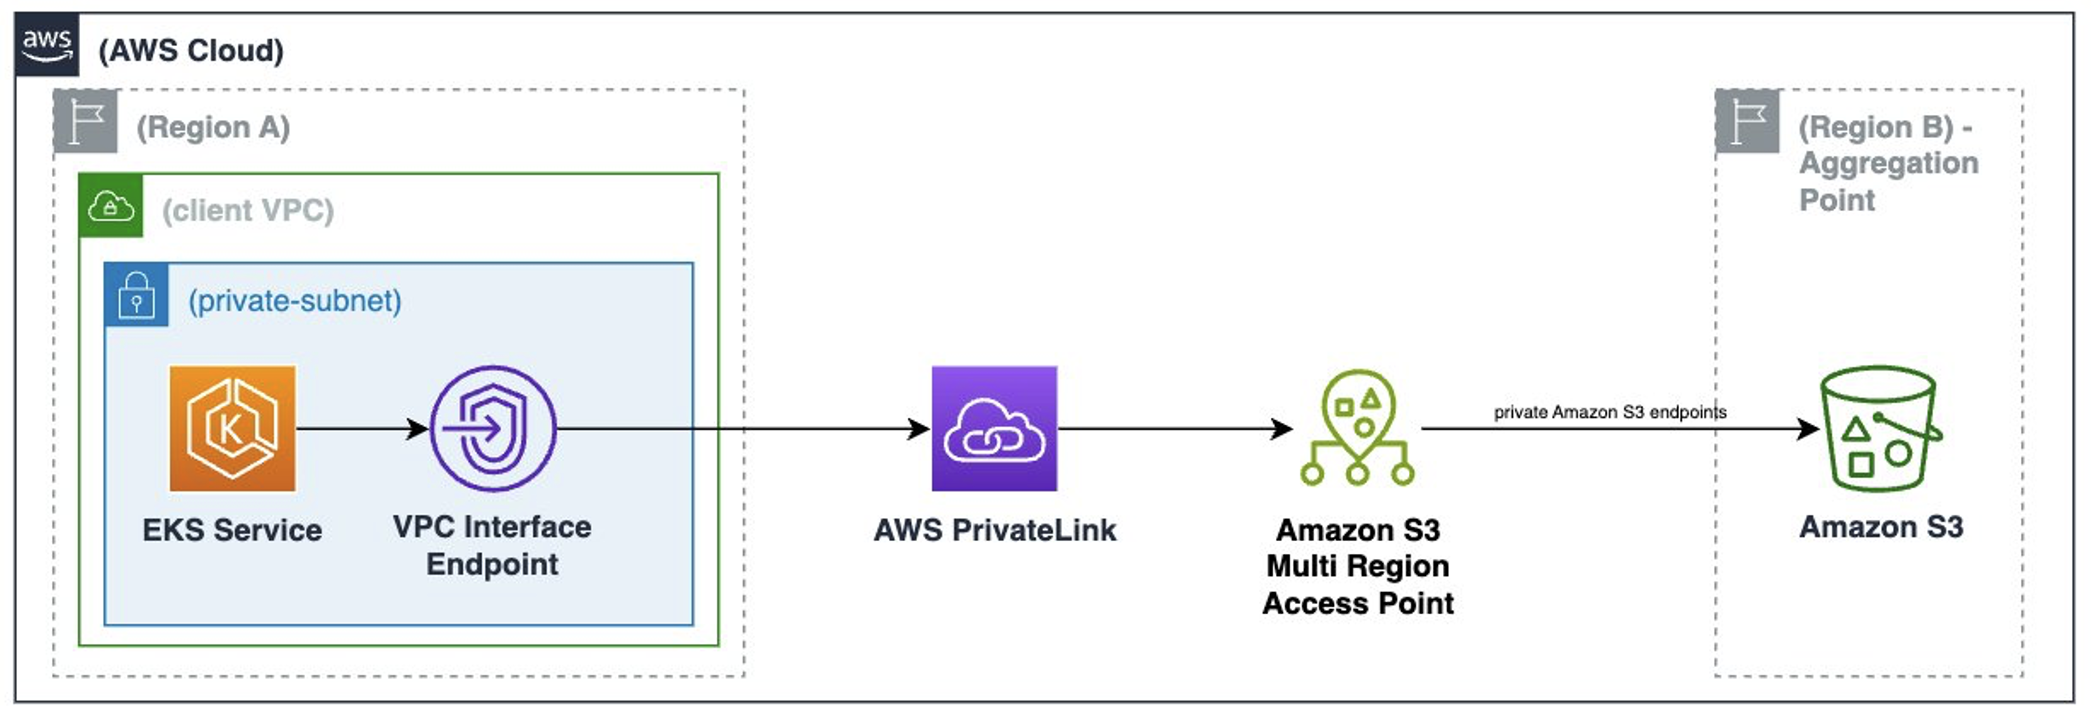
To enable the streamlined architecture for writing data cross-Region to the central S3 bucket, our enterprise customer created an S3 Multi-Region Access Point and added the central bucket as the only associated bucket. In each AWS Region that needed to write data to the central S3 bucket, our customer created a VPC interface endpoint using the com.amazonaws.s3-global.accesspoint endpoint type. Permissions were configured to allow connections between the S3 Multi-Region Access Point endpoint and the interface endpoint for the compute services writing data to the central bucket. The architectural change met the key requirements and delivered a streamlined, private, cost-efficient solution.
Prerequisites
To complete the walkthrough you need an active AWS account with permissions to create and configure the following resources:
- An Amazon Virtual Private Cloud (Amazon VPC) with a private subnet
- Security groups
- An AWS Identity and Access Management (IAM) role that is assigned to the Amazon Elastic Compute Cloud (Amazon EC2) instance
- An EC2 Instance Connect Endpoint
- An S3 bucket (in a different Region than the VPC)
com.amazonaws.s3-global.accesspointVPC endpoints- An S3 Multi-Region Access Point
- An EC2 instance in the private subnet
Walkthrough
In this section, we go over the steps to set up the After architecture using S3 Multi-Region Access Points with VPC Interface Endpoints to write data from a private subnet in a Region to an S3 bucket in a different Region. We verify that all network traffic uses private addresses.
1. Create a VPC with a private subnet
Use the Region us-west-1 (N. California) for the VPC and Amazon EC2 portion, and us-east-2 (Ohio) for the Amazon S3 portion, but you can choose any AWS Region that supports S3 Multi-Region Access Points.
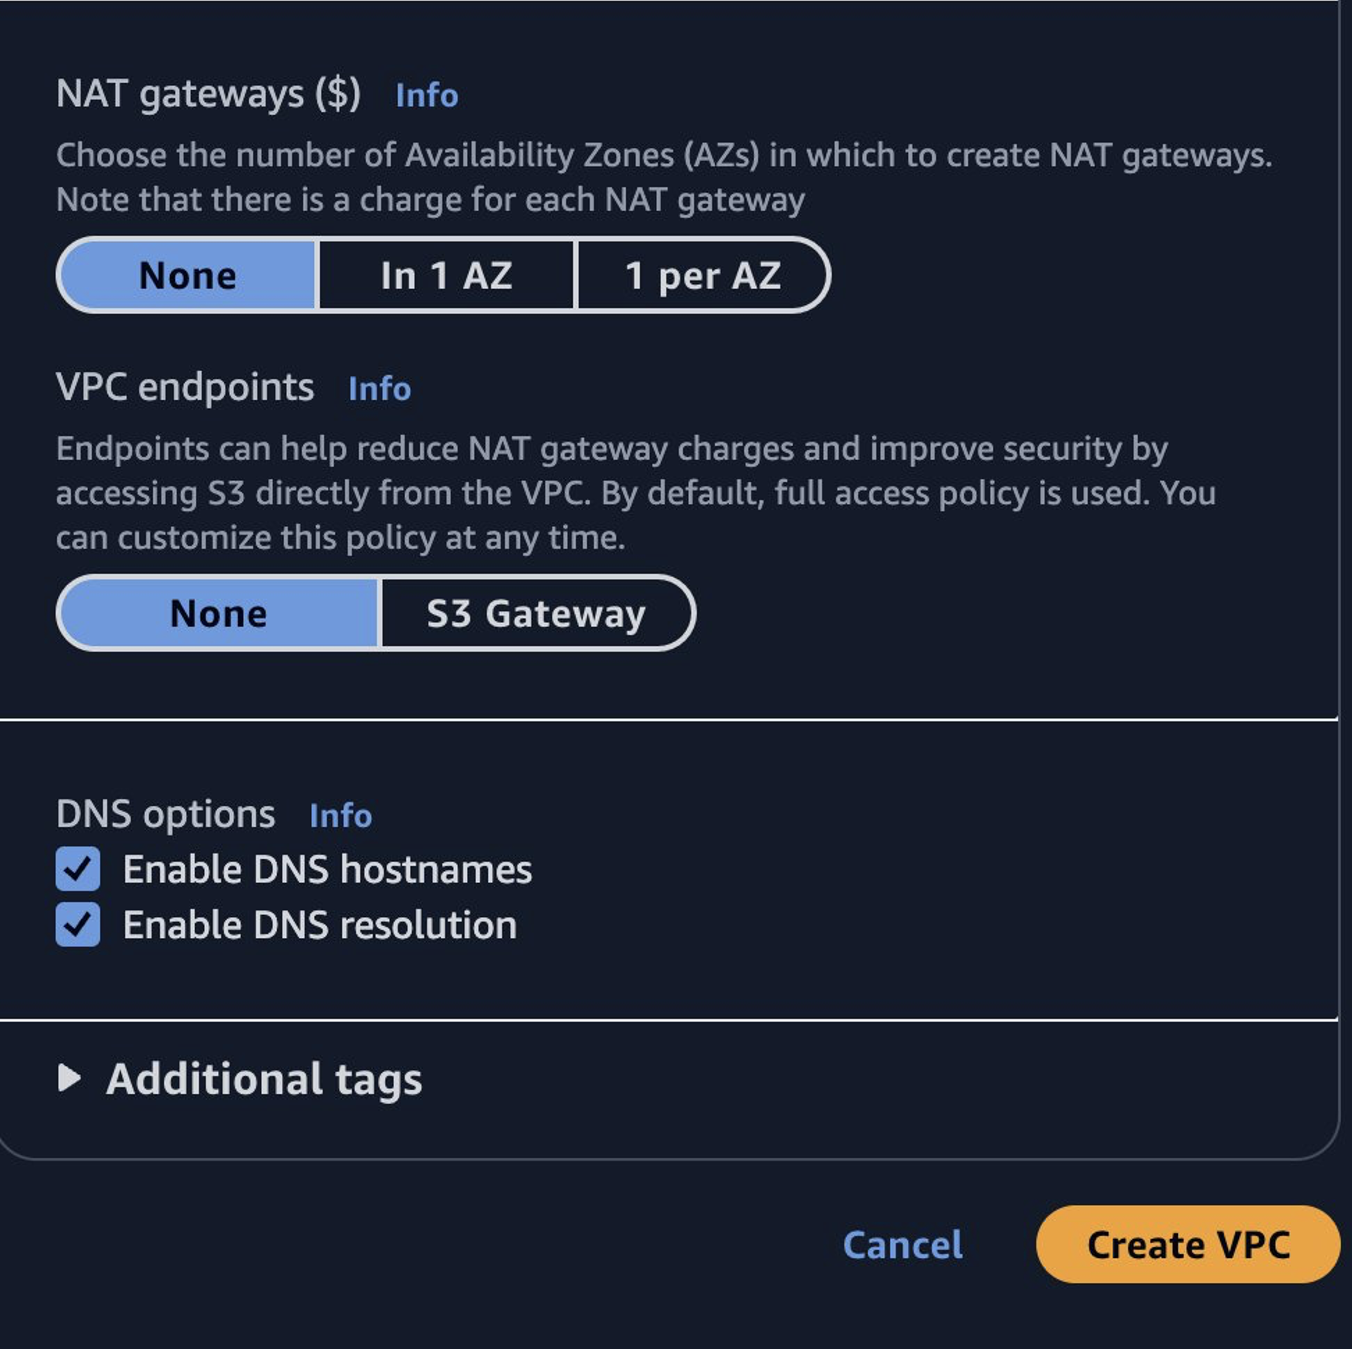
Log in to the AWS Management Console, navigate to the VPC dashboard, and choose Create VPC. In the VPC Settings section choose VPC and more and choose a name in the Name tag auto-generation section (for example mrap_blog_walkthrough).
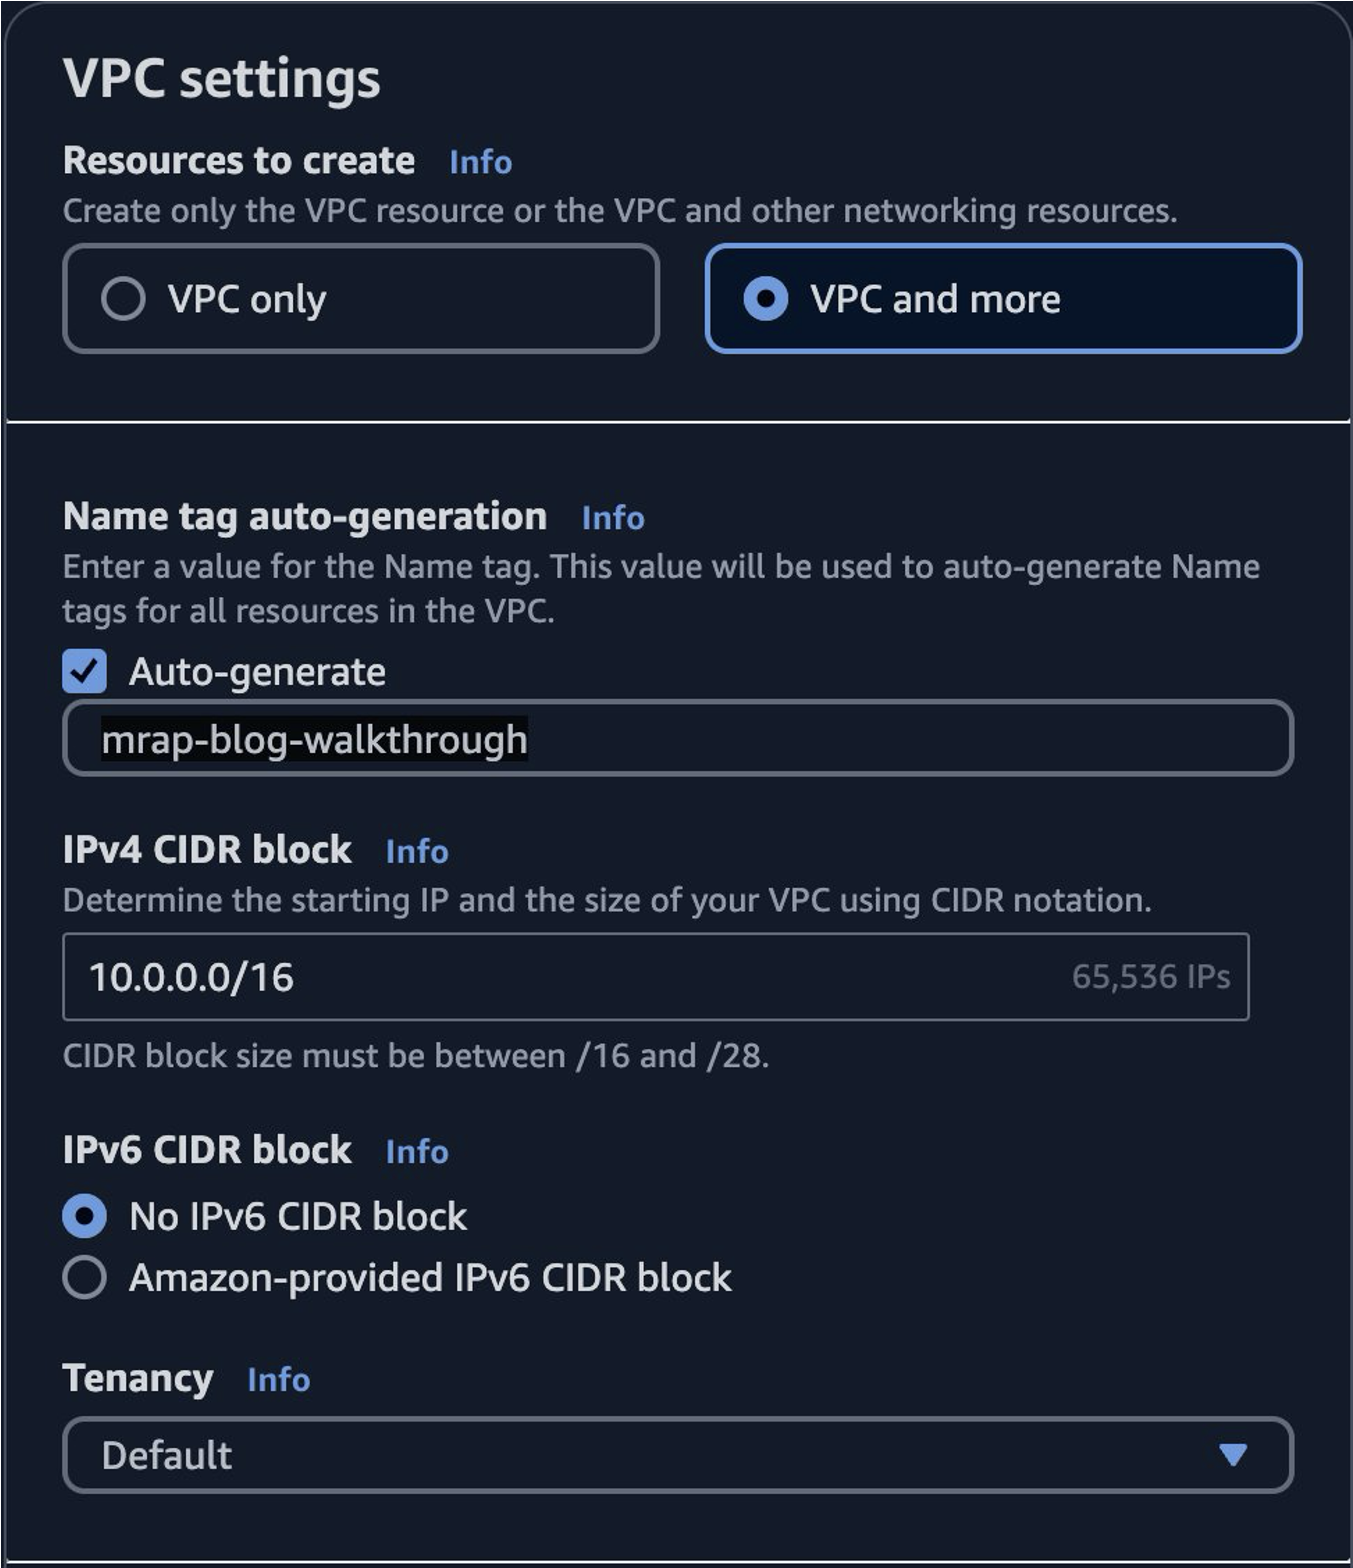
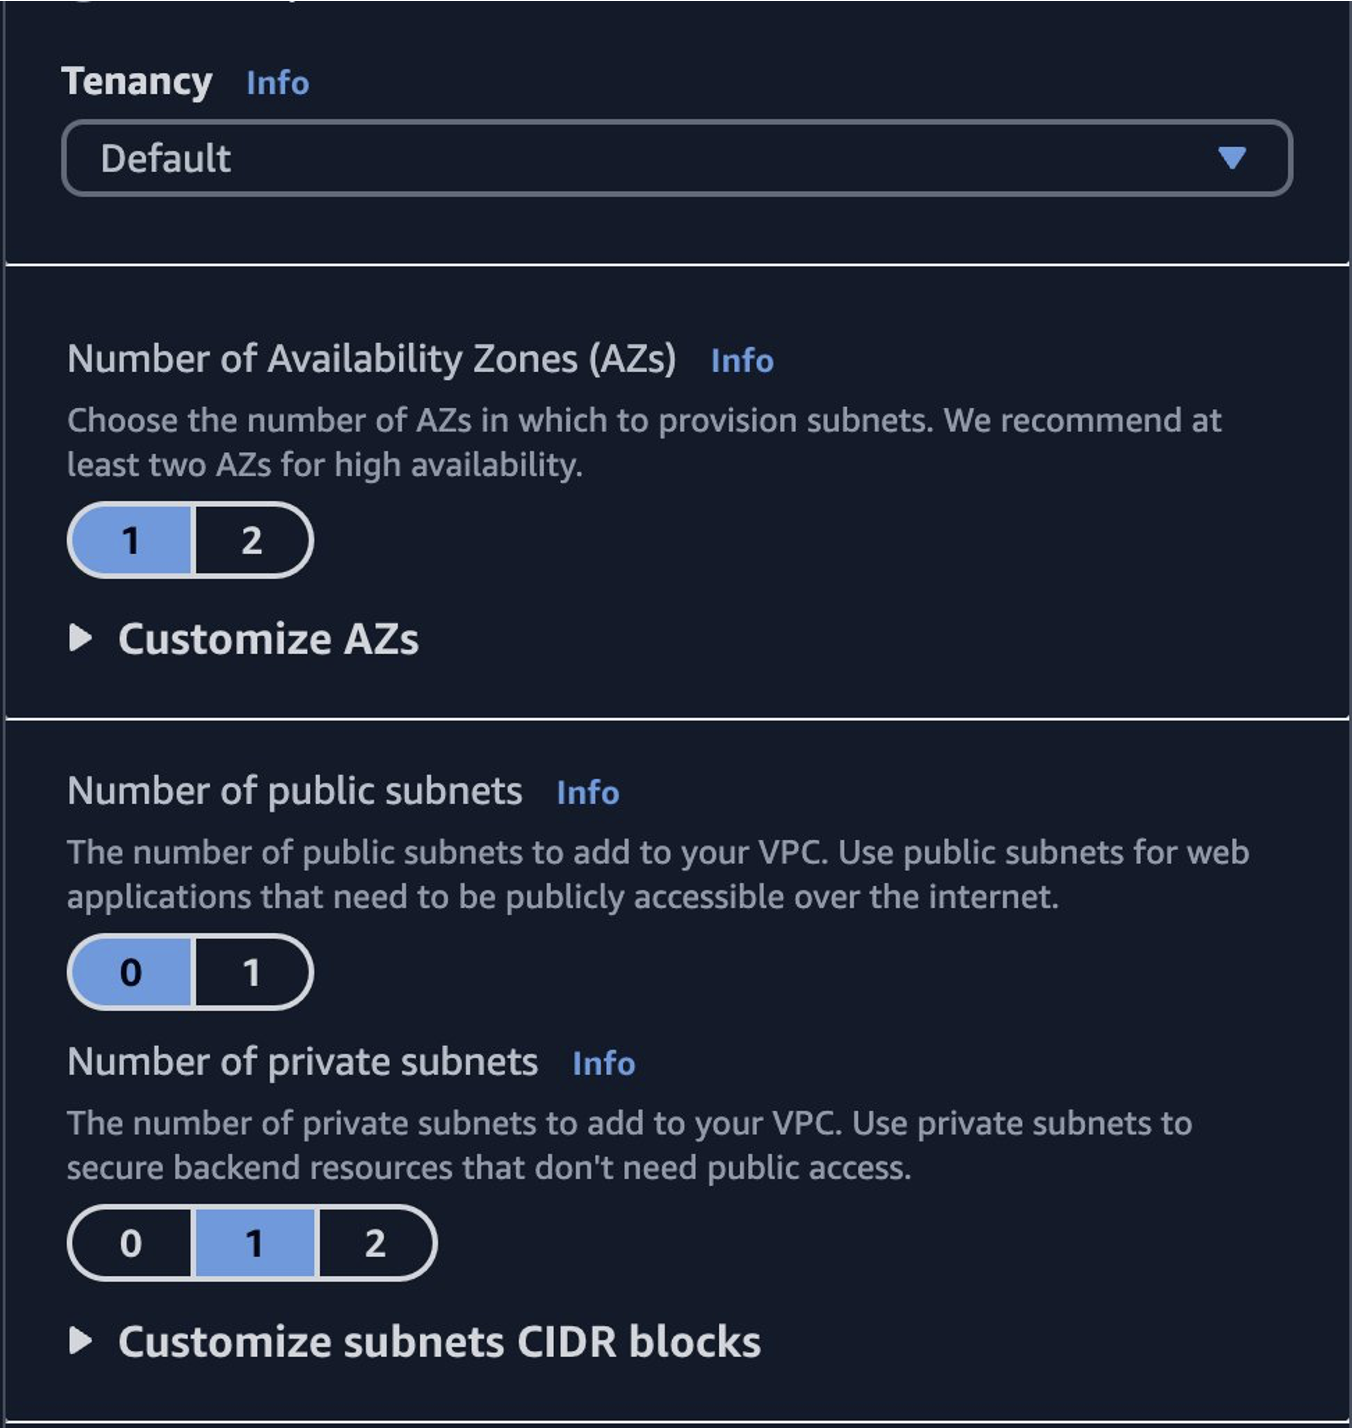
Choose 1 for Number of Availability Zones, choose 0 for Number of public subnets, and choose 1 for Number of private subnets.
In the NAT gateways section, choose None. In the VPC endpoints section, choose None. Keep the remaining default options and choose Create VPC.
2. Create security groups
Create security groups for the following resources:
- VPC Endpoint: EC2 Instance Connect Endpoint
- VPC Endpoint: com.amazonaws.s3-global.accesspoint
- EC2 instance in the private subnet
The following steps create restrictive security groups that only allow the necessary traffic to make the walkthrough work. You can skip these steps and use the default security group, which allows all traffic if you aren’t concerned with locking down security for the walkthrough.
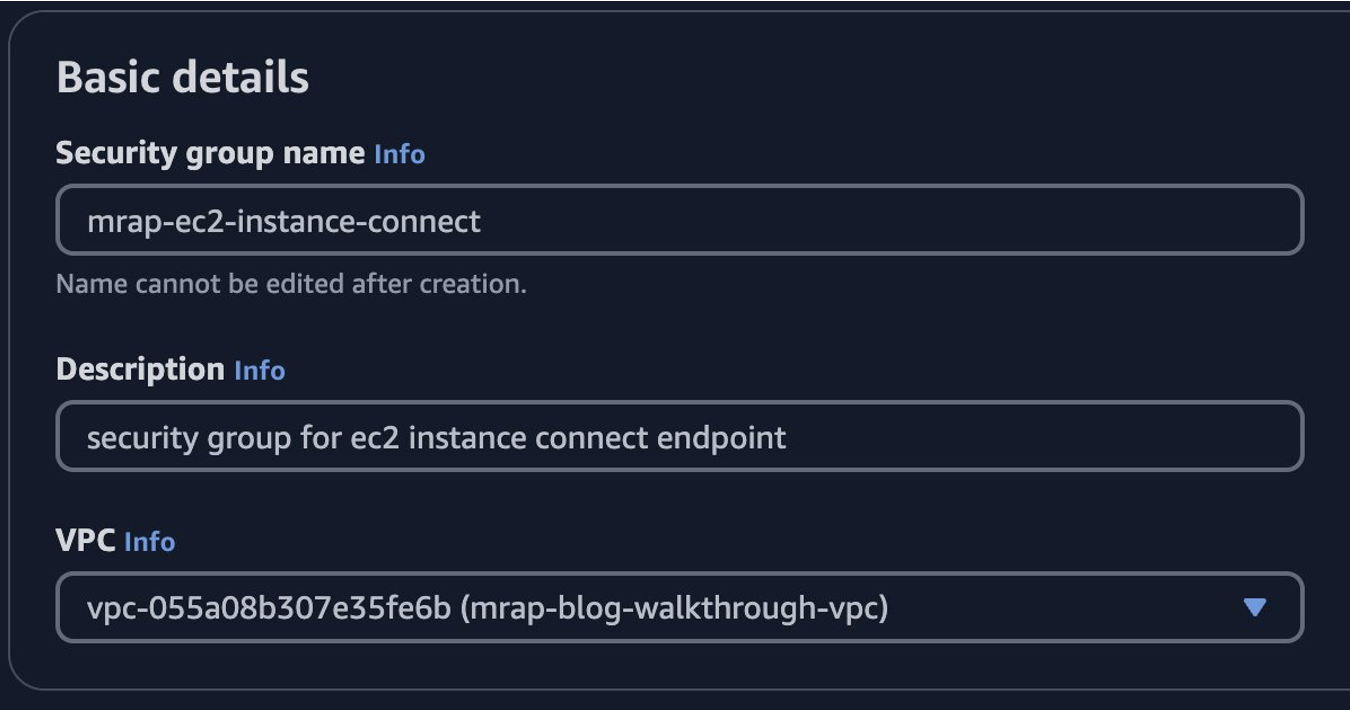
Navigate to the Security groups section in the VPC console and choose Create security group. Give the security group a Name (for example mrap-ec2-instance-connect) and Description and choose the VPC just created. Choose Create security group. The rules are updated when the EC2 instance security group is created.
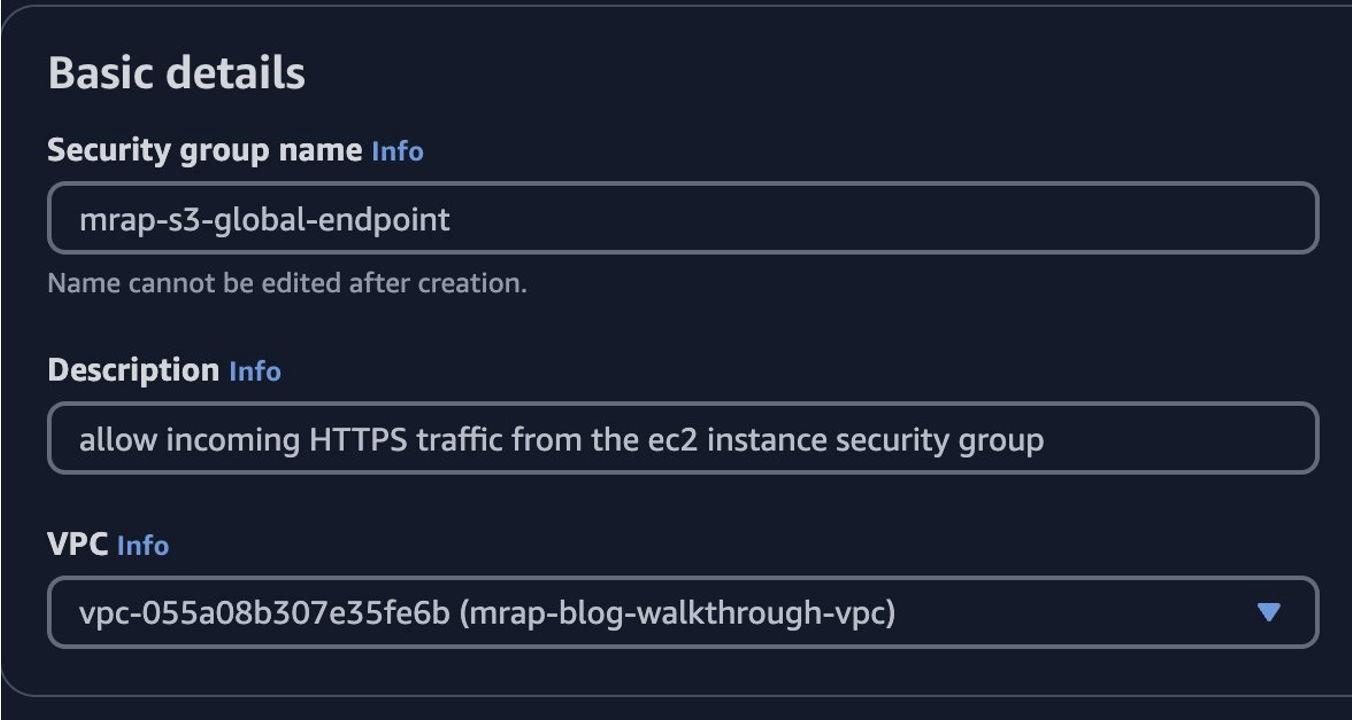
Create another security group for the VPC interface endpoint of the type com.amazonaws.s3-global.accesspoint. Give the security group a Name (for example mrap-s3-global-endpoint) and Description and choose the VPC just created. Choose Create security group. The rules are updated when the EC2 instance security group is created.
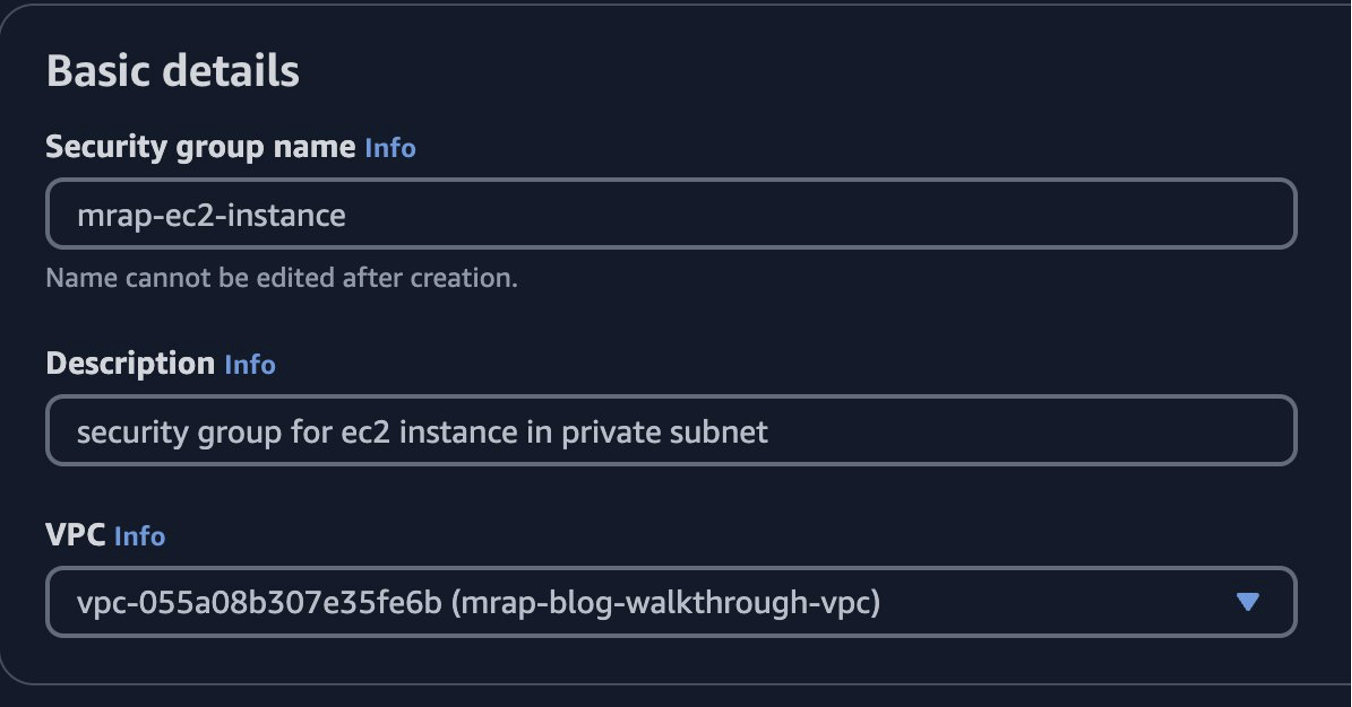
Create another security group for the EC2 instance. Give the security group a Security group name, Description, and choose the VPC just created.
Update the inbound rules to allow TCP on port 22 for the EC2 instance security group created previously. Update the outbound rules to allow HTTPS for the s3-global-endpoint security group created previously and choose Create security group.
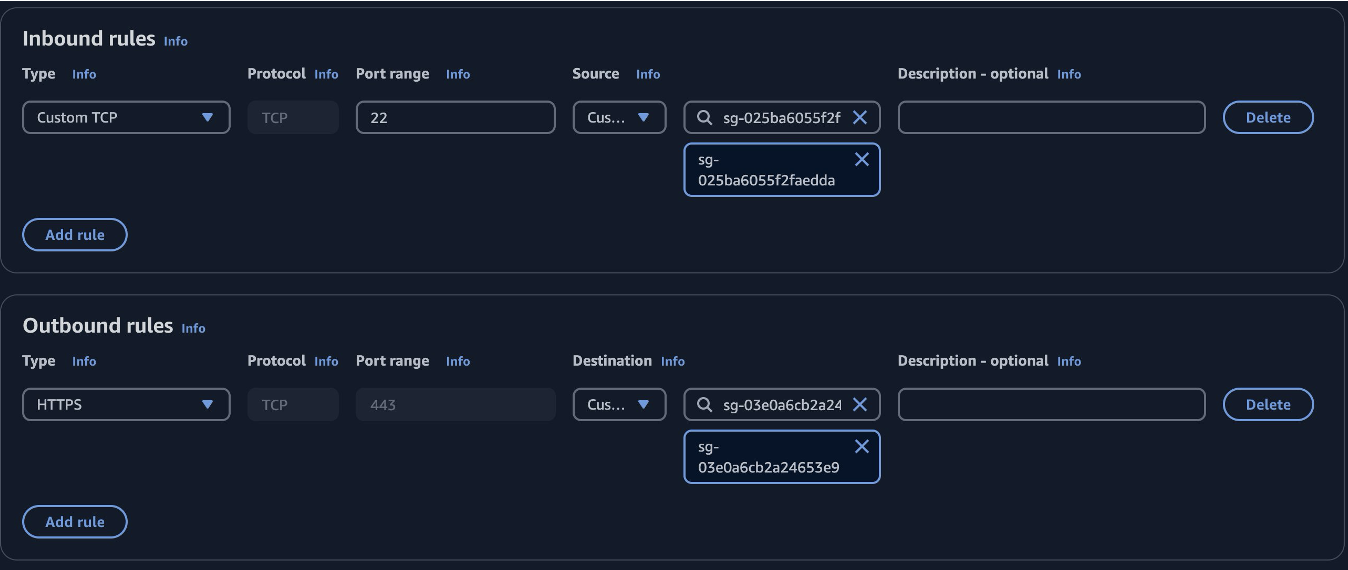
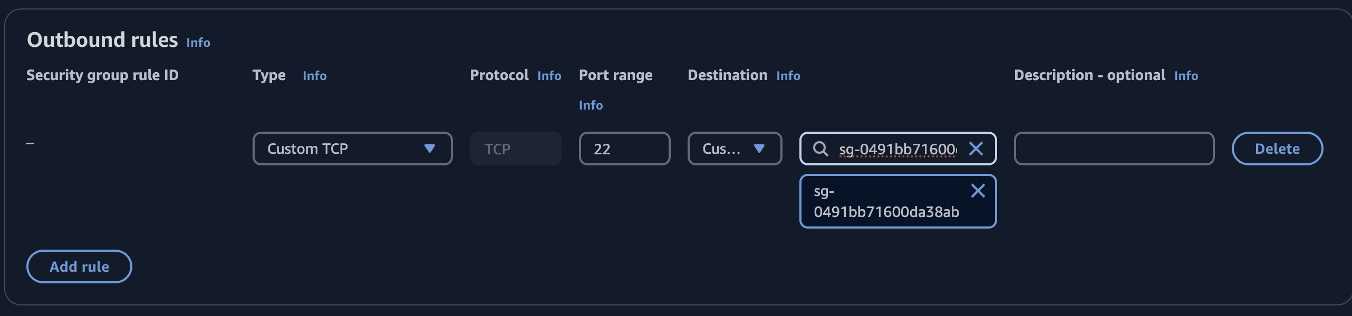
Update the security group outbound rules for the first security group (mrap-ec2-instance-connect) to allow outbound Custom TCP traffic on port 22 to the ec2-instance security group.
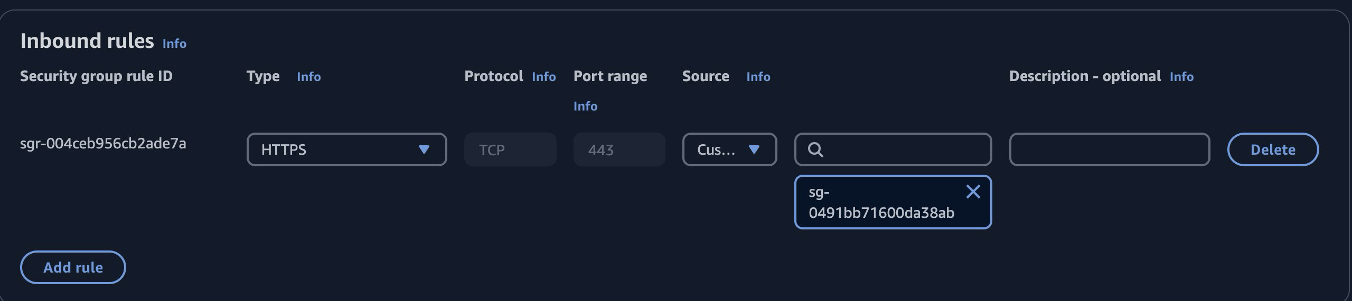
Update the security group inbound rules for the second security group (mrap-s3-global-endpoint) to allow inbound HTTPS traffic (TCP traffic on port 443) from the ec2-instance security group.
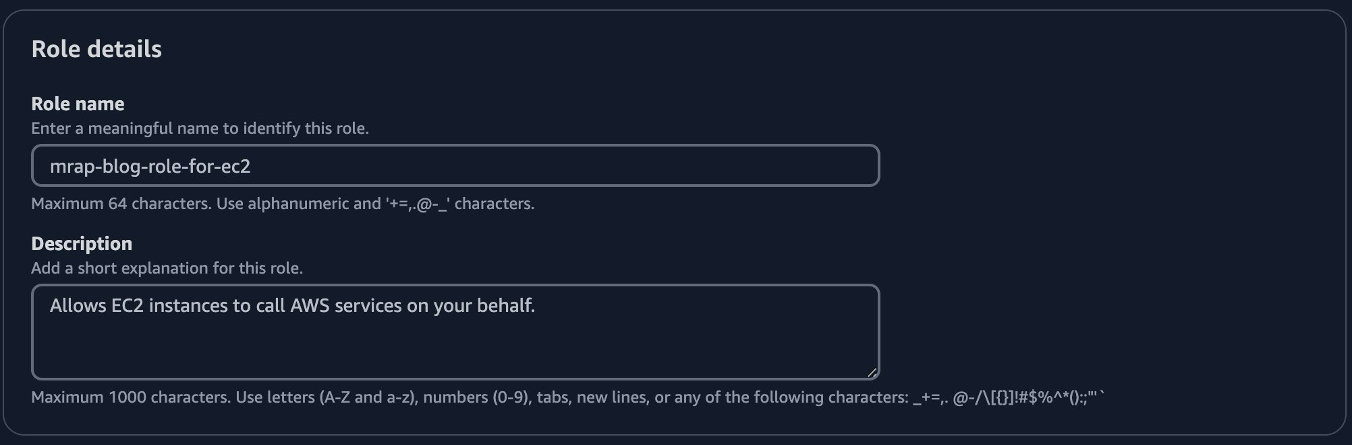
3. Create an IAM role for the EC2 instance
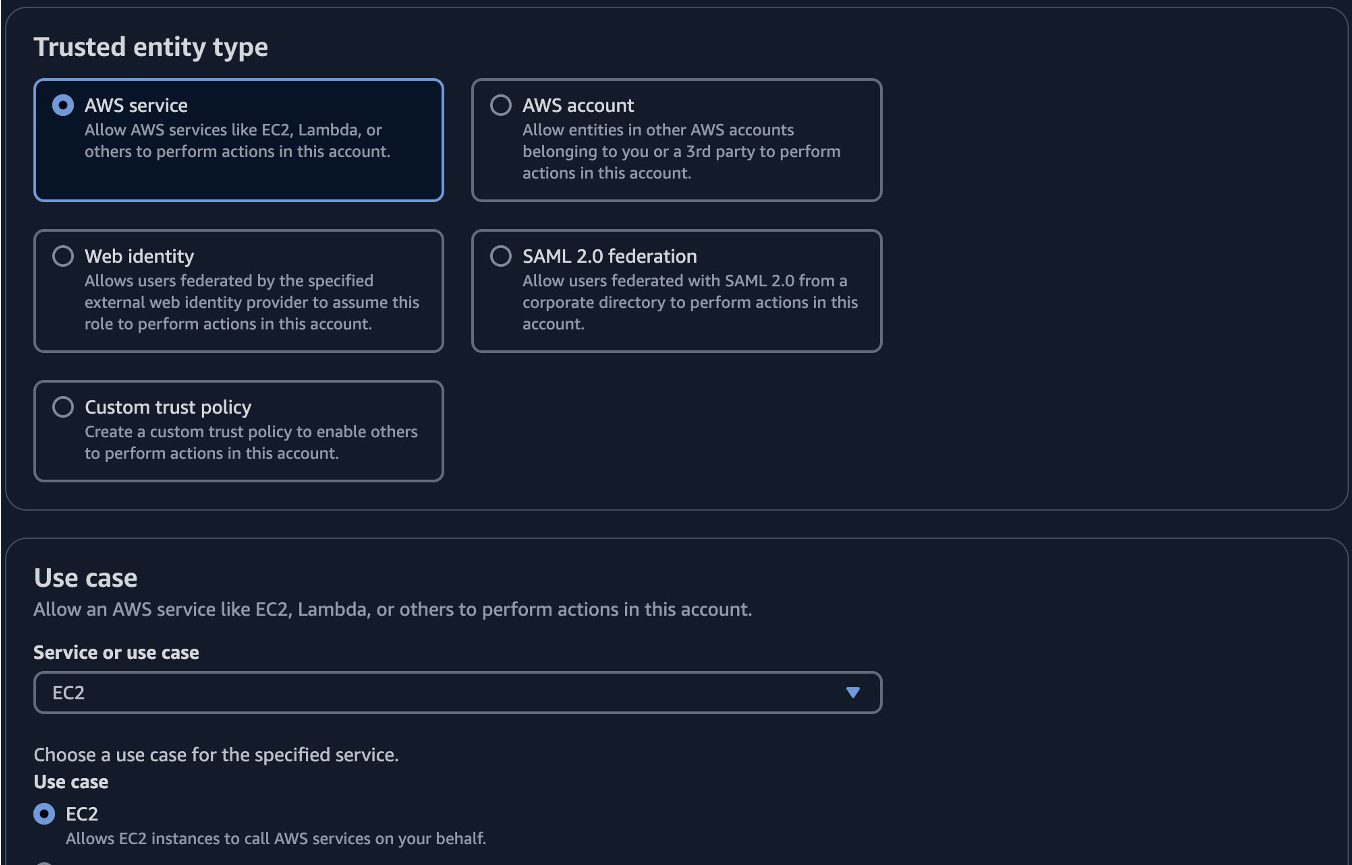
Navigate to the Roles section of the IAM console and choose Create role. Keep the default choice, AWS service, and choose EC2 from the Service or use case drop down menu. Choose Next.
For the walkthrough you are creating a role with no policies, so choose Next again. The policy you set on the S3 Multi-Region Access Point grants the necessary access to this role. Give the role a Role name and Description. This role is used after creating an EC2 instance and in our S3 Multi-Region Access Point policy. Choose Create Role.
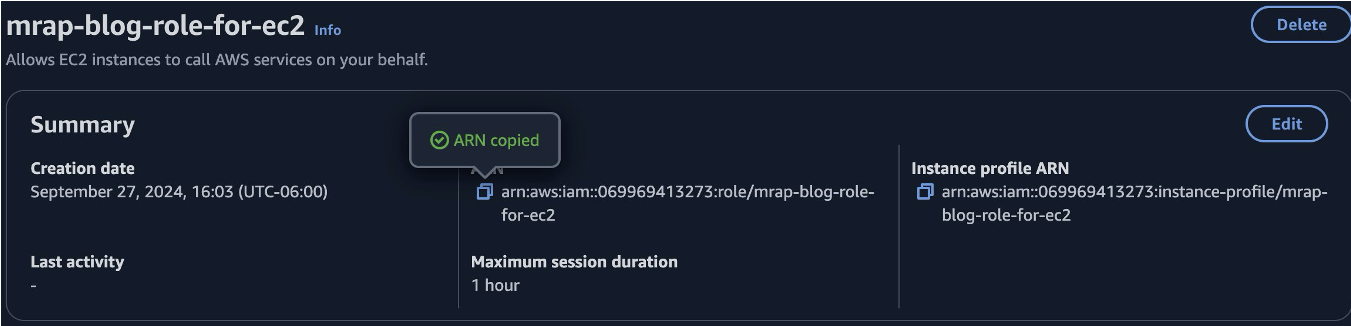
When the role has been created, choose View role.

Copy the Amazon Resource Name (ARN). The ARN is used in our S3 Multi-Region Access Point policy in a few steps.
4. Create an EC2 Instance Connect Endpoint
Navigate to the Endpoints section in the VPC console and choose Create endpoint. Give the endpoint a Name and choose EC2 Instance Connect Endpoint in the Service category. In the VPC section choose the VPC that you just created.
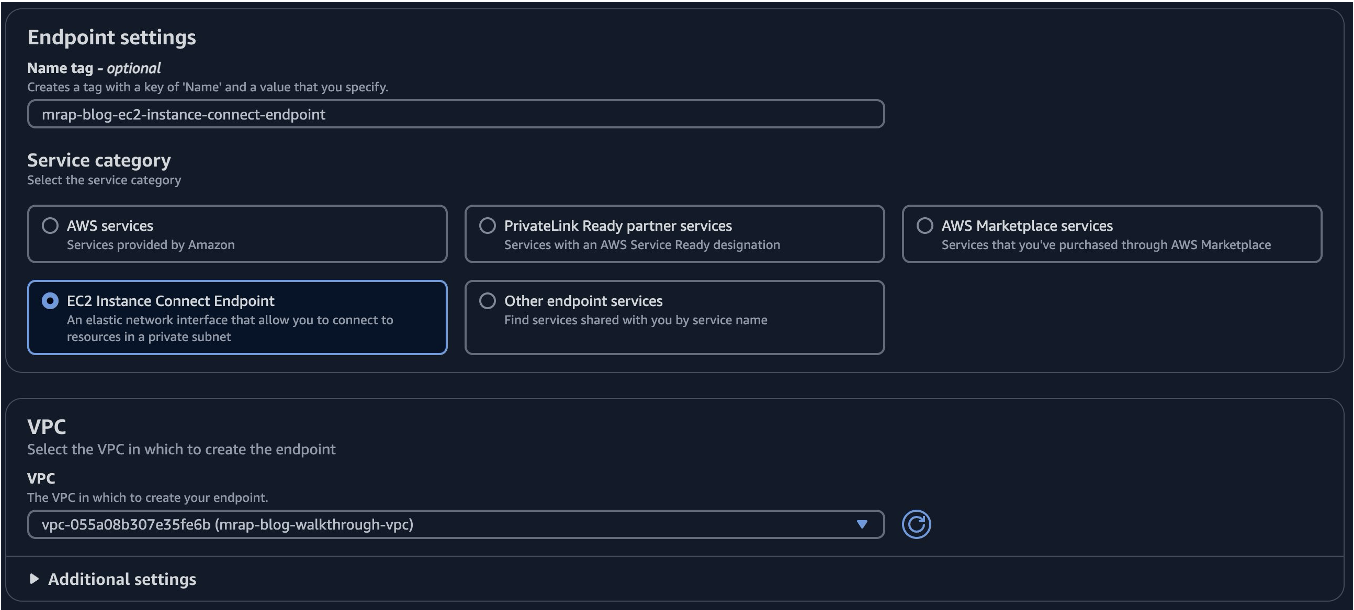
For the security group choose the security group created previously for ec2-instance-connect. Choose the subnet (should only be one option) and choose Create endpoint.
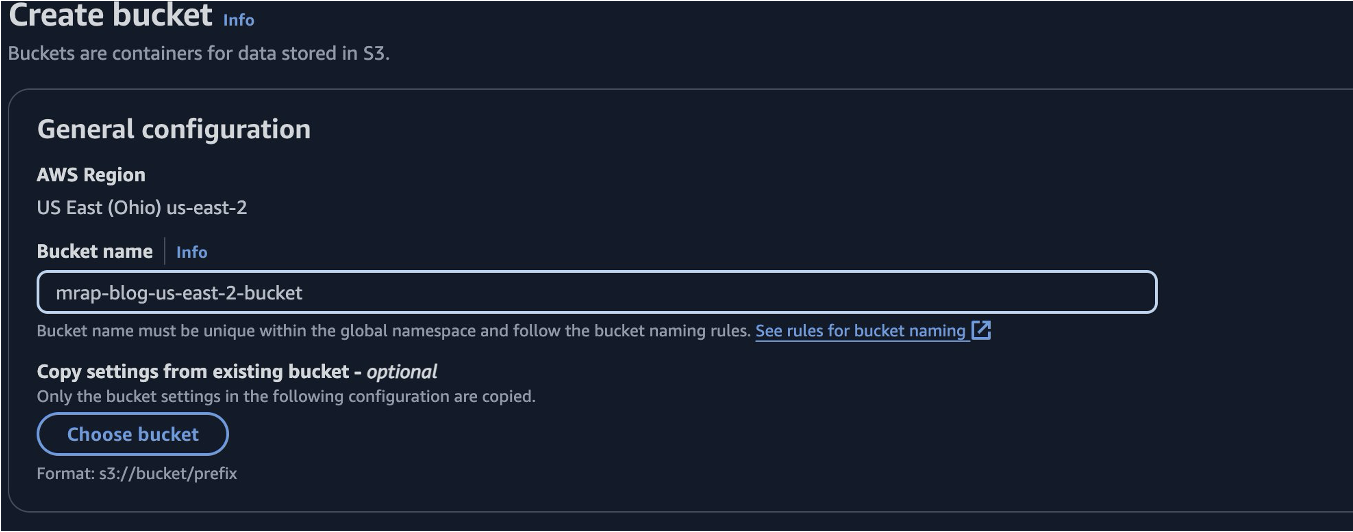
5. Create an S3 bucket in a different Region
Navigate to the Buckets section of the Amazon S3 console and make sure that the Region is different than the Region where the VPC was created, then choose Create bucket. Give the bucket a Bucket name, leave all the default settings, and choose Create bucket. After creating the S3 Multi-Region Access Point, update the bucket policy to delegate all access to the S3 Multi-Region Access Point.
6. Create a com.amazonaws.s3-global.accesspoint VPC endpoint
To access the S3 Multi-Region Access Point global endpoint over the private network using AWS PrivateLink, you must create another VPC interface endpoint of the type com.amazonaws.s3-global.accesspoint. Use the ID of this VPC endpoint in the S3 Multi-Region Access Point policy to only allow requests that originate from this endpoint.
Navigate to the Endpoints section in the VPC console and choose Create endpoint. Give the endpoint a name and leave the category on AWS services. In the Services search filter, type com.amazonaws.s3-global.accesspoint and choose the option.
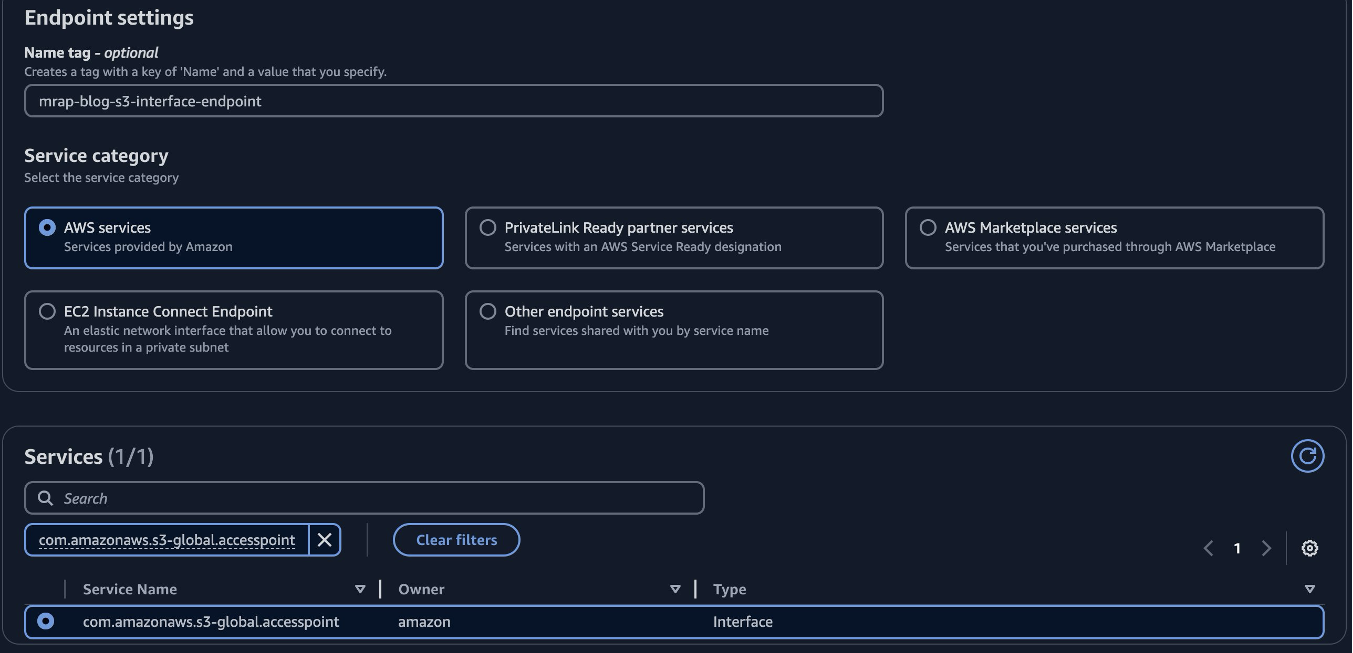
Choose the VPC created previously and choose the subnet.
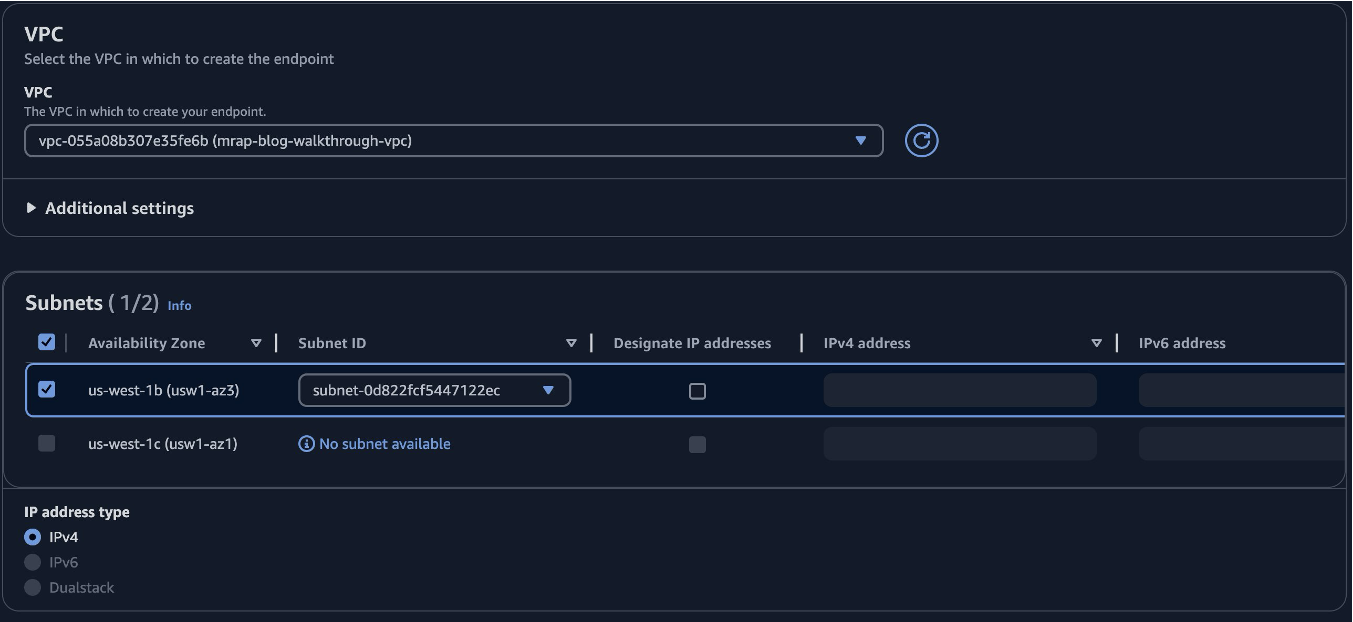
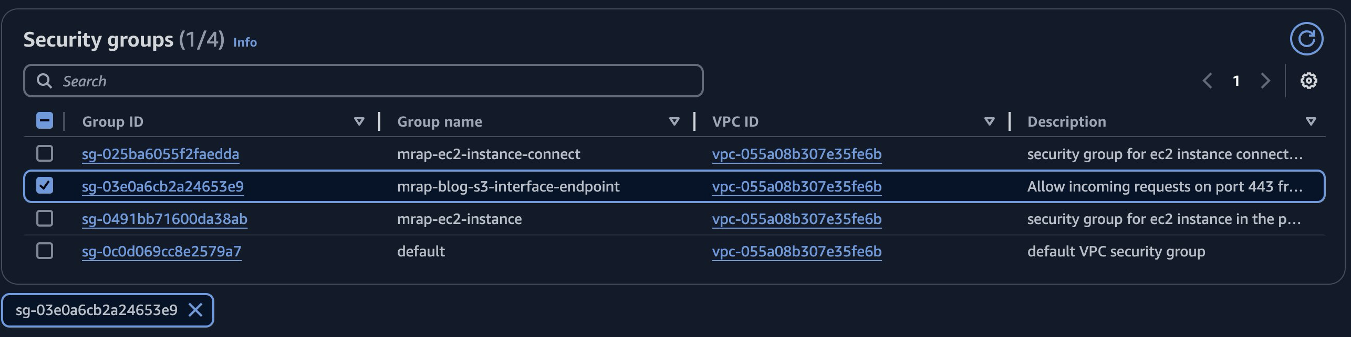
Choose the security group created previously (or default if that section was skipped) and leave the policy as full access. Choose Create endpoint.
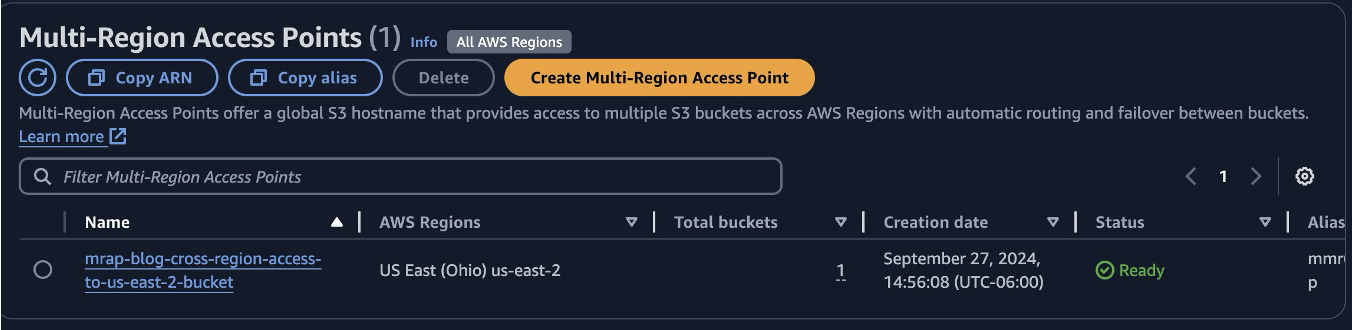
7. Create an S3 Multi-Region Access Point for the bucket
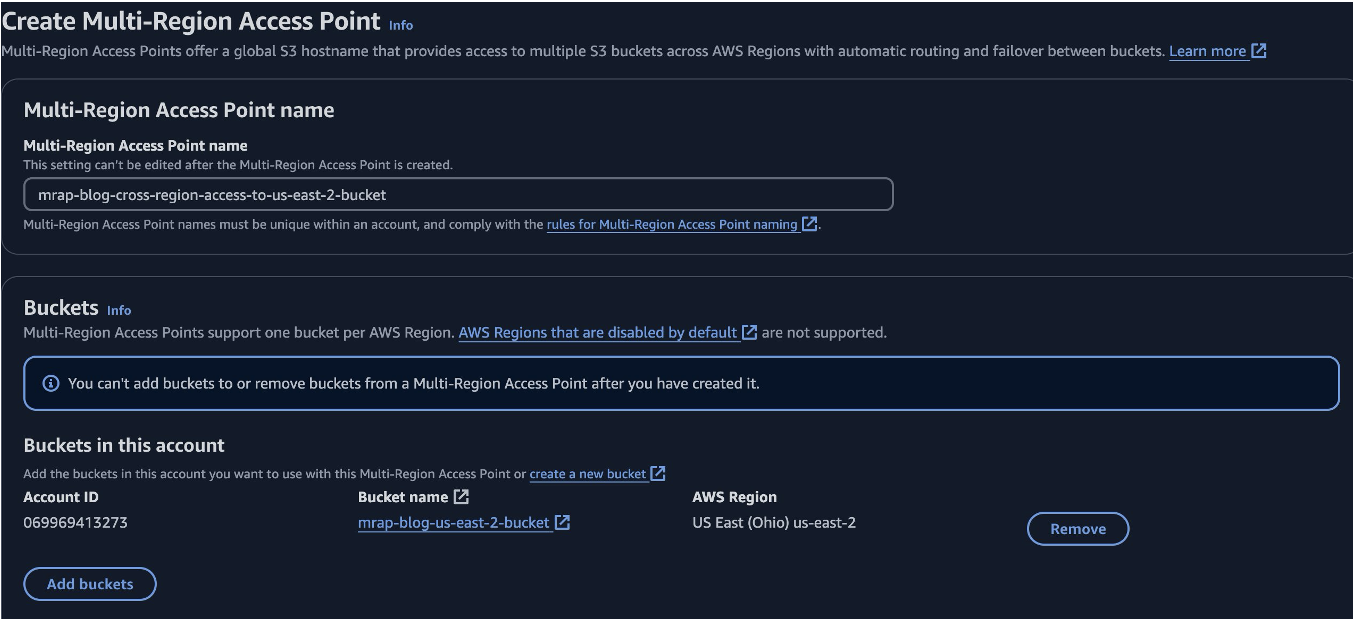
Navigate to the S3 Multi-Region Access Points section of the Amazon S3 console and choose Create Multi-Region Access Point. Give the S3 Multi-Region Access Point a Name (the name cannot be changed later), add the bucket created in a different Region previously in the Buckets section, leave defaults for everything else, and choose Create Multi-Region Access Point. It may take up to 30 minutes for the S3 Multi-Region Access Point to be created. When it is available you can update the permissions. A common pattern for S3 Multi-Region Access Points is to add buckets from multiple AWS Regions. The goal of this architecture is to access a single bucket from multiple AWS Regions.
Choose Copy ARN, which is used to update the bucket policy of the bucket just added. Navigate to the Buckets section of the Amazon EC2 console and choose the link for the bucket that was added to the S3 Multi-Region Access Point.

Choose the Permissions tab, scroll down to the Bucket policy section, and choose Edit. Paste the following policy replacing your bucket and S3 Multi-Region Access point ARNs where indicated and Save changes. The bucket ARN is available in the Edit bucket policy view. This policy allows all actions when the request comes from the S3 Multi-Region Access Point ARN. You further lock down permission in the S3 Multi-Region Access Point policy.
{
    "Version": "2012-10-17",
    "Statement" : [
    {
        "Effect": "Allow",
        "Principal" : { "AWS": "*" },
        "Action" : "*",
        "Resource" :
        [ "Bucket ARN", "Bucket ARN/*"],
        "Condition": {
            "StringEquals" : {
            "s3:DataAccessPointArn" : "MRAP ARN" }
        }
    }]
}
Navigate back to the S3 Multi-Region Access Points section and choose the link for the S3 Multi-Region Access Point when the status is Ready.
Choose the Permissions tab, scroll down to the S3 Multi-Region Access Point policy section, and choose Edit. Paste the following policy replacing your role and S3 Multi-Region Access Point ARNs, and the ID of your com.amazonaws.s3-global.accesspoint Endpoint (vpce ID) where indicated and choose Save changes. If you need to grant more permission (for example DeleteObject), then you can modify the Action list.
{
   "Version":"2012-10-17",
   "Statement":[
      {
         "Effect":"Allow",
         "Principal":{
            "AWS":"<Role ARN>"
         },
         "Action":[
            "s3:ListBucket",
            "s3:GetObject",
            "s3:PutObject"
         ],
         "Resource":[
            "<MRAP ARN>",
            "<MRAP ARN>/object/*"
         ],
         "Condition": {
                "StringEquals": {
                    "aws:SourceVpce": "<vpce ID>"
                }
      }
   ]
}
8. Create an EC2 instance in the private subnet
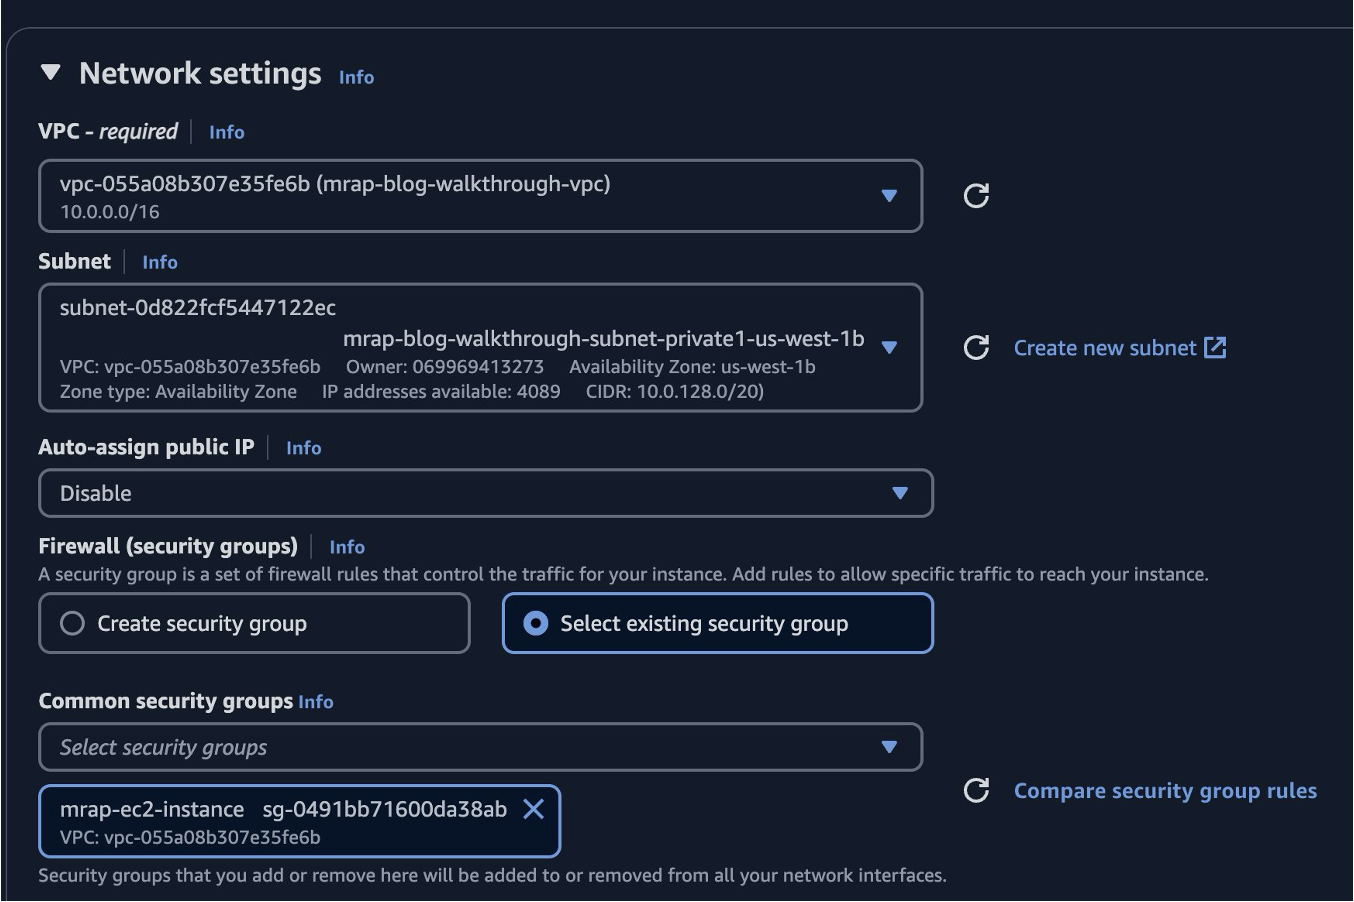
Switch back to the Region where you created the VPC. Navigate to the Launch an instance section in the Amazon EC2 console. Give the instance a Name and leave the defaults for the instance type (t2.micro). Choose Proceed without a key pair (EC2 Instance Connect Endpoint doesn’t need a key pair), then scroll down and choose Edit on the Network settings section. Choose the VPC and Security group created previously and choose Launch instance.
Navigate to Instances in the Amazon EC2 console and choose the created instance. Choose Actions > Security > Modify IAM role.
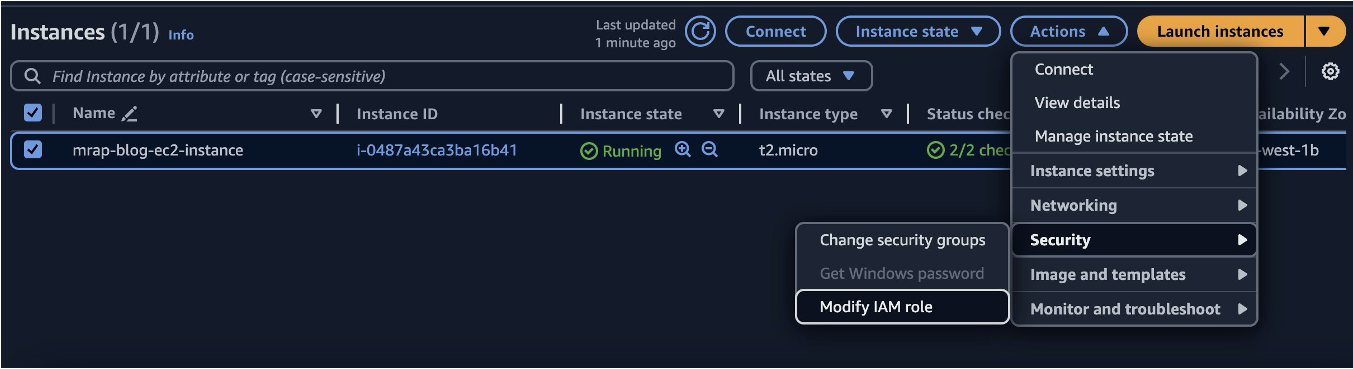
Choose the role created previously and choose Update IAM role. Navigate to Instances in the Amazon EC2 console, choose the created instance, and choose Connect.

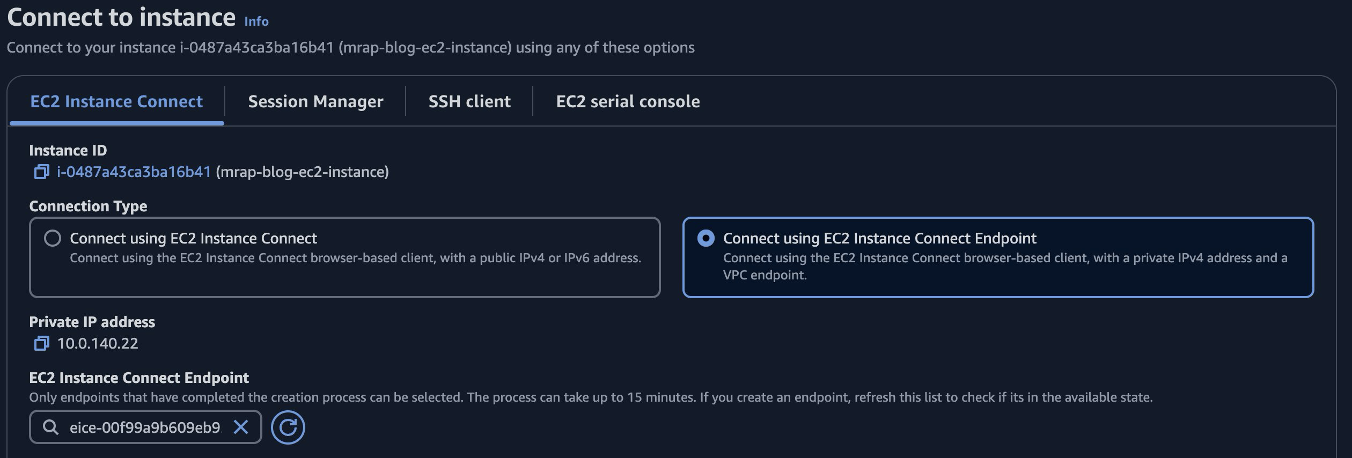
In the EC2 Instance Connect tab choose Connect using EC2 Instance Connect Endpoint. The endpoint created previously should populate. Choose Connect.
9. Test using S3 Multi-Region Access Points over PrivateLink by creating and listing objects
In the terminal window that appears create a text file with the following command:
echo "Test MRAP Object" >> test_mrap.txt
Next, save the file to the bucket in a different Region over PrivateLink using the S3 Multi-Region Access Point to interact with the bucket with the following command.
aws s3api put_object –body test_mrap.txt \ –bucket <MRAP ARN> –key <optional_prefix>/test_mrap.txt

Finally, list the object just written using the following command.
aws s3 ls <MRAP ARN>/<optional_prefix>/
Conclusion
In this post, we explored the challenges of moving data from many AWS Regions to a centralized Region. We reviewed how a customer can update a key cross-Region data movement workflow using Amazon S3 Multi-Region Access Points. Salesforce had this challenge of gathering data from their many Regions to a central observability and monitoring Region. The architecture changes helped Salesforce streamline cross-Region data movement while decreasing costs and keeping the network traffic private. Using S3 Multi-Region Access Points and VPC Interface Endpoints allowed Salesforce to write data directly to Amazon S3 over the private AWS network using global acceleration for this latency sensitive workload for about 70% less cost than the previous architecture. For workloads that write data from compute to Amazon S3 in different AWS Regions, this pattern reduces cost and complexity without sacrificing performance.
Get started with S3 Multi-Region Access Points by reviewing the user guide or try out the workshop.