Business Productivity
Use Amazon QuickSight to visualize data from Amazon Honeycode
Amazon Honeycode gives you the power to build custom apps without programming. Honeycode apps are built in four steps:
- Organize your data in Tables.
- Build apps using the drag-and-drop App Builder.
- Use Automations to replace manual steps in your process.
- Share your apps with your team.
Honeycode lets you get started quickly by using an app template or by importing your existing data in CSV files. To export data from Honeycode, you can copy and paste from your Honeycode Tables.
Honeycode can be used across many different industries and fields and still have the same effect or end goal. What if you’re a Human Resources manager who wants to synchronize employee data from an external system? Or if you’re a compliance officer for a financial firm and want to keep snapshots of your Honeycode data for data retention purposes? How about a retail store manager who wants to visualize and analyze the data you’ve collected in Honeycode using your business intelligence tool? The answer: Amazon Honeycode API. Honeycode APIs allow you to extend Honeycode beyond its existing capabilities but they do require IT level skills to set them up.
In this post I show how to use two of Honeycode’s APIs:
- GetScreenData: Reads data from a Honeycode app screen
- InvokeScreenAutomation: Invokes an action defined in a Honeycode app screen such as adding, overwriting, and deleting data
Prerequisite
If you don’t have one already, create a new Honeycode account and log in. To get started with the Honeycode API, link your Honeycode team with your AWS account
Overview
In this post, I look at how to set up a survey app using Amazon Honeycode. I show how to write the survey results to an Amazon S3 bucket using an AWS Lambda function. Finally, I visualize the survey results data using Amazon QuickSight. Here’s an overview of the architecture:
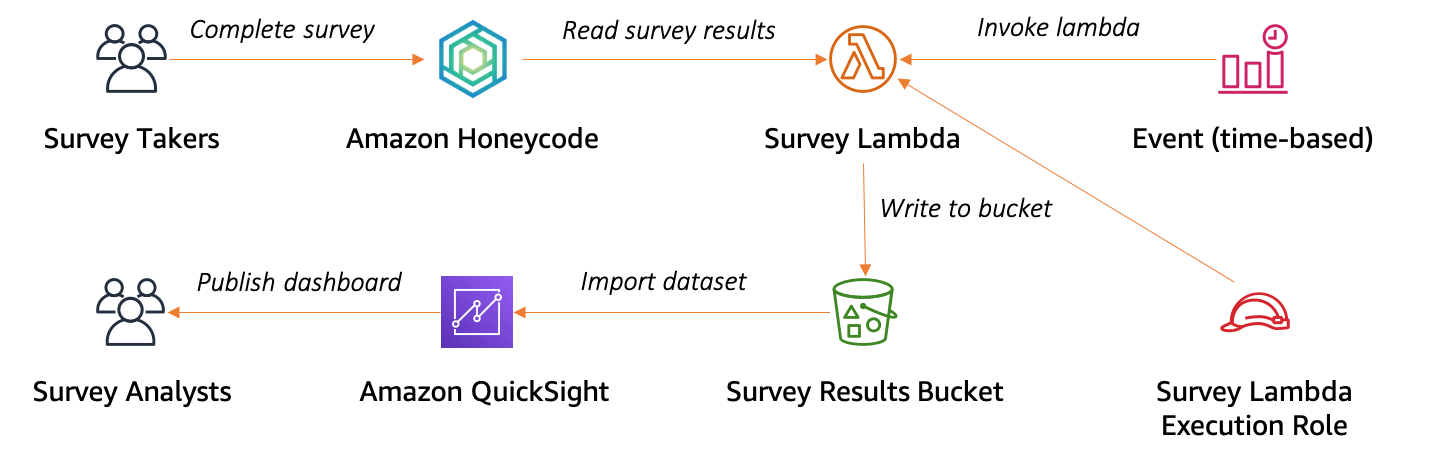
Amazon Honeycode API sample architecture
Create a survey app using Amazon Honeycode
Honeycode provides templates for a number of common use cases. Using a Honeycode template creates a workbook with the required tables to store the data, in addition to apps and automations with the basic functionality for that use case. You can then customize the app to meet your needs.
Use the Simple Survey template to create a new workbook. Next, update the Survey table data model by adding an additional column, ‘In S3’. You use this column to indicate if a row of survey results is stored in the S3 bucket. You then use the same column to create an automation that deletes survey results older than a month, after being stored in the S3 bucket.
This allows you to keep your Honeycode tables current and store historical data in cost-effective, long-term storage options, such as Amazon S3 and Amazon S3 Glacier. Next, you create another Honeycode app, Survey API, with a user interface to read new survey results and to update existing survey results. Follow along with the instructional video to create this app in your own Honeycode account.
Create a serverless API to read and write data from Amazon Honeycode
In this section, you create a serverless API. This reads the survey results from the Honeycode app using GetScreenData API and stores the data in S3. You then update the In S3 column in Honeycode with the current time by using the InvokeScreenAutomation API.
This section uses the AWS CDK to deploy the serverless API components and policies. AWS CDK allows you to manage infrastructure using code. The application includes:
- The Survey Lambda function that reads and writes the data.
- The survey-results S3 bucket where the survey results are stored in CSV format.
- The SurveyTimer Amazon EventBridge event that triggers the Survey Lambda function every hour.
Note: The following video shows AWS Cloud9 to deploy the API application. AWS Cloud9 is a cloud-based integrated development environment (IDE) that lets you write, run, and debug your code within a browser. It includes a code editor, debugger, and terminal. You can use the default configuration when creating an AWS Cloud9 environment. To use your own machine for deploying the API, follow the instructions to install and configure AWS CDK. The commands to be executed are
npm install && cdk bootstrap && cdk deploy
Survey API application source: https://github.com/aws-samples/amazon-honeycode-quicksight-integration-sample
Create an Amazon QuickSight dashboard to visualize the results
In this section, you use Amazon QuickSight to visualize the survey results. Amazon QuickSight is an analytics service that you can use to create datasets, perform one-time analyses, and build visualizations and dashboards.
First, create a new Amazon QuickSight dataset to read the JSON files stored in the S3 bucket. Then use that dataset to create a visualization of the survey results. Finally, publish the visualization as a dashboard to be shared with other users.
Cleanup
You can remove the serverless API application by running the following command in the AWS Cloud9 IDE:
cdk destroy
Conclusions
In this post, you created a survey application in Amazon Honeycode. You use Honeycode’s API to read and write data using a serverless API and finally you visualize the survey results using Amazon QuickSight. The possibilities in Honeycode are virtually endless. Let us know what you think in the comments!
Not yet a Honeycode customer? Sign up for the free version here.