AWS Security Blog
How to use CI/CD to deploy and configure AWS security services with Terraform
Like the infrastructure your applications are built on, security infrastructure can be handled using infrastructure as code (IAC) and continuous integration/continuous deployment (CI/CD). In this post, I’ll show you how to build a CI/CD pipeline using AWS Developer Tools and HashiCorp’s Terraform platform as an IAC tool for AWS Web Application Firewall (WAF) deployments. AWS WAF is a web application firewall that helps protect your applications from common web exploits that could affect availability, compromise security, or consume excessive resources.
Terraform is an open-source tool for building, changing, and versioning infrastructure safely and efficiently. With Terraform, you can manage AWS services and custom defined provisioning logic. You create a configuration file that describes to Terraform the components needed to run a single application or your entire AWS footprint. When Terraform consumes the configuration file, it generates an execution plan describing what it will do to reach the desired state, and then executes it to build the described infrastructure.
In this solution, you’ll use Terraform configuration files to build your WAF, deploy it automatically through a CI/CD pipeline, and retain the WAF state files to be later referenced, changed, or destroyed through subsequent deployments in a durable backend. The CI/CD solution is flexible enough to deploy many other AWS services, security or otherwise, using Terraform. For a full list of supported services, see HashiCorp’s documentation.
Note: This post assumes you’re comfortable with Terraform and its core concepts, such as state management, syntax, and command terms. You can learn about Terraform here.
Solution Overview
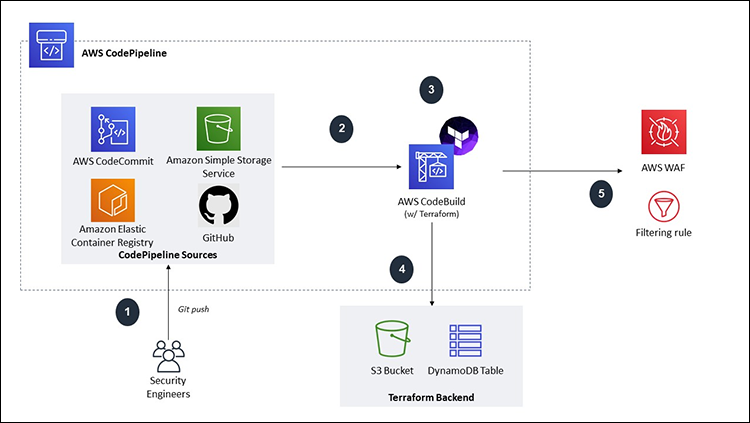
Figure 1: Architecture diagram
For this solution, you’ll use AWS CodePipeline, an automated CD service to form the foundation of the CI/CD pipeline. CodePipeline helps us automate our release pipeline through build, test, and deployment. For the purpose of this post, I will not demonstrate how to configure any test or deployment stages.
The source stage uses AWS CodeCommit, which is the AWS fully-managed managed, Git-based source code management service that can be interacted with via the console and CLI. CodeCommit encrypts the source at rest and in transit, and is integrated with AWS Identity and Access Management (IAM) to customize fine-grained access controls to the source.
Note: CodePipeline supports different sources, such as S3 or GitHub – if you’re comfortable with those services, feel free to substitute them as you walk through the solution.
For the build stage, you’ll use AWS CodeBuild, which is a fully managed CI service that compiles source code, runs tests, and produces software packages that are ready to deploy. With CodeBuild, you don’t need to provision, manage, and scale your own build servers. CodeBuild uses a build specification file, which is a collection of build commands, variables and related settings, in a YAML file, that CodeBuild uses to run a build.
Finally, you’ll create a new Amazon Simple Storage Service (S3) bucket and Amazon DynamoDB table to durably store the Terraform state files outside of the CI/CD pipeline. These files are used by Terraform to map real world resources to your configuration, keep track of metadata, and to improve performance for large infrastructures.
For the purpose of this post, the security infrastructure resource deployed through the pipeline will be an AWS WAF, specifically a Global Web ACL that can attach to an Amazon CloudFront distribution, with a sample SQL Injection and Blacklist filtering rule.
The deployment steps will be as shown in Figure 1:
- Push artifacts, Terraform configuration files and a build specification to a CodePipeline source.
- CodePipeline automatically invokes CodeBuild and downloads the source files.
- CodeBuild installs and executes Terraform according to your build specification.
- Terraform stores the state files in S3 and a record of the deployment in DynamoDB.
- The WAF Web ACL is deployed and ready for use by your application teams.
Step 1: Set-up
In this step, you’ll create a new CodeCommit repository, S3 bucket, and DynamoDB table.
Create a CodeCommit repository
- Navigate to the AWS CodeCommit console, and then choose Create repository.
- Enter a name, description, and then choose Create. You will be taken to your repository after creation.
- Scroll down, and then choose Create file, as shown in Figure 2:

Figure 2: CodeCommit create file
- You will be taken to a new screen to create a sample file, write readme into the text body, name the file readme.md, and then choose Commit changes, as shown in Figure 3:

Figure 3: CodeCommit editing files
Note: You need to create a sample file to initialize your Master branch that will not interfere with the build process. You can safely delete this file later.
Create a DynamoDB table
- Navigate to the Amazon DynamoDB console, and then choose Create table.
- Give your table a name like terraform-state-lock-dynamo.
- Enter LockID as your Primary key, keep the box checked for Use default settings, and then choose Create, as shown in Figure 4.
Note: Copy the name and ARN of the DynamoDB table because you will need it later when configuring your Terraform backend and CodeBuild service role.
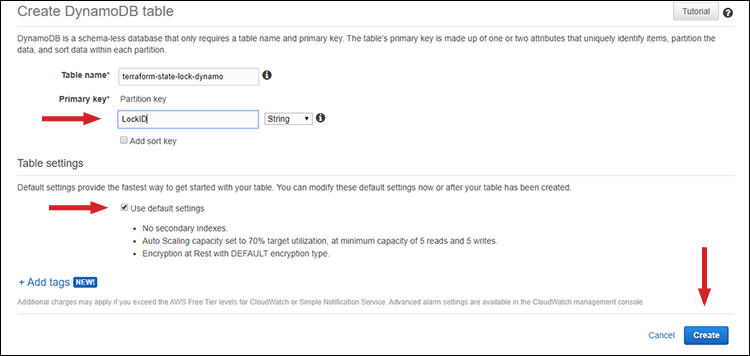
Figure 4: Create DynamoDB table
Create an S3 bucket
- Navigate to the Amazon S3 console, and then choose Create bucket.
- Enter a unique name and choose the Region you have built the rest of your resources in, and then choose Next.
- Enable Versioning and Default encryption, and then choose Next.
- Select Block all public access, choose Next, and then choose Create bucket.
Note: Copy the name and ARN of the S3 bucket because you will need it later when configuring your Terraform backend and CodeBuild service role.
Step 2: Create the CI/CD pipeline
In this step, you will create the rest of your pipeline using CodePipeline and CodeBuild. If you have decided to not use CodeCommit, read CodePipeline’s documentation here about other sources.
- Navigate to the AWS CodePipeline console, and then choose Create pipeline.
- Enter a Pipeline name, select New service role, and then choose Next, as shown in Figure 5:

Figure 5: CodePipeline settings
- Select AWS CodeCommit as the Source provider, select the name of the repository you created, and then choose master as your Branch name.
- Choose Amazon CloudWatch Events (recommended) as your detection option, and then choose Next, as shown in Figure 6:

Figure 6: CodePipeline source stage
- For Build provider, choose AWS CodeBuild and change your region as needed, and then choose Create project.
Important: Selecting Create Project will open a new screen in your browser with the AWS CodeBuild console; do not close the browser because you will need it!
- Enter a Project name and description, and then scroll to the Environment section.
- For Environment image, choose Managed image, and then configure the following sub-selections, as shown in Figure 7:
- Operating system: Ubuntu
- Runtimes(s): Standard
- Image: aws/codebuild/standard:1.0
- Image version: Always use the latest image for this runtime version

Figure 7: CodeBuild environment image
- Select the checkbox under Privileged, select New service role, and take note of this Role name because you will be modifying it later.

Figure 8: CodeBuild service role
- Choose the dropdown menu named Additional configuration (shown in Figure 8), scroll down to Environment variables, and then enter the following values, as shown in Figure 9:
- Name: TF_COMMAND
- Value: apply (this is case sensitive)
- Type: Plaintex

Figure 9: CodeBuild variables
Note: These values are used by the build specification to inject Terraform commands into Runtime.
- In the Buildspec section, choose Use a buildspec file. You don’t need to provide a name because buildspec.yaml in your ZIP package is the default value CodeBuild will look for.
- In the Logs section, choose the checkbox next to CloudWatch logs – optional, and then choose Continue to CodePipeline (see Figure 10).

Figure 10: CodeBuild logging
Note: The separate window will close at this point and you will be back in the CodePipeline console.
- Now, back in the CodePipeline console, choose Next, choose Skip deploy stage, and then choose Skip when prompted, as shown in Figure 11.

Figure 11: CodePipeline skip deploy stage
- Confirm your details are correct in the Review screen, and then choose Create pipeline.
After creation, you will be taken to the Pipeline Status view for the pipeline you just created. This interface allows you to monitor the status of CodePipeline in near real time. You can pivot to your Source repository and Build project by selecting the Details link, as shown in Figure 12.
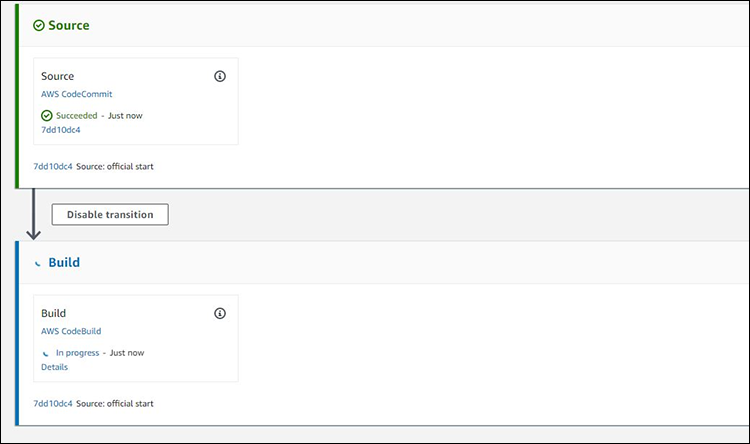
Figure 12: CodePipeline status
You can also see previous CodePipeline runs by choosing the History view on the navigation pane on the left, as shown in Figure 13. This view is also useful for viewing multiple concurrent CodePipeline runs.
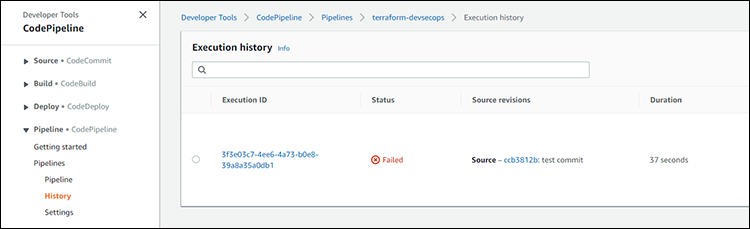
Figure 13: CodePipeline History
Step 3: Modify the CodeBuild service role
In this section, you will add an additional policy to your CodeBuild service role to allow Terraform to deploy your WAF and write state information to DynamoDB and S3.
- Navigate to the IAM Console, and then choose Roles from the navigation pane.
- Search for the CodeBuild service role, select it, and then choose Add inline policy.
Note: The inline policy is used to avoid accidental deletions or modifications, and provide a one-to-one relationship between the permissions and the service role.
- Choose the JSON tab and paste in the following policy. Ensure you populate the Resources section of the policy with the ARN of your S3 Bucket and DynamoDB table created in Step 3.1, as shown in Figure 14.

Figure 14: IAM resource edits
- Choose Review policy, enter a name for the inline policy, and then choose Create policy.
You now have the required permissions to deploy, modify, and delete your WAF, as needed. For pipelines that will be deploying multiple services, or using different backends for the state files, the permissions will need to be much more broadly defined.
Step 4: Deploy the WAF with CodePipeline
With all permissions and supporting infrastructure set up, you can now deploy your WAF. Navigate to this GitHub repository and clone it; there are five files you will need:
- provider.tf
- variables.tf
- waf-conditions.tf
- waf-rules.tf
- buildspec.yaml
- Open the file named provider.tf in a text editor and modify the following values, as shown in Figure 15:
- region=: Enter your preferred AWS Region (on lines 3 & 13)
- bucket=: Name of your S3 bucket (on line 10)
- dynamodb_table=: Name of your DynamoDB table (on line 11)

Figure 15: provider.tf modification
- Save and close this file, navigate to the AWS CodeCommit console, and then select your repository.
- Choose the drop-down menu named Add file, and then select Upload file (see Figure 16).

Figure 16: CodeCommit Upload files
- Using the Console, upload all five files downloaded from GitHub. Alternatively, you can learn how to do this using the CLI in the AWS CodeCommit User Guide.
- After you’ve uploaded the last file, navigate to the CodePipeline console, and then select your pipeline.
Note: If the source message within the UI doesn’t match what you entered for your last upload commit message, use the History tab to find your execution with all files added because the previous deployments will fail due to the missing files.
- To access the Build project Build logs console, in the Build section, choose Details, as shown in Figure 17.

Figure 17: CodePipeline status details
- Choose Tail logs to view logs in near real-time from the CodeBuild environment. You will be able to see the output from Terraform, as well as other information, such as errors and environmental logs, from the CodeBuild service, as shown in Figure 18.This view can be useful for debugging missing permissions for Terraform, as it will cause a failure and Terraform will log what IAM permissions were denied

Figure 18: CodeBuild tail logs
- After a successful deployment, navigate to the AWS WAF Web ACL Console, and then choose the Web ACL that was deployed.
- Choose the Rules tab, and then select the Rules’ hyperlinks to inspect how they were created, as shown in Figure 19.

Figure 19: Web ACL views
From here, you can associate the Global Web ACL with a CloudFront distribution to test the efficacy. This AWS Samples GitHub repository contains a more in-depth demo on how to effectively tune a WAF.
Important clean up
You will now clean up your deployed Web ACL. Doing this is important because you will be charged $5.00 USD per Web ACL, and $1.00 per rule per Web ACL, per month, on top of other related charges. Read the AWS WAF Pricing page for more details around AWS WAF pricing.
- Navigate to the AWS CodeBuild console, and then choose your CodeBuild project.
- Choose the Build details tab, scroll to the Environment section, and then choose Edit.
- Expand the Additional configuration drop-down menu, and then scroll to Environment variables.
- Under the Value of your previously created variable, replace the value with destroy, and then choose Update environment.
- Navigate back to the Pipelines menu in the AWS CodePipeline console, and then select your pipeline.
- Choose Release Change, and then choose Release, when prompted. Wait for the Build stage to report success to confirm deletion of our WAF resources.
Conclusion
In this post, you learned how to use AWS Developer Tools to create a Serverless CI/CD pipeline that you can use to automate deployments of infrastructure with Terraform. By using Terraform and CI/CD, your security engineers can deploy security infrastructure services in a clearly defined and immutable process, such as AWS WAF.
To further extend this solution, you can include manual confirmation stages via Amazon Simple Notification Service (SNS) to enforce approvals before all CI/CD pipelines deploy resources into your accounts. You can also choose to isolate your CI/CD pipelines by placing them in a VPC. Finally, you can select the WAF Rules deployed by Terraform as the starting point for a Rule group in AWS Firewall Management Service (FMS), which allows you to define multi-account WAF deployments for accounts in AWS Organizations.
Want more AWS Security how-to content, news, and feature announcements? Follow us on Twitter.