Tips for Securing Your EC2 Instance
Hosts on the Internet are vulnerable to attack, including your EC2 instances. This article outlines a number of best practices for helping you secure your instances.
Submitted By: Jinesh Varia
AWS Products Used: Amazon EC2
Created On: July 02, 2008
Introduction
Just
like any host on the Internet, your EC2 instances can be vulnerable to attack.
While the EC2 firewall is a very powerful tool for securing your instance from
unwanted network traffic, if configured incorrectly, you may inadvertently leave
your instance vulnerable to attack.
The three most important things you can do to mitigate
potential risks to your instances are:
- Lock down ports to prevent unauthorized access
- Ditch passwords and require administrators to use SSH keys
- Keep up to date with software patches
This article is not intended to be an exhaustive EC2 security guide, nor are there any implicit or explicit guarantees that these steps will ensure absolute system security, but it's a good place to start.
Lock it Down: Close All Unnecessary Ports
In order to prevent criminals from gaining privileged access
to your virtual server and planting malware or stealing data, you need to make
sure that important ports/protocols are only accessible by trusted IP addresses
and networks. For example, remote administration ports like 22 (SSH) and 3389
(RDP) should only allow access from your private network or bastion hosts, and
not the entire Internet (which is specified in security groups as 0.0.0.0/0). For
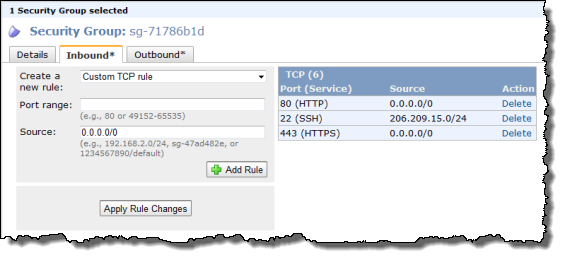
example, you can use the AWS Management Console to create a security group that
restricts SSH access to only the 206.209.15.0/24 network while allowing anyone
HTTP/HTTPS access from anywhere. Here is what it would look like in the AWS
Console:
If you're using the command line interface, you would use the ec2-create-group command to create a
security group and then the ec2-authorize
command to add a rule to the security group, which would look like this:
PROMPT> ec2-create-group default -p 22
PERMISSION     default ALLOWS tcp 22 22 FROM CIDR 206.209.15.0/24

PROMPT> ec2-authorize default -p 22
PERMISSION default ALLOWS tcp 22 22 FROM CIDR 206.209.15.0/24
In addition to remote administration ports 22 and 3389,
there are several other ports that allow privileged or database access. Make
sure you restrict these ports to IPs or subnets you trust, and don't allow
public Internet access (0.0.0.0/0) to them. Here is a list of common ports you
should consider locking down:
20/21 - FTP
22 - SSH
1433 - MSSQL Server
1434 - MSSQL Monitor
3389 - RDP
3306 - MySQL
4333 - MSQL
5432 - PostgreSQL
5500 - VNC RDP
Security Groups can be used to secure ports over TCP, UDP, and ICMP protocols. We recommend that you open only those ports that must be open for your service to operate.
Ditch Those Passwords: Use SSH Keys
Additional security can be provided by using secure authentication methods. We recommend using public-key authentication instead of passwords to remotely log in to your instances with SSH. Passwords are vulnerable to a variety of simple attacks, including dictionary and brute-force attacks.
If you used the Amazon Linux AMI to launch your instance,
the password login feature is already disabled by default and you must use a
public/private key pair to SSH into the instance. You can use the AWS
Management Console to create the key pair or you can use a third-party tool
like ssh-keygen
(a tool provided with the standard OpenSSH installation) and import the public
key to EC2.
If you're using a third-party AMI or one you've created, the AMI may not have the password authentication option disabled by default. You should take a moment to verify and disable that option.
Key Generation and Distribution
In the Amazon EC2 User Guide we showed you how to generate the initial key pair for the root user. You'll also need to create similar key pairs for all users who require access to your instances.
In the example below (to be run on your local machine, not your EC2 instance), replace "user" with the actual user's login, name or some other unique identifier.
ssh-keygen -f user
This will create two files:
- id_rsa (private key)
- id_rsa.pub (public key)
Copy all the public key files that you generated to your instance:
ssh-copy-id -i user user@ec2-your-instance-name.compute.amazonaws.com
Or you can manually transfer it over using a program like SCP:
scp -i root *.pub ec2-your-instance-name.compute.amazonaws.com:/tmp
For generating SSH keys for regular user accounts, we recommend that each user in your organization generate their own key. Have them provide their public key to your system administrator who can then distribute it to the appropriate EC2 instances that the user should have access to.
Because you must specify the name of the key pair you plan to use to connect to the instance when you launch the instance, this means that you must have already generated and imported the key pair to EC2. For information on how to create an SSH key pair using the AWS Management Console, refer to the Amazon EC2 User Guide. For information on importing a key pair created with a third-party tool, see Importing Your Own Key Pair to Amazon EC2.
Disable Password-based Login
To disable the password authentication option, log in to your instance as an administrator/root and edit the SSH daemon configuration file:
# nano /etc/ssh/sshd_config
Find the line:
PasswordAuthentication yes
and change it to:
PasswordAuthentication no
Caution: whenever making changes to your sshd_config file, make sure that you have an active shell session in case you've made a fatal syntax error. After restarting sshd, log in from another session to test it before terminating your active terminal session.
Save the configuration file and restart your SSH daemon:
# /etc/init.d/sshd restart
Now test out the connection to your instance using your SSH key.
User Account Creation
Log in to the instance as root. For each user you are creating, add the user to your instance with:
# useradd -c "firstname lastname" user -m
For simplicity's sake, use the same "user" name as you did for key generation. Now we need to place the key into their SSH authorized keys file (again, replacing "user" with the username you chose earlier):
# cd ~user
# mkdir .ssh
# chmod 700 .ssh
# chown user:user .ssh
# cat /tmp/user.pub >> .ssh/authorized_keys
# chmod 600 .ssh/authorized_keys
# chown user:user .ssh/authorized_keys
Logging In
Ensure that your users all have their appropriate private keys (generated earlier) and that they are in the users' ".ssh" directory of the local machine. Each user can now log in to any instance that has them added as a user and a copy of their public key in the .ssh/authorized_keys file in their home directory on the EC2 instance:
ssh -i my-key-pair.pem ec2-user@ec2-your-instance-name.compute.amazonaws.com
For directions on how to log into your instance using PuTTy, please read this section.
Bundle Up
These keys and user entries now exist on the current running instance and when you have added all your users, you should bundle and register the new AMI as described in the Amazon EC2 User Guide so that any new instances you launch from the AMI will already have all the appropriate accounts set up. Naturally, this may be tedious for situations with many user accounts or many instances, so you could equally provide a scripted solution that runs at instance start or periodically that keeps track of active users by synchronizing with a persistent store such as S3.
Cleaning Up
Remember to delete keys from the authorized_keys file on your instances when someone leaves your organization or no longer requires access. This can easily be achieved with:
# userdel user
Caution: This will delete all data in the user's home directory.
Keeping Current: Patch Regularly
Both Windows and Linux are operating systems supported by large and active communities, and there are always new versions, security patches, and upgrades to many components of each platform. Many of these upgrades are in response to security vulnerabilities, so it's important to always stay current with the latest patches. AWS updates the Amazon-provided Windows- and Linux-based AMIs on a regular basis with patches. When you first log in to your instance, you will have the opportunity to install any updates. However, to get patches out to your running instances, you have two choices:
- If you don't need to preserve data or customizations on your running EC2 instances (or you're using EBS for persistence storage), you can simply relaunch new instances with the latest AMI. When you log in to the instance, you can download and install security updates.
- If you need to preserve data or customizations on your running EC2 instances, you can install updates for individual packages on your instances. Updates are provided for the Amazon Linux AMI via the Amazon Linux repositories.
The easiest tool to use to maintain your packages is to use a package manager. You can use something like the yum which is the package manager for Amazon Linux, Redhat, and many other operating systems. Log in to your instance as root and simply run:
# yum update
This will determine the latest version of your packages and prompt you on whether or not they should be updated. Other distributions may offer similar tools; for example, Debian and Ubuntu may use:
# apt-get update
When you rebundle an updated AMI as your own, it will incorporate all the existing package changes, but it's still important to establish a periodic check for all your running instances to collect any new changes.
You should also subscribe to security mailing lists such as BugTraq, which is an early-warning channel for the latest exploits and vulnerabilities. If you are running any specialized applications, you should also subscribe to their development and announcement mailing lists, because they may announce problems even before security lists like BugTraq.
Security alerts for the Amazon Linux AMI can be found in the Amazon Linux AMI Security Center.
What Else You Can Do
Most of these tips are security configuration tasks that you're probably already used to performing for the physical servers in your data center or office. For EC2 instances on AWS, the tasks just may be performed a little differently.
In addition to the tips above, we also recommend the following best practices:
- Audit any proprietary applications you may be running on your EC2 instance
- Review configuration settings on your packages and harden their configuration from attackers
- Provide access only to those users who have a business need to be on your systems.
- Give them the minimum access and privileges they need to perform their specific tasks.
- Provide temporary escalated privileges such as sudo for users who need to perform occasional privileged tasks.
- Have a procedure to revoke access when it is no longer needed.