Windows on Amazon EC2 Security Guide
As with any other Internet-connected host, it is important to consider the security implications of the hosts you run and take adequate steps to protect them. This document is designed to explain what you can expect from your Windows instances on Amazon EC2, and give you pointers on how to protect Windows in the cloud.
Submitted By: Jesper M. Johansson
AWS Products Used: Amazon EC2
Created On: May 22, 2012
By Jesper M. Johansson
Principal Security Architect, Amazon.com
Default Setup
Amazon EC2 running Windows is provided through an Amazon Machine Image (AMI). The Amazon-provided Windows AMIs are, as much as possible, configured the way you would expect a Windows Server to be configured if you just installed it from Microsoft-issued media. It is our goal to deliver an instance that behaves exactly the way you would expect and to avoid any surprises with respect to features and functionality.
Please note that third parties may provide Amazon EC2 AMIs running Windows as well. Amazon.com cannot vouch for the configuration or contents of those images. This document applies solely to AMIs provided by Amazon.com.
Differences Between Default Windows and Amazon EC2 AMIs
For proper functioning of your instances as well as for your convenience, a few changes have been made from the installation defaults. This section outlines those changes.
EC2config Service
The images contain one additional service installed by Amazon Web Services, the EC2 Config Service. This service runs as LocalSystem. The ec2config service provides the following functionality:
- At initial setup
- Sets the hostname to the private DNS name
- Generates and sets a random password on the Administrator account
- Initializes and formats the ephemeral disks
- Generates and installs the host certificate used for Terminal Services
- Syncs the instance clock with a time server
- After initial setup
- Writes the last three entries in the System event log to the Amazon EC2 console so you can debug startup problems.
- Prepares instances for bundling
The ec2config service is primarily used during initial setup, as you can see from above. If you are not planning on bundling the instance (preparing a new AMI from it) you may be able to disable, or even uninstall, that service. If you uninstall the service you may reinstall it from its installation (msi) file. Notifications of updates to the service will be posted on the Amazon EC2 forums, at https://developer.amazonwebservices.com/connect/forum.jspa?forumID=30. The latest version of the service is available from https://s3.amazonaws.com/ec2-windows-downloads/EC2Install.zip.
Should you wish to remove the ec2config service, you may do so by running this command:
sc delete ec2config
The binaries for the ec2config service, as well as additional tools needed to configure the image appropriately at first start, are contained in the %ProgramFiles%\Amazon directory.
Xen Drivers
The images contain a set of drivers to permit access to the Xen virtualized hardware presented by Amazon EC2 to the guest operating system (OS). The source files for the drivers are in the %ProgramFiles%/RedHat directory on 32-bit images, and in the %ProgramFiles(x86)%\RedHat directory on 64-bit images. The binaries actually in use are copied into %SystemRoot%\System32\DRIVERS. The two drivers are the rhelnet, the RedHat Paravirtualized network driver, and rhelscsi, the RedHat SCSI miniport driver. The following are the relevant characteristics of these two drivers:
SERVICE_NAME: rhelnet
           TYPE               : 1  KERNEL_DRIVER
           START_TYPE         : 3    DEMAND_START
           ERROR_CONTROL      : 1    NORMAL
           BINARY_PATH_NAME   : system32\DRIVERS\rhelnet.sys
           LOAD_ORDER_GROUP   : NDIS
           TAG                : 12
           DISPLAY_NAME       : RedHat PV NIC Driver
           DEPENDENCIES       :
           SERVICE_START_NAME :
SERVICE_NAME: rhelscsi
            TYPE               : 1  KERNEL_DRIVER
            START_TYPE         : 0   BOOT_START
            ERROR_CONTROL      : 1   NORMAL
            BINARY_PATH_NAME   :  \SystemRoot\system32\DRIVERS\rhelscsi.sys
           LOAD_ORDER_GROUP   : SCSI miniport
            TAG                : 33
            DISPLAY_NAME       : rhelscsi
            DEPENDENCIES       :
          SERVICE_START_NAME :
While your system will be able to operate without these drivers, they do improve performance significantly. Therefore you should not disable these drivers.
SCW Installed By Default
The Security Configuration Wizard (SCW) is a new security tool included with Windows Server 2003 Service Pack 1 and higher. In Windows Server 2003, however, SCW is an optional component; not installed by default. In order to make it easier for you to secure your Amazon EC2 instances, we have added SCW to the default installation image. It is available from the Start menu in the Administrative Tools folder.
SCW is a wizard that walks you through the process of attack surface reduction on Windows. It will analyze your computer and recommend services to disable, settings to make, and ports to close off. You can even use it to build IPsec rules to restrict inbound communication only to particular hosts as well as set a few basic security settings. It helps you actually implement one of the most basic security recommendations: turn off everything you do not need. SCW contains a database enumerating the interdependencies between services making that task much easier. It is an extremely valuable tool for securing Windows.
A complete guide for how to use SCW is beyond the scope of this document. For more information, please see the following Microsoft resources:
- SCW Homepage – https://www.microsoft.com/scw
- SCW Quickstart Guide - https://go.microsoft.com/fwlink/?linkid=43850
- SCW Deployment Guide - https://go.microsoft.com/fwlink/?LinkId=43851
- SCW Troubleshooting Guide and all other documentation in a single archive: https://www.microsoft.com/downloads/details.aspx?FamilyID=903fd496-9eb9-4a45-aa00-3f2f20fd6171&DisplayLang=en
SCW is a very valuable resource for securing Windows. We highly encourage you to use it.
Pagefile Configuration
Due to limitations in the maximum size of the volume hosting the C: drive, the pagefile on the C: is set to a very small size, only large enough to be able to create a memory dump if the instance crashes. A larger pagefile may be hosted on a separate volume.
Managing Your Instances
You can either manage your instances using the command line utilities or using the ElasticFox Firefox extension. Both are available for download from https://developer.amazonwebservices.com/connect/kbcategory.jspa?categoryID=88. The ElasticFox extension, shown in Figure 1, provides graphical access to all or most of the management functionality.

Figure 1 The ElasticFox Firefox extension makes managing your Amazon EC2 instances much simpler
Using Elasticfox you can get all the relevant information about your instances, including the console output and the last three errors in the System Event log, as shown in Figure 2. It can also be used to create new instances, retrieve their initial passwords, and decommission instances.

Figure 2 ElasticFox gives you all the relevant console output
Remote Administration
You will administer your Windows instances via the Microsoft Remote Desktop Protocol (RDP). RDP is exactly what it sounds like: a method to access the desktop of a computer remotely. While it is possible to configure authenticated Amazon EC2 instances to receive connections using other ports, the intent is to use RDP to administer your instances.
If you have several Windows instances we recommend that you open RDP access from the Internet to only one of them, and use it as a proxy administration instance. The preferred setup is shown in Figure 3.

Figure 3 Preferred Amazon EC2 Management Flow
By configuring your management flow as shown in Figure 3 you avoid having to expose RDP to the Internet on more instances than necessary. This enables you to reduce your attack surface and exposure.
By default, all access to your images, including RDP, is blocked. To open access to the images you must use the ec2-authorize command, or by creating a rule using ElasticFox. For example, this command will enable RDP access to all your current and future instances by opening port 3389 to your default security group:
ec2-authorize default –p 3389
Using ElasticFox you can create a rule by going to the Security Groups tab, and clicking the green checkmark under group permissions. That will pop up the dialog shown in Figure 4.

Figure 4 You can enable RDP using ElasticFox
Figure 4 shows how to create a rule for all hosts on the Internet. By specifying a different IP address and subnet mask in CIDR notation you can restrict access to only specific hosts.
You may also block RDP access using the built-in IPsec functionality in Windows. For management hosts that may move and get different IP addresses, IPsec enables you to still provide minimal access to your instances. For example, you can use a blanket rule such as the one shown in Figure 4 to open RDP, and then use an IPsec rule to restrict access to only those hosts that can present the appropriate certificate. This prevents you from having to open it to all hosts when the source is likely to change IP address. For more information on these options, see the section below on "Restricting Access".
Server-Authenticated RDP
By default, all instances are configured to present a self-signed digital certificate to authenticate themselves to you when you connect over RDP. This allows you to verify that you are, in fact, sending your credentials to the computer you think you are. You must, however, manually verify the thumbprint of the certificate and you must have an RDP client that supports server authentication. The default client in Windows XP does not. You may download an updated client from Microsoft at: https://support.microsoft.com/kb/925876.
To verify the certificate, follow these steps:
- Launch your Windows instance
- Get the password for the Administrator account on the instance by using ec2-get-password command or by right-clicking on the instance in ElasticFox and selecting "Get Administrator Password".
- Use ec2-get-console-output command to get the RDP certificate thumbprint. For example:
c:\>  ec2-get-console-output i-01234abcd
   …
     10/1/2008 1:13:59 PM: CN=i-5586263c, OU=EC2,  O=Amazon.com197068665D415FCAB3DEE7C10E36DDA16024DB67
   …
You may also use ElasticFox to get this information, as shown in Figure 2.
- Make note of the line surrounded by the tag.
- The CN value (inside the tag) should match your instance Id
- The string contained within the tag will be used later to make sure that you are correcting to the correct server.
- Launch the Remote Desktop Connection. You can do this within ElasticFox by right-clicking the instance and selecting "Connect to Public DNS Name," or by launching the Microsoft RDP client from Start\All Programs\Accessories, or by typing mstsc.exe at a command prompt. If you did not use ElasticFox, also take these steps:
- Enter the Public IP Address for your instance in the text box and click the “Options” button.
- Click on the rightmost tab (it will be labeled either “Security” or “Advanced”. If it is not there, you will need to upgrade to a more recent version of the client.
- As shown in Figure 5 and Figure 6 you will see a drop-down box with different levels of Server Authentication. Select the middle one. It will be either “Attempt authentication” or “Warn Me”. If you select “No authentication” you will be allowed to connect without warnings, but you will also be unable to verify the server identity. If you select "Require authentication” you will be unable to connect to Windows AMIs at all.
- Click “Connect”

Figure 5 Windows XP and Windows Vista RDP Options Dialog
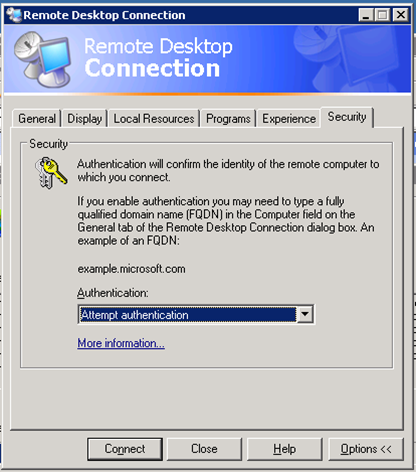
Figure 6 Windows Server 2003 RDP Options Dialog
- Upon connection you will be presented with a “Security Alert,” shown in Figure 7 and Figure 8 that tells you the client cannot verify the identity of the remote computer because:
- The Server name on the certificate is incorrect
- The certificate is not from a trusted certifying authority
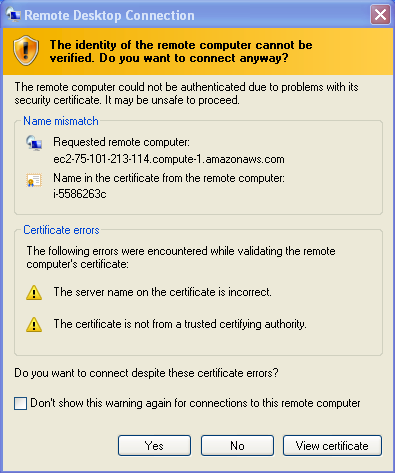
Figure 7 Certificate warning in Windows XP and Windows Vista
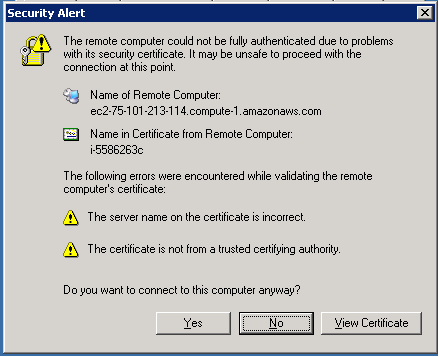
Figure 8 Certificate warning in Windows Server 2003 - Click “View certificate” to manually verify the information. You will be presented with one of the dialogs in Figure 9 or Figure 10

Figure 9 Certificate dialog in Windows XP and Windows Vista
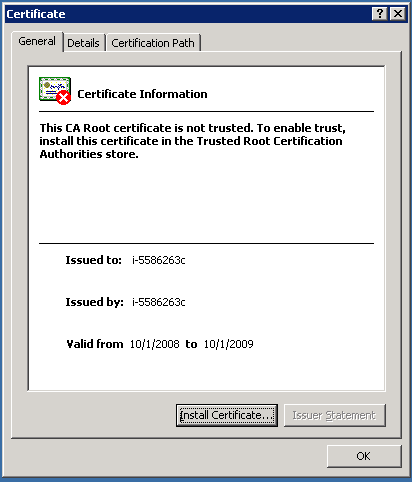
Figure 10 Certificate dialog in Windows Server 2003
- Click on the “Details” tab at the top of the dialog box. You will see one of the dialogs in Figure 11 or Figure 12
- In the list of fields on the “Details” tab, you will find an entry called “Thumbprint”. This value needs to match the “Thumbprint” you recorded earlier. The thumbprints may differ in formatting and capitalization, but the actual value must match.
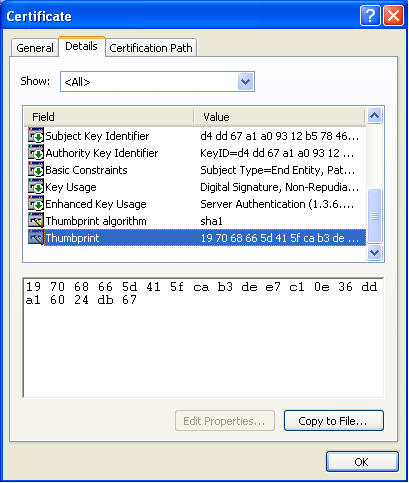
Figure 11 The certificate details dialog on Windows Vista and Windows XP shows the thumbprint information
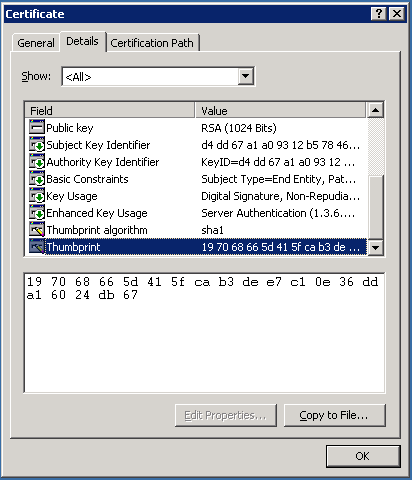
Figure 12 The certificate details dialog on Windows Server 2003 shows the certificate thumbprint
- Click “OK”
- Click “Yes” to continue connecting to the remote computer


Note that whenever you are connected to a server that has identified itself using a certificate a padlock will appear in the connection bar at the top of the screen, as shown in Figure 13. If you click on the padlock, you can view the certificate and verify its thumbprint.

Figure 13 The RDP connection bar shows the security state of the connection
Site-to-Site Access
If you are planning on using your Windows Instances to provide services to internal Windows clients at your main site we recommend using the Site-to-Site VPN feature in Windows Routing and Remote Access Services (RRAS). A complete guide to using RRAS is beyond the scope of this document, but further information is available on the Microsoft web site: https://technet.microsoft.com/en-us/library/cc787328.aspx as well as in the book "Deploying Virtual Private Networks with Windows Server 2003" (https://www.amazon.com/dp/0735615764).
Passwords, Users, and Authentication
The default password on the Administrator account is set automatically on all instances to a random value by the ec2Config service. You can retrieve the password originally set by using the ec2-get-password command, as shown here:
C:\>ec2-get-password  i-cb1db1a2 -k gsg-keypair.txt
   3bA2tIP123C
Alternatively, you may use the "Get Administrator Password" command in ElasticFox by right-clicking on the instance, as shown in Figure 14. The first time you use this feature in ElasticFox you will be asked to set your gsg-keypair. This is the keypair you generated when you first configured your AWS account. The path to the gsg-keypair file is stored in the ec2ui.last.ec2privatekey.file Firefox variable.

Figure 14 ElasticFox can retrieve the original Administrator password on your instances
Keep in mind that both of these methods only show you the original password set on these instances. Neither gets you the current password. We highly recommend you change the initial password as soon as possible. However, once you do, Amazon cannot recover your password for you. Amazon does not keep any record of any of the passwords you configure on your instances. If you forget the password or passwords needed to connect to an instance, you will have no option other than to decommission the instance and create a new one. For that reason, we recommend you record the administrative password for your instances in accordance with your normal security practices.
Windows Server 2003 supports passwords up to 255 characters. In addition, spaces are fully supported in passwords, enabling you to use true pass phrases instead of passwords. We recommend you use this functionality to create very strong and very long pass phrases for the accounts on your instances. In addition, we recommend you use different pass phrases for the Administrator accounts on each instance. This prevents an attacker who manages to gain control over one of your instances from using it to "Island hop" to another of your instances using the security dependency created by sharing pass words across hosts.
Finally, we recommend that every user who needs to administer your instances use a separate account. If multiple users use the same account you have no way to track who did what to your instance, losing accountability. Use the "Computer Management" tool or set up a Windows domain to manage accounts on your instances. Make sure that all your users have the right to access your instances using Terminal Services as this is the only method you can use to connect to your instances. Administrators have that right by default but you can grant it to additional users using the Group Policy Editor, as shown in Figure 15. You can access the Group Policy Editor using the gpedit.msc command. Alternatively, add any users who need to connect to your instance via Remote Desktop to the Remote Desktop Users group.

Figure 15 Grant additional users permission to access your instance in the Group Policy Editor
Restricting Access
As mentioned earlier, we highly recommend that you restrict access to your Amazon EC2 instances as much as possible. By default, Amazon EC2 restricts access to all ports on your instances. You must use the ec2-authorize command (https://docs.amazonwebservices.com/AmazonEC2/dg/2006-10-01/CLTRG-authorize.html), as discussed earlier, to open additional ports to your instances. We highly recommend you use the ec2-authorize command to very restrictively provide access to your instances.
Firewall and IPsec
In addition to the ec2-authorize command, you may use the Windows Firewall and IPsec to restrict access to your instances. Using a technique known as "Server Isolation" you may provide extremely restrictive access to your Amazon EC2 instances, making exploiting them extremely difficult for an attacker. For example, by ensuring that only the web server can connect to the database server and the only port it can do so on is the SQL Server port, TCP 1433, you can prevent an attacker on one computer from executing many attacks on another computer. For example, rather than providing unlimited access within your virtual network, you may build a very restrictive network, as shown in Figure 16

Figure 16 Using Server Isolation you can effectively contain attacks
As shown in Figure 16, using Server Isolation you can restrict communications within your network to only that which is absolutely necessary. Should an attacker compromise, for instance, the SQL Server, the types of traffic he can send to the rest of your network or the Internet is extremely limited, making further compromise much more difficult.
A complete guide to deploying Server Isolation is beyond the scope of this document. However, the following are helpful resources.
- Microsoft's Server and Domain Isolation page: https://technet.microsoft.com/en-us/network/bb545651.aspx.
- Protect Your Windows Network: https://www.amazon.com/dp/0321336437. A book on protecting a network running on Windows, which includes two chapters on network isolation and security dependencies.
- Port Requirements for the Windows Server System: https://support.microsoft.com/kb/832017. A Microsoft knowledge base article which documents all ports used by all components of the Windows Server System.
Security Tools
Windows includes several built in and optional tools and resources to assist you in protecting your Windows hosts. While no tool or process can guarantee absolute security, the following resources should be helpful.
SCW
SCW, the Security Configuration Wizard, is a wizard-based security configuration tool. It can be used to explore your server's attack surface as well as to tailor a security policy to exactly what you want your server to do. For example, it can be extremely helpful in building a Server Isolation deployment because it knows about the traffic patterns of all the services in Windows and can help you configure IPsec rules to permit them. SCW is not installed by default, but we have included it in the default Windows instances on Amazon EC2.
Security Policy Tools
The security policy tools: Local Security Policy (secpol.msc), the Security Configuration Editor (consists of two separate Microsoft Management Console snap-ins), and the Group Policy Editor (gpedit.msc) are the primary tools to configure low-level security policy settings in Windows. These tools mostly provide access to the same set of tools but through slightly different interfaces. They provide access to a large number of low-level settings, and can have significant adverse effects on the stability of your system if used incorrectly. However, for detailed security configuration of Windows, they are absolutely essential.
Security Guides
To minimize the chances that you use the security tools incorrectly, we recommend you use the Windows Security Guides to help secure your Windows instances. The Windows Server 2003 Security Guide (https://technet.microsoft.com/en-us/library/cc163140.aspx) is created by Microsoft with the input of many external entities and is the definitive resource to configuring security settings on Windows. It includes configurations for enhanced security for several types of servers for those organizations that do not consider the default settings sufficient. Keep in mind, however, that the default settings in Windows more or less map to the Enterprise level of the Security Guide. In other words, you may or may not need to use the Security Guide.
For SQL Server 2005 security, refer to the SQL Server 2005 Security Best Practices document: https://download.microsoft.com/download/8/5/e/85eea4fa-b3bb-4426-97d0-7f7151b2011c/SQL2005SecBestPract.doc and the SQL Server security technical center at https://www.microsoft.com/sql/technologies/security/default.mspx.
Instances with SQL Server pre-installed have all the default databases installed in %ProgramFiles%. This is contrary to normal recommended best practice, which recommends keeping all the databases on a separate volume. However, when an image is bundled into an AMI, only the C: drive is bundled. This requires putting the default databases on C:. We recommend you install all other databases on a separate drive, and consider moving the default databases as well. Remember, however, that if you do they will not persist if you bundle an instance into a new AMI.
SQL Server 2005 Surface Area Configuration
SQL Server 2005 comes with the SQL Server 2005 Surface Area Configuration tool, shown in Figure 17. We highly recommend that you use this tool to help configure the attack surface on your SQL Server instances.

Figure 17 SQL Server 2005 Surface Area Configuration
The Surface Area Configuration tool is designed for two main purposes. First, it helps you manage all the services that are installed as part of a SQL Server 2005 installation. For example, you can use it to disable any unnecessary services and to manage the protocols used to connect to your SQL Server and where those connections may come from. Second, you can use it to manage features on the SQL Server. For example, the xp_cmdshell extended stored procedure is one of several commonly used by attackers. You may use the Surface Area Configuration tool to ensure that extended stored procedure stays disabled (it is disabled by default). Keep in mind, however, that while the Surface Area Configuration tool is a useful tool, it does not give you the power that a competent database administrator can give you by hand tuning your instances. For example, while the Surface Area Configuration tool can disable xp_cmdshell, a competent administrator can delete it entirely.
We highly recommend that you evaluate your risk posture, learn as much as you can about the services you run, and harden them appropriately according to your risk tolerance.
Other Resources
In addition to the guides, there are two very good books on Windows security that we recommend. The first is Protect Your Windows Network, mentioned above (https://www.amazon.com/dp/0321336437). It is a practical guide to how to protect networks based on Windows, specifically focused on Windows Server 2003. The second book is the Windows Security Resource Kit (https://www.amazon.com/dp/0735621748). The Resource Kit is part of the technical documentation set for Windows and contains much information on how security works in the operating system. An updated version of the Resource Kit is available (https://www.amazon.com/dp/0735625042) but it is primarily focused on Windows Server 2008, which is not yet available in Amazon EC2.
Disabling Features
By default, Windows Server 2003 comes reasonably locked down. However, for maximum security, there are still features that can be disabled. For instance, if you are not using a particular instance to serve up files over Windows networking you may disable the Server service. The Print Spooler service is only needed on print servers or computers that must be able to print. The Computer Browser service largely superfluous as it relies on broadcast traffic to help you locate servers on the network graphically. Broadcast traffic is not permitted in Amazon EC2. There are many more examples. In general, we recommend that you analyze the footprint needed on your servers using SCW and disable all services that are not needed.
A caution is necessary here, however: do not disable RDP or Terminal Services. If you do you will no longer be able to access or manage any of your instances! You may want to experiment with disabling services on a local computer before you try it on your production instances in Amazon EC2.
Keeping Your Instances Updated
While your instances are relatively well updated when you receive them, Amazon AWS is not responsible for deploying future updates to your instances. The AMIs provided at the initial launch of Amazon EC2 running Windows contain all security updates issued up through October 14, 2008. Future AMIs will contain more recent updates.
Once you deploy an instance you must manage the patch level of your instances yourself, including any updates issued after the AMIs were built. You may use the Windows Update service, or the Automatic Updates tool to deploy Microsoft updates. Any third party software you deploy must also be kept up to date using whatever mechanisms are appropriate for that software.
Bundling and Secret Data
Bundling is a term used to refer to the creation of a new AMI. If, for instance, you are building a set of instances that are nearly identical you may want to create an AMI that has most of the configuration of those instances already performed. This enables you to very quickly get a new instance up and running. However, if you do so, you should consider clearing any private data prior to bundling the image.
First, ensure that the Administrator password, and passwords on any other accounts, is set to an appropriate value before bundling. These passwords will be available to anyone who launches your AMI.
Second, if you have stored passwords in the Windows credential stores you may want to clear those before bundling. To do so, go into the Stored Usernames and Passwords Control Panel applet and remove any values you do not want in there.
Finally, you should consider wiping all free space on the disks before bundling the image. You may do this with the cipher command in Windows. For example, this command will wipe all free space on the C: drive, ensuring that all data stored there is unrecoverable.
cipher c:\ /w
Reporting Problems
If you believe you have discovered a security problem with your Windows instances, please contact the regular support channels for Amazon EC2.