Artificial Intelligence
Build a Voice Kit with Amazon Lex and a Raspberry Pi
In this post, we show how you can embed Amazon Lex into custom hardware using widely available components. We demonstrate how you can build a simple voice-based AI kit and connect it to Amazon Lex. We’ll use a Raspberry Pi and a few off-the-shelf components totaling less than $60. By the end of this blog you will have a network-connected hardware device integrated with the Amazon Lex PostContent API. We also demo a couple of example Bots—a voice controlled robot and a voice controlled metronome.
Component Overview
You need the following components to build the Amazon Lex hardware kit.
- Raspberry PI 3 Model B, ~$35 from Amazon.
- Kinobo – USB 2.0 Mini Microphone, ~$5 from Amazon.
- Adafruit I2S 3W Stereo Speaker Bonnet and speakers, ~$12 from adafruit.
- (Optional) Qunqi Clear Case Box Enclosure, ~$20 from Amazon.
Physical Construction
Raspberry Pi
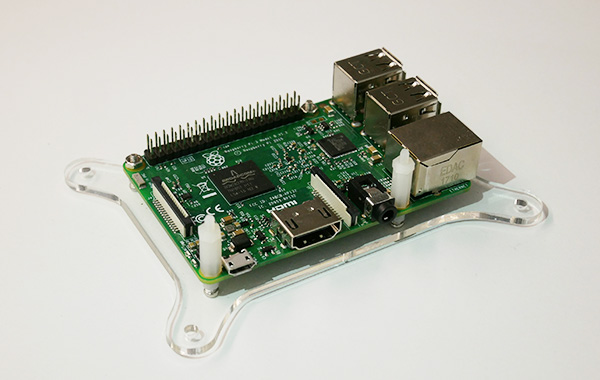
Figure 1. Raspberry PI Model B
We use a stock Raspberry PI 3 Model B for this project. Figure 1 shows the Raspberry Pi mounted in a Clear Case Box kit. The Clear Case Box neatly packages the Pi, Digital Audio Controller (DAC), and speakers but is not necessary.
Microphone
Installing the Kinobo USB Mic is simple, just pick a USB port and plug it in!

Figure 2. Raspberry PI 3 Model B with Kinobo USB Mic |

Figure 3. Raspberry PI 3 Model B with Kinobo USB Mic, installed |
Digital audio controller
The Adafruit I2S 3W Stereo Speaker Bonnet is a 3W stereo amplifier and digital audio controller (DAC) that runs speakers directly off the Raspberry Pi without needing an additional power source. The bonnet comes as a fully assembled printed circuit board (PCB) with a 2×20 header and 2 terminal blocks.
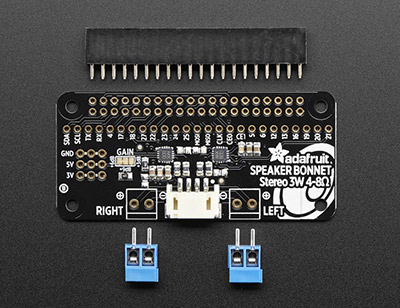
Figure 4. Adafruit I2S 3W Stereo Speaker Bonnet, 2×20 header, and terminal blocks
Some light soldering is required to attach the header onto that PCB so you can plug it into your Raspberry Pi.
Figures 5 and 6 show the DAC with header and terminal blocks soldered. If you’re not an expert solderer (we aren’t) try stopping by your local makerspace.

Figure 5. Adafruit I2S 3W Stereo Speaker Bonnet (DAC), Bottom |

Figure 6. Adafruit I2S 3W Stereo Speaker Bonnet (DAC), Top |
Figure 7 shows the DAC mounted on the Raspberry Pi.

Figure 7. DAC mounted on the Raspberry Pi
Speakers
After the DAC is mounted you can attach the enclosed speaker set to the solderless terminal in the middle. We took the additional step of mounting the speakers to the top of our Clear Case Box by drilling (using a Dremel) holes in the case to match the mounting holes in each speaker.
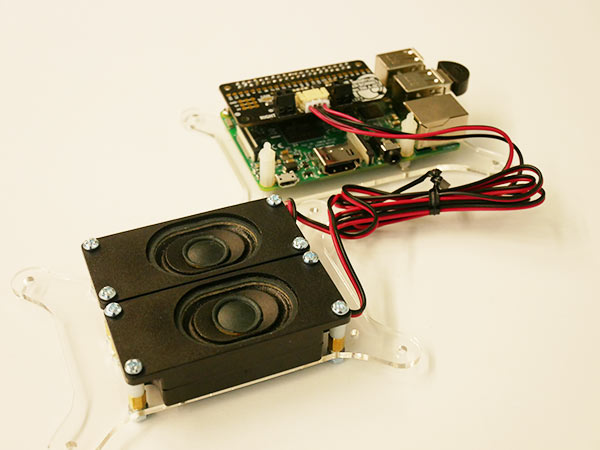
Figure 8. Speakers connected to JST jack and mounted
Completed Product
Figure 9 shows the completed kit.
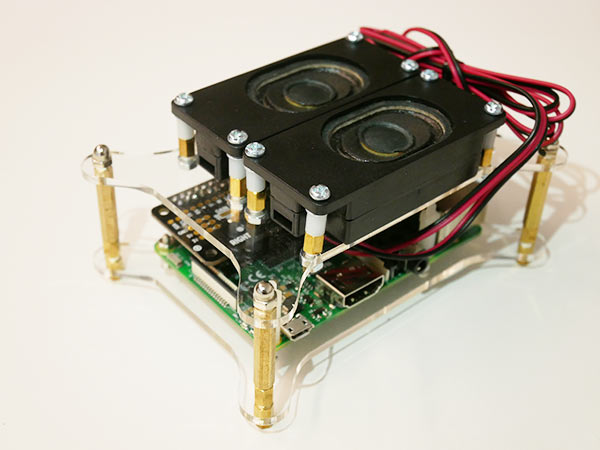
Figure 9. Complete Amazon Lex AI Kit
Installation and testing
OS
We used the 6/21 image of Raspbian Jessie for this project, 2017-06-21-raspbian-jessie.img. The latest version should work too.
- Download the latest version of Raspbian Jessie from RasberryPi.org.
- Follow the installation instructions to download the image and write it to an SD card.
Headless Setup (Optional)
We like to use a headless (no keyboard, mouse, or monitor required) setup for Raspberry Pi development. It’s a little more effort but, once complete, you can access your Raspberry Pi from anywhere you are as long as it can connect to a network. The optional directions that follow describe setting up SSH and VPC access to your Raspberry Pi to enable headless access. If you want to skip these directions you can connect a keyboard, mouse, and monitor directly to the Raspberry Pi and jump to the next section.
SSH (optional)
To enable SSH place a file named ssh (without any extension) on the boot partition of the SD card. Detailed instructions can be found here.
VNC (optional)
VNC is a graphical desktop sharing system that allows you to remotely control the desktop interface of one computer (running VNC Server) from another computer or mobile device (running VNC Viewer). When using a Raspberry Pi some tasks, like connecting to a WIFI network, are much easier using the GUI.
The Raspberry Pi VNC documentation has a great guide for setting up a VNC server and viewer for your Raspberry Pi.
Network configuration
Just connecting an Ethernet cable is enough to get your Raspberry Pi on the network. We found it’s quickest to use the GUI (either directly or via VPC) to connect your Raspberry Pi to a wireless network. After you are on the network your Raspberry Pi will be available at raspberry.local or by its IP address.
Note: We found Fing to be the easiest way to find our Raspberry Pi’s IP address.
Digital audio controller
Adafruit has detailed instructions for installing and testing their I2S DAC. We found that the install instructions referenced by the Adafruit instructions worked better.
The easiest way to get started with the DAC is to use the one-line installer:
- ssh into your Raspberry Pi and create a new directory named lex.
- Run the phatdac install script.
- When prompted to continue, enter y.
- If prompted to reboot enter y. If you need to reboot rerun the script after you have reconnected to the Raspberry Pi.
- When asked if “you wish to test your system now”, enter y.
You should hear an audio sample played for each stereo channel. Detailed instructions for using the DAC, including manual install options, can be found here:
Mic
We don’t need to install anything to use the microphone. All the necessary ALSA libraries should be installed. You can test that the microphone is working with the following command.
Press ctrl-C to terminate the script once you are done speaking. You can test the recorded audio with the following command.
If you can hear the recorded audio while playing back temp.wav you’re ready to start capturing and streaming audio to Amazon Lex.
Amazon Lex integration
Install Node.js
Install Node and npm using apt-get. Type the following into a terminal window of your Raspberry Pi:
Verify that Node and npm were installed by checking the installed version.
Note: If there is a naming conflict with the node package it will be installed as nodejs. You can manually create a symlink to /usr/bin/node or use nodejs in place of node in the following commands.
Install the SDK
The preferred way to install the AWS SDK for Node.js is to use npm. Type the following into a terminal window:
Bot conversation launcher script
Now that we have a working microphone, speakers, and we have installed the Amazon Lex JavaScript SDK, we can call the PostContent operation and have a conversation with our bot.
This Node script listens for audio input, detects sound, and starts streaming the audio to Amazon Lex. After silence has been detected, it terminates the stream, and plays the response. The script continues to listen and respond until the conversation state is Fulfilled.
We need to install some dependencies before we can run the script. The script relies on the fs, tailstream, and child_process npm packages and SoX and mpg321 commands for recording and playback.
npm packages
From your ~/lex directory install the npm dependencies with the following command.
SoX
SoX reads and writes audio files in most popular formats and can apply effects to them. It can combine multiple input sources, synthesize audio, and, on many systems, act as a general purpose audio player or a multi-track audio recorder. We are using SoX to start and stop our audio capture and to trim (remove silence from the beginning and end) the captured audio. Install SoX with the following command.
Here is the SoX command we are using to record audio in a format Amazon Lex will understand and, more importantly, perform silence detection and trimming. Note that this command is for your information only. It is not meant for you to execute.
The first part of the command indicates we want to record PCM– encoded (signed 16 bit little endian) audio, sampled at 16000 Hz, as a WAV file.
And the second part specifies how we want to handle silence detection before and after we start recording.
The first triplet of values removes silence, if any, at the start until 0 seconds of sound above 1%. The % is a threshold value, which is used to indicate what sample value you should treat as silence. The second triplet stops recording when there are at least 4 instances of .3 seconds of silence below 2%.
mpg321
Once we get a successful response from Amazon Lex we play the audio stream using mpg321. mpg321 is a very popular command-line mp3 player. Install mpg321 with the following command.
Testing
Now that we have installed our dependencies we can test our Amazon Lex conversation script. From the ~/lex directory, create a file called lex.js with the contents of the above script.
Note: Make sure to update the example script with your credentials and Bot name.
Once you are done, save the script, and execute it with the following command.
If everything is correct, you should see the output from the SoX command in the terminal. Speak aloud an utterance for your bot and listen for the Amazon Lex response. The script will continue until the conversation state is Fulfilled. See the Amazon Lex documentation on building a Bot if you don’t have one. For inspiration, check the “So, what can I do with it?” section which has videos of different Bot integrations.
Hot word
At this point we have functional audio capture and playback and a Node script that will orchestrate an Amazon Lex PostContent operation-based dialog. To complete the project we’ll add hot word detection so that we can invoke our kit by saying a hot word out loud. For this project we use a third-party library (Snowboy) for hot word detection. Snowboy is a customizable, “hot word” detection engine which runs locally and is compatible with Raspberry Pi out of the box.
Install
Follow the instructions below or the more detailed Snowboy quick start instructions.
In the ~/lex directory make a new directory called “snowboy” and download the Snowboy binary to it.
Unpack the Snowboy tar-ball.
Install the Snowboy dependencies.
Install pyaudio.
You also need to install libatlas-base-dev. (This step differs from the Snowboy instructions.)
Test
After the installation is complete you’ll be able to run the Snowboy test script. Make sure you are in the following directory: ~/lex/snowboy/rpi-arm-raspbian-8.0-1.2.0.
When the script reports that it’s listening say the hot word “Snowboy” out loud. You should hear a beep to indicate that the hot word was recognized.
Create a custom hot word (optional)
In the next section, we’ll modify the Snowboy demo script to run our lex.js bot invoker. If you want to use a custom hot word you can build and download a personal hot word model from the Snowboy dashboard. For this demo we created a “hot word” model for “botbot” and “metronome“.
Tying it all together
Now we are ready to setup our hot word loop. The code below is a slight modification of the demo.py file that’s included with the Snowboy binaries. Once started it listens for the hot word, stops the hot word detector when it hears the hot word, executes our Lex bot invoker script, and restarts itself after the bot invoker script is completed.
Create a new file in the ~/lex/snowboy/rpi-arm-raspbian-8.0-1.2.0 directory called lex-wake.py, copy the above code into it, and save. You can test it with the following command.
Note: Our personal hot word model is “Botbot.pmdl,” you can use your own if you created one or the included Snowboy model “resources/snowboy.umdl”.
You should see the hot word loop start. Say the hot word aloud. After your Bot has been invoked and the conversation state is “Fulfilled” the hot word loop will start listening again.
Congratulations, you have created your very own AI Kit! Check out the “So, what can I do with it?” section below for examples of exciting uses for your new kit, including a voice-controlled robot and metronome.
Running On Startup (optional)
To start listening for your hot word on startup edit the /etc/rc.local file to include your hot word script.
References
- Adafruit speaker bonnet for Raspberry Pi
- Raspberry Pi Phat DAC Install
- RasspberryPi VNC Documentation
- Headless Raspberry Pi Setup
- Raspberry Pi image install instructions
- Raspbian image download
- SoX
- mpg321
- Snowboy
Complete reference code
https://github.com/awslabs/aws-lex-ai-kit
So, what can I do with it?
You can hook it up to any Amazon Lex bot—we’d love to hear about what you build with it! We connected the voice kit to two bots to create a voice controlled GoPiGo robot and a voice controlled metronome.
Voice Controlled Robot
In this example there are two main intents, Drive and Turn, which have slots for direction, distance, and unit. Fulfillment is handled by a Lambda function, which updates an IoT device shadow, and the robot moves.
Voice Controlled Metronome
In this example we return the Intent parameters directly to the Voice Kit. The Intent has only one slot, Tempo. Once the tempo value is returned we start a metronome with the requested tempo and play a tick using the on board speakers.
We’d love to hear what you think about the post, answer any questions you have, and/or hear about the voice kit audio projects you put together. You can give us feedback in the comment section below.
Additional Reading
Learn how to capture voice input in a browser and send it to Amazon Lex!
About the Author
 Andrew Lafranchise is a Senior Software Development Engineer with AWS Deep Learning. He works with different technologies to improve the Lex developer experience. In his spare time, he spends time with his family and is working on a Lex bot that can interact with his twin 3 year old daughters.
![]()