AWS Partner Network (APN) Blog
Running Applications on Amazon EKS Using Amazon EC2 Spot Instances with Spotinst Ocean
By Roy Rodan & Anjali Vijayakumar, Partner Solutions Architects at AWS
By Stav Maor, Chief of Staff at Spotinst
By Grant Lee, Sr. Dir. Strategic Alliances at Spotinst
 |
 |
While implementing a microservices architecture, Kubernetes can be a powerful tool to manage containers. However, if you’re just starting out in the Kubernetes ecosystem, it can be hard to get a hang of.
While this is not a beginner tutorial covering the basics of Kubernetes, we will help you get started with Amazon Elastic Container Service for Kubernetes (Amazon EKS) to set up a production-ready Kubernetes cluster.
We will also use Spotinst Ocean to help us manage Amazon EKS clusters and reduce costs by provisioning clusters on Amazon EC2 Spot instances.
Spotinst is an AWS Partner Network (APN) Advanced Technology Partner with AWS Competencies in both Containers and Cloud Management Tools. Spotinst helps customers save on their AWS computing costs by leveraging Amazon EC2 Spot Instances with ease and confidence.
Introducing Spotinst Ocean
Ocean is Spotinst’s Serverless Kubernetes Engine. It simplifies managing, scaling, and operating Kubernetes clusters, and reduces costs by up to 80 percent by provisioning Spot instances to run your workload.
Ocean automatically ensures your containers are placed on the best possible mix of Spot, Reserved, and On-Demand Instances. This helps to optimize your Kubernetes clusters for cost, availability, and performance.
Pricing for Ocean is free for the first 20 instances, and after that the cost is 20 percent of the monthly savings. For example, if by using Ocean you saved $500 a month, the licensing cost is $100.
Prerequisites
- Spotinst account.
- Latest version of the AWS Command Line Interface (CLI) with the optional autocomplete.
- AWS Identity and Access Management (IAM) Authenticator.
- Kubernetes kubectl command line.
- Metrics server for Amazon EKS.
wgetpackage.
Configuring Spotinst Ocean
In the Spotinst console, click on Cloud Clusters under the Ocean section on the left, and then click the Create Cluster button on the top right.

Figure 1 – Spotinst console page for Elastigroup and Ocean.
Next, choose the EKS Create a New Cluster option. You can also choose EKS Join an Existing Cluster, if you already have an Amazon EKS cluster.
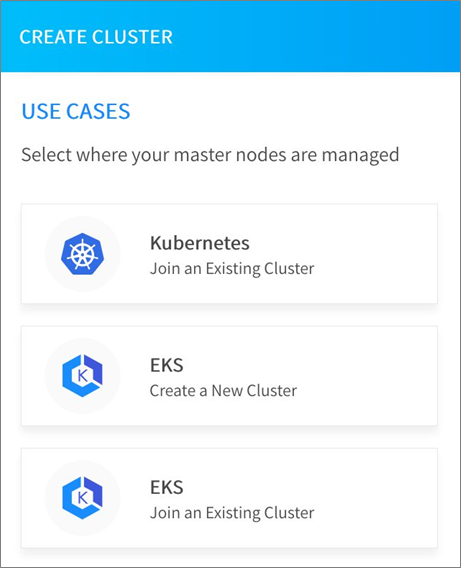
Figure 2 – Choosing the proper Amazon EKS cluster configuration.
Follow the instructions on the screen (five steps) to proceed and create the cluster.
Step 1: Create a Spotinst token to connect Amazon EKS to Spotinst Ocean, and then click Generate Token.
Step 2: For Amazon EKS Cluster parameters, set the desired Cluster Name, Region, and Key Pair.
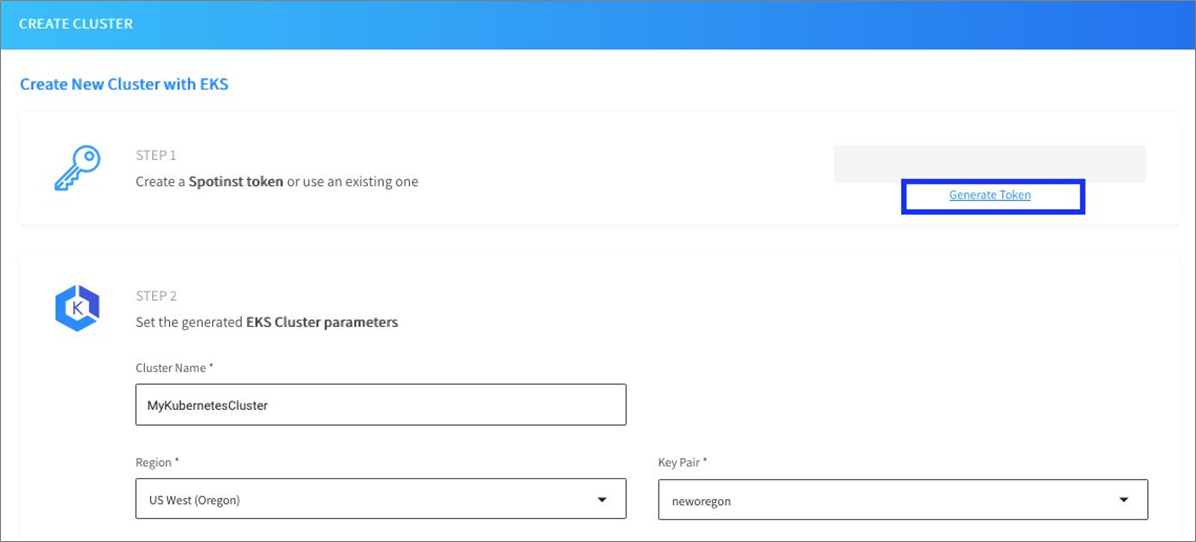
Figure 3 – Setting up an Amazon EKS cluster information.
Step 3: Click on Launch CloudFormation Stack. This opens up a new window in your browser to take you to the AWS sign-in page.
After signing in to your AWS account, you’ll notice that all of the parameters for the AWS CloudFormation stack were already populated. Check the box at the bottom of the page to allow CloudFormation to create IAM resources and click Create.
Note that it may take up to 10 minutes for the CloudFormation stack to complete deployment in your AWS account. When the stack status changes to ‘CREATE_COMPLETE’, please return to the Spotinst window in your browser.
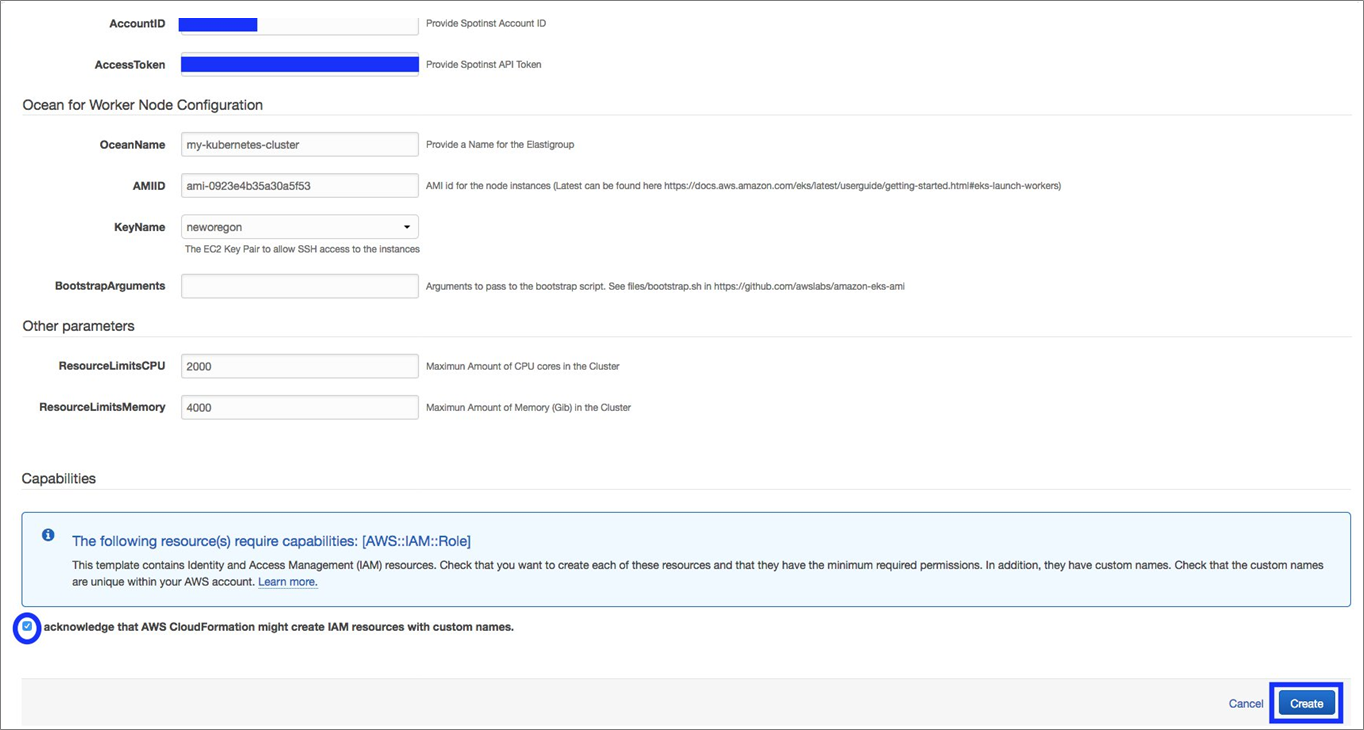
Figure 4 – AWS CloudFormation settings page.
Step 4: Open up a terminal and execute the commands as shown on the screen in your Spotinst console.
Make sure the IAM credentials used to create the Amazon EKS Cluster match the IAM credentials you have configured for AWS CLI.
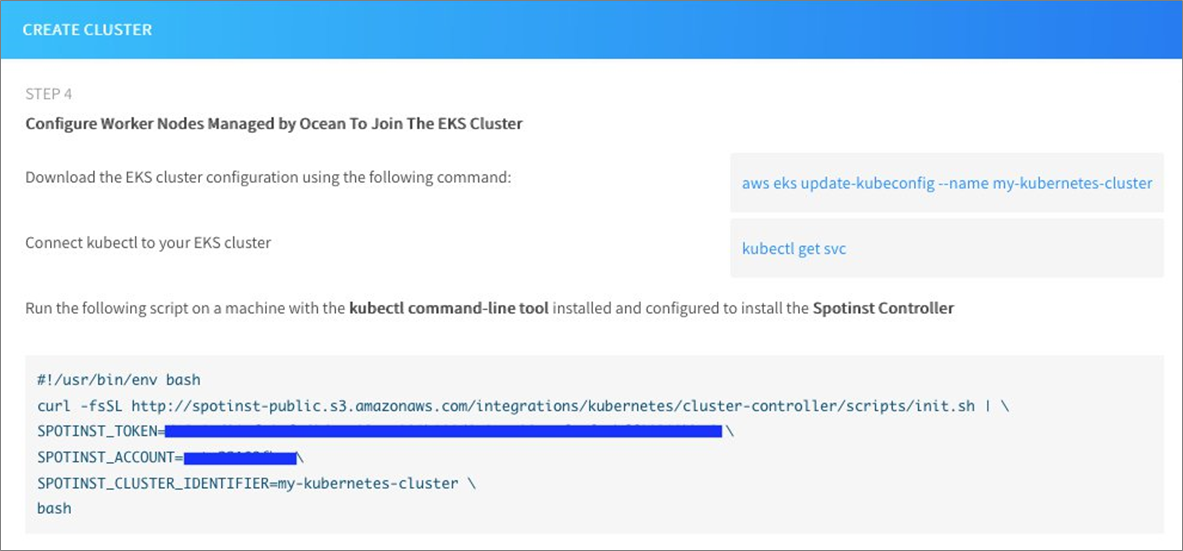
Figure 5 – Spotinst Amazon EKS cluster controller setup.
Step 5: Follow the instructions on the screen to configure AWS authenticator. When finished, click Done.

Figure 6 – Spotinst Amazon EKS authenticator setup.
After you complete the initial setup stages, you’ll see your new cluster appear on the Spotinst console.
It will take a few minutes for the data to populate and for nodes to register. You can hit the refresh button next to the Create Cluster button to refresh the dashboard.
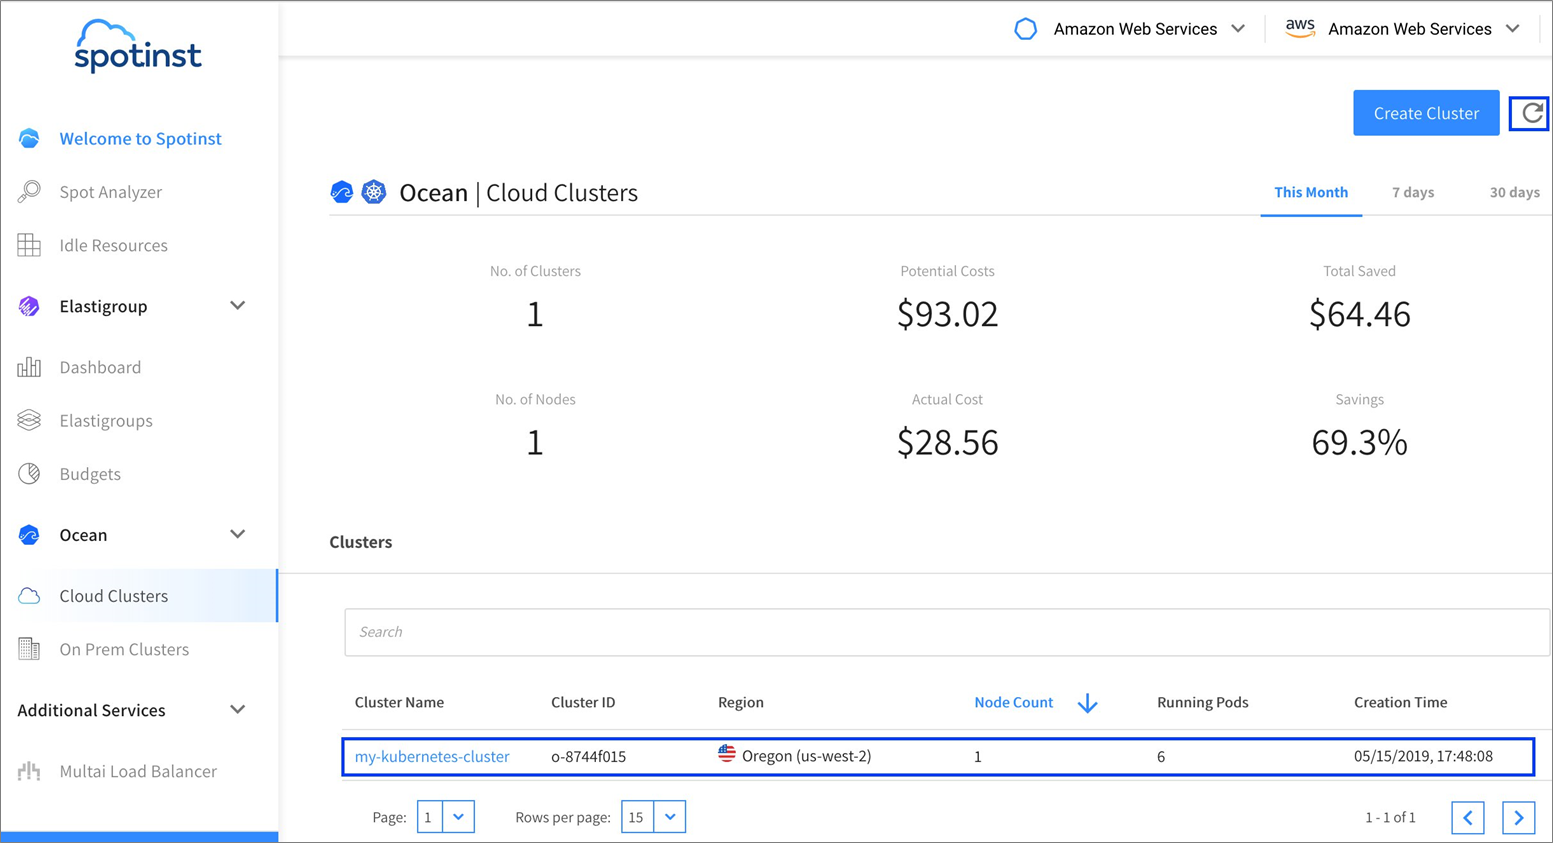
Figure 7 – Spotinst console showing your new cluster.
Creating the Web-App Pod
Now, let’s see Ocean in action. In this example, we’ll install a simple Apache container. We’ll use a custom Docker image based on the php-apache image. This is based off of Kubernetes Horizontal Pod Autoscaler Walkthrough.
Once we set up the cluster, we’ll generate some load to cause the cluster to scale up and down, and see how Ocean orchestrates this over Amazon EC2 Spot Instances.
Run the following command to start a deployment running the Docker image and expose it as a service on port 80. For more information on the Docker file, see the walkthrough we noted above.
kubectl run php-apache --image=k8s.gcr.io/hpa-example --requests=cpu=200m --expose --port=80
Expected output:
service/php-apache created
deployment.apps/php-apache created
Setting up Metrics Server
Follow this AWS User Guide to make sure you have a Metrics server running for Kubernetes. Otherwise, the Horizontal Pod Autoscaler (HPA) will show Targets as <unknown> like in the example below:
NAME REFERENCE TARGETS MINPODS MAXPODS REPLICAS AGE
php-apache Deployment/php-apache <unknown>/50% 1 10 1 15s
Setting up HPA
The command below will create a Horizontal Pod Autoscaler that maintains between one and 10 replicas of the Pods controlled by the php-apache deployment we created earlier.
HPA will increase and decrease the number of replicas to maintain an average CPU utilization of 50 percent across all Pods.
kubectl autoscale deployment php-apache --cpu-percent=50 --min=1 --max=10
Expected output:
horizontalpodautoscaler.autoscaling/php-apache autoscaled
Check the current status of autoscaler by running:
kubectl get hpa
Expected output:
NAME REFERENCE TARGETS MINPODS MAXPODS REPLICAS AGE
php-apache Deployment/php-apache 0%/50% 1 10 1 20s
Please note the current CPU consumption is zero percent, as we are not sending any requests to the server.
Generating Load to Scale up Pods
In the next step, we’re going to run a simple loop of wget command to generate load on the cluster and see HPA in action.
Open an additional terminal window and run:
kubectl run -i --tty load-generator --image=busybox /bin/sh
Hit enter for command prompt, and then run the following loop (one line):
while true; do wget -q -O- http://php-apache.default.svc.cluster.local; done
Wait a couple of minutes and check that the CPU load has increased significantly:
kubectl get hpa
Expected output:
NAME REFERENCE TARGETS MINPODS MAXPODS REPLICAS AGE
php-apache Deployment/php-apache 491%/50% 1 10 1 13m
In this example, we see that CPU consumption has increased to 491 percent of the request. As a result, the deployment was resized to 10 replicas:
kubectl get deployment php-apache
Expected output:
NAME DESIRED CURRENT UP-TO-DATE AVAILABLE AGE
php-apache 10 10 10 10 23m
Check the Spotinst dashboard to see the scaling event and cluster statistics.
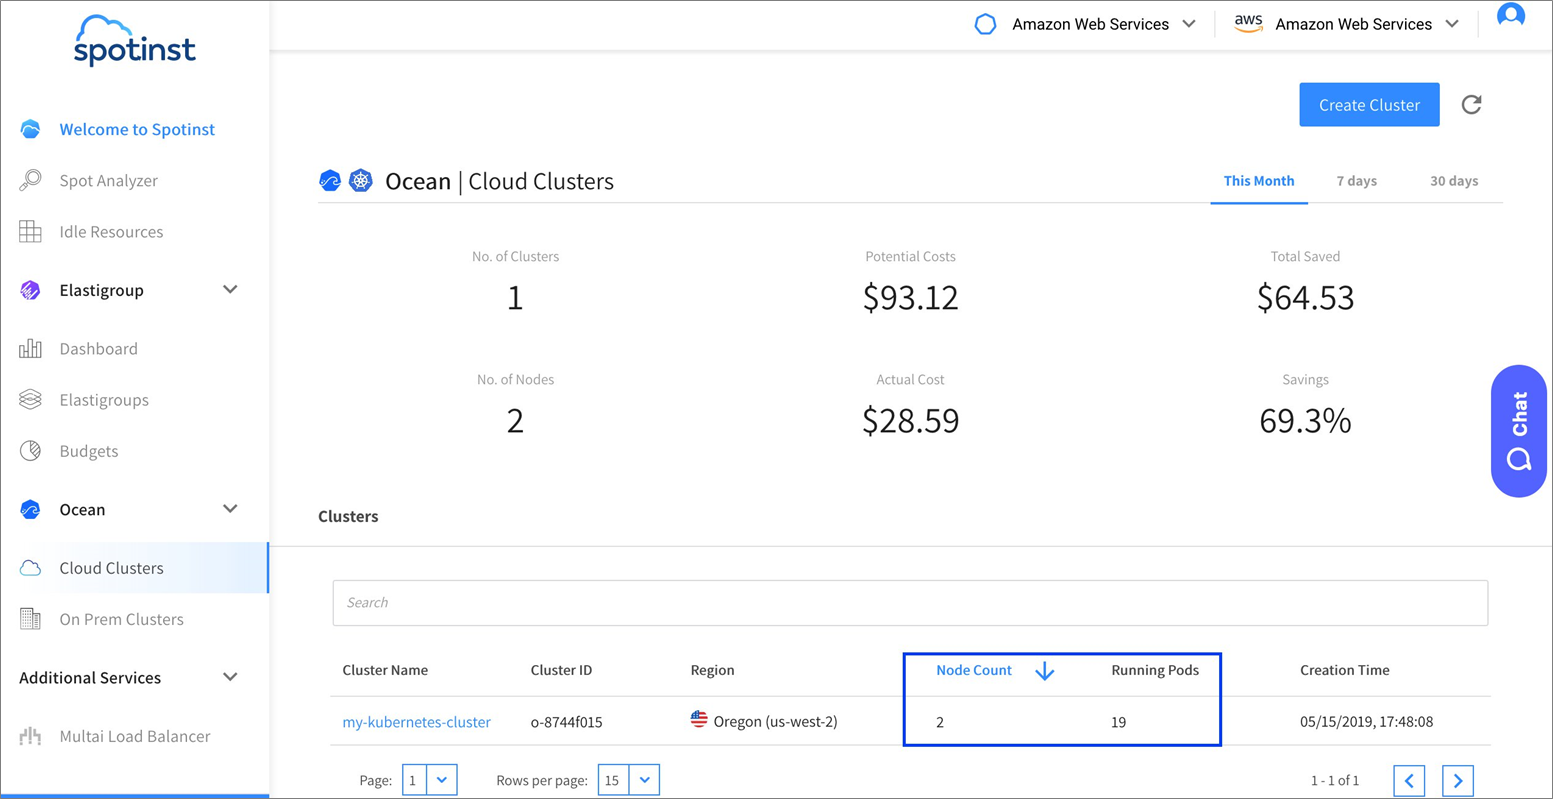
Figure 8 – Spotinst console after Amazon EKS scaling.
Click on the cluster and explore further details about the cluster.
You will also see new instances in your Amazon Elastic Compute Cloud (Amazon EC2) console as a result of Spotinst Ocean creating new spot requests to handle the load.

Figure 9 – AWS console showing Spot instance used.
Stop Load Test
In the terminal where you created the container with busybox image, terminate the load generation by typing <Ctrl> + C.
After a minute or so, verify the result state:
kubectl get hpa
Expected output:
NAME REFERENCE TARGETS MINPODS MAXPODS REPLICAS AGE
php-apache Deployment/php-apache 0%/50% 1 10 1 34m
Check the deployment status:
kubectl get deployment php-apache
Expected output:
NAME DESIRED CURRENT UP-TO-DATE AVAILABLE AGE
php-apache 1 1 1 45m
CPU utilization has dropped back to zero; as a result, HPA auto scaled the number of replicas back down to 1.
In a few minutes, one of the Amazon EC2 instances will be terminated as it was not required any more.
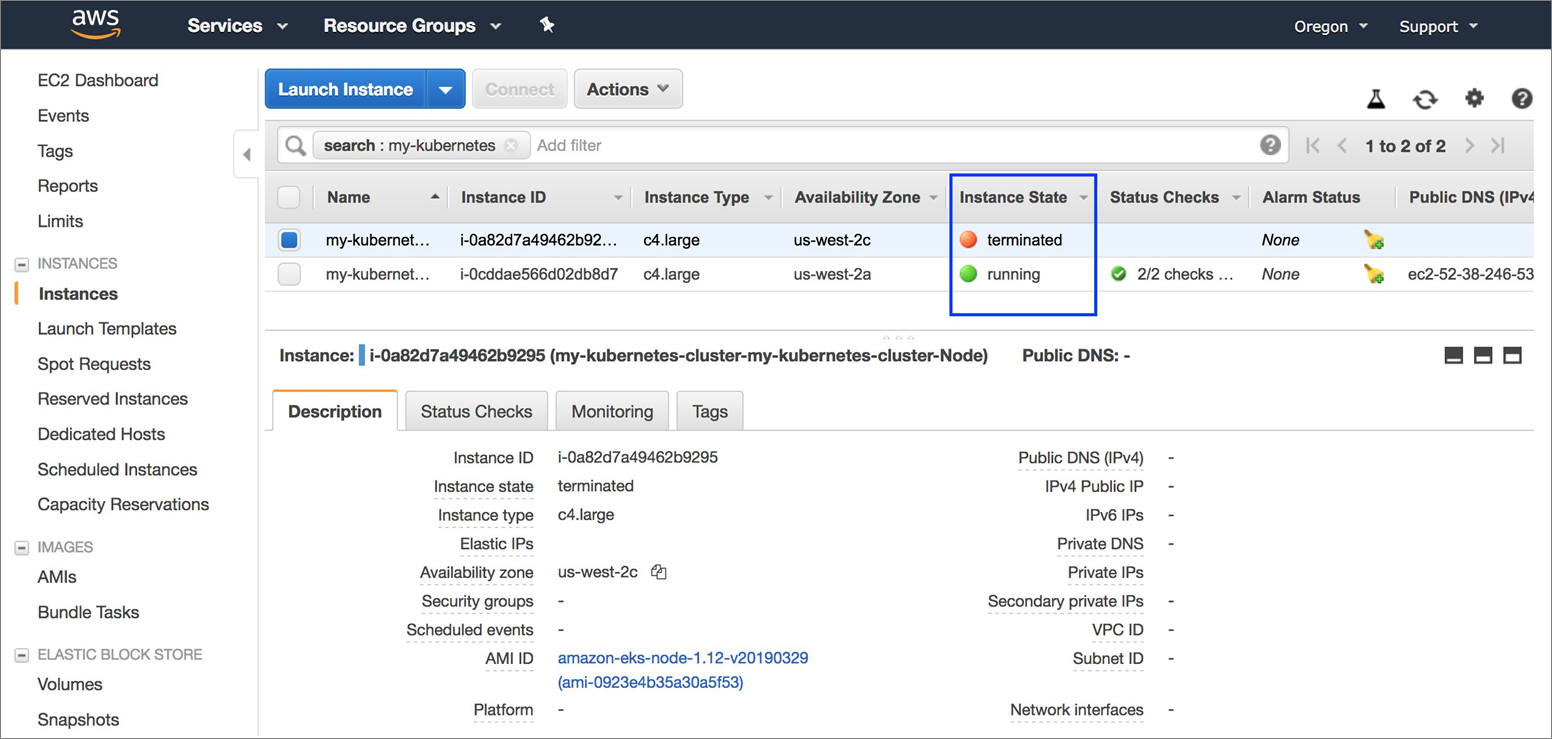
Figure 10 – AWS console with Amazon EC2 showing Spot instance terminated.
The corresponding spot request was cancelled as well.
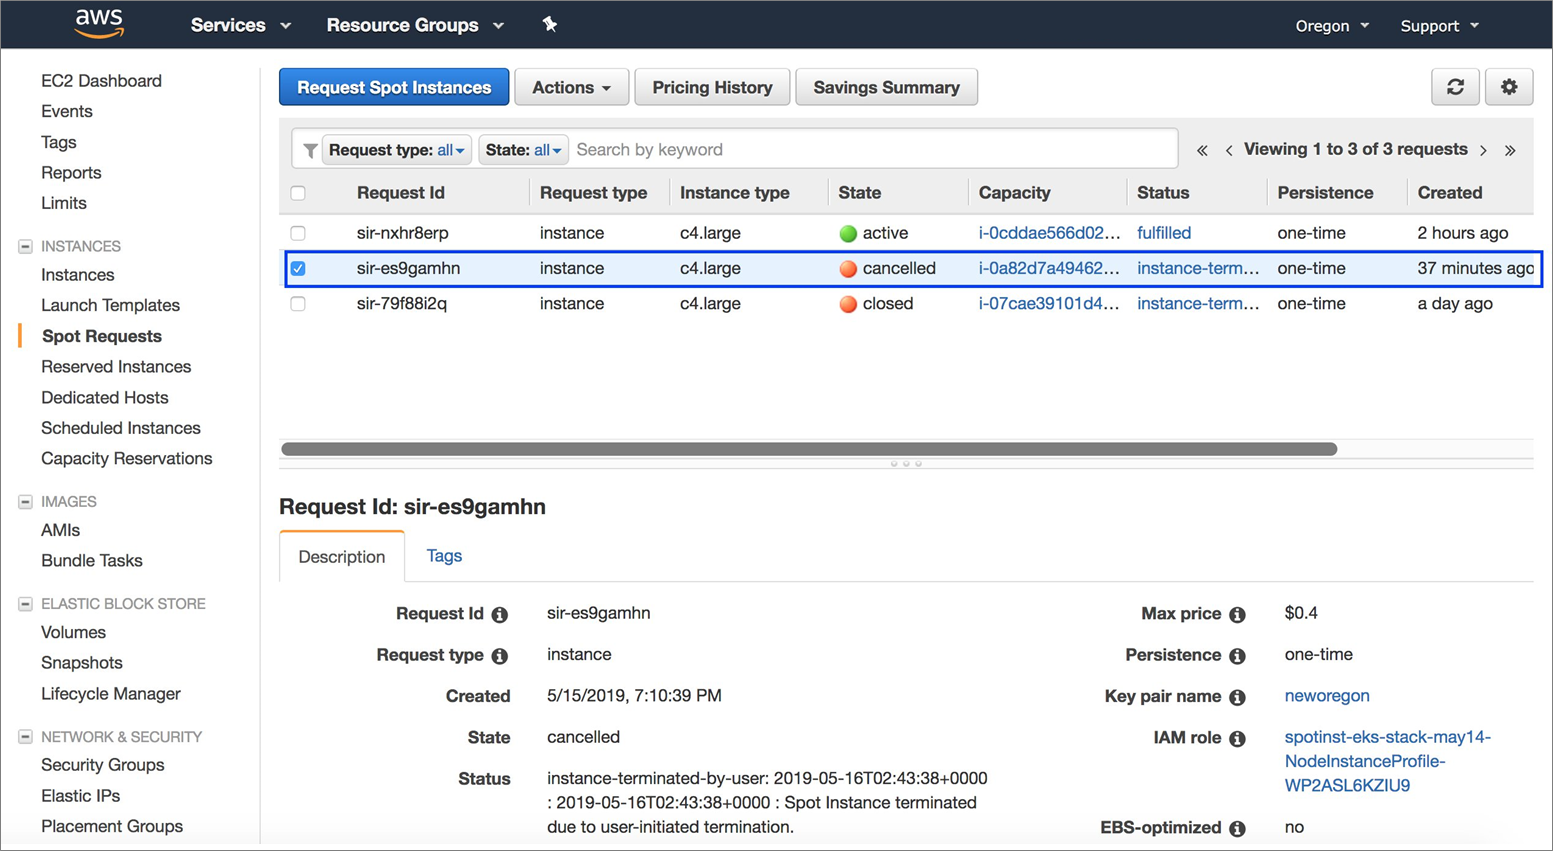
Figure 11 – AWS console for Spot instances showing cancelled request.
You can check your cost savings in the Spotinst console.

Figure 12 – Spotinst console showing savings and cluster usage.
Summary
In this post, we learned how using two managed services–Amazon EKS for Kubernetes workloads and Spotinst Ocean for the underlying provisioning of Spot instances–can help you focus on running your application on AWS.
You can do this without the overhead of managing the scaling events, choosing the right instance sizes, and utilizing your Reserved, On-Demand, and Spot instances in an optimal way that reduces your spend by up to 80 percent.
Spotinst Ocean has additional capabilities which we didn’t mention; capabilities that were developed to ease Kubernetes operations for engineering teams running workloads in the cloud.
We also learned how Spotinst Ocean can help scale Amazon EKS clusters while automatically provisioning them over a mix of Amazon EC2 instances, thus optimizing costs and removing the overhead of operating clusters yourself.
.
AWS Competency Partners: The Next Smart
Spotinst is an AWS Competency Partner, and if you want to be successful in today’s complex IT environment and remain that way tomorrow and into the future, teaming up with an AWS Competency Partner is The Next Smart.

.
|
Spotinst – APN Partner Spotlight
Spotinst is an AWS Competency Partner. They help companies save on their AWS computing costs by leveraging Amazon EC2 Spot Instances with ease and confidence.
Contact Spotinst | Solution Overview | AWS Marketplace
*Already worked with Spotinst? Rate this Partner
*To review an APN Partner, you must be an AWS customer that has worked with them directly on a project.