AWS Marketplace
Accelerate customer identity development with Auth0 MCP and Kiro CLI
Customer identity and access management (CIAM) sits on the critical path of every customer-facing application, so any friction in building it directly delays feature delivery and increases the risk of misconfigurations reaching production. Before a single feature ships, developers scaffold sign-up and login flows, secure the APIs behind them, author custom rules that run at authentication time, and instrument it all for observability. Traditionally, this work is scattered across tools: developers navigate an identity provider’s dashboard, copy client IDs between browser tabs, and write custom logic in a separate editor. Each context switch adds friction, slows iteration, and creates room for configuration errors.
Auth0 is a customer identity platform that provides authentication and authorization for the applications developers build. The Auth0 Model Context Protocol (MCP) server exposes Auth0’s developer-facing capabilities, such as application configuration, API and scope definition, machine-to-machine (M2M) grants, Actions, and log analysis, over a secure OAuth-based device authorization flow.
Kiro is an AI-powered integrated development environment (IDE) built by Amazon Web Services (AWS), and Kiro CLI brings its agentic capabilities to your terminal.
This post shows how to integrate the Auth0 MCP server with Kiro CLI so you can build, secure, extend, and debug customer identity through natural-language commands in your terminal. Similar configuration also works in the Kiro IDE, so you can use the Auth0 MCP server from either the terminal or the IDE; this post focuses on Kiro CLI.
Why subscribe to Auth0 in AWS Marketplace
You can integrate Auth0 into an AWS hosted application by using Auth0 as an external identity provider through OpenID Connect (OIDC) or SAML or by connecting it directly to AWS services such as Amazon API Gateway, AWS Lambda, and Amazon EventBridge.
When you subscribe to Auth0 in AWS Marketplace, you streamline procurement, reduce contracting overhead by using your existing AWS agreements, and consolidate billing. Subscribing handles procurement and billing only; the technical setup of the MCP server with Kiro CLI is described below.
Prerequisites
To implement the solution, you first need to complete the following steps:
- Subscribe to Auth0 in AWS Marketplace. This provisions an Auth0 tenant for your organization.
- Sign in to your Auth0 dashboard and note your tenant domain (for example, your-tenant.us.auth0.com), as shown in the following screenshot.
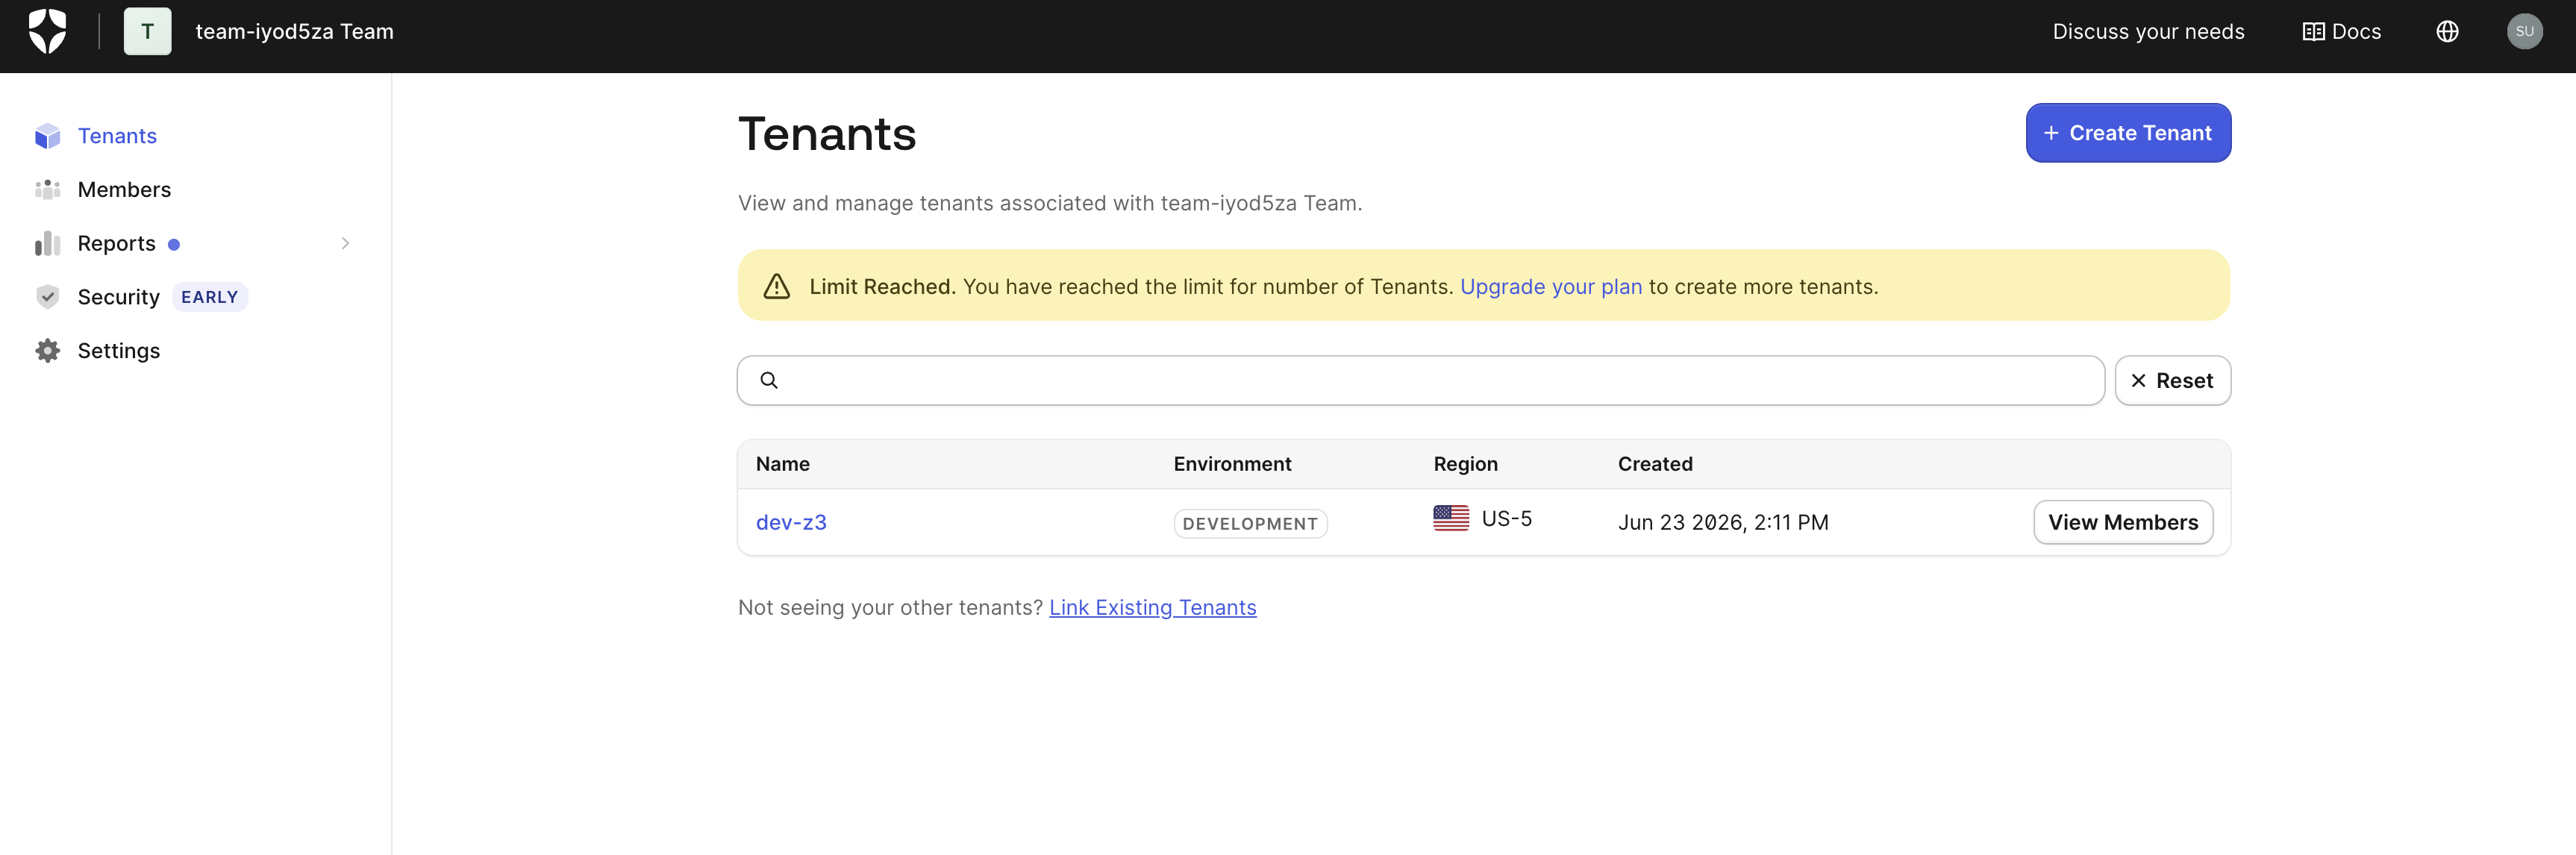
Figure 1: Auth0 dashboard showing the available tenants
- Install Node.js 18 or later on your workstation. Node.js includes npm and the npx runner used to launch the Auth0 MCP server, so no additional setup is required.
- Subscribe to Kiro and configure Kiro CLI with your AWS account.
Configure the MCP server
Create or edit ~/.kiro/settings/mcp.json to register the Auth0 MCP server with Kiro CLI:
{ "mcpServers": { "auth0": { "command": "npx", "args": ["-y", "@auth0/auth0-mcp-server", "run"], "env": { "DEBUG": "auth0-mcp" } } } }
The server is published on npm as @auth0/auth0-mcp-server and runs locally through npx, so no separate clone is required.
Authenticate to your Auth0 tenant
Run the one-time initialization to authorize the MCP server against your tenant using the OAuth 2.0 device authorization flow:
npx @auth0/auth0-mcp-server init --scopes'read:clients,create:clients,update:clients,read:resource_servers,create:resource_servers,update:resource_servers,read:actions,create:actions,update:actions,read:logs,create:client_grants,offline_access'After you run the command, the terminal displays the requested scopes and a one-time verification code, as shown in the following code block:
Verify this code on screen: <DEVICE_CODE>
Press Enter to open the browser to log in or ^C to quit.
The CLI prints a verification URL and one-time code, then opens your browser. Sign in to Auth0, select the tenant you want, and grant the requested scopes. The MCP server automatically refreshes access tokens in the background using a refresh token issued during initialization. Credentials are stored in your operating system’s credential store—Keychain on macOS, Credential Manager on Windows, or libsecret on Linux. The following screenshot shows the device-confirmation prompt that the CLI opens in your browser.
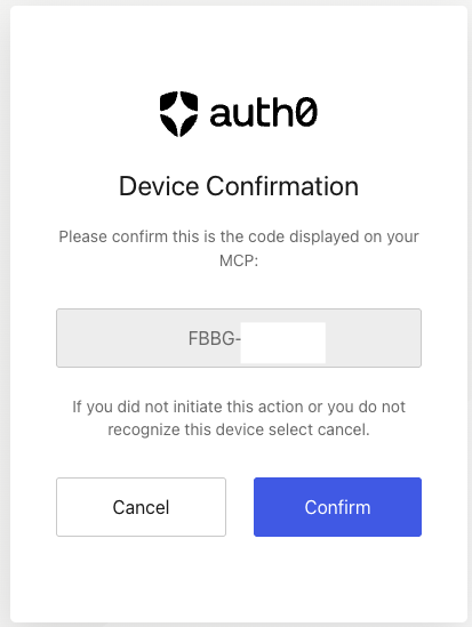
Figure 2: Browser device-confirmation prompt asking you to confirm the one-time code
After confirming the code, the browser presents the consent screen listing the scopes the Auth0 MCP server is requesting.
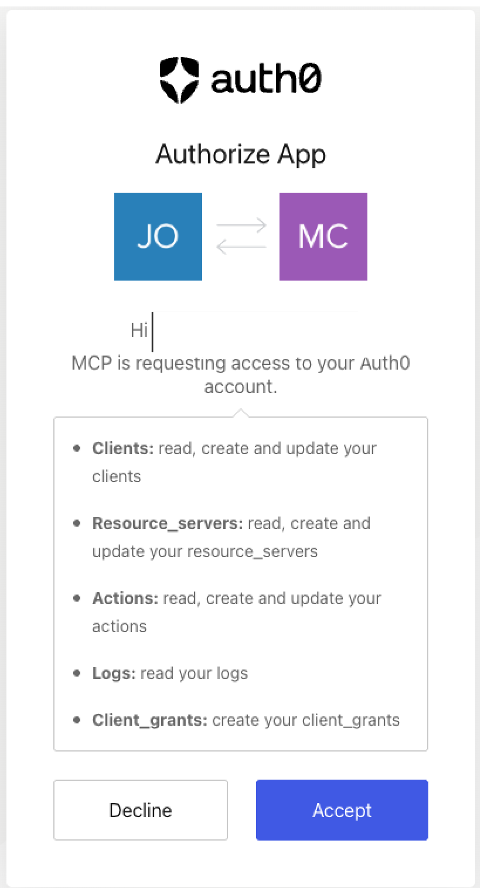
Figure 3: Browser consent screen listing the scopes the Auth0 MCP server is requesting
For unattended deployments such as CI/CD pipelines, headless servers, or Auth0 Private Cloud tenants, use a machine-to-machine application with the supported initialization options. Store the client secret in the platform secret store; do not place it in the MCP configuration file or command history.
After you complete the authentication flow, the MCP server is ready to serve requests. To confirm that the session is active and check when the access token expires, run the session command. The following code block shows example output; replace the placeholders with values from your tenant:
% npx @auth0/auth0-mcp-server session
✓ Active authentication session:
Domain: <YOUR_AUTH0_TENANT>.us.auth0.com
Token expires: in <N> hours (<DATE_AND_TIME>)
Verify the configuration
Launch Kiro CLI:
kiro-cli
Run /mcp to confirm the Auth0 server loaded with a green check, then test the connection by asking:
List my Auth0 applications
Kiro routes the request to the auth0_list_applications tool and returns the applications in your tenant. The following screenshot shows the configured servers with their status as running.
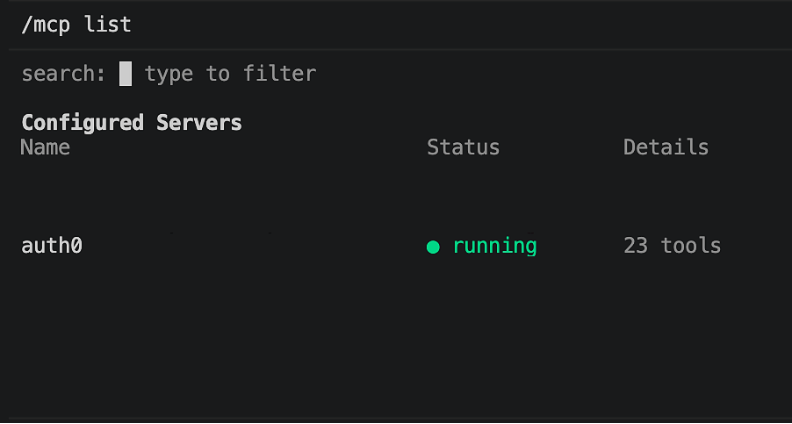
Figure 4: Kiro CLI showing the auth0 MCP server loaded successfully
Use cases
The four examples in this section were run live against a demo Auth0 tenant and build on each other. The application created in the first use case is the same one analyzed in the fourth use case.
Use case 1: Create a React SPA and get integration code for Auth0
Ask Kiro:
Create a Single Page Application (SPA) named "React Storefront", set http://localhost:3000 as the callback, logout, and web-origin URL, and give me the Auth0 React SDK quickstart code.
Kiro calls auth0_create_application to register a single-page application with the appropriate application type, configures the callback, logout, and web-origin URLs, and returns the client ID. A SPA is a public client and must not use a client secret. If you have a React project locally, Kiro can write the Auth0 SDK quickstart into the source tree; otherwise, ask it to print the snippet inline.
Auth0 does not create or deploy the React application in your AWS account. This step registers its identity configuration in your Auth0 tenant. “React Storefront” is an example name for an existing frontend project. You can also scaffold a local project, for example with npm create vite@latest, and then add the returned client ID with the Auth0 React SDK. The following screenshot shows Kiro registering the SPA and returning its client configuration.
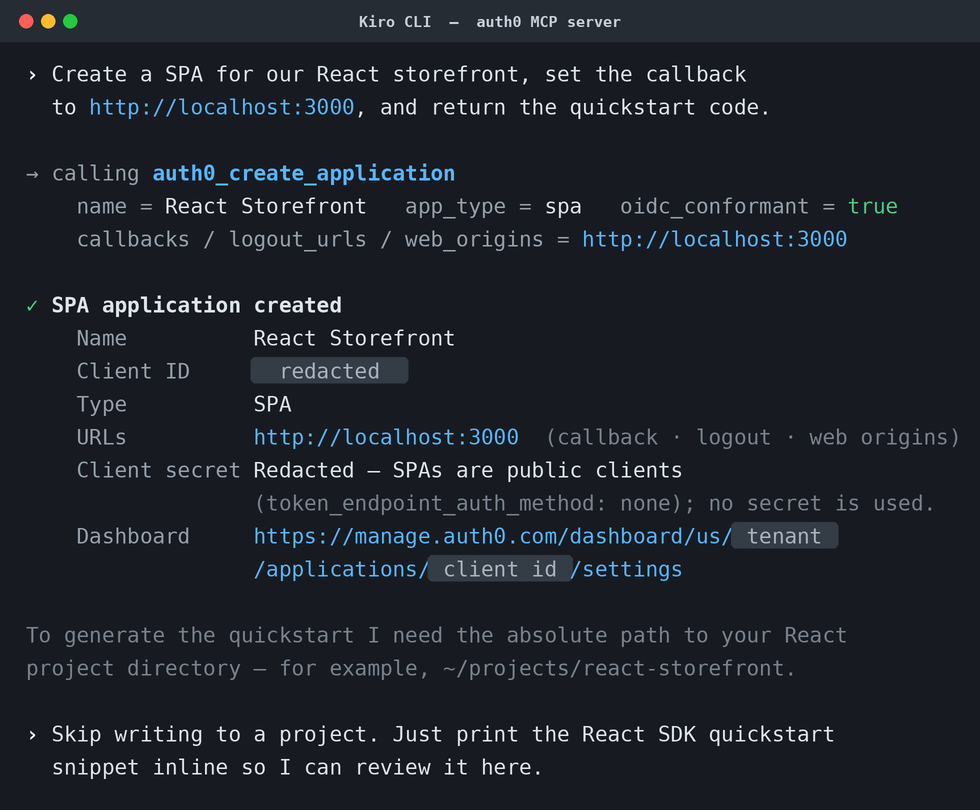
Figure 5: Kiro creates a SPA application and returns the client configuration
Use case 2: Secure a backend API, authorize M2M access, and wire it into AWS
Ask Kiro:
In a sandbox AWS account, create an Auth0 API named Orders Service API with identifier https://orders.blogdemo.example.com and scopes read:orders and write:orders. Create a machine-to-machine application named Fulfillment Worker and grant it both scopes.
In us-west-2, deploy an orders-service Node.js Lambda function behind an orders-api API Gateway HTTP API with GET /orders and POST /orders. Configure an Auth0 JWT authorizer using the tenant as issuer and the API identifier as audience. Require read:orders for GET and write:orders for POST. Set AUTH0_DOMAIN and AUTH0_AUDIENCE, tag all resources for cleanup, and return a resource inventory. Confirm that missing and invalid tokens receive HTTP 401, then provide the invoke URL.
Kiro plans the work as a task list and starts on the identity side, chaining three Auth0 tool calls—auth0_create_resource_server, auth0_create_application, and auth0_create_application_grant—to define the API and scopes, create the M2M client with the client-credentials grant type, and authorize it. The following screenshot shows Kiro defining the Orders Service API and creating the M2M grant for the Fulfillment Worker.
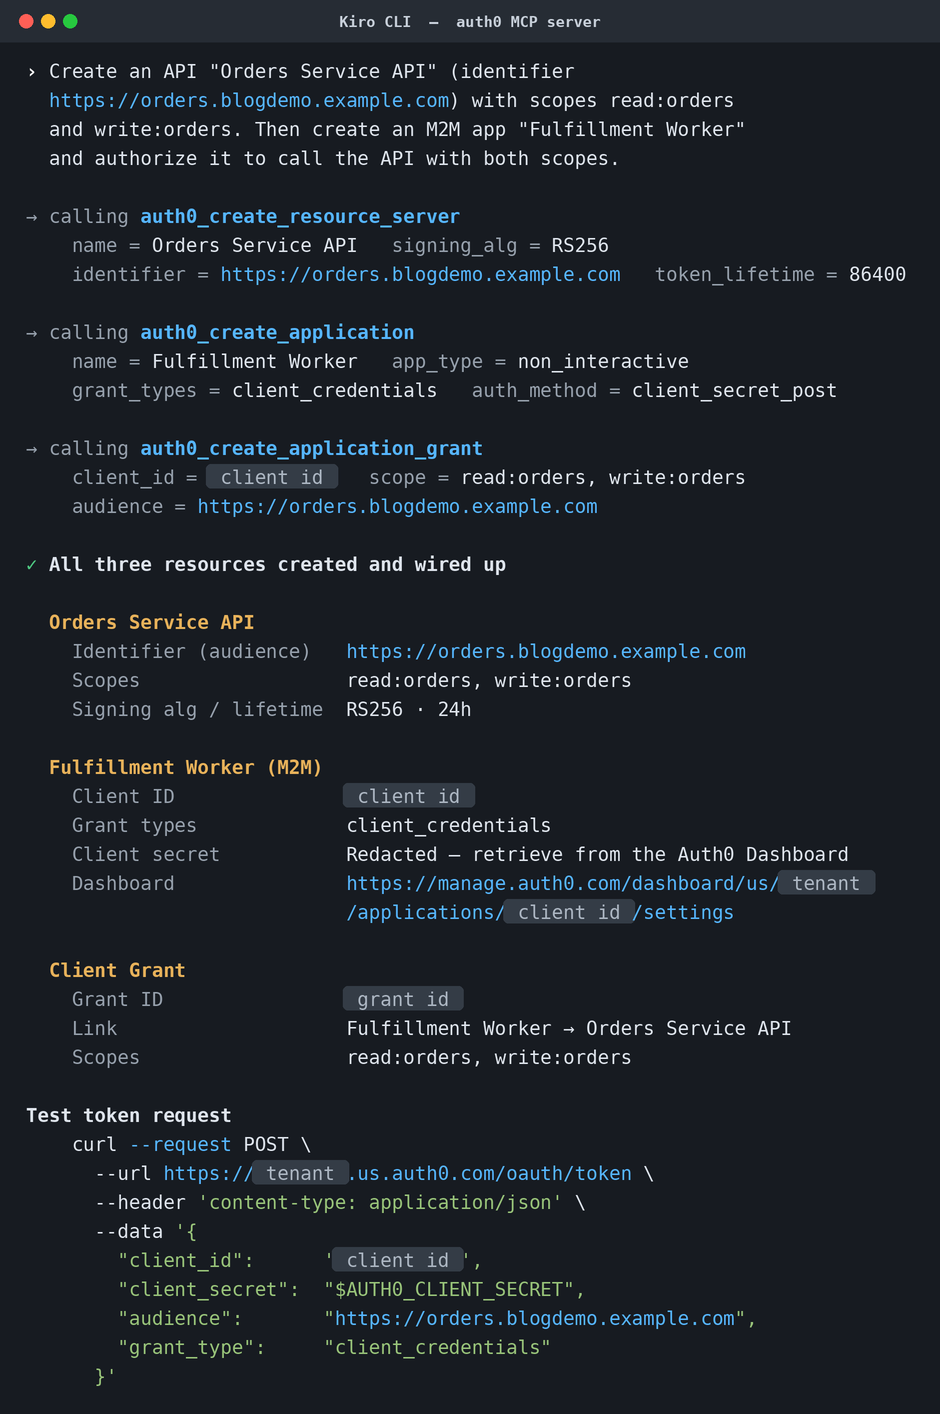
Figure 6: Kiro defines an API with scopes and creates an M2M grant
Kiro then uses the AWS credentials configured for Kiro CLI. It writes the Node.js handler that reads scopes from the validated JWT claims, creates the Lambda function and execution role, creates the API Gateway HTTP API with a Lambda proxy integration, and configures a JWT authorizer with the Auth0 tenant as issuer and the API identifier as audience. It also assigns route-level authorization scopes and sets the AUTH0_DOMAIN and AUTH0_AUDIENCE environment variables. The values returned by the Auth0 tools become inputs to the AWS configuration, which avoids copying identifiers between browser tabs.
Kiro verifies the negative paths before reporting back: it calls the endpoint without a token and with an invalid token and confirms that both return HTTP 401. API Gateway validates the JWT issuer and audience, while the route authorization scopes enforce read:orders and write:orders on the applicable routes. The following screenshot shows the Auth0 resources, AWS resources, and verification results returned by the run.
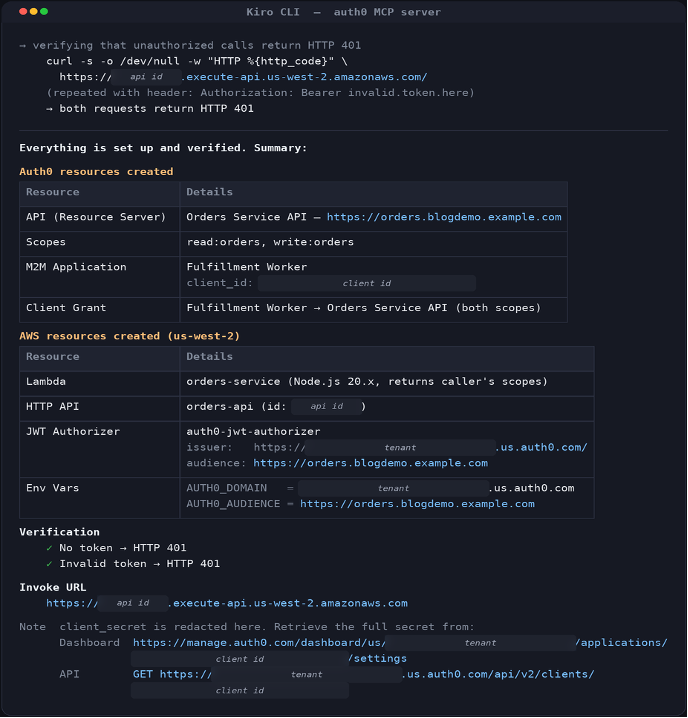
Figure 7: Kiro configures API Gateway and AWS Lambda with the values returned by the Auth0 MCP server, verifying enforcement before reporting the invoke URL
For cross-reference, the following screenshot shows the JWT authorizer in the Amazon API Gateway console, with the Auth0 tenant as issuer and the Orders Service API as audience.
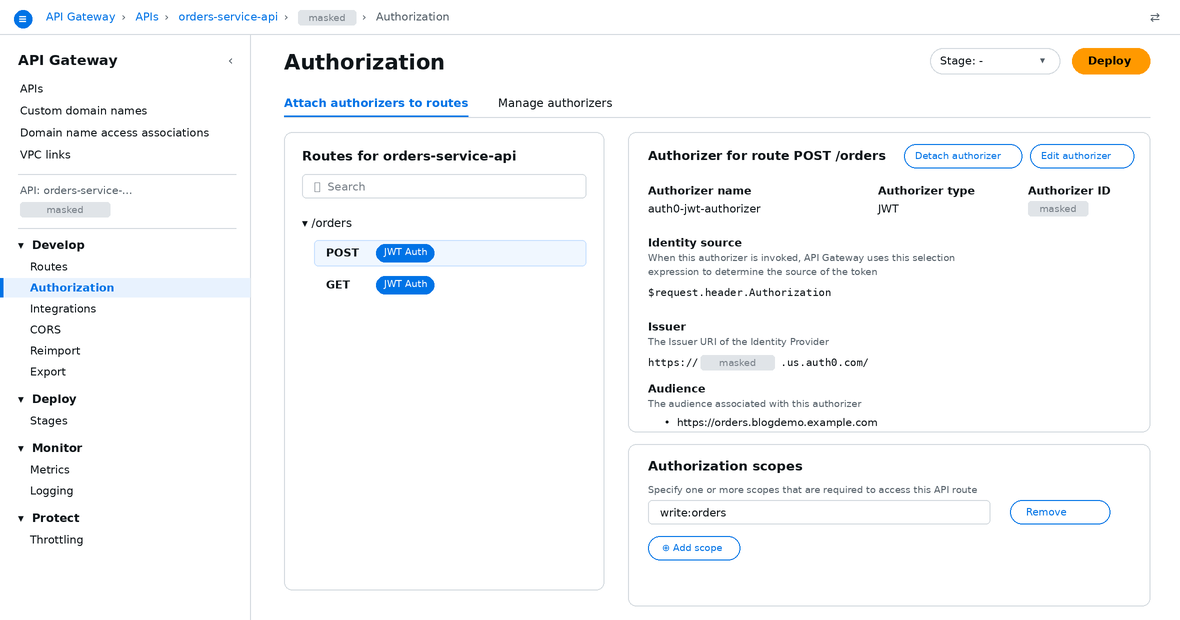
Figure 8: The JWT authorizer in the API Gateway console reflecting the Auth0 configuration created by Kiro
The Auth0 MCP server redacts client secrets in its responses. Keep the Fulfillment Worker secret outside the Kiro conversation. Ask Kiro to generate a local test script that reads AUTH0_CLIENT_SECRET from the environment, requests a client-credentials token, calls the invoke URL, and verifies both scopes without printing or persisting the secret:
Generate test-orders-token.sh. Read AUTH0_CLIENT_SECRET from the environment, never print it, request a client-credentials token, call the invoke URL, and confirm that the response contains read:orders and write:orders.
After Kiro creates the script, set AUTH0_CLIENT_SECRET in a separate terminal and run the script. A successful result, together with the HTTP 401 checks, demonstrates that Auth0 issued the M2M token, API Gateway validated it and enforced the required route scope, and the validated claims reached the Lambda function.
Use case 3: Extend the login pipeline with custom logic
Ask Kiro:
Write the Actions needed to block signups from disposable email domains and add the user's loyalty tier as a custom claim.
Auth0 Actions are scoped to a single trigger, so the prompt requires two Actions. Kiro creates and deploys a pre-user-registration Action version that rejects disposable-domain signups before a user is created and a post-login Action version that enriches tokens with a loyalty-tier claim. The Actions must still be attached to their respective flows before they run.
The pre-user-registration Action Kiro wrote (Node.js runtime):
exports.onExecutePreUserRegistration = async (event, api) => {
  const DISPOSABLE = new Set([
    '10minutemail.com',
    'mailinator.com',
    'guerrillamail.com',
    'tempmail.com',
    'yopmail.com',
  ]);
  const domain = (event.user.email || '').split('@')[1]?.toLowerCase();
  if (domain && DISPOSABLE.has(domain)) {
    api.access.deny(
      'disposable_email_blocked',
      `Signups from ${domain} are not allowed.`
    );
  }
};
The post-login Action Kiro wrote (Node.js runtime) attaches the loyalty tier from event.user.app_metadata.loyalty_tier as a namespaced custom claim on both the ID token and access token:
exports.onExecutePostLogin = async (event, api) => {
  const namespace = 'https://blogdemo.example.com';
  const tier = event.user.app_metadata?.loyalty_tier || 'standard';
  api.idToken.setCustomClaim(`${namespace}/loyalty_tier`, tier);
  api.accessToken.setCustomClaim(`${namespace}/loyalty_tier`, tier);
};
The URL-based namespace prevents the loyalty-tier claim from colliding with standard token claims. Downstream services that validate Auth0-issued access tokens, such as an API Gateway endpoint backed by AWS Lambda, can read the tier without an additional profile lookup. Users without a tier default to standard. The configured MCP tools create and deploy the Action versions but do not bind them to flows; attach each Action to its flow in the Auth0 dashboard. The following screenshot shows Kiro creating both Actions in one pass.
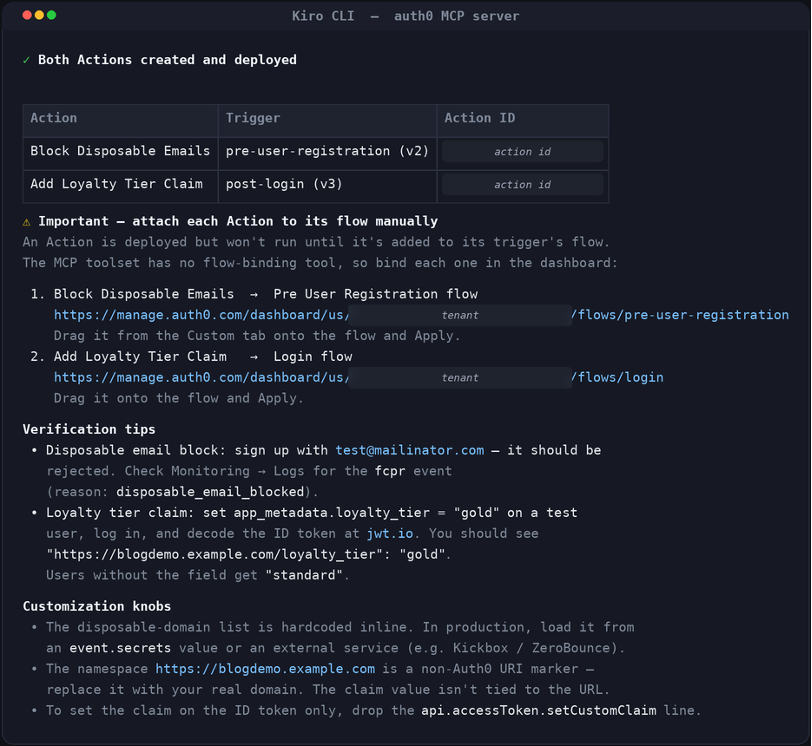
Figure 9: Kiro creates the two required Actions; attach each Action to its flow manually
Use case 4: Diagnose auth issues from tenant logs
Ask Kiro:
Show me the most recent failed login attempts on my tenant from the last hour, group them by error code, and tell me what's most likely causing them so I can fix my app config.
Kiro queries the tenant logs with auth0_list_logs, groups the results by Auth0 error code, and relates the failures to the application from the first use case. In the demo run, it identified eight callback URL mismatches and grouped them by attempted redirect URI. Three redirect URIs looked consistent with local development ports; another used an unrecognized external domain that was not on the allowed callbacks list. Kiro treated the external URI as potentially suspicious and recommended verifying its ownership before making any configuration change. It then proposed three possible fixes through auth0_update_application and waited for the user to choose one.
The following screenshot shows Kiro’s grouped failure analysis of the eight failed login events.
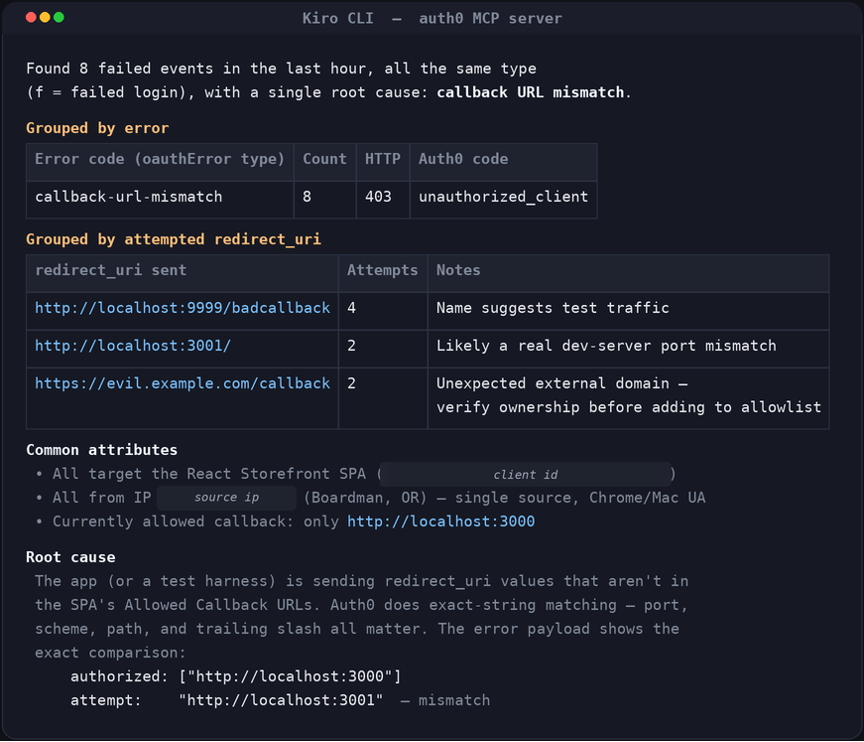
Figure 10: Log analysis in Kiro
Next, Kiro presents its recommended configuration fixes, as shown in the following screenshot.
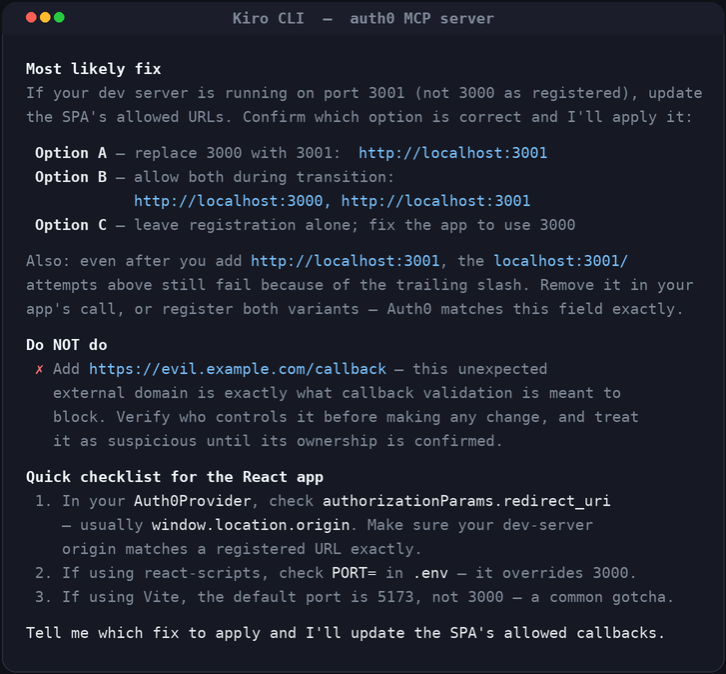
Figure 11: Kiro’s recommendation
For cross-reference, the corresponding Failed Login events are also available in your Auth0 dashboard Logs page.
Clean up
To disconnect Kiro CLI from your tenant, remove the auth0 entry from mcp.json, restart Kiro CLI, and clear stored credentials:
npx @auth0/auth0-mcp-server logout
Then delete the demo resources from the Auth0 dashboard: the SPA application, the M2M application, the Orders Service API, and the two Actions. The Auth0 MCP server intentionally exposes only read, create, and update operations.
In your AWS account, delete the demo resources created for use case 2: the orders-api HTTP API in Amazon API Gateway, the orders-service Lambda function, and the orders-service-lambda-role IAM role, all in us-west-2.
Removing these demo resources promptly also avoids unnecessary cost: idle applications and an unused tenant continue to count against your Auth0 subscription, so cleaning them up keeps your Auth0 and AWS spend aligned with what you actually use.
Conclusion
In this post, we showed how to integrate the Auth0 MCP server with Kiro CLI to register identity configuration, secure APIs, author authentication logic as code, and analyze tenant logs. The workflow combines terminal-based prompts with browser approval, dashboard flow binding, and manual cleanup where required.
Get started today
To get started, subscribe to Auth0 in AWS Marketplace for consolidated billing, then configure the Auth0 MCP server to work with Kiro CLI.