AWS Marketplace
How to fit AWS Partner Central agents into your environment with your own AI agent
Many AWS Partners already have AI agents, automation pipelines, or internal tools that power their daily workflows. These include Slack bots that summarize deals, CRM integrations that track pipeline health, or custom portals where sales teams collaborate. Partners want to connect these existing tools and data sources to AWS Partner Central to accelerate co-sell motion as part of the AWS Marketplace seller journey, without re-entering information or rebuilding what already works.
As an AWS Marketplace seller, your ability to co-sell effectively with Amazon Web Services (AWS) directly impacts your visibility, deal velocity, and revenue growth in AWS Marketplace. Streamlining how your tools communicate with Partner Central is a key step in maturing your co-sell motion, whether you’re a new partner building pipeline or an established one scaling operations.
This post shows how to integrate the AWS Partner Central Agent MCP Server into your existing environment. You’ll build a lightweight orchestrator that connects your current tools to Partner Central using agent-to-agent communication via Model Context Protocol (MCP). Instead of replacing what already works, you add an integration layer. This layer lets your agent talk to the Partner Central agent using natural language.
Why agent-to-agent?
Traditional API integrations require you to understand every field, validation rule, and payload structure of the target system. Agent-to-agent communication inverts this model: your agent expresses what it wants to accomplish, and the Partner Central Agent handles how.
The agent-to-agent architecture for the AWS Partner Central automation pattern uses two cooperating AI agents. Your custom orchestrator gathers context and decides what to update, communicating through MCP to an AWS hosted Partner Central agent that validates and executes the changes with built-in approval workflows. This is shown in the following pattern.
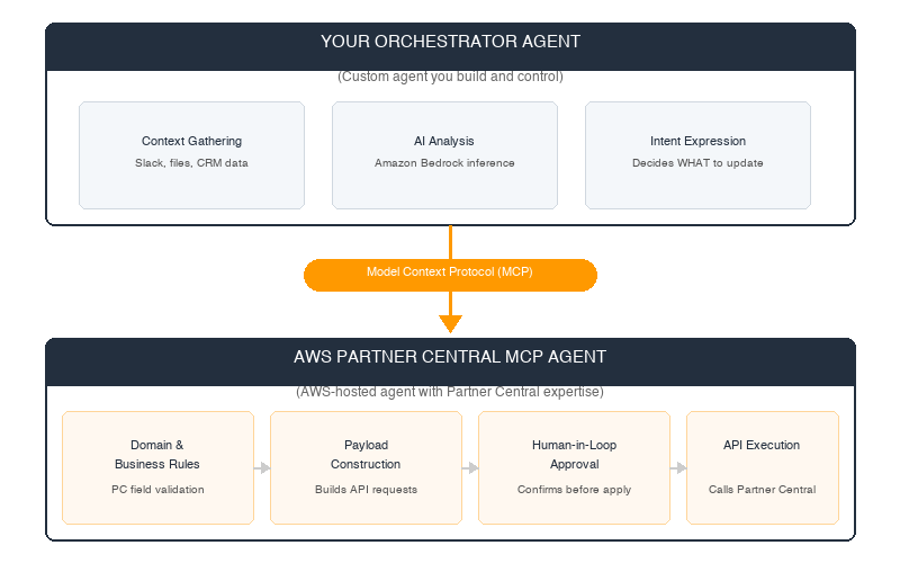
Figure 1: Agent-to-agent architecture. Your orchestrator communicates through MCP to the AWS Partner Central Agent
| Approach | Your code handles | Partner Central handles |
|---|---|---|
| Direct API | Field mapping, validation, payload construction, error handling | API processing |
| Agent-to-agent | Gathering context, expressing intent | Validation, business rules, payload construction, approval workflow, API processing |
With this approach, the Partner Central Agent handles business rules, required fields, and validation so you don’t have to encode that logic yourself. You communicate intent in natural language rather than constructing JSON payloads, and a human-in-the-loop approval workflow requires explicit confirmation before any co-sell update is applied.
Architecture overview
The pattern uses three components:
- Context sources – Your existing tools (Slack channels, local documents, uploaded files, CRM exports)
- Orchestrator agent – A Python application that gathers context, calls Amazon Bedrock to synthesize insights, and delegates Partner Central updates to the MCP agent
- Partner Central MCP agent – The AWS-hosted agent that receives natural-language requests, validates them, and executes Partner Central API calls after human approval
This architecture lets you integrate co-sell opportunity management directly into your existing workflows. If you’re tracking deals through a custom CRM, you can export deal notes and pass them to the orchestrator. If your team collaborates through Slack, you can pull channel context as input. Automated pipeline tools can trigger the orchestrator on a schedule to keep opportunities current.
The result is a connection between your systems and Partner Central that strengthens your co-sell motion without requiring your team to context-switch between tools.
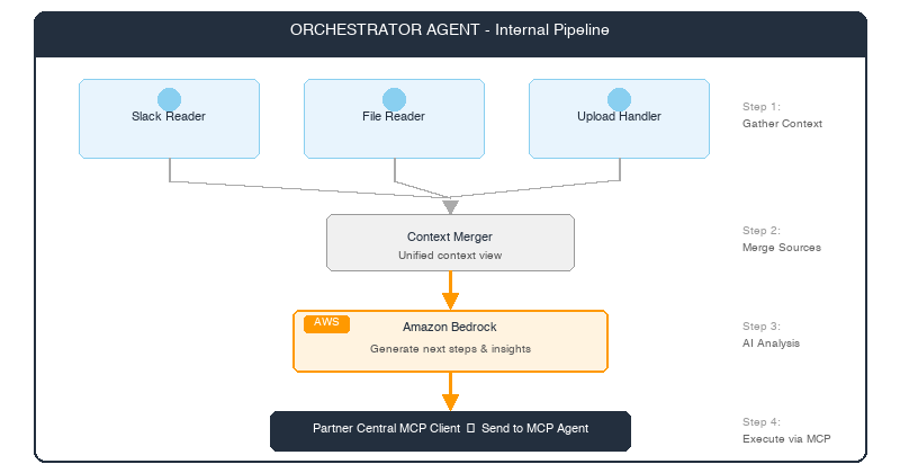
Figure 2: Orchestrator agent internal pipeline. Context sources flow through a merger to Amazon Bedrock for analysis, then to the MCP client for execution.
Getting started
The sample repository contains a working orchestrator, a verification script, and demo files. Rather than reproducing the full setup instructions here, we recommend following the hands-on workshop which walks through each step in detail.
To get started quickly:
git clone https://github.com/aws-samples/partner-crm-integration-samples.git

cd partner-crm-integration-samples/partner-central-api-sample-codes/agentToAgent

pip install -r requirements.txt
Prerequisites
- An AWS account with Amazon Bedrock model access enabled (we use Claude by Anthropic in Amazon Bedrock)
- AWS credentials configured (
aws configure) - Python 3.10+ installed
- AWS SDK for Python (Boto3) version 1.35.0 or later (for
partnercentral-sellingservice support) - AWS Identity and Access Management (IAM) permissions for Partner Central Selling API and Partner Central MCP Agent (attach the
AWSMcpServiceActionsFullAccessmanaged policy)
Configuration
The sample uses a config.json file to specify the catalog and endpoints:
{
  "catalog": "Sandbox",
  "region": "us-east-1",
  "endpoints": {
    "partnercentralselling": "https://partnercentral-selling.us-east-1.api.aws",
    "partnercentralmcp": "https://partnercentral-agents.us-east-1.api.aws/mcp"
  }
}
Set catalog to Sandbox for testing or AWS for production. The Sandbox catalog lets you experiment without affecting real opportunities.
Tip: To use the Sandbox catalog, you must first register as a partner using the CreatePartner API. See the workshop guide for details.
Run python verify_setup.py to confirm all components are working before proceeding.
How the orchestrator works
The orchestrator agent (orchestrator_agent.py) follows a four-step workflow:
1. Gather context. The agent reads from your existing sources
from orchestrator_agent import OrchestratorAgent

agent = OrchestratorAgent()

context_sources = agent.gather_context(
    slack_channels=["partner-deals"],
    local_folders=["./deal-notes"],
    uploaded_files=["meeting_notes.txt"]
)
2. Fetch current opportunity data. The agent retrieves the current state of the opportunity from Partner Central to provide context for AI generation:
opportunity_data = agent.mcp_client.get_opportunity("O15081741")3. Generate next steps with Amazon Bedrock. Using the gathered context and current opportunity data, the agent calls Amazon Bedrock to synthesize actionable next steps:
next_steps = agent.next_steps_generator.generate(
    context_sources=context_sources,
    prompt="Generate next steps based on meeting notes",
    opportunity_data=opportunity_data
)
4. Update via the Partner Central MCP agent. The orchestrator sends the generated content to the Partner Central MCP agent using a signed HTTP request:
mcp_response = agent.mcp_client.update_next_steps(
    opportunity_id="O15081741",
    next_steps=next_steps
)
The MCP agent receives the natural-language request, constructs the appropriate API payload, and presents it for human approval before running the update.
Running the demo
Try a dry run first to see the generated output without updating Partner Central:
python orchestrator_agent.py --opportunity-id O15081741 \
  --upload demo_meeting_notes.txt --dry-run
When you’re ready to update the opportunity, remove the --dry-run flag:
python orchestrator_agent.py --opportunity-id O15081741 \
  --upload demo_meeting_notes.txt \
  --prompt "Generate next steps based on meeting notes"
The agent generates next steps and then presents an approval prompt. This human-in-the-loop approval is a key safety feature—no update reaches Partner Central without your explicit confirmation.
How the MCP communication works
The orchestrator communicates with the Partner Central MCP agent through a single signed HTTP POST request. The communication flow works as follows:
- Your agent constructs a natural-language message describing the update it wants to make.
- The message is sent to the MCP endpoint using AWS Signature Version 4 (SigV4) authentication.
- The Partner Central agent processes the request, validates it against business rules, and returns a
requires_approvalstatus with the proposed changes. - Your agent presents the approval to the user and sends back an approve or reject decision.
- On approval, the Partner Central agent executes the API call and returns the result.
The following is the MCP request payload:
payload = {
    "jsonrpc": "2.0",
    "id": 1,
    "method": "tools/call",
    "params": {
        "name": "sendMessage",
        "arguments": {
            "content": [{"type": "text", "text": f"Update..."}],
            "catalog": "Sandbox",
            "stream": False
        }
    }
}
The request is signed with SigV4 and sent as a standard HTTPS request—no special SDK or protocol library required.
Running as an API server
For production use, you can run the orchestrator as a FastAPI server that other services in your environment can call:
python server.py
# Server running at http://localhost:8001
This exposes endpoints for generating next steps with file uploads:
curl -X POST http://localhost:8001/api/generate-with-files \
  -F "opportunity_id=O15081741" \
  -F "prompt=Generate next steps from meeting notes" \
  -F "files=@meeting_notes.txt" \
  -F "update_opportunity=true"
Adapting the pattern to your environment
The sample demonstrates generating next steps from meeting notes, but the same communication pattern works across different partner environments. The following table shows common integration approaches.
| Your Environment | Integration Approach |
|---|---|
| Slack bot | Add a slash command that triggers the orchestrator with the current channel as context |
| CRM integration | Export deal notes from your CRM, pass them as uploaded files to the orchestrator |
| Scheduled pipeline | Run the orchestrator on a cron schedule to keep opportunities current based on recent activity |
| Multi-agent framework | Add the MCP endpoint as a tool in your existing agent framework (such as LangChain or CrewAI) |
Regardless of how you trigger the orchestrator, the communication protocol with the Partner Central MCP agent remains the same: construct a natural-language message describing what you want to do, send it to the MCP endpoint with SigV4 authentication, and handle the approval response. The implementation details on your side will vary based on your tools and infrastructure.
Clean up
If you used the Sandbox catalog for testing, no cleanup is required because Sandbox data doesn’t affect production. If you deployed the FastAPI server, stop it with Ctrl+C. If you provisioned any AWS resources for the orchestrator (such as Amazon Bedrock model access, IAM roles, or compute resources running the agent), review and remove those through the AWS Management Console to avoid ongoing charges.
Conclusion
The AWS Partner Central Agent MCP Server lets you integrate your existing AI tools with Partner Central’s co-sell workflows through a single HTTP endpoint. Rather than building direct API integrations that require you to encode Partner Central’s business rules, you delegate those concerns to the MCP agent while your orchestrator focuses on what it does best: gathering context from your environment and generating insights.
For AWS partners, this reduces the resources in maintaining up to date co-sell opportunities. When your pipeline tools can automatically surface updates and route them through Partner Central, your deal velocity improves and your visibility to AWS field teams increases. Keeping co-sell data current also strengthens your position in programs like the AWS Marketplace Channel Incentive Program (ACIP).
Whether your environment is a Slack bot, an internal service, a scheduled pipeline, or a multi-agent framework, the communication protocol with the Partner Central MCP agent is the same. The integration code on your side will differ based on your stack, but the MCP endpoint provides a consistent interface: express intent, let the agent validate and construct the payload, and approve before it lands.
To implement this pattern, try the sample code on GitHub and complete the hands-on workshop.