AWS Marketplace
Publishing your SaaS products in AWS Marketplace in the AWS European Sovereign Cloud
Public sector organizations in highly regulated industries need to reach customers while meeting strict sovereignty requirements. The Amazon Web Services (AWS) European Sovereign Cloud (ESC) is a new independent AWS partition designed to serve these organizations. AWS partitions are isolated groupings of AWS Regions and services that operate independently with their own set of endpoints, resource identifiers, and security boundaries.
This post is the third in a three-part series on listing software products in the AWS European Sovereign Cloud:
Part 1: Registering as a seller — covers account setup and seller registration.
Part 2: Publishing Amazon Machine Image (AMI) products.
Part 3: Publishing Software as a Service (SaaS) products (this post).
At the time of writing, AWS Marketplace in the AWS European Sovereign Cloud supports two listing types: SaaS and AMI products.
Prerequisites
Before you begin, complete the following steps:
- Complete the seller registration for the AWS Marketplace in the ESC. If you haven’t registered as a seller yet, follow the steps in part one of this series, AWS Marketplace in the European Sovereign Cloud: Register as a Seller, before continuing. After your seller account is active, you can return to this post to proceed.
- List your SaaS product. After you register in the AWS Marketplace in the ESC, you can start listing your SaaS product in the AWS ESC catalog. All SaaS pricing models are supported, including contract, subscription, contract with consumption, and no-cost options. This post explores setting up each type of pricing model.
Understanding SaaS listing workflow
The process includes five key steps:
- Sign in to AWS Partner Central using your AWS Marketplace seller account.
- Use your commercial AWS Marketplace console to navigate to AWS Partner Central. Switch to the AWS Marketplace – European Sovereign Cloud catalog to create and manage your AWS ESC listing. (AWS Partner Central is only available through your commercial AWS Marketplace seller account.)
- Confirm your application is hosted in the AWS ESC. Your application infrastructure, including all API integrations with AWS Marketplace, must run from within your AWS ESC account using the eusc-de-east-1 partition. This is mandatory because products listed in the AWS Marketplace in the ESC must operate entirely within the AWS ESC partition.
- Integrate your SaaS product with the AWS Marketplace in the ESC partition. Complete your integration from within your AWS ESC account using the eusc-de-east-1 partition for all API calls. Amazon Simple Notification Service (Amazon SNS) topics are not supported in AWS ESC. Instead, you can use Amazon EventBridge events to manage your product subscription events.
- Test your SaaS product in the AWS ESC partition.
Step-by-step SaaS listing
Follow these steps to create your SaaS listing:

Figure 1: Summary of SaaS listing walkthrough
- Log in to the AWS Partner Central console using your AWS Marketplace seller account.
- From the left navigation menu, scroll down to find and select Marketplace settings.
- At the top of the Marketplace Management Portal, use the catalog selector to choose AWS Marketplace – European Sovereign Cloud.
If you can’t select AWS Marketplace – European Sovereign Cloud, it means your registration for the AWS ESC catalog is incomplete. Review part one of this blog post series, AWS Marketplace in the European Sovereign Cloud: Register as a seller.
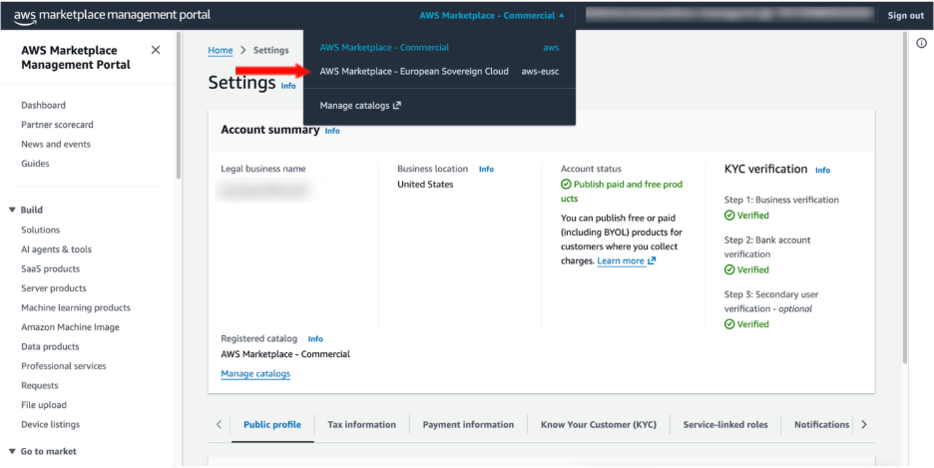
Figure 2: AWS Marketplace catalog options
- Confirm AWS Marketplace – European Sovereign Cloud is displayed as the target catalog. In the Build section of the left menu, select Create SaaS product.
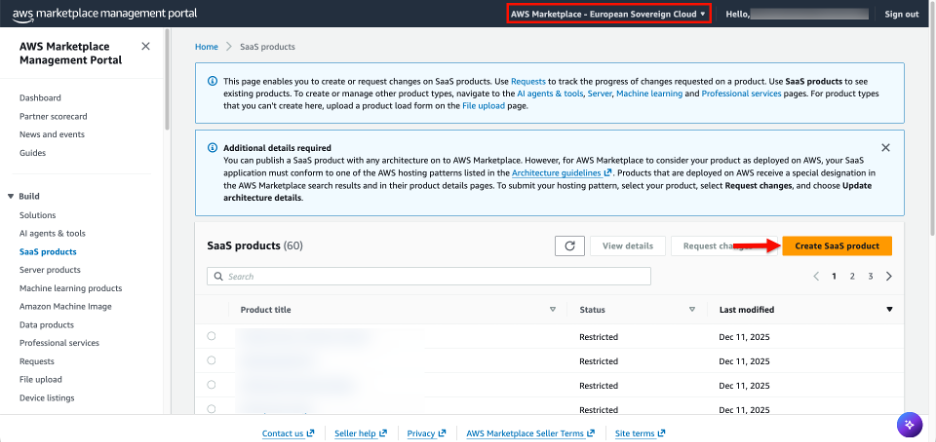
Figure 3: Create SaaS product in the ESC partition
- In the Product title, ID, and code box, enter your product title and select Generate product ID and product code.
- After the ID and product code are generated, select Continue to wizard.
- Follow all the steps in the setup wizard to get your product to a limited state. If you require support during the wizard process, you can consult the Creating a SaaS product section of the AWS Marketplace Seller guide, or the Create a SaaS listing lab in the AWS Marketplace seller workshop.
- After completing the wizard, it takes 15 to 20 minutes for the automated validation process to review your product and get it to limited status.
You can monitor the request status by selecting View details in the top right corner or using the Requests tab in the Build section in the left menu. Don’t move on to the next section of this post before your request status is Succeeded.
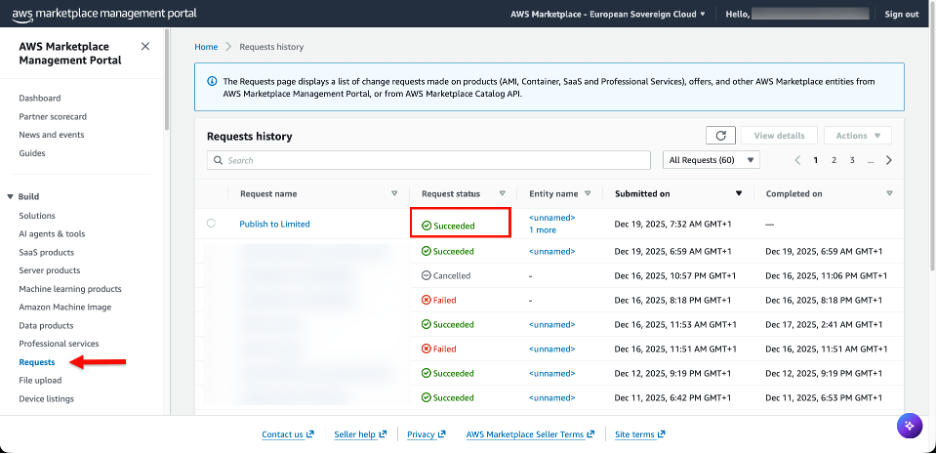
Figure 4: Monitor requests screen
Integrating your SaaS product with AWS Marketplace in the ESC
Just as with AWS Marketplace in the Commercial partition, you integrate your SaaS products with AWS Marketplace to get published in the AWS Marketplace in the ESC. If you intend to list a product in this marketplace, your application and its integration must be completed from within your AWS ESC account using the eusc-de-east-1 partition for all API calls.
Because the integration is similar to the Commercial partition, this post describes the integration at a high level, focusing specifically on details unique to the AWS Marketplace in the ESC. For a complete step-by-step walkthrough and clean up, refer to AWS Marketplace seller workshop, which includes the following labs: Integrate your SaaS, Integrate your SaaS for Concurrent Agreements, and a Serverless SaaS Integration reference.
One difference is the subscription and entitlement through Amazon SNS topics aren’t supported in the AWS ESC. Instead, you can use the new Amazon EventBridge events to manage your product subscription events. You can review the complete list of Amazon EventBridge events, which are also available in the Commercial partition and will replace topics by 2027.
Subscription, registration flow, and Amazon EventBridge rules
After a buyer subscribes to your product in AWS Marketplace, they’re redirected to your product’s registration or landing page. The redirection is done using the POST HTTP method and includes the x-amzn-marketplace-token parameter in the request body.
Your registration landing page must:
- Capture the x-amzn-marketplace-token parameter
- Call the ResolveCustomer API with this token
The ResolveCustomer API call returns the information needed for your customer to complete the registration process on your landing page and associate their registration with the information retrieved from ResolveCustomer API. This information means both your product and AWS Marketplace can uniquely identify the subscription, which is essential for product integration. To communicate your buyer subscription status and act in your application accordingly, AWS Marketplace sends Amazon EventBridge events.
At this point, the integration process differs based on your pricing model. This section provides an overview of the ways you can review and implement the correct integration approach for your product pricing model.
Subscription or pay as you go (PAYG) pricing model integration
Follow this process to put a subscription pricing model into place:
- Buyer can access your product after getting the License Updated (Learn more about what the event body looks like.)
- When the buyer starts using your product, send metering records using the BatchMeterUsage API call. (For details on how to meter, you can explore the Configure your product to meter usage) Make the API call to the AWS ESC endpoint using the eusc-de-east-1 partition.
- If a buyer cancels a subscription to your product, a License Deprovisioned – Manufacturer event is generated. You have 1 hour to send the last metering records. Records sent after 1 hour are rejected.
- After getting the License Deprovisioned event, the buyer should no longer have access to your product.
For a more detailed description of the integration process, you can review the Your service validates new customers and meter usage pages.
Contract pricing model integration
Follow this process to implement a contract pricing model:
- After getting the License Updated event, run the GetEntitlements API call to retrieve your buyer’s entitlement. Use this information to set up their tenant, including their contract’s dimensions and length, so the buyer can access your product. Make the API call to the AWS ESC endpoint using the eusc-de-east-1 partition
- React to further License Updated events, which are triggered when there are changes to your buyer’s subscription. To identify the changes, make the GetEntitlements API call.
- When you get a License Deprovisioned event, the buyer should no longer have access to your product.
For a more detailed description of the integration process, you can review the Your service validates new customers, the Your service handles customer requests, and the Monitor changes to user subscriptions pages.
Contract with consumption pricing model integration
Follow this process to put a contract with consumption pricing model into place:
- After getting the License Updated event, run the GetEntitlements API call to retrieve your buyer’s entitlement. You can use this information to set up their tenant as well as the contract length and characteristics. Give the buyer access to your product. Make all API calls to the AWS ESC endpoint using the eusc-de-east-1 partition
- When the buyer starts to use your product, send metering records using the BatchMeterUsage API call. For details on how to meter, you can learn more by reading the Configure your product to meter usage page.
- React to further License Updated events, which are triggered when there are changes to your buyer’s subscription. To identify the changes, make the GetEntitlements API call.
- When you get a License Deprovisioned event, the buyer should no longer have access to your product.
For a more detailed description of the integration, you can review the Your service validates new customers, Your service handles customer requests, and meter usage pages.
Testing your product in the AWS ESC partition
After deploying your product and finishing the integration, follow these steps to test your product by subscribing to it to confirm it functions properly in the ESC partition:
- Log in to the AWS ESC console.
- Navigate to the AWS Marketplace console and search for your product.
- Select your product. In the upper right corner of the screen, select View purchase options.
- Fill in any information required to complete the subscription.
- Scroll to the bottom of the page and select Subscribe. A banner stating that AWS Marketplace is processing your request will appear. The subscription process takes a minute to complete.

Figure 5: Successful subscription process screen
- Set up your account. You will be redirected to your SaaS product registration landing page.
- Complete the registration to access to your SaaS product.
- Perform tests to validate all use cases of your software are fully supported in the ESC partition. If your product doesn’t work as expected, review the “Integrating your SaaS product with AWS Marketplace” section of this post before continuing. Otherwise, continue to the next step.
- Log in to AWS using your AWS Marketplace seller account and navigate to AWS Partner Central.
- In the Build section in the left menu, select SaaS products.
- At the top of the page, select AWS Marketplace – European Sovereign Cloud
- Select your product and request Update product visibility.
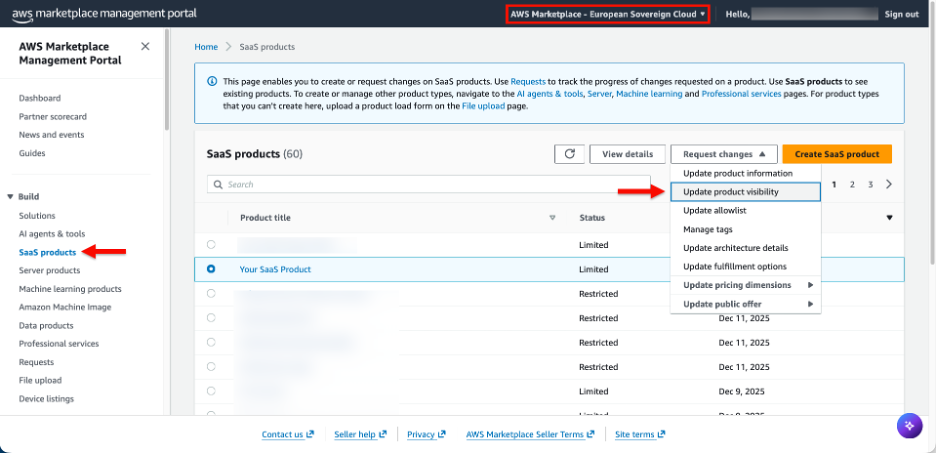
Figure 6: Update product visibility to “Public”
- Set visibility options to Public, set the public price in EUR, and select Submit.
Your product is ready for publication
You’ve completed the SaaS listing process and published your solution on the AWS Marketplace in the ESC. The AWS Marketplace operations team can test and validate your product and communicate with you about the next steps.
Clean-up
Because the integration in the AWS ESC follows the same approach as the Commercial partition, the cleanup steps are also equivalent. To clean up the resources you created during this walkthrough, follow the clean up instructions in the AWS Marketplace seller workshop.
Next steps
If you have an AMI product, refer to the second post in this three-part series where we cover how to publish AMI products in AWS Marketplace in the ESC.
For more information about AWS ESC, you can explore the AWS ESC documentation.