AWS Big Data Blog
Best Practices for Securing Amazon EMR
Whatever your industry, data is central to how organizations function. When we discuss data strategy with customers, it’s often in the context of how do they ingest, store, process, analyze, distribute, and ultimately secure data.
Amazon EMR is a managed Hadoop framework that you use to process vast amounts of data. One of the reasons that customers choose Amazon EMR is its security features. For example, customers like FINRA in regulated industries such as financial services, and in healthcare, choose Amazon EMR as part of their data strategy. They do so to adhere to strict regulatory requirements from entities such as the Payment Card Industry Data Security Standard (PCI) and the Health Insurance Portability and Accountability Act (HIPAA).
This post walks you through some of the principles of Amazon EMR security. It also describes features that you can use in Amazon EMR to help you meet the security and compliance objectives for your business. We cover some common security best practices that we see used. We also show some sample configurations to get you started. For more in-depth information, see Security in the EMR Management Guide.
Encryption, encryption, encryption
Our CTO, Werner Vogels, is fond of saying “Dance like nobody’s watching, encrypt like everybody is.” Properly protecting your data at rest and in transit using encryption is a core component of our well-architected pillar of security. Amazon EMR security configurations (described in the EMR documentation) make it easy for you to encrypt data. A security configuration is like a template for encryption and other security configurations that you can apply to any cluster when you launch it.
Encryption at rest
You have multiple options to encrypt data at rest in your EMR clusters. EMR by default uses the EMR file system (EMRFS) to read from and write data to Amazon S3. To encrypt data in Amazon S3, you can specify one of the following options:
- SSE-S3: Amazon S3 manages the encryption keys for you
- SSE-KMS: You use an AWS Key Management Service (AWS KMS) customer master key (CMK) to encrypt your data server-side on Amazon S3. Be sure to use policies that allow access by Amazon EMR.
- CSE-KMS/CSE-C: Amazon S3 encryption and decryption takes place client-side on your Amazon EMR cluster. You can use keys provided by AWS KMS (CSE-KMS) or use a custom Java class that provides the master key (CSE-C).
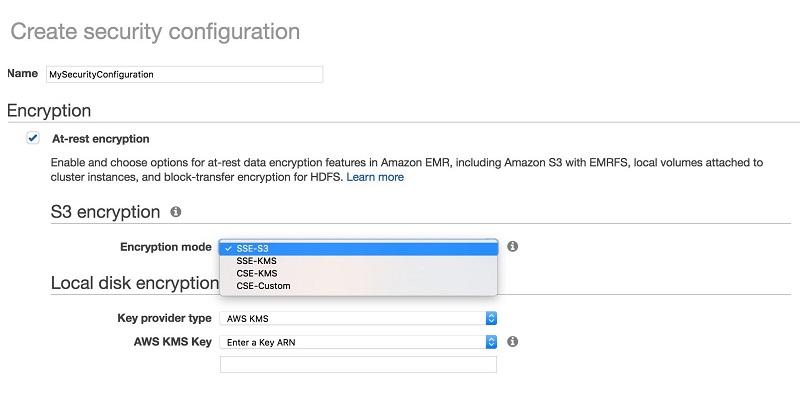
With Amazon EMR, setting up the encryption type for Amazon S3 is easy. You just select it from a list.
Which option to choose depends on your specific workload requirements. With SSE-S3, the management of the keys is completely taken care of by Amazon. This is the simplest option. Using SSE-KMS or CSE-KMS enables you to have more control over the encryption keys and enables you to provide your own key material for encryption. The encryption is applied to objects within the bucket. The applications running on your cluster don’t need to be modified or made aware of the encryption in any way.
For even more control, you can use a custom key provider with CSE-C. For more information, see Amazon S3 Client-Side Encryption in the EMR documentation.
For local disk encryption, you have two approaches that complement each other. Let’s break them down by the specific encryption target:
- To encrypt your root volume with local disk encryption, create a custom Amazon Machine Image (AMI) for Amazon EMR and specify Amazon EBS volume encryption. We cover details on custom AMIs a bit later in this post.
- To encrypt your storage volumes with local disk encryption, use Amazon EMR security configurations(described in the EMR documentation). Security configurations use a combination of open-source HDFS encryption and LUKS encryption.To use this feature, specify either the Amazon Resource Name (ARN) for an AWS KMS key or provide a custom Java class with the encryption artifacts.
For more information about using KMS with EMR and S3, see How Amazon EMR Uses AWS KMS in the EMR documentation.
If you are using AWS KMS as part of your encryption strategy, see AWS KMS Limits in the EMR documentation for information about the request rates supported for your use case.
Encryption in transit
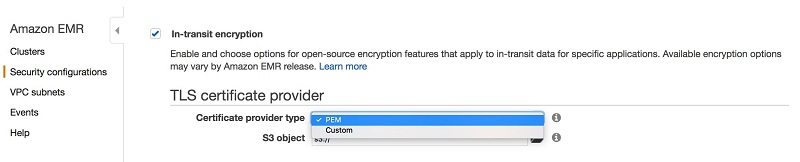
Amazon EMR security configurations enable you to choose a method for encrypting data in transit using Transport Layer Security (TLS) (as described in the EMR documentation). You can do either of the following:
- Manually create PEM certificates, zip them in a file, and reference from Amazon S3.
- Implement a certificate custom provider in Java and specify the S3 path to the JAR.
For more information on how these certificates are used with different big data technologies, check out In Transit Data Encryption with EMR.
Here’s what you’d see when creating a security configuration in the EMR Management Console.
Expressing encryption as code
You can also specify encryption by using the AWS CLI, Boto3, or AWS CloudFormation. Here’s an example with Boto3 that uses SSE-S3 for S3 encryption and KMS for local disk encryption:
And the same snippet for AWS CloudFormation:
For more information about setting up security configurations in Amazon EMR, see the AWS Big Data Blog post Secure Amazon EMR with Encryption.
Authentication and authorization
Authentication and authorization, otherwise known as AuthN and AuthZ, are two crucial components that need to be considered when controlling access to data. Authentication is the verification of an entity, and authorization is checking whether the entity actually has access to the data or resources it’s asking for. In other words, authentication checks whether you’re really who you say you are. Authorization checks whether you actually have access to what you’re asking for. Alice can be authenticated as indeed being Alice, but this doesn’t necessarily mean that Alice has authorization, or access, to look at Bob’s bank account.
Authentication on Amazon EMR
Kerberos, a network authentication protocol created by the Massachusetts Institute of Technology (MIT), uses secret-key cryptography to provide strong authentication. It helps you avoid having sensitive information such as passwords or other credentials sent over the network in an unencrypted and exposed format.
With Kerberos, you can maintain a set of services (known as a realm) and users that need to authenticate (known as principals). You provide a way for these principals to authenticate. You can also integrate your Kerberos setup with other realms. For example, you can have users authenticate from a Microsoft Active Directory domain and have a cross-realm trust set up. Such a setup can allow these authenticated users to be seamlessly authenticated to access your EMR clusters.
Amazon EMR installs open-source Hadoop-based applications on your cluster, meaning that you can use the existing security features that use Kerberos in these products. For example, you can enable Kerberos authentication for YARN, giving user-level authentication for applications running on YARN such as Apache Spark.
You can configure Kerberos on an EMR cluster (known as Kerberizing) to provide a means of authentication for cluster users. Before you configure Kerberos on Amazon EMR, we recommend that you become familiar with Kerberos concepts by reading Use Kerberos Authentication in the EMR documentation.
The following example shows Kerberizing with CloudFormation:
Authorization on Amazon EMR
Amazon EMR uses AWS Identity and Access Management (IAM) to help you manage access to your clusters. You can use IAM to create policies for principals such as users and groups that control actions that can be performed with Amazon EMR and other AWS resources.
There are two roles associated with each cluster in Amazon EMR that typically are of interest—the service role and a role for the Amazon EC2 instance profile. You use the service role, or EMR role, for any action related to provisioning resources and other service-level tasks that aren’t performed in the context of an EC2 instance. The instance profile role is used by EC2 instances within the cluster. The policies associated with this role apply to processes that run on the cluster instances. For more information on these roles and others, see Configure IAM Roles for Amazon EMR Permissions to AWS Services in the EMR documentation.
It’s important to understand how IAM helps you control authorized access to your cluster in relation to these roles and where it does not. IAM controls API-level actions done on other AWS services. IAM helps you with things like controlling access to objects in S3, protecting against cluster modification, and restricting access to keys from AWS KMS.
This has important implications. By default, any process running in a cluster inherits the access permissions of the IAM role associated with the cluster. In contrast, IAM doesn’t control activity inside of your clusters. You need to use other means to appropriately secure the processes running on each EC2 instance.
Because of these characteristics, formerly you used to face a particular Amazon EMR authorization challenge. This challenge was to understand how, by default, the IAM role attached to the EC2 instance profile role on your cluster determined the data that can be accessed in Amazon S3. What this effectively meant was that data access to S3 was granular only at the cluster level. This effect made it difficult to have multiple users with potentially different levels of access to data touching the same cluster.
With Amazon EMR versions 5.10.0 and later, EMRFS fine-grained authorization was introduced. This fine-grained authorization enables the ability to specify the IAM role to assume at the user or group level when EMRFS is accessing Amazon S3. This authorization enables fine-grained access control for Amazon S3 on multitenant EMR clusters and also makes it easier to enable cross-account Amazon S3 access to data.
The EMRFS authorization feature specifically applies to access by using HiveServer2. If your users are using Spark or other applications that allows for the execution of arbitrary code (for example, Jupyter, Zeppelin, SSH, spark-shell…), your users can bypass the roles that EMRFS has mapped to them.
For more information on how to configure your security configurations and IAM roles appropriately, read Configure IAM Roles for EMRFS Requests to Amazon S3 in the EMR documentation.
For a great in-depth guide on setting up a multitenant environment with both Kerberos authentication and EMRFS authorization, take a look at the following post on the AWS Big Data blog: Build a Multi-Tenant Amazon EMR Cluster with Kerberos, Microsoft Active Directory Integration and IAM Roles for EMRFS.
Network
Your network topology is also important when designing for security and privacy. We recommend placing your Amazon EMR clusters in private subnets, and use NAT to perform only outbound internet access.
Security groups control inbound and outbound access from your individual instances. With Amazon EMR, you can use both Amazon EMR-managed security groups and also your own security groups to control network access to your instance. By applying the principle of least privilege to your security groups, you can lock down your EMR cluster to only the applications or individuals who need access.
For more information, see Working With Amazon EMR-Managed Security Groups in the EMR Documentation.
The following example shows a security group with boto3:
The following example shows a security group with CloudFormation:
Minimal IAM policy
By default, the IAM policies that are associated with EMR are generally permissive, to enable you to easily integrate EMR with other AWS services. When securing EMR, a best practice is to start from the minimal set of permissions required for EMR to function and add permissions as necessary.
Following are three policies that are scoped around what EMR minimally requires for basic operation. You can potentially further minimize these policies by removing actions related to spot pricing and autoscaling. For clarity, the policies are annotated with comments—remove the comments before use.
Minimal EMR service-role policy
Minimal EMR role for EC2 (instance profile) policy
Minimal role policy for user launching EMR clusters
Bootstrap actions
Bootstrap actions are commonly used to run custom code for setup before the execution of your cluster. You can use them to install software or configure instances in any language already installed on the cluster, including Bash, Perl, Python, Ruby, C++, or Java.
For more details on how to use bootstrap actions, see Create Bootstrap Actions to Install Additional Software in the EMR documentation.
For the purposes of this blog post, we’ll discuss bootstrap actions to harden your cluster, apply security packages you might require, and set up third-party monitoring solutions.
When do bootstrap actions run in the cluster lifecycle?
Bootstrap actions run on each cluster instance after instance provisioning and before application installation. This approach has implications if you want to use bootstrap actions to modify the security configuration of applications that are provisioned by EMR. If this is the case, you can have your script wait on a particular trigger, like so with a bootstrap action dependent on Presto installation:
Be sure to run the preceding snippet in a background process so that it doesn’t block the provisioning process. Failing to do so results in a timeout failure.
For more information about the cluster lifecycle, refer to: Understanding the Cluster Lifecycle in the EMR documentation.
Custom AMIs and applying CIS controls to harden your AMI
Custom Amazon Machine Images (AMIs) provide another approach that you can take to help harden and secure your EMR cluster. Amazon EMR uses an Amazon Linux AMI to initialize Amazon EC2 instances when you create and launch a cluster. The AMI contains the Amazon Linux operating system, other software, and configurations required for each instance to host your cluster applications.
Specifying a custom AMI is useful for the following use cases:
- Encrypting the EBS root device volumes (boot volumes) of EC2 instances in your cluster, which you can’t do with a security configuration. Security configurations only help you encrypt your storage volumes. For more information, see Creating a Custom AMI with an Encrypted Amazon EBS Root Device Volume in the EMR documentation.
- Pre-installing applications and performing other customizations instead of using bootstrap actions, which can improve cluster start time and streamline the startup work flow. For more information and an example, see Creating a Custom Amazon Linux AMI from a Preconfigured Instance in the EMR documentation.
- Implementing more sophisticated cluster and node configurations than bootstrap actions enable.
By using a custom AMI instead of a bootstrap action, you can have your hardening steps prebaked into the images you use, rather than having to run the bootstrap action scripts at instance provision time. You don’t have to choose between the two, either. You can create a custom AMI for the common security characteristics of your cluster that are less likely to change. You can use bootstrap actions to pull the latest configurations and scripts that might be cluster-specific.
One approach that many of our customers take is to apply the Center for Internet Security (CIS) benchmarks to harden their EMR clusters, found on the Center for Internet Security website. It’s important to verify each and every control for necessity and function test against your requirements when applying these benchmarks to your clusters.
The following example shows using custom AMIs in CloudFormation:
The following example shows using custom AMIs in boto3:
Auditing
You might want the ability to audit compute environments, which is a key requirement for many customers. There are a variety of ways that you can support this requirement within EMR:
- From EMR 5.14.0 onwards, EMRFS, Amazon EMR’s connector for S3, supports auditing of users who ran queries that accessed data in S3 through EMRFS. This feature is turned on by default and passes on user and group information to audit logs like CloudTrail. It provides you with comprehensive request tracking.
- If it exists, you can configure and implement application-specific auditing on EMR. For example, this AWS Big Data Blog post walks through how to configure a custom event listener on Presto to enable audit logging, debugging, and performance analysis: Custom Log Presto Query Events on Amazon EMR for Auditing and Performance Insights.
- You can use tools such as Apache Ranger to implement another layer of auditing and authorization. For additional information, see this AWS Big Data Blog post: Implementing Authorization and Auditing using Apache Ranger on Amazon EMR
- AWS CloudTrail, a service that provides a record of actions taken by a user, role, or an AWS service, is integrated with Amazon EMR. CloudTrail captures all API calls for Amazon EMR as events. The calls captured include calls from the Amazon EMR console and code calls to the Amazon EMR API operations. If you create a trail, you can enable continuous delivery of CloudTrail events to an Amazon S3 bucket, including events for Amazon EMR.
- You can also audit the S3 objects that EMR accesses by using S3 access logs. AWS CloudTrail provides logs only for AWS API calls. Thus, if a user runs a job that reads and writes data to S3, the S3 data that was accessed by EMR doesn’t show up in CloudTrail. By using S3 access logs, you can comprehensively monitor and audit access against your data in S3 from anywhere, including EMR.
- Because you have full control over your EMR cluster, you can always install your own third-party agents or tooling. You do so by using bootstrap actions or custom AMIs to help support your auditing requirements.
Verifying your security configuration
You also want to verify that your configuration works, of course. Following are some steps that you can take to verify your configuration.
S3 server-side encryption (SSE) on EMR
Here, we want to verify a particular case. We want to ensure that if an S3 object is uploaded using EMRFS and server-side encryption (SSE) is enabled in the EMRFS configuration, it has metadata indicating it’s encrypted. For example, calling getSSEAlgorithm on the S3 object should return AES256 if the object is encrypted using an S3 key. It should return aws:kms if the object is encrypted using a KMS key.
We also want to check that if the file is downloaded using EMRFS, the original file and the downloaded file match in terms of content.
To verify this, do the following:
- Use Secure Shell (SSH) to connect to the master node as described in Connect to the Master Node Using SSH in the EMR documentation.
- Upload an object to S3 using EMRFS:
- hadoop fs -put <local path> <s3 bucket path>
- Check the metadata of the uploaded object directly:
- aws s3api head-object --bucket <s3 bucket path> --key file
- Download the file from S3 using EMRFS:
- hadoop fs -get <s3 bucket path> <local path>
- Use diff on the original and downloaded file and verify that they are the same.
S3 client-side encryption (CSE) on EMR
Similarly to verifying server-side encryption, we want to confirm another point. If an object is uploaded using EMRFS and client side encryption is enabled in the EMRFS configuration, the S3 object’s contents should be encrypted. A client that doesn’t possess the proper key shouldn’t be able to see them. If we get the object using an Amazon S3 client, the contents of the object shouldn’t be the same as the contents of the original object that was uploaded.
We also want to confirm that if we do use EMRFS to download the file, the contents of the downloaded file should match the contents of the original file.
To verify this, do the following:
- Use SSH to connect to the master node as described in Connect to the Master Node Using SSH.
- Upload an object to S3 using EMRFS:
- hadoop fs -put <local path> <s3 bucket path>
- Download the object from S3 using the AWS CLI:
- aws s3 mv <s3 bucket path> <local path>
- This file should NOT match the original file.
- Download the object from S3 using EMRFS:
- hadoop fs -get <s3 bucket path> <local path>
- This file SHOULD match the original file.
Local disk encryption
We also want to verify that if local disk encryption is enabled, all the block devices on the cluster are of type crypto_LUKS. If there is a partition that is not a LUKS partition, the following command exits with a return code of 1:
! blkid | grep -v crypto_LUKS
In addition, we want to verify that the local disk encryption uses the kind of key that was defined in the configuration.
Let’s try to use KMS to decrypt our encrypted local disk passphrase. If it is decrypted, we try to use it to open the LUKS partitions. If it doesn’t get decrypted, we assume it is a custom key.
To do so, we run the following commands:
- base64 -d /var/setup-devices/.encrypted-diskKey > (local path for encrypted passphrase)
- aws kms decrypt --ciphertext-blob fileb://(local path for encrypted passphrase) --query Plaintext > (local path for decrypted passphrase)
- If this step fails, the key is not from KMS
- sudo cryptsetup luksOpen --test-passphrase --key-slot 0 /dev/xvdb1 < (local path for decrypted passphrase) | cut -d '"' -f 2
Wrapping it up in AWS CloudFormation
We have provided the following AWS CloudFormation template to help you more easily deploy an EMR cluster that aligns to the patterns and practices we describe in this post. The following template spins up an EMR cluster with the following characteristics:
- Encryption at rest enabled for both S3 and the local disk
- Encryption in transit enabled using a certificate bundle that you specify
- A custom AMI CloudFormation parameter that can incorporate the concepts described in the custom AMI section
- Kerberos-enabled
- Fine-grained S3 authorization
Summary
In this post, we provide a set of best practices to consider and follow when securing your EMR clusters. If you have questions or suggestions, leave a comment.
Additional Reading
If you found this post useful, be sure to check out Restrict access to your AWS Glue Data Catalog with resource-level IAM permissions and resource-based policies, Implementing Authorization and Auditing using Apache Ranger on Amazon EMR, and Secure Amazon EMR with Encryption.
About the Authors
 Tony Nguyen is a Senior Consultant with AWS Professional Services. His specialty is in data and analytics, focused on helping public sector customers with their unique data challenges. He works directly with customers to design, architect, and implement big data and analytics solutions on AWS. When he’s not eyeballs-deep in data, he enjoys playing volleyball, cooking, and occasionally fooling himself into thinking that he’s a half-decent photographer.
 Dr. Aaron Friedman is a Healthcare and Life Sciences Partner Solutions Architect at Amazon Web Services. He works with ISVs and SIs to architect healthcare solutions on AWS, and bring the best possible experience to their customers. His passion is working at the intersection of science, big data, and software. In his spare time, he’s exploring the outdoors, learning a new thing to cook, or spending time with his wife and his dog, Macaroon.