AWS Big Data Blog
Improve DynamoDB analytics with AWS Glue zero-ETL schema and partition controls
You store transactional data in Amazon DynamoDB and get single-digit millisecond performance. However, when you want to run analytics, machine learning (ML), or reporting on that same data, you face a gap: your flexible, semi-structured DynamoDB schemas don’t align with the flat, columnar formats that analytics engines require. Bridging this gap typically means building and maintaining custom ETL pipelines, which adds development cost and operational overhead.
AWS Glue Zero-ETL integration removes that pipeline work. It enables replication of your DynamoDB tables to Apache Iceberg tables in Amazon Simple Storage Service (Amazon S3), then query it directly with Amazon Athena. During setup, you can configure two capabilities that will shape how replicated data looks and performs: schema unnesting flattens nested attributes into individual columns, and data partitioning organizes data so your queries scan only what they need.
In this post, you learn how to replicate Amazon DynamoDB data to Apache Iceberg tables in Amazon S3 through a zero-ETL integration. We walk through the challenges that the DynamoDB nested, schema-flexible data model introduces for analytics workloads, and show you how to configure schema unnesting and data partitioning for a sample product catalog table. We also cover how to query the replicated data in Amazon Athena using standard SQL.
Semi-structured data meets analytics
Your product catalog in DynamoDB contains items with nested attributes like product details, pricing tiers, and inventory information. A typical item looks like this:
{
  "product_id": "P-1001",
  "name": "Wireless Headphones",
  "productdetails": {
    "brand": "AudioTech",
    "category": "Electronics",
    "weight_kg": 0.25,
    "specification": {
       "color": "Black",
       "storage": "128GB"
    }
  },
  "pricing": {
    "list_price": 79.99,
    "discount_pct": 10
  },
  "created_at": 1701388800000
}
This structure supports fast transactional reads and writes. However, when you replicate this data for analytics, you face two decisions:
- You must decide whether to flatten nested maps like
productdetailsinto individual columns or preserve them as-is. - You must choose how to organize the data on disk so that queries filtering by brand or date range scan only relevant partitions.
With AWS Glue Zero-ETL, you address both decisions through configurable schema unnesting and data partitioning.
Solution overview
You replicate data from your DynamoDB table through AWS Glue Zero-ETL into Apache Iceberg tables stored in Amazon S3, then query the results with Amazon Athena. The following diagram illustrates the end-to-end architecture:
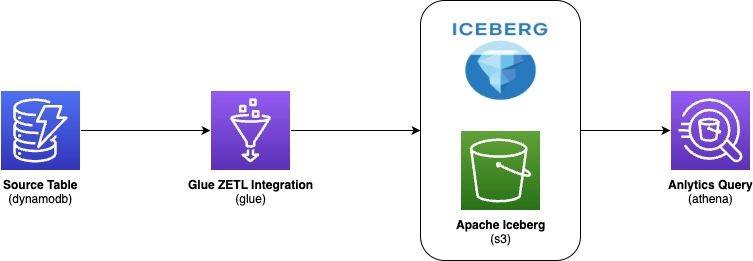
AWS Glue zero-ETL ingests data from Amazon DynamoDB, writes it in Apache Iceberg format to your Amazon S3 data lake, and makes it available for SQL queries in Amazon Athena—with no pipelines to build or maintain. With this integration, you:
- Save development time by skipping custom code and ETL job management
- Keep DynamoDB performance intact because replication doesn’t consume table’s provisioned read/write capacity
- Get data within 15 minutes of changes in the source table
- Query with standard tools because data lands in Apache Iceberg format, an open table format that AWS natively supports for high-performance analytics
During setup, you configure two output settings:
- Schema unnesting in Zero-ETL: You choose how nested attributes appear in the target. Flattening nested maps into individual columns streamlines your queries and reduces complexity.
- Data partitioning in Zero-ETL: You choose how data is organized into partitions. When you filter on a partition column, the query engine reads only matching data instead of scanning everything, cutting both query time and cost.
Schema unnesting
When you create a zero-ETL integration, you can choose one of three unnesting options. Schema unnesting transforms complex, nested DynamoDB structures into formats that analytics engines can query directly, removing post-processing transformations.
Each option changes how nested DynamoDB attributes appear in the target table. The right choice depends on your analytics tools and how consistent your DynamoDB schemas are.
Option 1: No unnesting
This option preserves the original nested structure. DynamoDB maps and lists remain as structured columns in the target.
Using the product example, the target table retains productid and value as columns to hold DynamoDB partition key and a DynamoDB record respectively.
Recommended for: Workloads where your analytics tools natively support querying nested data and you want to preserve the DynamoDB structure unchanged.
Option 2: Unnest one level
This option flattens top-level maps into individual columns. Lists remain nested.
With this option, productdetails and pricing each become separate columns.
Recommended for: Scenarios where your DynamoDB items have a consistent schema and you want to balance structure preservation with query simplicity.
Option 3: Unnest all levels (default)
This option recursively flattens nested structures using dot notation and produces the flattest schema.
For the product table, this creates columns such as productdetails.brand, productdetails.category, productdetails.specification.color , productdetails.specification.storage , pricing.list_price, and pricing.discount_pct. The pricing map flattens similarly. Each column is directly queryable without nested access patterns.
Recommended for: Analytics tools that prefer flat schemas when your DynamoDB items have a reasonably consistent structure. Note that deeply nested or highly variable schemas can produce very wide tables.
Data partitioning
You can speed up your queries and reduce costs by partitioning your replicated data. Partitioning divides data into logical segments on disk.
When you include a filter on a partition column in your query, the query engine skips irrelevant segments entirely. This behavior is called partition pruning: instead of scanning the entire dataset, the engine reads only the data that matches your filter conditions. For large tables, partition pruning can reduce both query runtime and cost significantly.
Default partitioning
If you don’t specify partition columns, AWS Glue Zero-ETL partitions data using the DynamoDB primary key with bucketing. This approach supports general-purpose queries without requiring manual configuration. For specific query patterns or performance requirements, you can define custom partitioning strategies described in the subsections that follow.
Identity partitioning
Identity partitioning uses raw column values to create partitions. You apply this strategy to low-to-medium cardinality columns such as brand, category, or AWS Region. To partition the product table by productdetails.brand and create a separate partition for each brand, use this configuration:
{
  "partitionSpec": [
    {
      "fieldName": "productdetails.brand",
      "functionSpec": "identity"
    }
  ]
}
With this setup, AWS Glue creates one partition directory per unique brand value. When you query for a specific brand, Athena reads only that partition.
Important: Avoid identity partitioning on high-cardinality columns such as primary keys or timestamps. This creates many small partitions, which degrades both ingestion and query performance
Time-based partitioning
Time-based partitioning organizes data by timestamp at a chosen granularity: year, month, day, or hour. You apply this strategy to time-series data and time-range queries. To partition the product table by month on the created_at column, which stores epoch milliseconds, use this configuration:
{
  "partitionSpec": [
    {
      "fieldName": "created_at",
      "functionSpec": "month",
      "conversionSpec": "epoch_milli"
    }
  ]
}
The conversionSpec parameter tells AWS Glue how to interpret the source timestamp. Supported values: epoch_sec (Unix seconds), epoch_milli (Unix milliseconds), and iso (ISO 8601 format).
Note: The original column values remain unchanged. AWS Glue transforms only the partition column values to timestamp type in the target table
Multi-level partitioning
You can combine strategies for a hierarchical scheme. To partition first by month and then by brand, use this configuration:
{
  "partitionSpec": [
    {
      "fieldName": "created_at",
      "functionSpec": "month",
      "conversionSpec": "epoch_milli"
    },
    {
      "fieldName": "productdetails.brand",
      "functionSpec": "identity"
    }
  ]
}
This scheme supports efficient queries that filter by date range, brand, or both. Place higher-selectivity columns first in the hierarchy and align the scheme with your most common query patterns.
Best practices
Keep these guidelines in mind when you configure your integration:
- Avoid identity partitioning on high-cardinality columns such as primary keys, timestamps, or system-generated IDs. This leads to partition explosion and degrades performance.
- Apply only one time-based function per column. For example, don’t partition col1 by year, month, day, and hour simultaneously.
- Match
conversionSpecto your actual data format. If your timestamps are in epoch milliseconds, useepoch_milli, notepoch_secoriso. - Choose granularity based on data volume. High-volume tables benefit from finer granularity (day or hour). Lower-volume tables work well with coarser granularity (month or year).
- Account for timezone implications with ISO timestamps. AWS Glue Zero-ETL normalizes timestamp partition values to UTC.
Prerequisites
To implement the AWS Glue Zero-ETL integration with a DynamoDB source, you will need:
- An AWS account with least privilege principle
- An AWS Glue database (for example,
ddb_zero_etl_demo_db) with an Amazon S3 bucket associated as the database location (setup instructions) - AWS Glue Data Catalog settings updated with an AWS Identity and Access Management (IAM) policy that grants fine-grained access control for zero-ETL (setup instructions)
- Create an IAM role named
zetl-role, to be used by zero-ETL to access data from your DynamoDB table - A DynamoDB source table (for example,
product) configured for zero-ETL integration (setup instructions)
Walkthrough: Create the zero-ETL integration
Complete these steps to create a zero-ETL integration with DynamoDB as the source and Apache Iceberg tables in Amazon S3 as the target.
Step 1: Select the source type
- Open the AWS Glue console.
- In the navigation pane, under Data Integration and ETL, choose Zero-ETL integrations.
- Choose Create zero-ETL integration.
- Select Amazon DynamoDB as the source type, then choose Next.
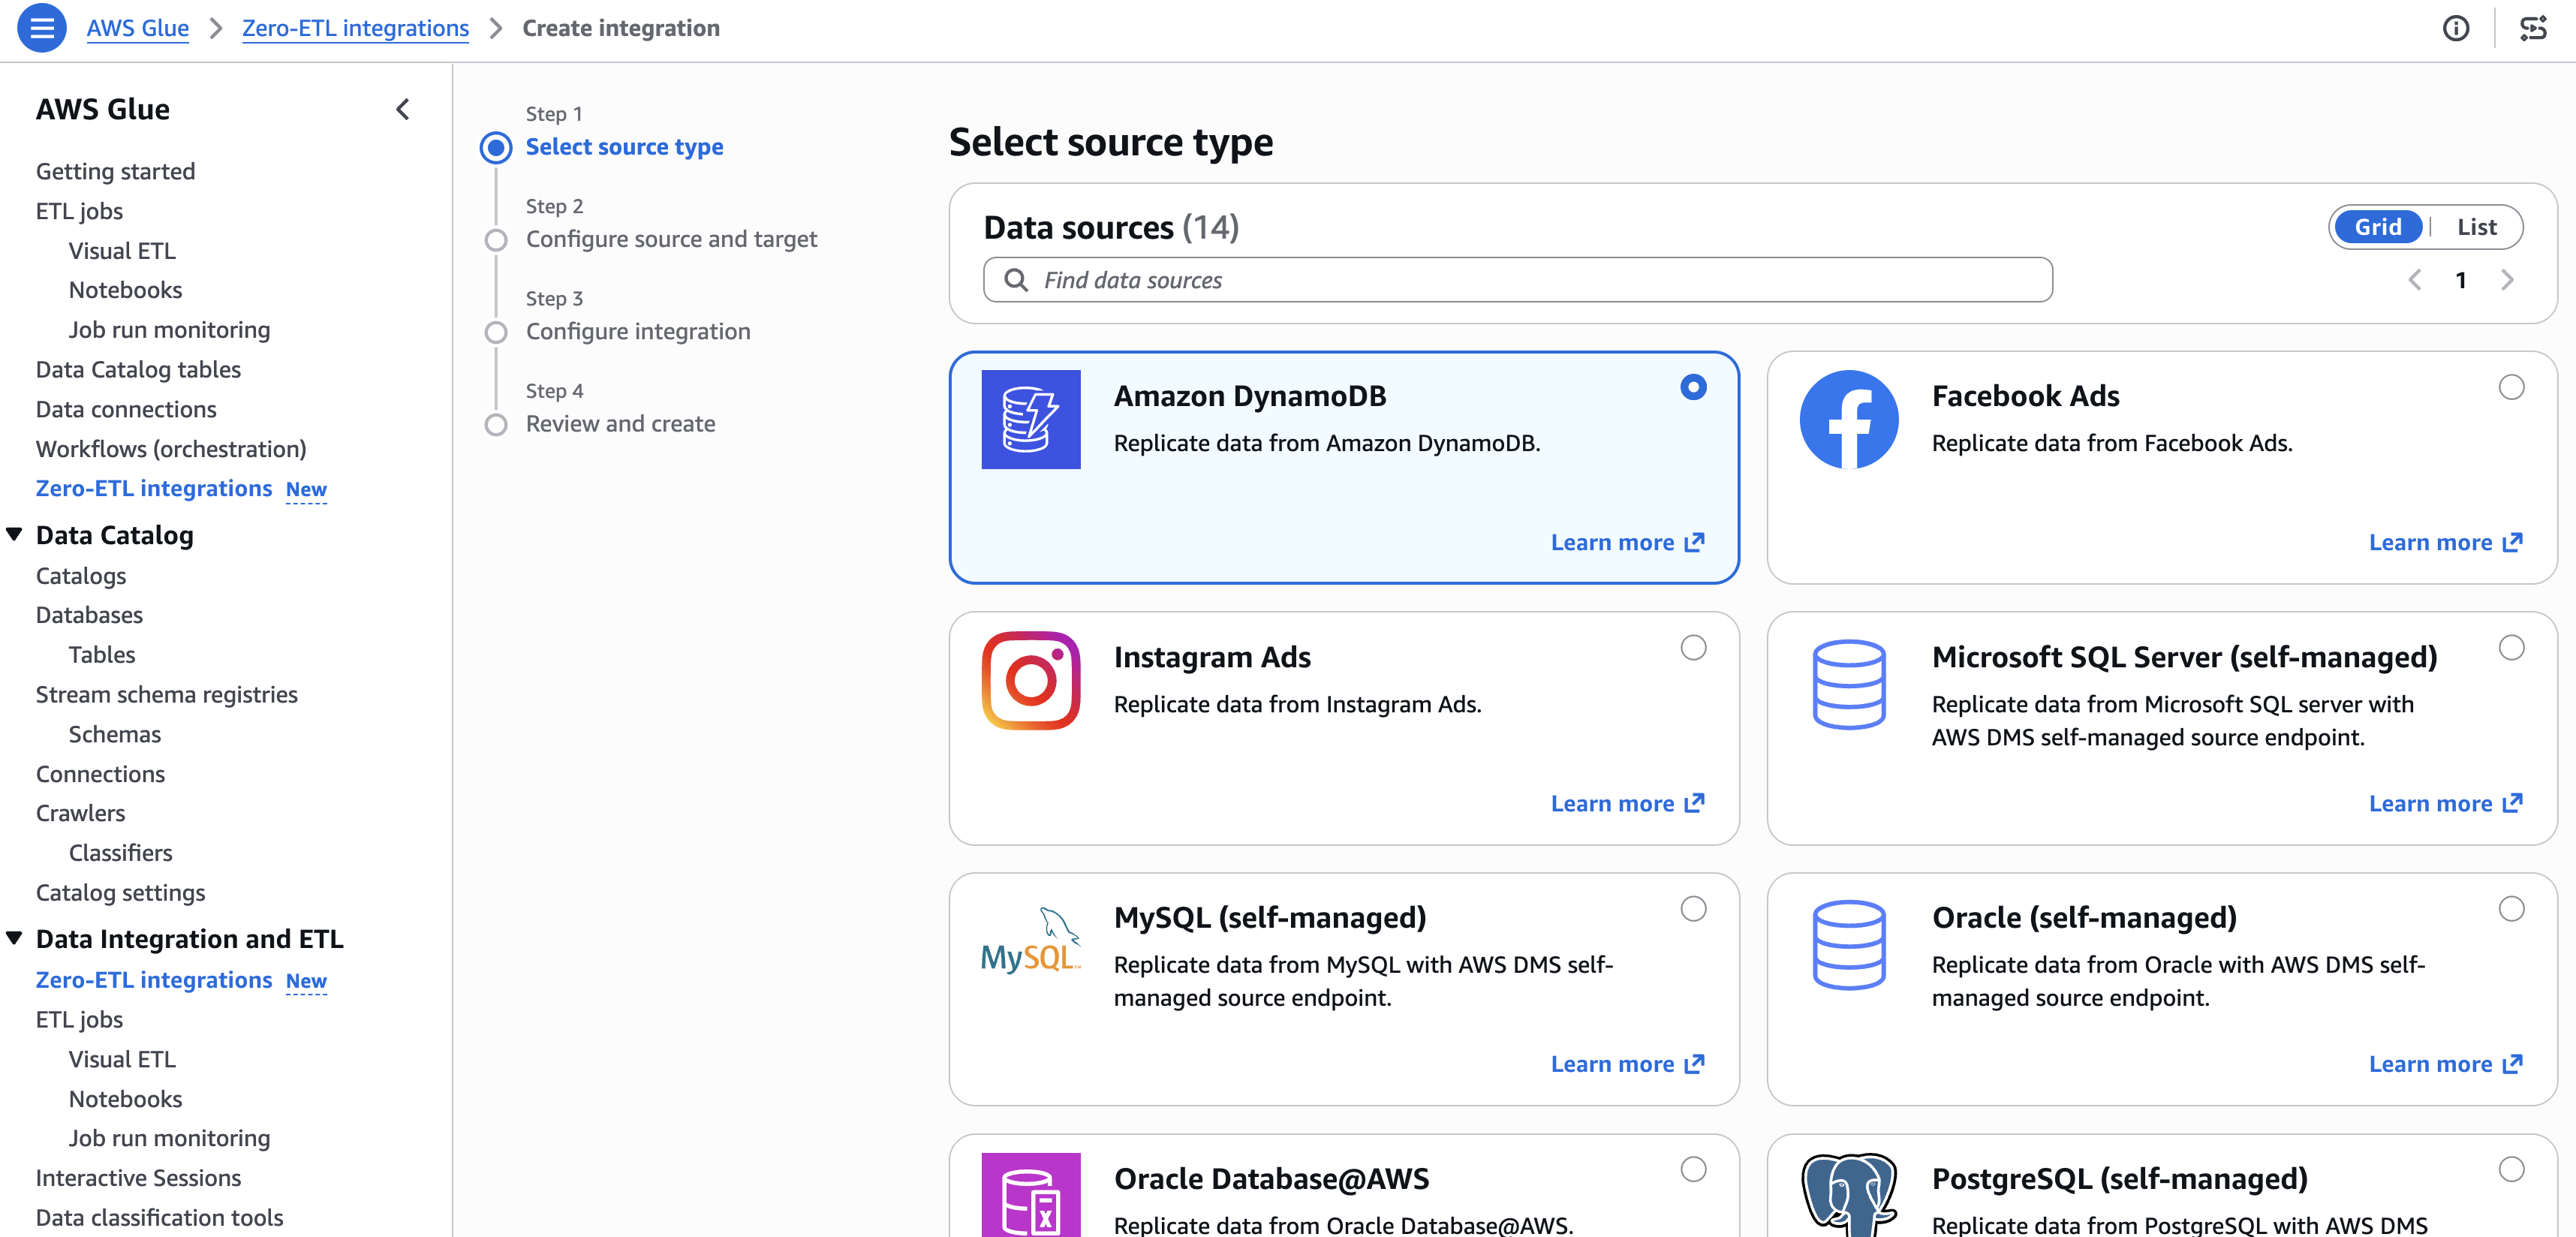
[Figure 1: Selecting Amazon DynamoDB as the zero-ETL source type]
Step 2: Configure source and target
- In Source details, select your DynamoDB table (for example,
product). - In Target details:
-
- Select the current account as target.
- Choose the catalog and target database (for example,
ddb_zero_etl_demo_db). - Select the IAM role (for example,
zetl-role).
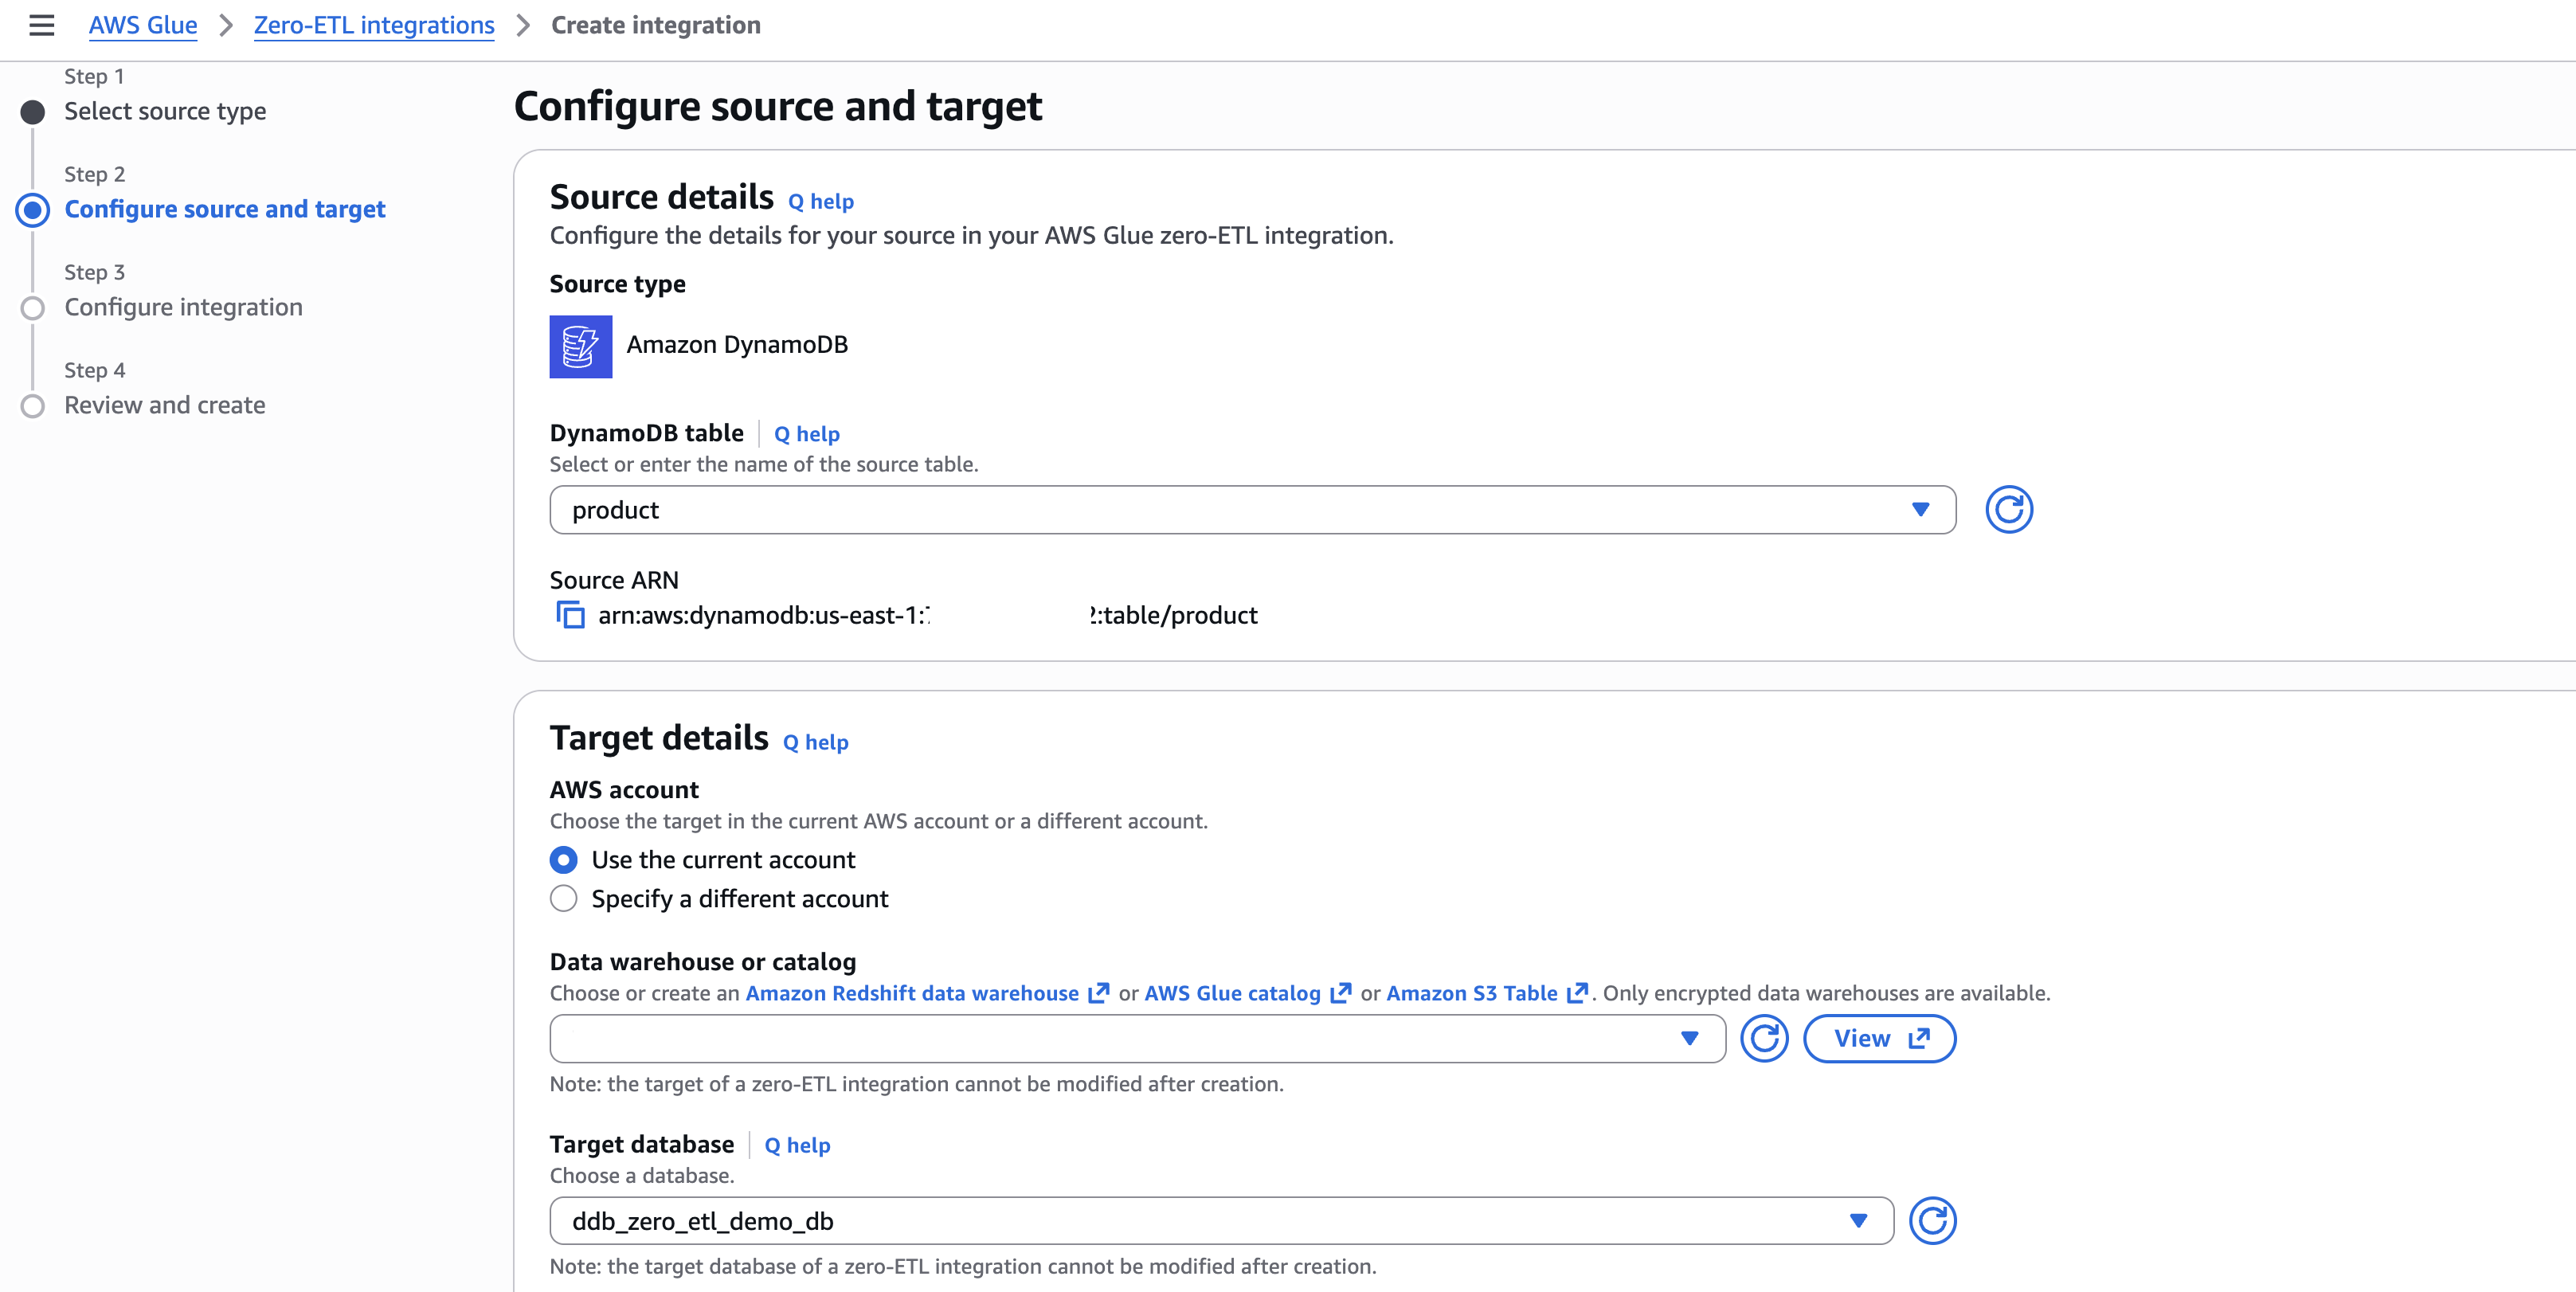
[Figure 2: Configuring source DynamoDB table and target database]
Step 3: Configure output settings
- Under Schema unnesting, select Unnest all fields.
- Under Data partitioning, select Specify custom partition keys.
- Enter the partition key (for example,
productdetails.brand) and set the function to Identity. - Choose Next.
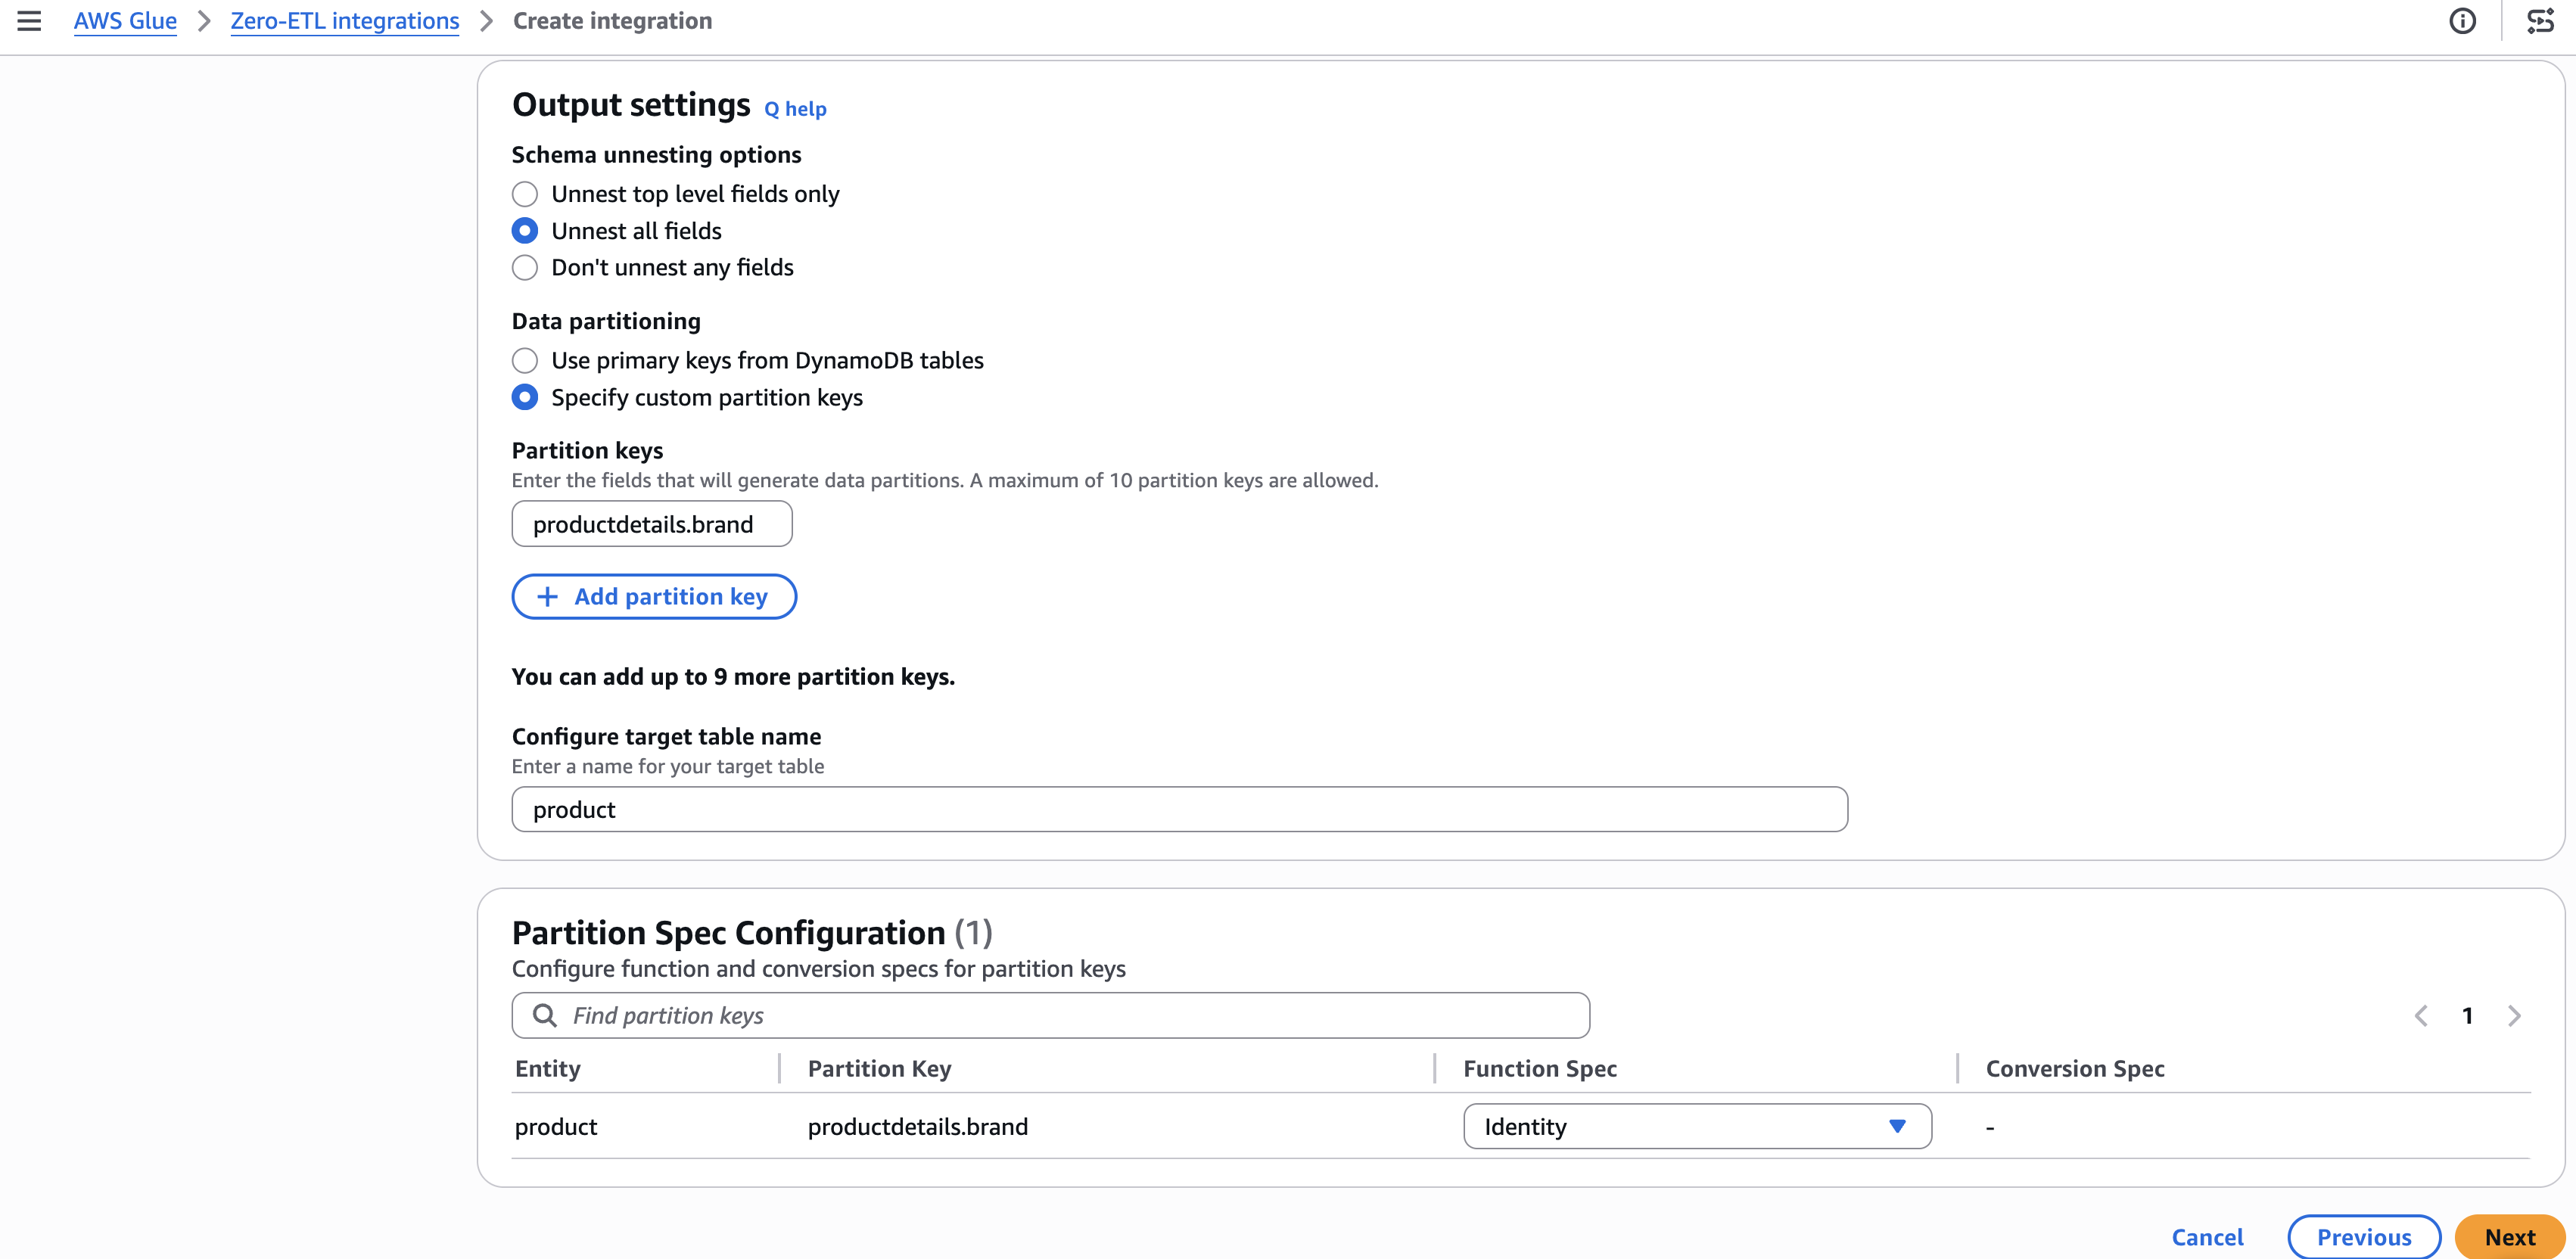
[Figure 3: Configuring schema unnesting and partition key settings]
Step 4: Set integration details
- Optionally configure encryption and replication settings. The default refresh interval is 15 minutes.
- Enter a name for the integration (for example,
ddb-zero-etl-demo). - Choose Next.
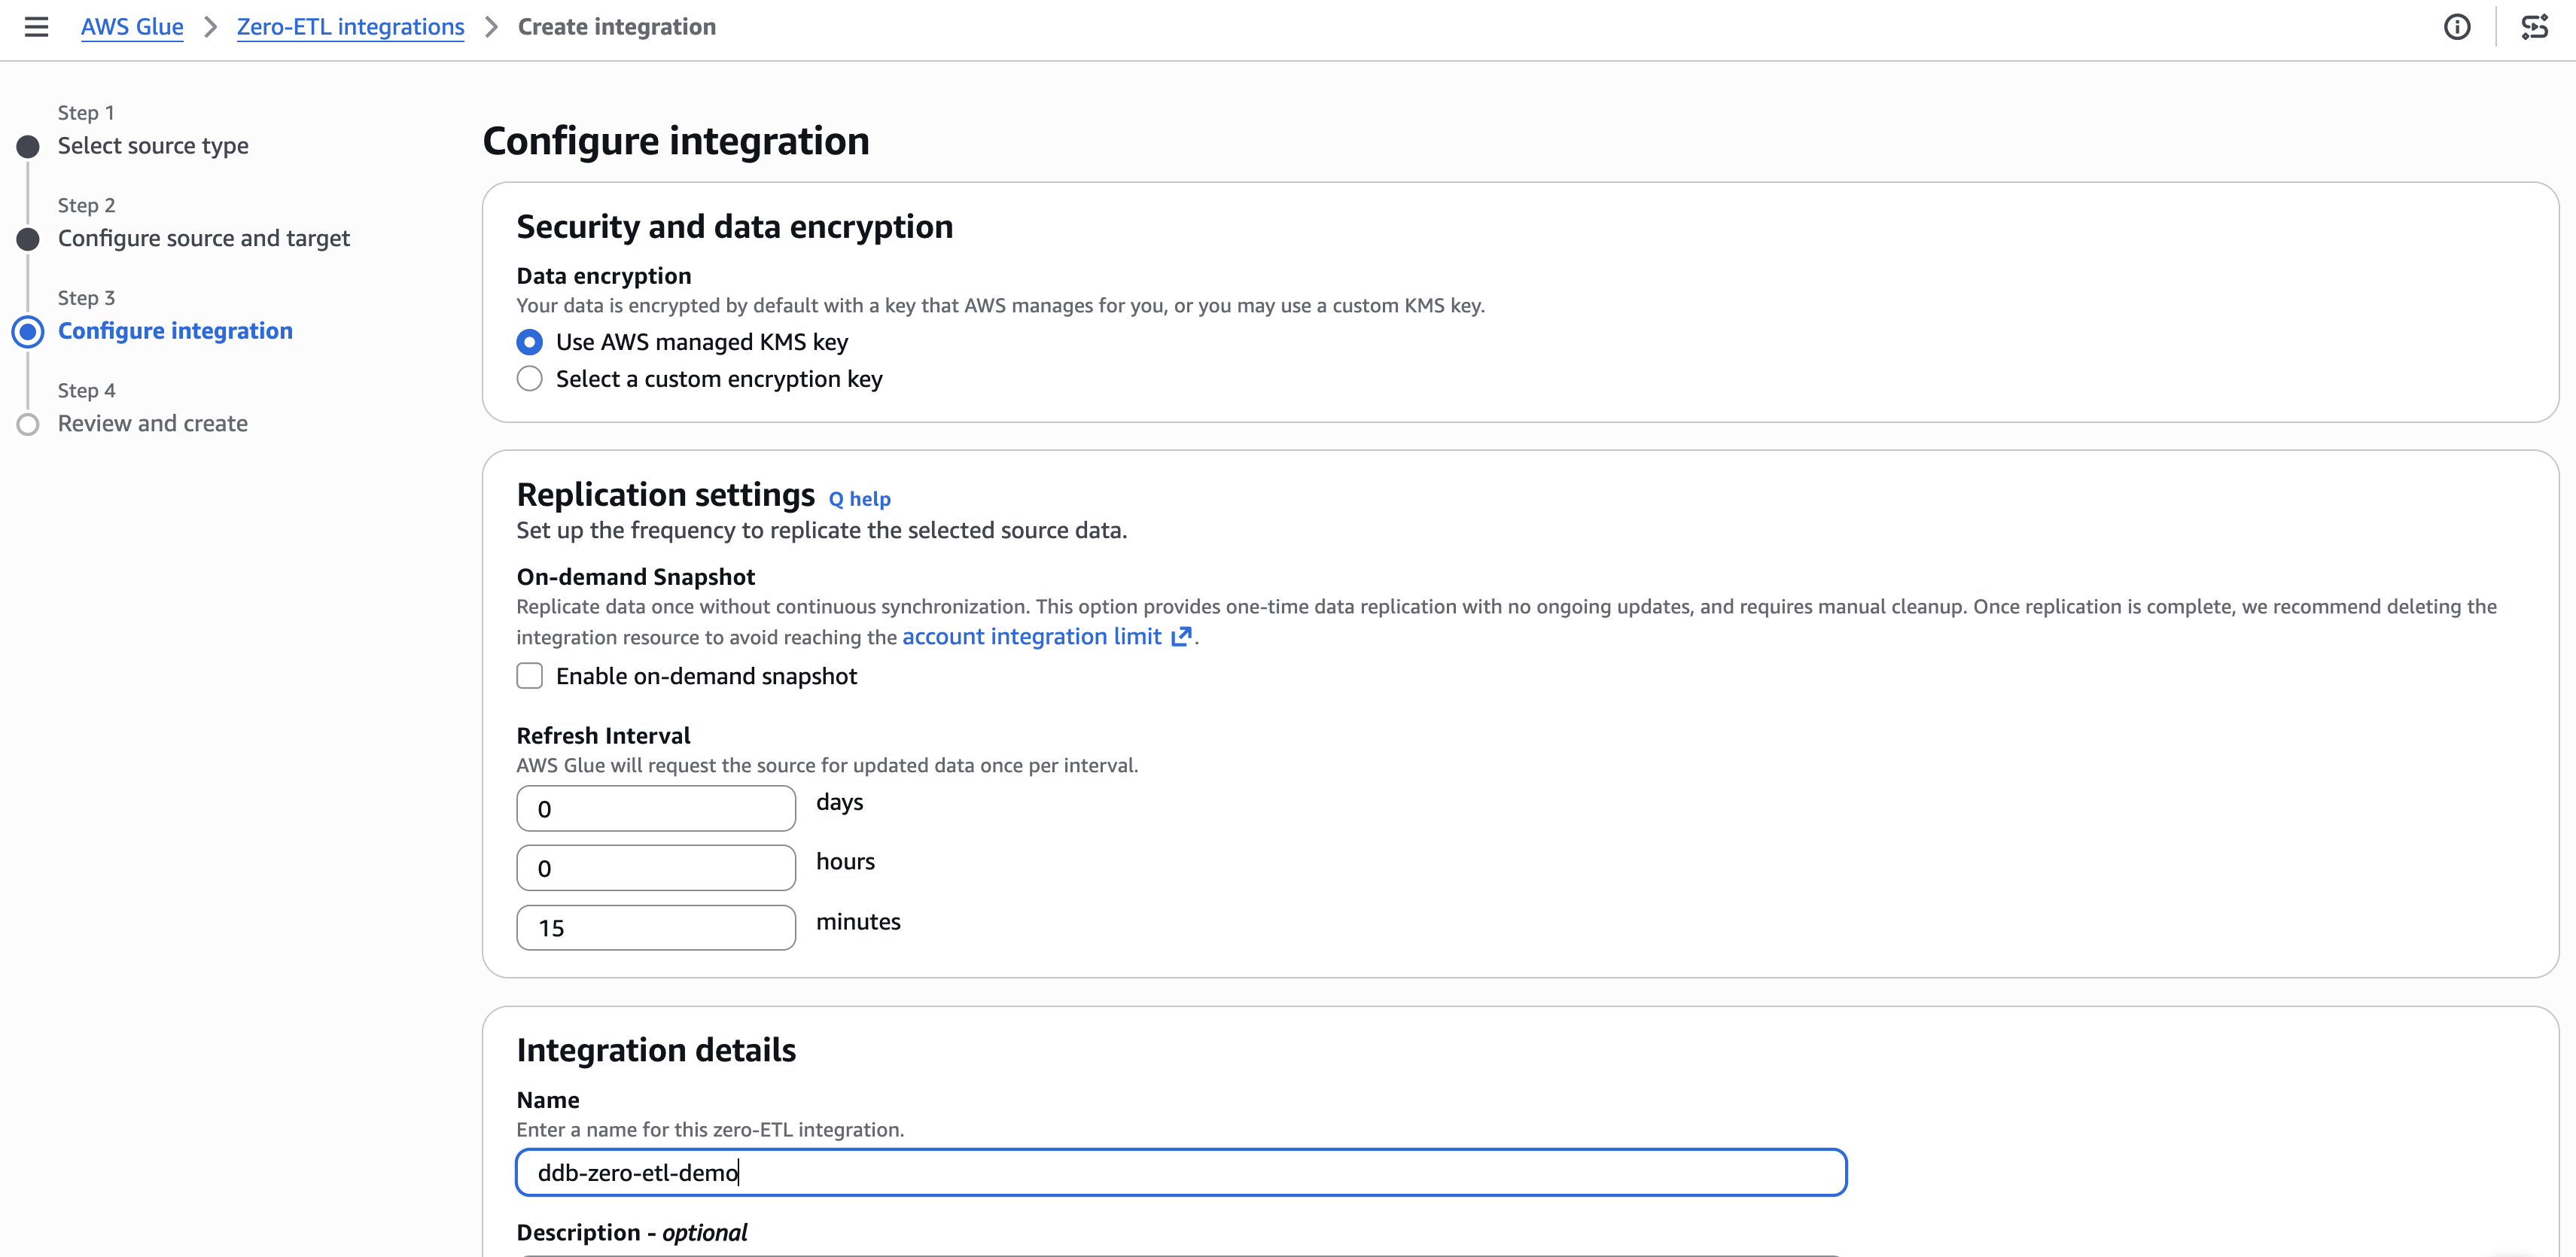
[Figure 4: Configuring encryption and replication settings]
Step 5: Review and create
- Review your settings and choose Create and launch integration.
- The integration shows as Active within about a minute.
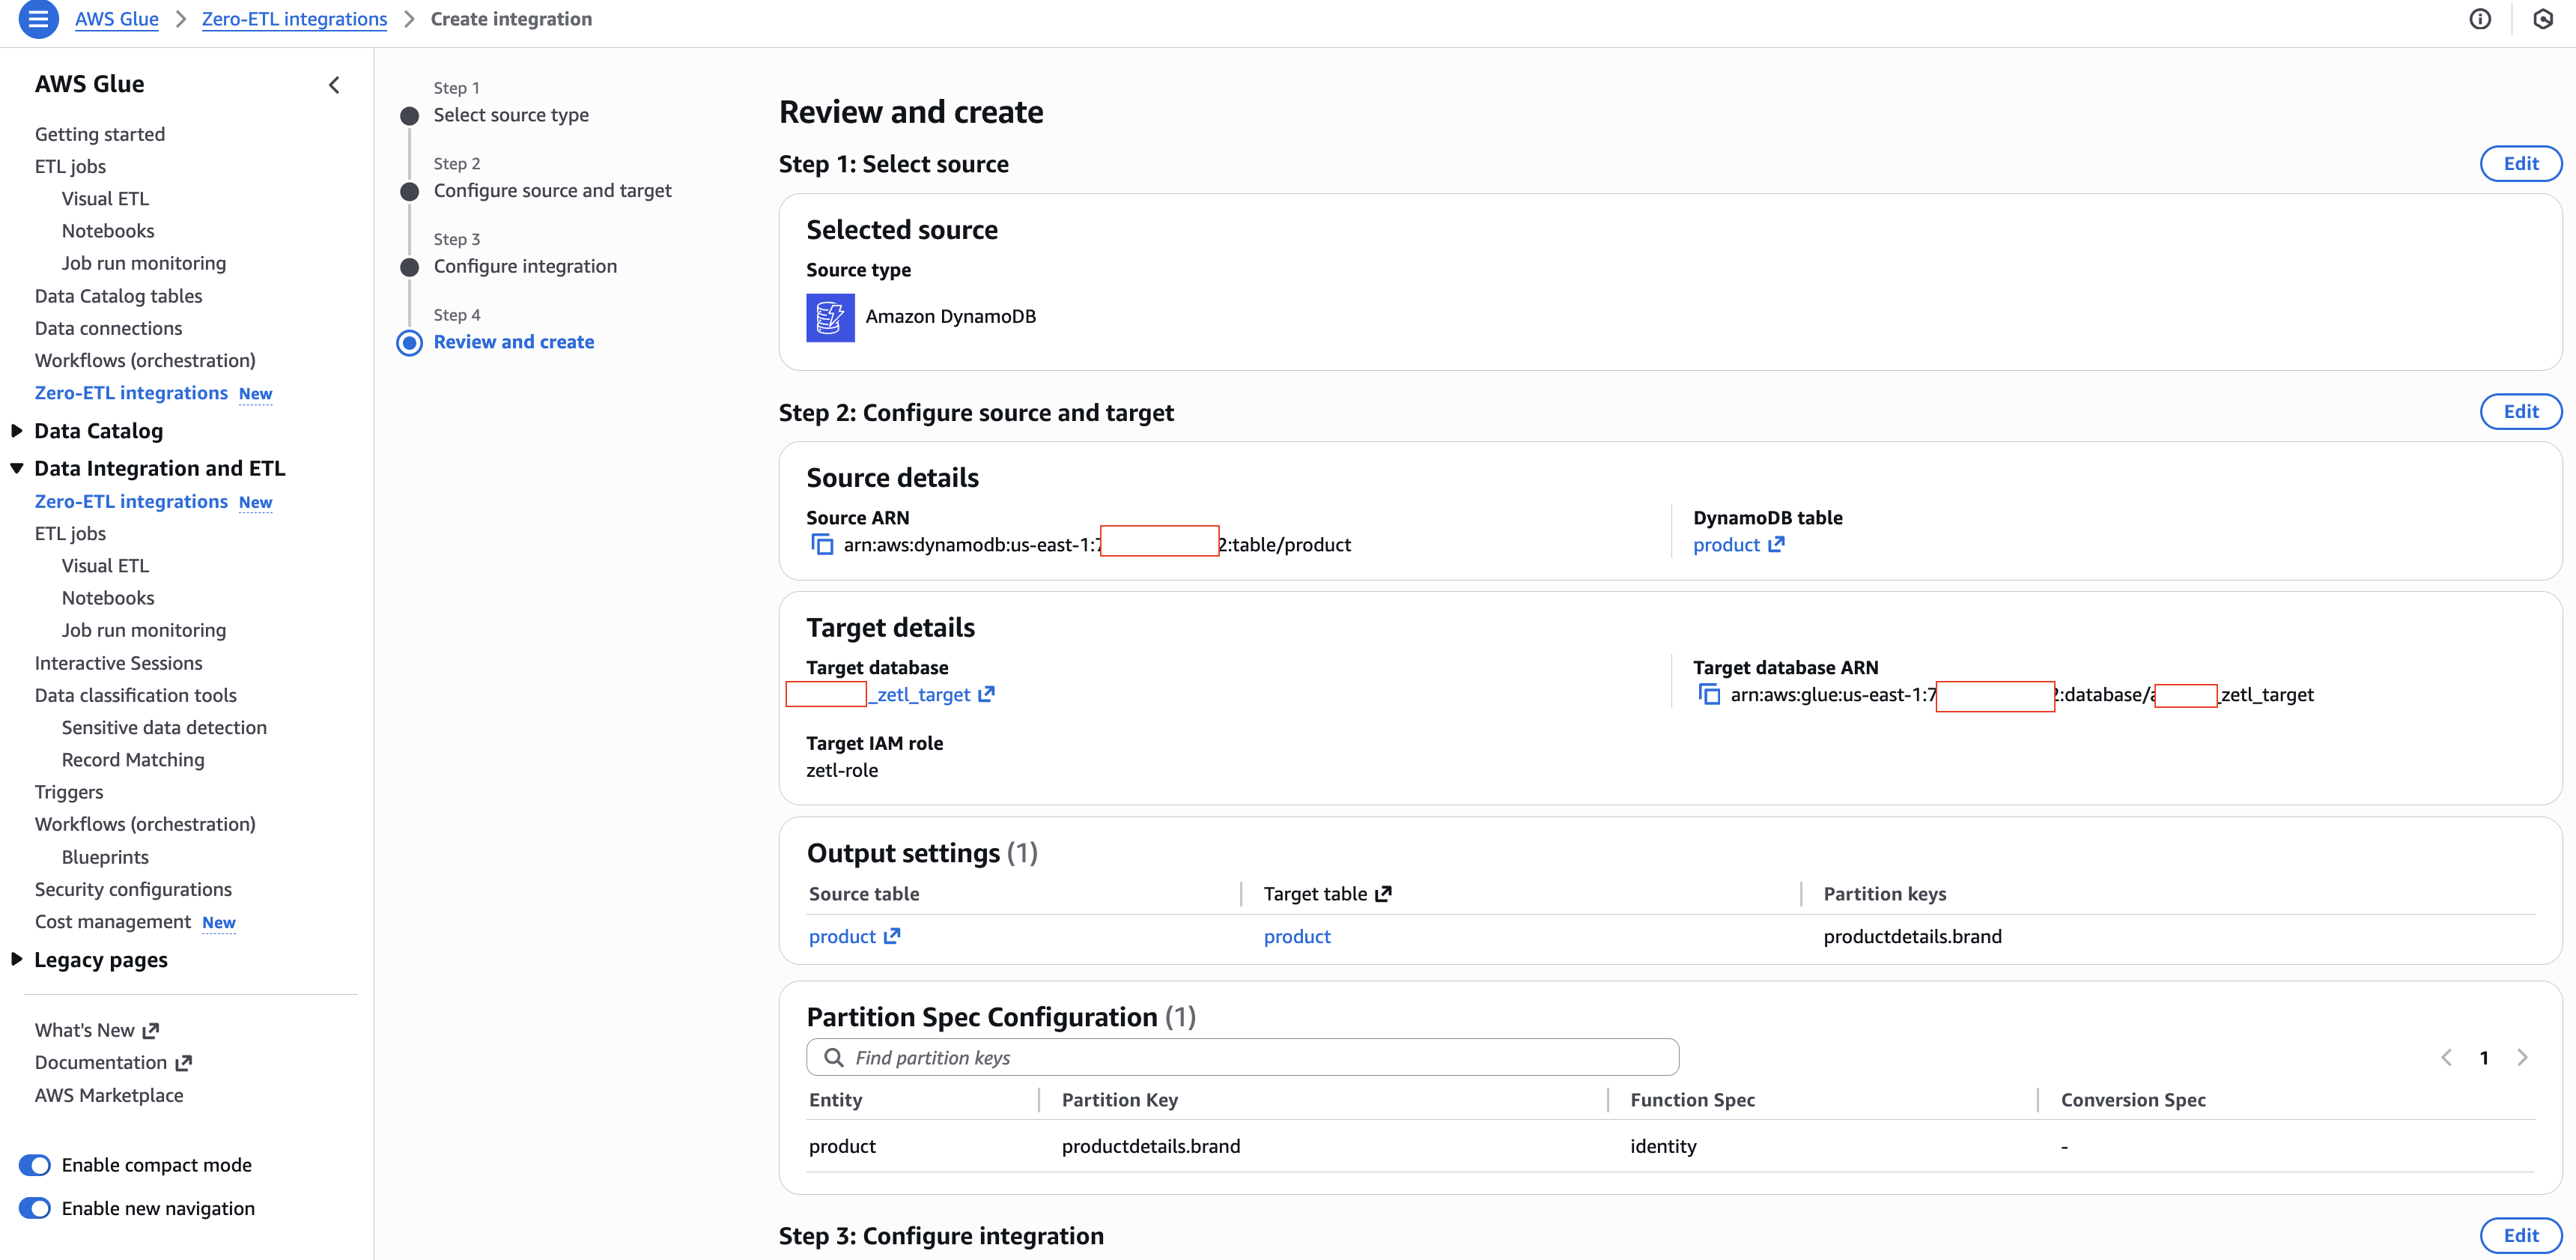
[Figure 5: Review and create summary]
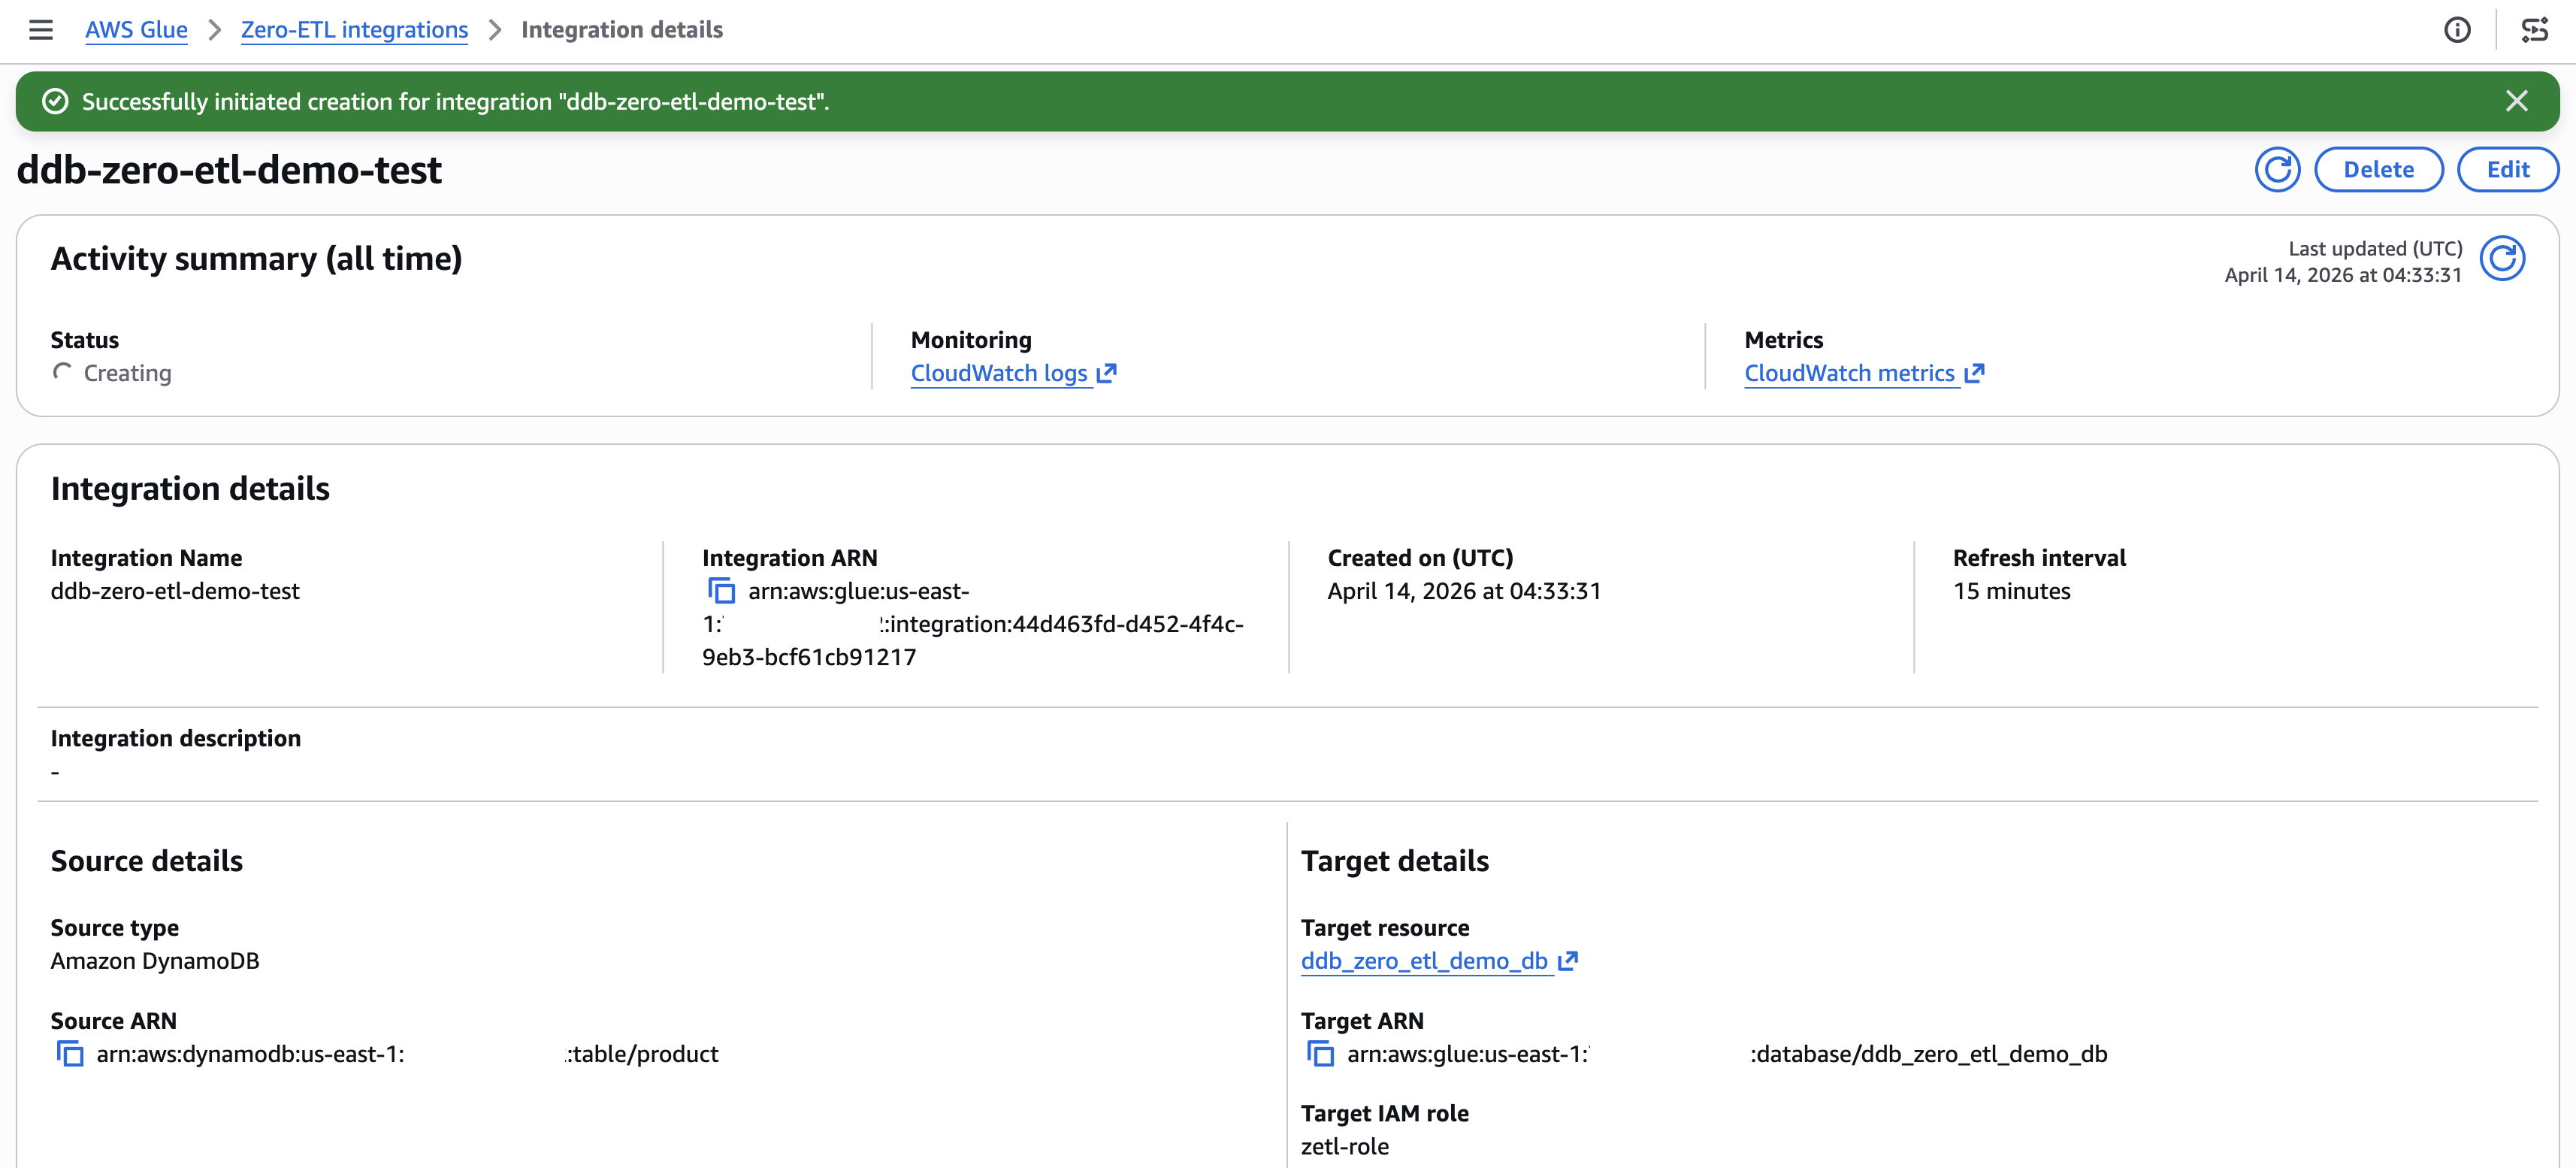
[Figure 6: Integration active with successful status]
Query the replicated data
After the integration is active and the initial replication completes (typically 15–30 minutes), you can query the data in Amazon Athena.
Preview the replicated data
- Open the Amazon Athena console.
- In the query editor, select your target database (for example,
ddb_zero_etl_demo_db). - Run a preview query:
SELECT * FROM "ddb_zero_etl_demo_db"."product"LIMIT 10;Verify schema unnesting
With Unnest all fields selected, nested attributes appear as individual columns with dot notation:
SELECT "productdetails.brand", "productdetails.category", "pricing.list_price"
FROM "ddb_zero_etl_demo_db"."product"
WHERE "productdetails.category" = 'Electronics';
Verify partition pruning
Queries that filter on the partition column (productdetails.brand) automatically skip irrelevant partitions:
SELECT product_id, name, "pricing.list_price"
FROM "ddb_zero_etl_demo_db"."product"
WHERE "productdetails.brand" = 'AudioTech';
[Figure 7: Athena query to retrieve the data from Apache Iceberg lakehouse]
You can verify the partition structure by navigating to the Amazon S3 bucket associated with your database. The data organizes into directories like:
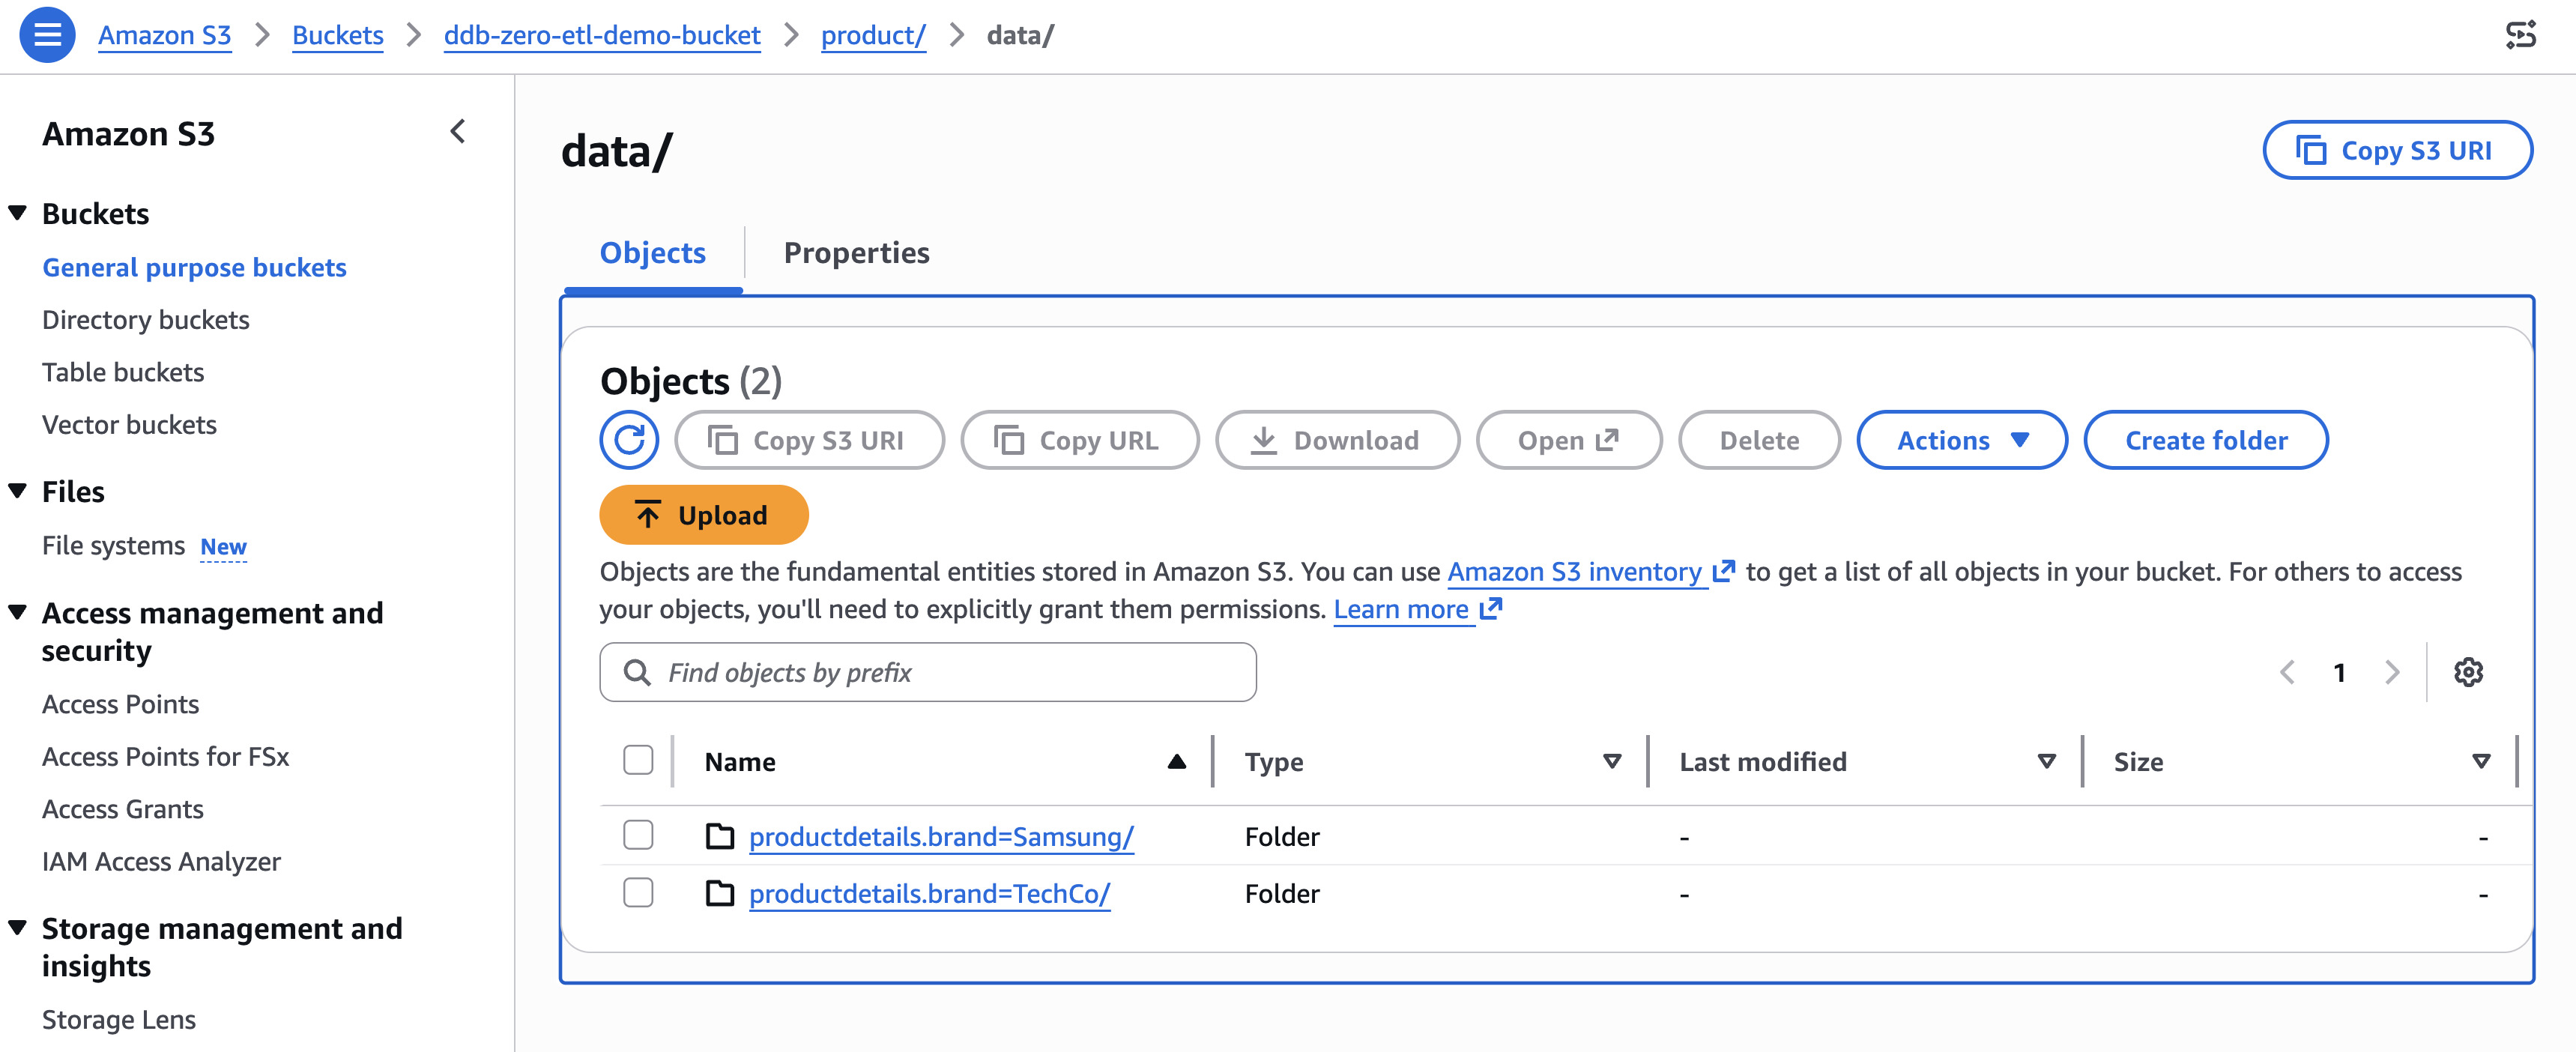
[Figure 8: Amazon S3 bucket organization for the identity partition productdetails.brand]
Clean up
To avoid ongoing charges, delete the resources in this order:
- Delete the zero-ETL integration. In the AWS Glue console, navigate to Zero-ETL integrations, select your integration, and choose Delete. Existing replicated data remains in the target, but new changes stop replicating.
- Delete the replicated table. In the AWS Glue Data Catalog, navigate to Tables, select the replicated table, and delete it.
- Delete the AWS Glue database. In the Data Catalog, select the database and delete it.
- Delete the Amazon S3 data. Empty and delete the S3 bucket associated with the database.
- Delete the DynamoDB table. If you created it for this walkthrough, delete the source table.
- Delete IAM resources. Remove the IAM role and policies created for the integration.
Conclusion
You configured schema unnesting and data partitioning for a DynamoDB zero-ETL integration, replicated a product catalog table to Apache Iceberg tables in Amazon S3, and verified the results in Amazon Athena. Unnesting flattened nested attributes into directly queryable columns. Partitioning helped the query engine skip irrelevant data, reducing both query time and cost. To take your integration further, try monitoring replication lag and data freshness with Amazon CloudWatch metrics. You can also experiment with different partitioning strategies on a staging table before applying them to production workloads, testing time-based partitioning alongside identity partitioning to find the optimal scheme for your query patterns. For broader analytics coverage, query the same Iceberg tables from Amazon Redshift Spectrum or Amazon EMR alongside Athena. For more details, explore these resources:
- AWS Glue Zero-ETL integrations
- Monitoring zero-ETL integrations
- Amazon Athena documentation
- Amazon DynamoDB Developer Guide
- Apache Iceberg on AWS