AWS Big Data Blog
Securely connecting on-premises data systems to Amazon Redshift with IAM Roles Anywhere
Securely connecting on-premises data systems to Amazon Redshift requires removing static credentials while preserving seamless access for your data teams. This solution extends connectivity from your on-premises data centers to Amazon Redshift by using short-lived, auditable credentials. All traffic remains within trusted, private channels.
Developers and data engineers need a process to run ingestion pipelines, Extract, Transform, Load (ETL) jobs, and analytics queries without managing static credentials or complex authentication flows. You can use AWS Identity and Access Management (IAM) Roles Anywhere to obtain temporary security credentials in IAM. This service extends the short-term credential model of AWS beyond the cloud and allows on-premises workloads to authenticate with IAM using X.509 certificates from an existing certificate authority. This approach removes static IAM access keys and applies least-privilege access through IAM policies. Every request is recorded in AWS CloudTrail. Paired with private Domain Name System (DNS) and Amazon Virtual Private Cloud (Amazon VPC) endpoints for Amazon Redshift, it keeps authentication and data flows inside private networks without traversing the public internet.
In this post, you will learn how to use AWS IAM Roles Anywhere with Amazon Redshift for secure, private connections. This removes the need to expose traffic to the public internet or manage long-lived access keys.
The challenge
Organizations connecting on-premises data systems to Amazon Redshift typically choose from several established security patterns, each with tradeoffs in risk, complexity, and operational overhead. Static IAM access keys are straightforward to adopt but require ongoing rotation, secure distribution, and storage across systems. Their long-lived nature increases the impact of accidental exposure in code, configuration files, or logs. Shared database or service credentials can streamline setup but often reduce auditability, weaken least-privilege controls, and create accountability challenges across teams. VPN or private network connections improve network isolation, yet they still require strong application-layer authentication and add infrastructure management burdens. Custom secret-management or credential-brokering solutions can reduce reliance on long-lived credentials, but they introduce additional components that must be built, integrated, and maintained. As organizations scale, these patterns often force tradeoffs between strong security controls and the developer productivity needed to build and operate data pipelines efficiently.
Solution overview
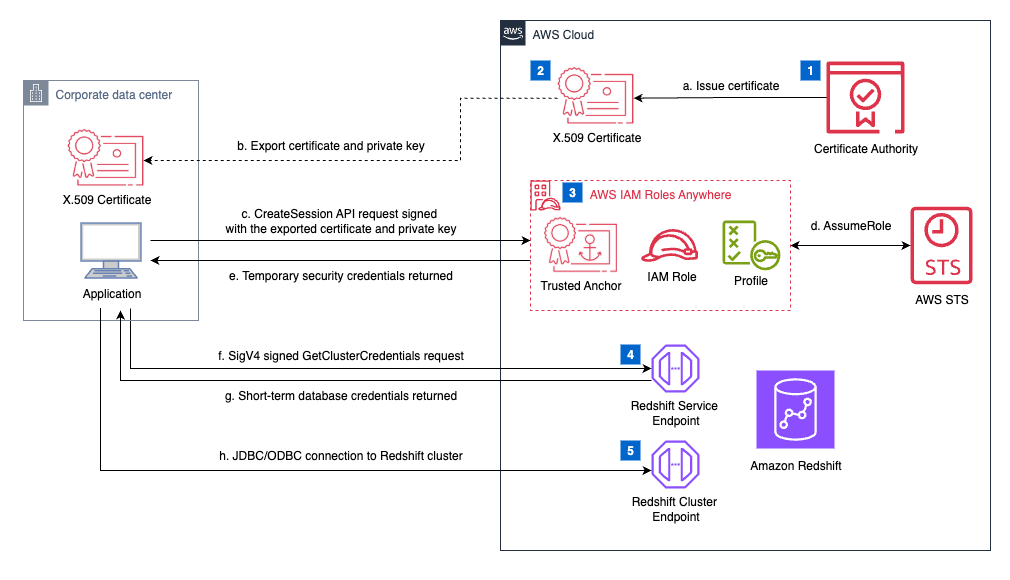
The solution integrates on-premises workloads with Amazon Redshift using IAM Roles Anywhere and the built-in IAM authentication of Amazon Redshift. The core idea is that on-premises workloads use X.509 certificates to obtain short-term IAM credentials, then exchange them for temporary Amazon Redshift database credentials. Both provisioned clusters and serverless workgroups are supported. The architecture consists of these main components:
- Amazon Redshift Service Endpoint – Handles secure API calls such as GetClusterCredentials, GetCredentials, and GetClusterCredentialsWithIAM. The on-premises workload uses these API endpoints to request temporary database credentials.
- Amazon Redshift Cluster Endpoint – Provides the connection point for database operations on provisioned Amazon Redshift clusters. After obtaining temporary credentials, applications and tools like JDBC/ODBC drivers or psql connect to the cluster endpoint. They use this connection to execute SQL queries, load data, and perform analytics tasks.
- Amazon Redshift Serverless Workgroup Endpoint – Serves the same function as the cluster endpoint but for serverless deployments. After temporary credentials are retrieved through the GetCredentials API, applications connect to this endpoint using standard database drivers (JDBC/ODBC) or command line tools like psql to run queries and load data.
- Certificate authority – For this post, we use AWS Private Certificate Authority (AWS Private CA) as the certificate authority (CA) source. Alternatively, you can integrate with an external CA. For more details, see IAM Roles Anywhere with an external certificate authority.
- X.509 Certificate – We use a sample private certificate stored in AWS Certificate Manager (ACM) and issued by AWS Private CA.
- IAM Roles Anywhere – Issues short-term AWS credentials to on-premises processes based on X.509 certificates from an organization’s certificate authority. These temporary credentials allow the workload to assume an IAM role that grants access to Amazon Redshift APIs.
To retrieve temporary credentials using IAM Role Anywhere, we use the credential_process parameter in AWS Command Line Interface (AWS CLI) profile configurations to trigger an external process that generates or retrieves credentials. This post uses X.509 certificates to authenticate and return temporary IAM credentials through IAM Roles Anywhere. The AWS IAM Roles Anywhere Credential Helper is executed to handle the signing process for the CreateSession API, returning credentials in a JSON format that applications and tools can consume.
Amazon Redshift provides several APIs that work together to support temporary, IAM-based authentication for different deployment scenarios. When connecting to a provisioned Amazon Redshift cluster, applications typically use the GetClusterCredentials API, which returns short-term database credentials tied to an IAM role’s permissions. For organizations with fully IAM-managed identities, GetClusterCredentialsWithIAM streamlines this process by automatically mapping the IAM identity to a database user, removing the need to specify usernames manually. In serverless deployments, the GetCredentials API performs the same function, issuing temporary credentials for Amazon Redshift Serverless workgroups based on IAM permissions. Collectively, these APIs keep static credentials from being stored or distributed while offering flexible integration paths for both provisioned and serverless Amazon Redshift architectures.
Flow overview
An on-premises ETL job begins by initiating a request and authenticates with AWS using IAM Roles Anywhere to assume an IAM role securely. After obtaining temporary security credentials, the workload calls the Amazon Redshift service endpoint to execute the GetClusterCredentials API, which returns short-term database credentials. These credentials allow the workload to connect to the Amazon Redshift cluster endpoint through a VPC endpoint. This enables running SQL queries or loading data into the cluster as part of the ETL process.
Prerequisites
You must have the following prerequisites to follow along with this post.
AWS account requirements
- An AWS account with permissions to deploy AWS CloudFormation templates.
- Access to AWS CloudShell for exporting a sample private certificate that we create using AWS CloudFormation in a later step.
Remote environment
Network Connectivity requirements
- Establish secure connectivity between your on-premises environment and AWS using AWS Site-to-Site VPN, AWS Direct Connect, or AWS Client VPN.
Deploy AWS resources with AWS CloudFormation
- Navigate to the AWS CloudFormation console.
- Choose Create Stack.
- Download the redshift-iamra-template template.
- For Specify template, choose Upload a template file and upload redshift-iamra-template.
- Choose Next.
- Enter a unique name for Stack name. The default value is
redshift-test. - Configure the stack parameters. The following table provides default values.
| Parameter name | Default value | Description |
VPCCIDR |
10.0.0.0/16 | CIDR block for the VPC |
PrivateSubnet1CIDR |
10.0.1.0/24 | CIDR block for the first private subnet |
PrivateSubnet2CIDR |
10.0.2.0/24 | CIDR block for the second private subnet |
CACommonName |
redshift-ca.example.com | Common Name for the Certificate |
CAOrganization |
Example Corp | Organization for the Certificate Authority |
CACountry |
US | Country for the Certificate Authority |
CAValidityInDays |
1826 | Validity period in days for the CA Certificate (5 years) |
RedshiftClusterIdentifier |
my-redshift-cluster |
Identifier for the Amazon Redshift cluster |
RedshiftDatabaseName |
dev |
Name of the initial database in the Amazon Redshift cluster |
RedshiftMasterUsername |
admin |
Main username for the Amazon Redshift cluster |
RedshiftNodeType |
ra3.xlplus |
Node type for the Amazon Redshift cluster |
ServerlessNamespace |
my-serverless-namespace |
Namespace identifier for Amazon Redshift Serverless |
ServerlessWorkgroup |
my-serverless-workgroup |
Workgroup identifier for Amazon Redshift Serverless |
- Select the acknowledgement checkbox and choose Create Stack. Stack deployment takes about 10 minutes to complete.
- When stack creation is complete, navigate to the Outputs tab on the AWS CloudFormation console and note down the values for the resources that the stack created.
The following table shows a summarized view of the output values.
| Output | Description | Example value |
CertificateAuthorityArn |
Amazon Resource Name (ARN) of the Private Certificate Authority | arn:aws:acm-pca:aa-example-1:111122223333:certificate-authority/a1b2c3d4-5678-90ab-cdef-EXAMPLE22222 |
ClientCertificateArn |
ARN of the sample client certificate | arn:aws:acm:aa-example-1:111122223333:certificate/a1b2c3d4-5678-90ab-cdef-EXAMPLE11111 |
ProfileArn |
ARN of the IAM Roles Anywhere profile | arn:aws:rolesanywhere:aa-example-1:111122223333:profile/a1b2c3d4-5678-90ab-cdef-EXAMPLE44444 |
RedshiftAccessRoleArn |
ARN of the Amazon Redshift Access role | arn:aws:iam::1222345677:role/Redshift-test-RedshiftAccessRole |
TrustAnchorArn |
ARN of the IAM Roles Anywhere profile. You will use this value for configuring credential_process for IAM Roles Anywhere in a later step. |
arn:aws:rolesanywhere:aa-example-1:111122223333:trust-anchor/a1b2c3d4-5678-90ab-cdef-EXAMPLE33333 |
RedshiftClusterEndpoint |
Private endpoint of the Amazon Redshift Cluster | my-redshift-cluster-123456789012.aa-example-1.redshift.amazonaws.com |
RedshiftClusterPort |
Port of the Amazon Redshift Cluster | 5439 |
ServerlessWorkgroupEndpoint |
Private endpoint of Amazon Redshift Serverless Workgroup | my-serverless-workgroup-123456789012.aa-example-1.redshift.serverless.amazonaws.com |
Export a sample private certificate using CloudShell
To export a sample private certificate using CloudShell, complete the following steps.
- Open CloudShell. For more details, see Navigating the AWS CloudShell interface.
- Export the certificate ARN from the CloudFormation outputs. If you changed the stack name in the previous step, use that value for
<stack-name>. Otherwise, use the default valueredshift-public-iam-roles-anywhere.
- Extract the certificate and private key files:
- Download the extracted certificate and private key files from CloudShell:
- Secure the private key on your local workstation.
After downloading the files, restrict file permissions to prevent unauthorized access:
chmod 400 private_key.pemchmod 400 certificate.pem
For production workloads, consider storing private keys in your operating system’s keychain (macOS Keychain, Windows Certificate Store), a hardware security module (HSM), or a secrets management tool rather than as files on disk.
Configure an AWS CLI profile
These are the steps to configure an AWS CLI profile on your system:
- Store the downloaded certificate and private key to your environment. For an automated approach to generate and rotate certificates, see Set up AWS Private Certificate Authority to issue certificates for use with IAM Roles Anywhere.
- Create a new profile named
onprem-redshift. This invokes the credential process. Replace the placeholders with your specific values. Find the values fortrusted-anchor-arn,profile-arn, androle-arnin your CloudFormation stack outputs.
- Verify your configuration. Open the
~/.aws/configfile and confirm that it contains a profile.
Test the solution
Follow these steps to validate your setup for provisioned clusters to confirm end-to-end connectivity:
- Verify network connectivity
Before testing authentication, confirm that your on-premises environment can reach the Amazon Redshift cluster endpoint:
telnet my-redshift-cluster.abc123.us-east-1.redshift.amazonaws.com 5439
If the connection succeeds, you should see a response indicating the port is open. If it fails, verify your VPN/Direct Connect configuration and security group rules.
- Create database user
If you haven’t already created a user, connect to your Amazon Redshift as the main user and create a dedicated user for testing:
CREATE USER analytics_user PASSWORD '[PASSWORD]';
- Retrieve Amazon Redshift database credentials
With the configuration in place, request temporary database credentials from Amazon Redshift:
This call returns a short-lived username and password that’s valid for connecting to the cluster. By default, the temporary credentials expire in 900 seconds. You can optionally specify a duration between 900–3600 seconds (15–60 minutes).
- Connect using JDBC/ODBC or psql
Use the issued credentials in your connection string. For JDBC:
For psql:
Validate and monitor
- Test authentication flows end-to-end using your ETL jobs.
- Review AWS CloudTrail logs to validate. It records role assumptions and Amazon Redshift API calls.
- Monitor session expiration to help workloads handle credential refresh seamlessly.
Testing end-to-end connectivity for Amazon Redshift Serverless
The testing process for Amazon Redshift Serverless follows a similar pattern to provisioned clusters, with minor differences in the API calls and connection parameters. These steps validate connectivity to your serverless workgroup.
- Verify network connectivity
telnet my-serverless-workgroup.abc123.us-east-1.redshift.amazonaws.com 5439
- Retrieve Amazon Redshift Serverless database credentials
- Connect using JDBC/ODBC or psql
Clean up
To avoid future charges, remove the deployed resources:
- Delete the CloudFormation stack.
- Remove the generated files from CloudShell:
rm cert_export.json encrypted_private_key.pem certificate.pem private_key.pem
Conclusion
In this post, we showed how to implement IAM Roles Anywhere with Amazon Redshift so that enterprises can securely connect on-premises data systems to their cloud data warehouse without relying on static credentials or public internet access. This architecture provides short-lived, auditable credentials, integrates with existing certificate authorities, and helps ensure authentication and data flows remain private and trusted.
With this approach, data engineers and developers can run ingestion pipelines, ETL jobs, and analytics queries, while security teams maintain full control through IAM governance and CloudTrail auditing. You can remove manual credential rotation tasks, allow your data engineers to connect to Amazon Redshift without managing static keys, and achieve complete audit trails through CloudTrail integration for your hybrid analytics environments.
To get started, deploy the solution using the CloudFormation template and follow the steps in this post. To learn more about the services used, see the following resources:
- IAM Roles Anywhere documentation
- Amazon Redshift IAM authentication
- AWS Private Certificate Authority
- AWS CloudTrail for auditing